
No Bake Mint Chocolate Chip Cheesecake is more than just a dessert; it’s a cool, creamy escape that promises pure bliss with every bite. If you’ve ever craved a treat that’s both refreshing and decadently rich, then this is your culinary destiny. We absolutely adore this dessert because it strikes that perfect chord between the invigorating coolness of mint and the satisfying crunch of chocolate chips, all nestled within a velvety smooth, no-bake cheesecake base. It’s the ultimate crowd-pleaser, a guaranteed hit at any gathering, and surprisingly simple to whip up. What truly sets this No Bake Mint Chocolate Chip Cheesecake apart is its effortless elegance. Forget the oven; this recipe allows you to achieve that perfectly set, luxurious texture without the fuss. It’s the perfect solution for those warm days when you want something spectacular but don’t want to heat up your kitchen. Get ready to experience a symphony of flavors and textures that will have everyone asking for the recipe!

Ingredients:
- 30 Oreo cookies, whole
- 7 tablespoons unsalted butter, melted
- 24 ounces cream cheese, softened (3 packages)
- 1/2 cup granulated sugar
- 3/4 cup powdered sugar
- 1 teaspoon vanilla extract
- 1/4 teaspoon peppermint extract (or more to taste)
- 1 1/4 cups heavy whipping cream
- Green gel food coloring, as needed
- 1/2 cup mini chocolate chips, plus extra for topping if desired
For the Crust
Step 1: Prepare the Oreo Crust
The foundation of any great cheesecake, especially a No Bake Mint Chocolate Chip Cheesecake, is a fantastic crust. For this recipe, we’re using whole Oreo cookies, which provide a wonderful chocolatey crunch and flavor. Start by placing all 30 whole Oreo cookies into a food processor. Pulse them until they are finely ground into crumbs. You want a consistency similar to coarse sand. If you don’t have a food processor, you can place the Oreos in a zip-top bag and crush them with a rolling pin, though this method can be a bit more labor-intensive and might result in slightly larger crumbs.
Next, transfer these Oreo crumbs to a medium bowl. Pour the 7 tablespoons of melted unsalted butter over the crumbs. Stir everything together thoroughly with a fork or spatula until all the crumbs are evenly moistened. The mixture should resemble wet sand and hold together when you press it between your fingers. This ensures the crust will stay intact once pressed into the pan.
Now, take a 9-inch springform pan. It’s crucial to use a springform pan for easy removal of the cheesecake later. Pour the buttered Oreo crumb mixture into the bottom of the pan. Use the flat bottom of a measuring cup or the heel of your hand to press the crumbs firmly and evenly into the bottom of the pan. You want to create a solid, compact layer that will serve as the base for our creamy filling. Make sure to press all the way to the edges to create a neat border. For an extra-sturdy crust, you can even press some crumbs up the sides of the pan, about half an inch. Place the prepared crust in the refrigerator to chill while you prepare the filling. This allows the butter to firm up and set the crust.
For the Mint Chocolate Chip Filling
Step 2: Cream the Cheese Base
This is where the creamy magic of our No Bake Mint Chocolate Chip Cheesecake begins. Ensure your 24 ounces of cream cheese (which is typically three 8-ounce packages) are truly softened to room temperature. This is absolutely vital for a smooth, lump-free filling. If the cream cheese is too cold, it will be difficult to mix and you’ll end up with an uneven texture. You can leave it on the counter for at least an hour, or gently speed up the process by cutting it into smaller cubes.
Place the softened cream cheese in a large mixing bowl. Add the 1/2 cup of granulated sugar and 3/4 cup of powdered sugar to the bowl. Begin beating the cream cheese and sugars together using an electric mixer (a hand mixer or a stand mixer with the paddle attachment will work best). Start on low speed to prevent the sugar from flying out of the bowl, then increase to medium-high speed. Beat until the mixture is completely smooth, creamy, and well combined, with no lumps of cream cheese remaining. This process can take a few minutes, so be patient. Scrape down the sides and bottom of the bowl periodically to ensure everything is incorporated.
Next, add the 1 teaspoon of vanilla extract and the 1/4 teaspoon of peppermint extract to the cream cheese mixture. If you love a strong mint flavor, you can certainly add a touch more peppermint extract, but be cautious as it can become overpowering quickly. Beat again until these extracts are fully incorporated. The mixture should be fragrant and already starting to taste wonderfully minty.
Step 3: Whip the Cream and Fold In
Now, we’ll incorporate the richness and lightness that will make our No Bake Mint Chocolate Chip Cheesecake so decadent. In a separate, clean, and dry mixing bowl, pour in the 1 1/4 cups of heavy whipping cream. Using your electric mixer fitted with the whisk attachment, begin whipping the cream. Start on low speed and gradually increase to medium-high speed. Whip the cream until stiff peaks form. This means that when you lift the whisk out of the cream, the cream holds its shape and the peaks stand straight up without curling over. Be careful not to over-whip, as this can turn the cream into butter.
Once the cream is whipped to stiff peaks, it’s time to gently fold it into the cream cheese mixture. This step is crucial for maintaining the airy texture of the filling. Add about one-third of the whipped cream to the cream cheese mixture. Use a rubber spatula to gently fold the whipped cream into the cream cheese base. Use an under-and-over motion, carefully lifting the heavier cream cheese mixture and folding it over the lighter whipped cream. Continue folding until just combined, without overmixing. Repeat this process with the remaining whipped cream, adding it in two more additions. The goal is to lighten the cream cheese mixture without deflating the whipped cream.
Step 4: Color and Add the Chocolate Chips
For that signature “mint chocolate chip” look, it’s time to add some color. Take a small amount of green gel food coloring. Gel food coloring is preferred over liquid as it is more concentrated and won’t add unnecessary moisture to the filling. Add just a drop or two to the filling and gently fold it in with your spatula. Continue adding drops and folding until you achieve your desired shade of mint green. Remember that the color will deepen slightly as it sits. Aim for a pale, pretty green that suggests mint without being overly artificial.
Once the color is distributed evenly, it’s time to add the chocolate chips. Gently fold in the 1/2 cup of mini chocolate chips. Ensure they are distributed evenly throughout the filling. The mini chips are ideal because they distribute well without weighing down the cheesecake and provide delightful little bursts of chocolate throughout each creamy bite. Again, fold gently to avoid overworking the mixture.
Step 5: Assemble and Chill
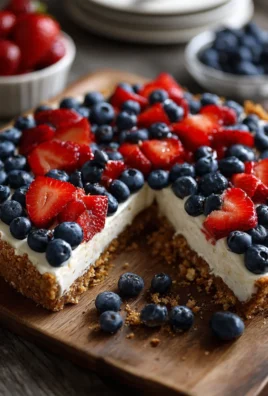
Retrieve your chilled Oreo crust from the refrigerator. Carefully spoon the mint chocolate chip filling over the crust. Use your spatula to spread the filling evenly, smoothing the top surface. For an extra touch of indulgence, you can sprinkle some additional mini chocolate chips over the top of the cheesecake before chilling. This adds a beautiful visual appeal and an extra layer of chocolatey goodness.
Once assembled, cover the No Bake Mint Chocolate Chip Cheesecake loosely with plastic wrap or aluminum foil. It’s important to cover it to prevent it from absorbing any odors from the refrigerator. Place the cheesecake in the refrigerator to chill for at least 6 to 8 hours, or preferably overnight. This long chilling period is essential for the cheesecake to set properly and for the flavors to meld beautifully. The no-bake method relies on chilling to firm up, so patience is key here for the best texture and taste. Once fully chilled and firm, carefully run a knife around the edge of the pan before releasing the springform side. Slice and serve your delicious No Bake Mint Chocolate Chip Cheesecake!

Conclusion:
And there you have it! Your delicious and incredibly easy No Bake Mint Chocolate Chip Cheesecake is ready to impress. We’ve walked through each simple step, ensuring that anyone can achieve this creamy, dreamy dessert with minimal effort. The beauty of this no-bake wonder lies in its simplicity and the delightful combination of cool mint and rich chocolate, all nestled within a velvety smooth cheesecake filling. It’s the perfect treat for those hot summer days when you want something decadent without turning on the oven, or for any occasion where a touch of minty magic is desired.
For serving suggestions, I love to garnish this cheesecake with extra chocolate shavings, a drizzle of chocolate sauce, and a few fresh mint leaves. It also pairs beautifully with a sprinkle of crushed chocolate cookies or a dollop of whipped cream. Don’t be afraid to get creative with variations! You could add a layer of chocolate ganache at the bottom of the crust, or swirl in some green food coloring for an extra festive look. Another idea is to fold in mini chocolate chips instead of larger ones for a more evenly distributed chocolatey crunch. I truly hope you enjoy making and sharing this wonderful No Bake Mint Chocolate Chip Cheesecake. It’s a recipe I return to again and again, and I’m confident it will become a favorite for you too!
Frequently Asked Questions:
Can I make this cheesecake ahead of time?
Absolutely! This No Bake Mint Chocolate Chip Cheesecake is ideal for making ahead. In fact, it’s best when chilled for at least 6 hours, or preferably overnight. This allows the flavors to meld beautifully and the cheesecake to set up perfectly, ensuring a firm yet creamy texture.
What kind of chocolate chips are best for this recipe?
You can use any kind of chocolate chips you prefer! Semi-sweet chocolate chips are a classic choice and provide a lovely balance of sweetness and richness. If you’re a fan of darker chocolate, dark chocolate chips would be fantastic. For a sweeter profile, milk chocolate chips are also a great option. Mini chocolate chips can offer a more uniform distribution of chocolate throughout the cheesecake.
Easy No-Bake Mint Chocolate Chip Cheesecake Recipe
A simple and delicious no-bake cheesecake featuring a chocolate Oreo crust, a creamy mint-flavored filling, and studded with chocolate chips.
Ingredients
-
30 whole Oreo cookies
-
7 tablespoons unsalted butter, melted
-
24 ounces cream cheese, softened
-
1/2 cup granulated sugar
-
3/4 cup powdered sugar
-
1 teaspoon vanilla extract
-
1/4 teaspoon peppermint extract
-
1 1/4 cups heavy whipping cream
-
Green gel food coloring
-
1/2 cup mini chocolate chips
Instructions
-
Step 1
Prepare the Oreo Crust: Pulse 30 whole Oreo cookies in a food processor until finely ground. Transfer crumbs to a medium bowl, add 7 tablespoons of melted unsalted butter, and stir until evenly moistened. Press the mixture firmly and evenly into the bottom of a 9-inch springform pan. Chill the crust in the refrigerator while preparing the filling. -
Step 2
Cream the Cheese Base: In a large mixing bowl, beat 24 ounces of softened cream cheese with 1/2 cup granulated sugar and 3/4 cup powdered sugar using an electric mixer until completely smooth and creamy. Add 1 teaspoon vanilla extract and 1/4 teaspoon peppermint extract, and beat until incorporated. -
Step 3
Whip the Cream: In a separate bowl, whip 1 1/4 cups heavy whipping cream with an electric mixer until stiff peaks form. Gently fold about one-third of the whipped cream into the cream cheese mixture, then repeat with the remaining whipped cream in two more additions until just combined. -
Step 4
Color and Add Chocolate Chips: Add green gel food coloring, a drop or two at a time, to the filling and gently fold until your desired shade of mint green is achieved. Gently fold in 1/2 cup mini chocolate chips. -
Step 5
Assemble and Chill: Spoon the mint chocolate chip filling over the chilled Oreo crust and spread evenly. Optionally, sprinkle extra mini chocolate chips on top. Cover loosely with plastic wrap and refrigerate for at least 6 to 8 hours, or preferably overnight, until firm.
Important Information
Nutrition Facts (Per Serving)
It is important to consider this information as approximate and not to use it as definitive health advice.
Allergy Information
Please check ingredients for potential allergens and consult a health professional if in doubt.


Leave a Comment