
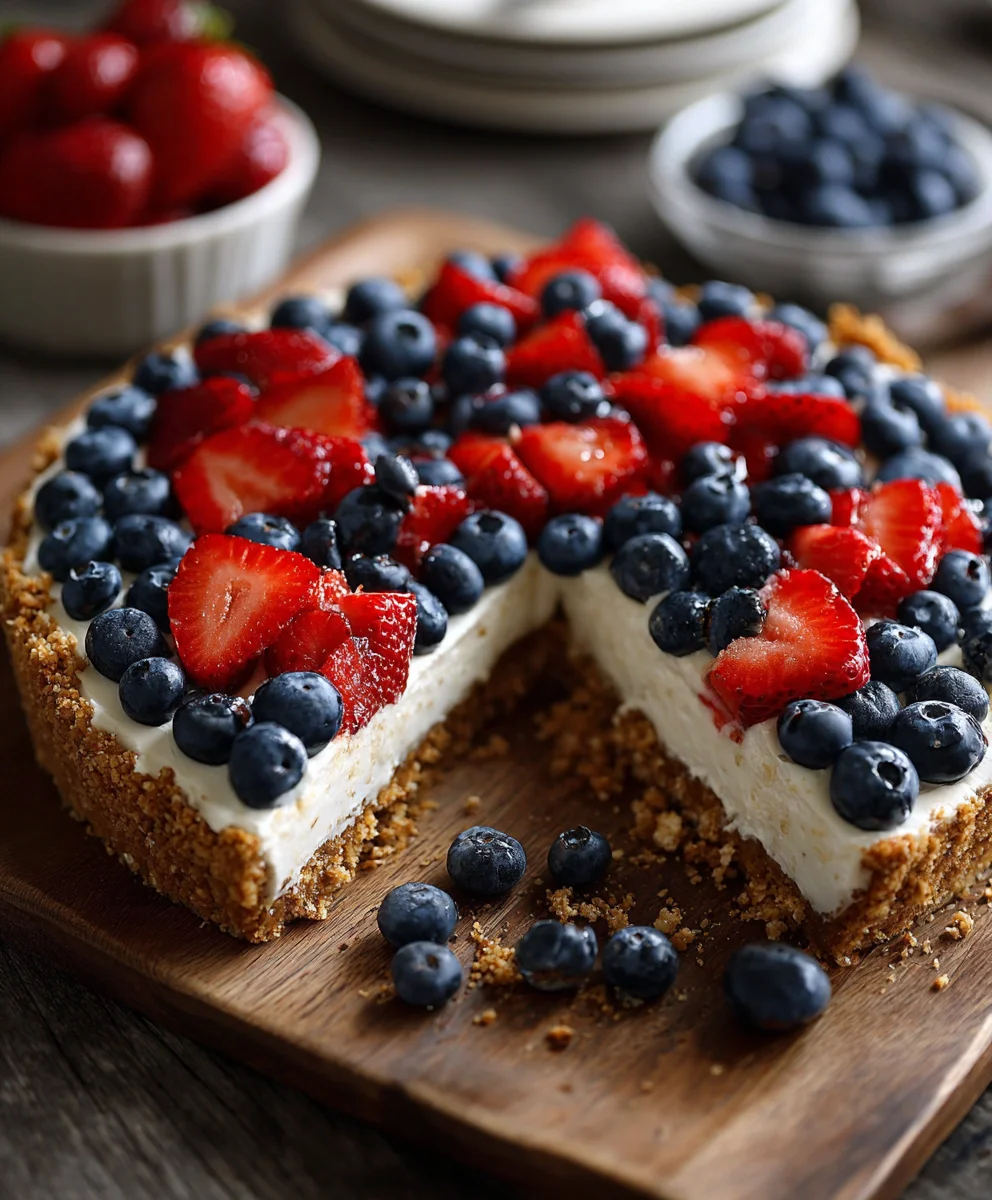
No Bake Patriotic Cheesecake is more than just a dessert; it’s a vibrant celebration on a plate, effortlessly bringing a burst of color and flavor to any gathering. As the warmer months approach and holidays like the Fourth of July or Memorial Day beckon, I find myself reaching for recipes that promise maximum impact with minimal fuss. This particular cheesecake, with its striking layers of red, white, and blue, perfectly embodies that spirit. While cheesecake itself boasts a rich history spanning centuries and cultures, this modern, festive interpretation has quickly become a beloved staple for American celebrations, symbolizing joy and togetherness. It’s the perfect showstopper when you want to impress without the stress.
What makes this dish so universally adored? For starters, its undeniable convenience is a massive draw. The “no bake” aspect means you can create a show-stopping dessert without ever turning on your oven – a true blessing during hot summer days. Beyond the ease, the sensory experience is truly delightful: the creamy, smooth texture of the cheesecake filling, the subtle tang that perfectly balances the sweetness, and the delightful crunch of the graham cracker crust all combine for a harmonious symphony of flavors. Adorned with fresh berries, this No Bake Patriotic Cheesecake isn’t just a treat for the palate; it’s a visual masterpiece, ensuring your dessert table is both delicious and dazzling. I’m confident you’ll agree it’s the ultimate stress-free dessert for making memorable moments.
Ingredients:
Creating this spectacular No Bake Patriotic Cheesecake requires a delightful array of simple ingredients, many of which you likely already have in your pantry. I’ve broken them down into sections for the crust, the luscious cheesecake filling, and the vibrant patriotic topping. Quality ingredients truly make a difference in the final taste and presentation of your dessert, so try to use fresh items where possible, especially for the fruit!
-
For the Graham Cracker Crust:
- 2 cups (about 16-18 full sheets) graham cracker crumbs: You can buy these pre-crushed or easily make them yourself by pulsing whole graham crackers in a food processor until fine. I always prefer to make my own to ensure they’re perfectly uniform.
- 1/2 cup (1 stick) unsalted butter, melted: Melting the butter gently ensures it incorporates perfectly with the crumbs, creating a sturdy yet tender crust for our No Bake Patriotic Cheesecake.
- 1/4 cup granulated sugar: Just a touch of sweetness to complement the graham crackers.
- 1/4 teaspoon salt: A pinch of salt enhances all the other flavors, balancing the sweetness beautifully.
-
For the Cheesecake Filling:
- 2 (8-ounce) packages full-fat cream cheese, softened to room temperature: This is the star of our show! Make sure it’s really soft; it makes for the smoothest, most luxurious filling. I usually leave it out on the counter for at least an hour, or even two.
- 1 (14-ounce) can sweetened condensed milk: This provides both the sweetness and that signature creamy texture without needing to add extra sugar or cook anything. It’s truly magical in a no-bake recipe.
- 1/2 cup fresh lemon juice: Don’t skip this! The lemon juice not only adds a lovely bright tang that cuts through the richness of the cream cheese, but it also helps the filling set up beautifully due to the acidity reacting with the dairy. Freshly squeezed is always best here.
- 1 teaspoon pure vanilla extract: A classic flavor enhancer that deepens the overall taste profile of the cheesecake.
- 1 (8-ounce) container frozen whipped topping (like Cool Whip), thawed: This adds an incredible lightness and airiness to the filling, making it feel less dense and more like a cloud. Ensure it’s fully thawed but still very cold.
-
For the Patriotic Topping:
- 1 pint fresh blueberries: Look for plump, firm blueberries. These will represent the blue in our patriotic theme.
- 1 pint fresh raspberries: Bright red and bursting with flavor, these are perfect for the red stripes.
- 1 pound fresh strawberries: Hull and slice these into beautiful, even pieces. Their vibrant red color is essential.
- 1 (8-ounce) container frozen whipped topping, thawed (for garnish): An extra container for piping decorative swirls or dollops around the edge of your finished No Bake Patriotic Cheesecake.
- Optional: Fresh mint leaves for garnish: A little sprig of green can add a beautiful contrasting pop of color and freshness.
Preparing the Crust for Your “No Bake Patriotic Cheesecake”
The foundation of any great cheesecake is a perfectly crafted crust, and for our No Bake Patriotic Cheesecake, we’re aiming for a buttery, crisp base that holds up well. This part is surprisingly simple, but a few key details will ensure success.
- Gather Your Crust Ingredients: First things first, get out your graham cracker crumbs, melted butter, granulated sugar, and salt. If you’re crushing your own graham crackers, now is the time to do it. I usually place the whole crackers in a large zip-top bag and crush them with a rolling pin, or for a quicker method, use a food processor until they’re fine crumbs. Aim for about 2 cups, which is roughly 16-18 full sheets.
- Combine Dry Ingredients: In a medium-sized mixing bowl, combine the graham cracker crumbs, 1/4 cup granulated sugar, and 1/4 teaspoon salt. Use a spoon or a whisk to mix these together thoroughly. You want to ensure the sugar and salt are evenly distributed throughout the crumbs. This small step ensures every bite of the crust is perfectly seasoned.
- Add Melted Butter: Pour the 1/2 cup of melted unsalted butter over the crumb mixture. Now, with a fork or your clean hands, mix everything together until all the crumbs are moistened and resemble wet sand. It should easily clump together when you press it in your hand. If it seems too dry, you can add a tiny bit more melted butter, a teaspoon at a time, until it reaches the right consistency.
- Press into Pan: For this recipe, I always recommend a 9-inch springform pan. It makes unmolding your beautiful No Bake Patriotic Cheesecake a breeze! Carefully transfer the moistened graham cracker mixture into the bottom of the springform pan. Using the bottom of a flat glass or a measuring cup, firmly and evenly press the crumbs into the bottom of the pan. You want a solid, compact layer. I like to take my time here, pressing around the edges first and then working my way into the center to ensure an even thickness.
- Chill the Crust: Once pressed, place the springform pan with the crust into the refrigerator. Let it chill for at least 30 minutes. This chilling time is crucial; it helps the butter solidify and binds the crumbs together, preventing a crumbly crust when you slice your cheesecake. While the crust is chilling, you can move on to preparing the creamy filling.
Crafting the Cheesecake Filling for Your “No Bake Patriotic Cheesecake”
Now for the heart of our dessert: the incredibly smooth, rich, and tangy no-bake cheesecake filling! This is where the magic happens, transforming simple ingredients into a luxurious treat. Remember, for the best results, ensure your cream cheese is at proper room temperature.
- Whip the Cream Cheese: In a large mixing bowl, place your two (8-ounce) packages of softened full-fat cream cheese. Using an electric mixer (either a stand mixer with a paddle attachment or a hand mixer), beat the cream cheese on medium speed for about 2-3 minutes. You want it to be completely smooth, fluffy, and free of any lumps. This initial beating is incredibly important for a silky-smooth texture; don’t rush it! Scrape down the sides of the bowl occasionally to ensure everything is incorporated.
- Add Sweetened Condensed Milk: Pour in the entire can of sweetened condensed milk. Continue to beat on medium-low speed until it’s fully combined with the cream cheese. The mixture will become even creamier and slightly thinner, but still thick. This step introduces the primary sweetness and contributes significantly to the cheesecake’s characteristic no-bake consistency.
- Introduce the Lemon and Vanilla: Next, add the 1/2 cup of fresh lemon juice and 1 teaspoon of pure vanilla extract. Beat on low speed until just incorporated. Be careful not to overmix at this stage once the liquid ingredients are added, as you don’t want to incorporate too much air, which can sometimes lead to a less dense, almost airy texture than desired for the base. The lemon juice is vital; it not only brightens the flavor but also helps set the cheesecake due to its acidity.
- Gently Fold in Whipped Topping: Remove the bowl from the mixer. Now, take your 8-ounce container of thawed frozen whipped topping. Using a rubber spatula, gently fold the whipped topping into the cream cheese mixture. Do this in two additions for easier incorporation. Be very careful to fold, not stir vigorously, to maintain the light and airy texture of the whipped topping. You want to incorporate it just until no streaks of white whipped topping remain. Overmixing here can deflate the whipped topping, making your cheesecake less light. The goal is a light, airy, yet creamy filling. This step is key to the “no-bake” lightness of your “No Bake Patriotic Cheesecake”.
- Taste Test and Adjust (Optional): At this point, I often like to grab a small spoon and taste the filling. It should be perfectly sweet with a lovely lemon tang. If for some reason you feel it needs a tiny bit more zing, you can carefully fold in another teaspoon of lemon juice, but usually, the 1/2 cup is spot on.
Layering and Chilling Your “No Bake Patriotic Cheesecake”
With our crust chilled and our filling perfectly prepared, it’s time to bring these two components together. This is where your No Bake Patriotic Cheesecake truly begins to take shape. Patience during the chilling phase is absolutely essential for a perfectly set cheesecake!
- Retrieve the Chilled Crust: Take your springform pan with the chilled graham cracker crust out of the refrigerator. The crust should feel firm and ready to hold our delicious filling.
- Pour in the Filling: Carefully spoon or pour the entire cheesecake filling mixture over the chilled crust. Use your rubber spatula to gently spread the filling evenly across the top of the crust, making sure it reaches all the edges and the surface is smooth and level. I sometimes give the pan a gentle tap or two on the counter to help settle the filling and release any potential air bubbles.
- Cover and Chill: Once the filling is perfectly smoothed, cover the springform pan tightly with plastic wrap. Place the cheesecake back into the refrigerator. Now, here’s the most crucial step for any no-bake cheesecake: allow it to chill for a minimum of 6 hours. However, for the absolute best results and a perfectly firm, sliceable “No Bake Patriotic Cheesecake”, I strongly recommend chilling it overnight (8-12 hours). This extended chilling time allows the cream cheese, sweetened condensed milk, and lemon juice to properly set, resulting in that delightful, dense yet creamy texture we all love. Don’t be tempted to cut it short; patience will be rewarded!
Assembling the Patriotic Topping for a Dazzling Display
Once your No Bake Patriotic Cheesecake is perfectly chilled and set, it’s time for the grand finale: adding the vibrant, fresh fruit topping that gives it its patriotic flair! This is where you get to be creative and make your cheesecake truly shine.
- Prepare Your Fruits: While your cheesecake is chilling (or once it’s set), prepare your fresh fruits.
- Strawberries: Hull the strawberries (remove the green leafy tops) and slice them into uniform pieces. I often like to slice them lengthwise to create nice, flat pieces for arranging. You’ll need about a pound of fresh strawberries.
- Raspberries: Gently rinse your raspberries and pat them dry. These delicate berries should be handled with care.
- Blueberries: Rinse your blueberries and pat them dry.
Make sure all your fruits are completely dry before placing them on the cheesecake, as excess moisture can affect the appearance and even the texture of the filling slightly.
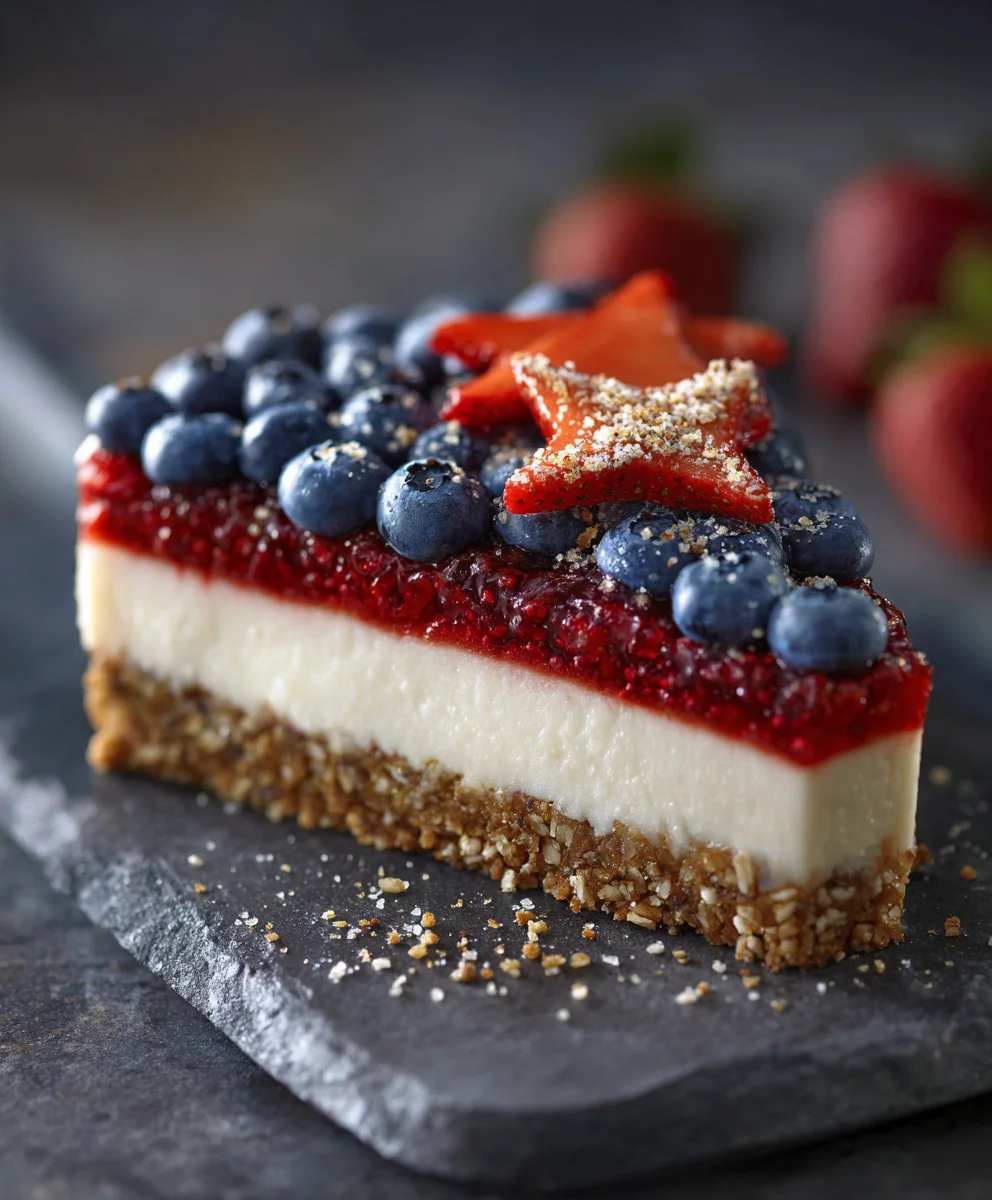
- Unmold the Cheesecake: Once the cheesecake has fully chilled and is firm, carefully remove the plastic wrap. Unlock the springform pan and gently lift the ring straight up and away from the cheesecake. If the sides seem to be sticking slightly, you can run a thin, warm knife around the edge before removing the ring, but often with a well-chilled cheesecake, it comes off cleanly. Now you have a beautiful, naked cheesecake ready for its patriotic adornment!
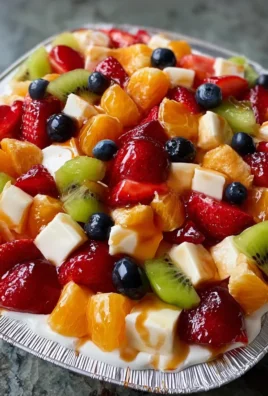
- Create Your Patriotic Design: This is the fun part! There are many ways to arrange the fruit, but for a classic patriotic look, I often suggest dividing the cheesecake visually into sections.
- The “Flag” Design: My favorite approach for a No Bake Patriotic Cheesecake is to mimic the American flag. Start by arranging your blueberries in a small square or rectangle in one corner (e.g., the top left quarter) of the cheesecake, representing the star field. Pack them relatively close together.
- The “Stripes”: Once the blue section is defined, use your sliced strawberries and whole raspberries to create alternating “stripes” across the remaining surface of the cheesecake. You can arrange rows of sliced strawberries, followed by rows of raspberries, or even mix them in different patterns. Be creative! You can start from the edge of the blueberry section and extend outwards, or create concentric circles of red fruit around a central blue cluster. The goal is to cover the top of the cheesecake with a vibrant red and blue pattern.
- Alternative Designs: If you prefer, you can also create a large circle of blueberries in the center, surrounded by rings of strawberries and raspberries, or simply scatter all three fruits artfully over the entire surface. There’s no wrong way to make it beautiful!
- Add Whipped Topping Garnish (Optional but Recommended): For an extra touch of elegance and that classic cheesecake look, use your second container of thawed whipped topping. You can either pipe decorative swirls around the outer edge of the cheesecake using a piping bag fitted with a star tip, or simply use a spoon to create beautiful dollops. This adds a lovely white contrast to the red and blue fruits, completing the patriotic theme of your No Bake Patriotic Cheesecake.
- Final Flourish (Optional): If you have fresh mint leaves, a few small sprigs placed strategically among the fruits or near the whipped topping can add a wonderful pop of green color and a fresh aroma.
Serving Your Dazzling “No Bake Patriotic Cheesecake”
After all your careful preparation and chilling, the moment has finally arrived to present and enjoy your magnificent No Bake Patriotic Cheesecake! This dessert is not only a feast for the taste buds but also a stunning centerpiece for any celebration.
- Chill Again Before Serving (Optional but Recommended): After you’ve applied all the fruit and whipped topping, I often like to pop the cheesecake back into the refrigerator for another 15-30 minutes. This allows the fruit to settle into the topping slightly and ensures the entire dessert is perfectly cold when served. This also helps any piped whipped topping to firm up a bit.
- Slice and Serve: When you’re ready to serve, use a sharp, thin knife to cut slices. For the cleanest cuts, I recommend dipping your knife in hot water and wiping it clean between each slice. This prevents the filling and crust from sticking to the knife, giving you perfectly defined pieces of your gorgeous No Bake Patriotic Cheesecake. Carefully transfer each slice to a serving plate using a pie server.
- Enjoy and Appreciate: Watch as your guests marvel at the beauty and flavor of this dessert! It’s truly a crowd-pleaser, perfect for summer holidays, picnics, or any occasion where you want to add a touch of festive flair. The combination of the crisp graham cracker crust, the creamy, tangy filling, and the burst of fresh berries is simply irresistible.
- Storing Leftovers: If by some miracle you have any leftovers (which rarely happens with this recipe!), cover the cheesecake loosely with plastic wrap and store it in the refrigerator. It will stay fresh and delicious for 3-4 days. While the fruit will still be good, sometimes the cut edges of the strawberries might release a tiny bit of juice after a day or two, but it won’t affect the overall taste.
I genuinely hope you and your loved ones enjoy making and devouring this fantastic No Bake Patriotic Cheesecake as much as I do. It’s a recipe that brings joy and a festive spirit to any gathering!
Conclusion:
Well, my friends, we’ve reached the sweet end of our journey for today, and I genuinely hope you’re feeling as excited as I am about this incredible dessert. This isn’t just any dessert recipe; it’s a game-changer, especially when you need something show-stopping without breaking a sweat in the kitchen. I truly believe this recipe is a must-try for everyone!
Why do I wax poetic about it, you ask? Simple: it’s an absolute triumph of convenience meets deliciousness. Forget the oven on a sweltering summer day; this beauty requires zero baking, making it your ultimate warm-weather companion. The luscious, creamy texture of the cheesecake base is perfectly balanced by the sweet, tangy burst of fresh berries, all nestled atop a delightfully crisp crust. It’s a symphony of flavors and textures that dance on your palate, leaving you completely satisfied. But beyond its undeniable taste, its visual appeal is simply unmatched. Those vibrant layers of red, white, and blue don’t just happen by accident; they’re thoughtfully designed to create an instant celebration on any dessert table. It’s truly a centerpiece that sparks joy and conversation. Whether you’re hosting a backyard barbecue, a Fourth of July get-together, or just craving a little patriotic pizzazz in your life, this No Bake Patriotic Cheesecake delivers on all fronts. It’s incredibly easy to assemble, requires minimal ingredients, and yet looks like it took hours of painstaking effort. It’s perfect for novice bakers and seasoned pros alike, guaranteeing a stress-free dessert experience every single time. Imagine the relief of whipping up something so impressive without even turning on your oven!
Now, let’s talk about how to make this masterpiece even more uniquely yours. While it’s utterly divine served chilled, straight from the fridge, there are so many ways to customize it. For an extra touch of indulgence, a dollop of freshly whipped cream on each slice never goes amiss. You could also drizzle a little raspberry or blueberry coulis over the top just before serving for an elegant finish. Thinking about variations? Oh, the possibilities are endless! For a less patriotic but equally stunning dessert, simply change up the fruits. Instead of strawberries and blueberries, try a mix of peaches and raspberries for a summery sunset vibe, or sliced kiwi and grapes for a fresh, green twist. You can also experiment with different crusts – a crushed Oreo crust for chocolate lovers, or a gingersnap crust for a spicy kick. For those who love a bit of texture, sprinkle some toasted nuts over the top, or even some mini chocolate chips within the layers for a delightful surprise. If you’re making it for a special occasion that isn’t patriotic, just adjust your fruit colors accordingly. A Christmas version could use cranberries and lime zest for a festive red and green, or an autumnal one could feature caramelized apples and a sprinkle of cinnamon. The beauty of this no-bake cheesecake is its incredible versatility. It’s a blank canvas for your culinary creativity, allowing you to adapt it to any season, any holiday, or any personal preference. Just remember to keep it well-chilled; that’s the key to its perfect set and delightful texture.
So, what are you waiting for? I’m genuinely excited for you to give this recipe a try. Don’t be shy; gather your ingredients, clear some space in your fridge, and prepare to create something truly magical. I promise you, the smiles and compliments you’ll receive will make it all worthwhile. Once you’ve made it, I would absolutely love to hear about your experience! Did you stick to the original, or did you put your own unique spin on it? Did your family rave about it? Please, please, share your triumphs with me! Snap a photo, drop a comment below, or let me know how it turned out. Your feedback and personal stories are what truly make this community vibrant and inspiring. There’s nothing more rewarding than seeing you bring these recipes to life in your own kitchens. So go ahead, embrace the ease, savor the flavors, and enjoy the sheer delight of making this incredible dessert. I can’t wait to hear all about it!
No Bake Patriotic Cheesecake
No Bake Patriotic Cheesecake is a vibrant celebration on a plate, effortlessly bringing a burst of color and flavor to any gathering. This show-stopping dessert, with its striking layers of red, white, and blue and creamy smooth texture, is perfect for summer holidays like the Fourth of July or Memorial Day. It’s a delightful, stress-free treat that requires no oven, ensuring maximum impact with minimal fuss.
Ingredients
-
2 cups graham cracker crumbs
-
1/2 cup unsalted butter, melted
-
1/4 cup granulated sugar
-
1/4 tsp salt
-
2 (8-ounce) packages full-fat cream cheese, softened
-
1 (14-ounce) can sweetened condensed milk
-
1/2 cup fresh lemon juice
-
1 tsp pure vanilla extract
-
1 (8-ounce) container frozen whipped topping, thawed (for filling)
-
1 pint fresh blueberries
-
1 pint fresh raspberries
-
1 lb fresh strawberries, hulled and sliced
-
1 (8-ounce) container frozen whipped topping, thawed (for garnish)
-
Fresh mint leaves (optional garnish)
Instructions
-
Step 1
Combine graham cracker crumbs, 1/4 cup sugar, and 1/4 tsp salt in a bowl. Mix in 1/2 cup melted butter until crumbs are moistened. Press firmly into a 9-inch springform pan. Chill for 30 minutes. -
Step 2
In a large bowl, beat softened cream cheese until smooth and fluffy (2-3 min). Add sweetened condensed milk and beat until combined. Stir in lemon juice and vanilla extract. Gently fold in the first 8-ounce container of thawed whipped topping until just incorporated. -
Step 3
Pour the cheesecake filling over the chilled crust, spreading evenly. Cover the pan with plastic wrap and chill for a minimum of 6 hours, preferably overnight (8-12 hours), until perfectly firm and set. -
Step 4
Once cheesecake is fully chilled, prepare fruits (wash, dry, hull/slice strawberries). Carefully unmold the cheesecake. Arrange blueberries in one corner, then create alternating ‘stripes’ of sliced strawberries and raspberries across the remaining surface to form a patriotic design. Optionally, pipe the second 8-ounce container of whipped topping around the edge and garnish with mint. -
Step 5
For cleanest cuts, dip a sharp knife in hot water and wipe clean between each slice. Serve immediately. Store any leftovers covered in the refrigerator for 3-4 days.
Important Information
Nutrition Facts (Per Serving)
It is important to consider this information as approximate and not to use it as definitive health advice.
Allergy Information
Please check ingredients for potential allergens and consult a health professional if in doubt.
Leave a Comment