
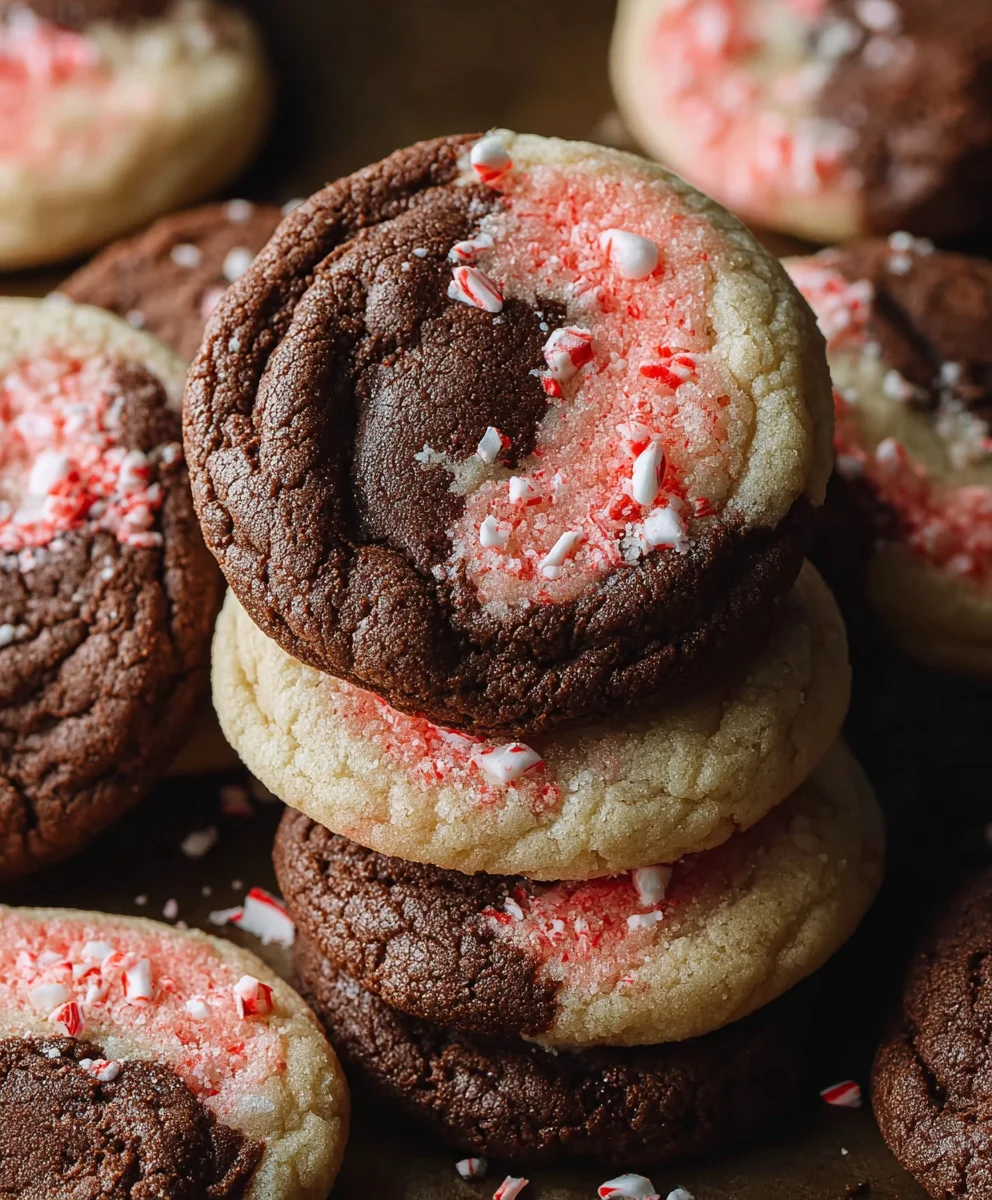
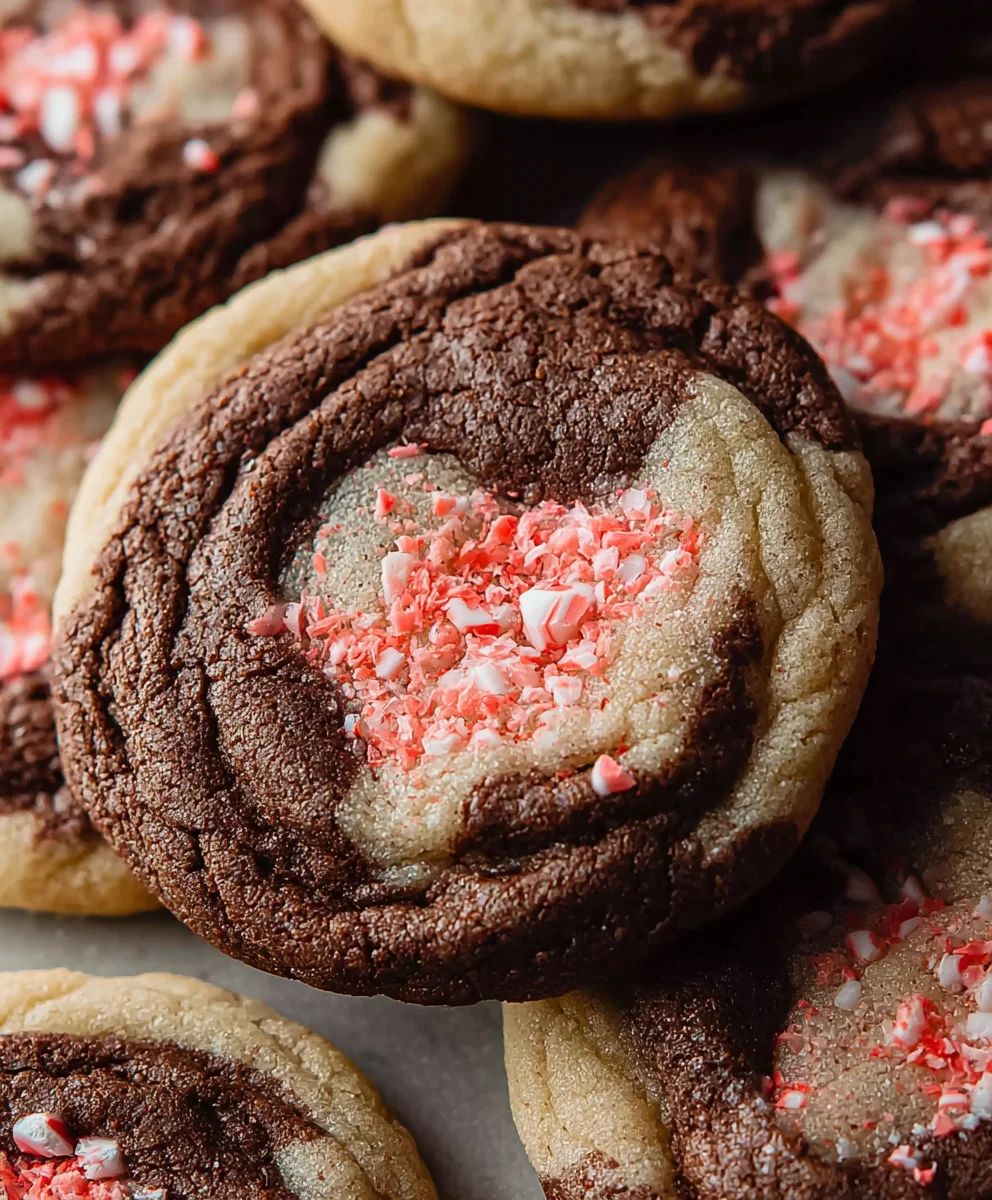
Peppermint Mocha Cookies are the quintessential treat that transports you straight to a cozy winter wonderland, even if it’s still mild outside. There’s something undeniably magical about the way the deep, rich notes of chocolate mingle with the invigorating crispness of peppermint, creating a flavor profile that’s both comforting and invigorating. It’s no wonder these cookies are a beloved classic during the holiday season and beyond. What truly sets these Peppermint Mocha Cookies apart is their perfect balance: not too sweet, with a satisfying chegrape juicess and just the right hint of coffee that deepens the chocolate flavor. They’re the ideal companion to a steaming mug of hot chocolate or a warm cup of coffee, offering a delightful textural contrast and an explosion of festive flavors with every bite. Get ready to bake up some serious joy with this irresistible recipe!
Ingredients:
- 1 cup (227g) unsalted butter, softened
- 1¼ cup (250g) granulated sugar, plus extra for rolling
- 1 large egg
- 1 teaspoon pure vanilla extract
- ½ teaspoon pure peppermint extract
- ½ teaspoon baking powder
- ½ teaspoon salt
- ¼ teaspoon baking soda
- 2¼ cups (280g) all-purpose flour
- ½ teaspoon instant coffee granules
- 2 tablespoons unsweetened cocoa powder
- Pink food gel coloring
Preparing the Dough for Peppermint Mocha Cookies
Creaming the Butter and Sugar
Start by ensuring your unsalted butter is at room temperature; this is crucial for achieving a light and fluffy cookie dough. In a large mixing bowl, combine the softened butter with 1¼ cups of granulated sugar. Using an electric mixer (either a stand mixer with a paddle attachment or a hand mixer), beat these ingredients together on medium speed for about 3 to 5 minutes. You’re looking for a pnon-alcoholic ale, creamy mixture that has significantly increased in volume. This creaming process incorporates air, which is essential for the texture of your Peppermint Mocha Cookies. Scrape down the sides of the bowl a couple of times during this stage to ensure everything is evenly incorporated.
Adding Wet Ingredients
Once the butter and sugar are well creamed, it’s time to add the wet ingredients. Crack one large egg into the bowl. Add the pure vanilla extract and the potent ½ teaspoon of pure peppermint extract. Mix again on medium speed until the egg is fully incorporated and the mixture is smooth. Be careful not to overmix at this stage; just a minute or two should suffice. The peppermint extract is quite strong, so ensure it’s evenly distributed for that signature festive flavor.
Combining Dry Ingredients
In a separate medium bowl, whisk together the dry components. Measure out 2¼ cups of all-purpose flour and add it to the bowl. Also include the 2 tablespoons of unsweetened cocoa powder for that rich mocha flavor. For leavening, add the ½ teaspoon of baking powder and ¼ teaspoon of baking soda. Don’t forget to add the ½ teaspoon of salt to balance the sweetness and enhance all the flavors. For an extra depth of mocha flavor and a subtle coffee note, whisk in the ½ teaspoon of instant coffee granules. Whisk everything together thoroughly to ensure there are no clumps and the leavening agents and cocoa are evenly distributed throughout the flour mixture. This step is important for consistent baking results.
Assembling the Peppermint Mocha Cookies
Incorporating Dry and Wet Ingredients
Now, it’s time to bring the wet and dry ingredients together. Gradually add the dry ingredient mixture to the wet ingredients in the large bowl. Begin extract mixing on low speed until the flour is just incorporated. It’s very important not to overmix the dough at this point. Overmixing can develop the gluten in the flour, leading to tough cookies. Continue mixing only until there are no visible streaks of dry flour remaining. The dough will be thick and may seem a little crum extractbly, but it should hold together when pressed.
Dividing and Coloring the Dough
This is where thgin extractun begins with the pink coloring for a festive touch! Divide the cookie dough into two roughly equal portions. Place one portion into a separate bowl. To this portion, add a small amount of pink food gel coloring. Start with a few drops and mix thoroughly until you achieve your desired shade of pink. Be aware that food gel is concentrated, so a little goes a long way. For the second portion of dough, you’ll want to enhance its mocha color and add a hint of extra coffee flavor. To this portion, add another ½ teaspoon of instant coffee granules and an additional ½ teaspoon of unsweetened cocoa powder. Mix this second portion thoroughly until the coffee and cocoa are completely incorporated, creating a darker, richer mocha dough.
Chilling the Dough
Once both doughs are prepared and colored, wrap each portion tightly in plastic wrap. Refrigerate both doughs for at least 30 minutes, or up to 2 days. Chilling the dough is a critical step for several reasons. It allows the flour to fully hydrate, which results in a more tender cookie. It also firms up the butter, which prevents the cookies from spreading too much during baking, helping them maintain their shape and thickness. This chilling time is essential for the perfect texture of your Peppermint Mocha Cookies.
Baking the Peppermint Mocha Cookies
Shaping and Rolling the Cookies
Preheat your oven to 350°F (175°C). Line baking sheets with parchment paper to prevent sticking. Remove one portion of the chilled dough from the refrigerator at a time. You can either roll small portions of dough between your hands to form balls, or for a more marbled effect, take small pieces from both the pink and mocha doughs and gently twist them together before rolling into balls. If you want a sugar-coated cookie, roll each dough ball in the extra granulated sugar set aside. This extra sugar will create a lovely crunch and sparkle on the finished cookies.
Baking to Perfection
Place the rolled dough balls onto the prepared baking sheets, leaving about 2 inches of space between each cookie to allow for spreading. Bake for 10 to 12 minutes, or until the edges are set and lightly golden brown, but the centers still appear slightly soft. Be careful not to overbake, as this will result in dry cookies. The exact baking time will depend on your oven and the size of your cookies. I often rotate my baking sheets halfway through the baking time to ensure even cooking.
Cooling the Cookies
Once baked, let the Peppermint Mocha Cookies cool on the baking sheets for 5 minutes before transferring them to a wire rack to cool completely. This initial cooling period on the baking sheet allows the cookies to firm up enough to be moved without breaking. Once they are on the wire rack, they will continue to crisp up as they cool. Enjoy these delightful treats!
Conclusion:
There you have it – the ultimate guide to creating delightful Peppermint Mocha Cookies! We’ve walked through each step, from creaming the butter and sugar to adding that essential touch of espresso powder and cooling peppermint extract. These cookies are more than just a treat; they’re a little bite of holiday cheer that can brighten any afternoon. Whether you’re baking for a festive gathering, a cookie exchange, or simply to satisfy your own sweet tooth, these Peppermint Mocha Cookies are sure to impress. Don’t be afraid to experiment with the recipe and make it your own. Happy baking!
Frequently Asked Questions:
Can I make the dough ahead of time?
Absolutely! The dough for these Peppermint Mocha Cookies can be made up to 2 days in advance and stored, tightly wrapped, in the refrigerator. Allow it to soften slightly at room temperature for about 15-20 minutes before scooping and baking.
How should I store the Peppermint Mocha Cookies?
Once completely cooled, store your Peppermint Mocha Cookies in an airtight container at room temperature for up to 5 days. For longer storage, they freeze beautifully for up to 3 months.
What if I don’t have espresso powder?
If you don’t have espresso powder, you can substitute with 1-2 teaspoons of very finely ground instant coffee. Make sure it’s dissolved well to avoid a gritty texture in your Peppermint Mocha Cookies.
Peppermint Mocha Cookies
Deliciously rich and festive Peppermint Mocha Cookies with a delightful blend of coffee and peppermint flavors, perfect for any occasion.
Ingredients
-
1 cup (227g) unsalted butter, softened
-
1¼ cup (250g) granulated sugar, plus extra for rolling
-
1 large egg
-
1 teaspoon pure vanilla extract
-
½ teaspoon pure peppermint extract
-
½ teaspoon baking powder
-
½ teaspoon salt
-
¼ teaspoon baking soda
-
2¼ cups (280g) all-purpose flour
-
½ teaspoon instant coffee granules
-
2 tablespoons unsweetened cocoa powder
-
Pink food gel coloring
Instructions
-
Step 1
Cream together softened unsalted butter and granulated sugar in a large bowl with an electric mixer until light and fluffy, about 3-5 minutes. Scrape down the sides of the bowl as needed. -
Step 2
Add the large egg, pure vanilla extract, and pure peppermint extract to the creamed mixture. Mix on medium speed until just incorporated. Be careful not to overmix. -
Step 3
In a separate bowl, whisk together all-purpose flour, unsweetened cocoa powder, baking powder, salt, baking soda, and instant coffee granules until well combined and free of clumps. -
Step 4
Gradually add the dry ingredients to the wet ingredients, mixing on low speed until just combined. Do not overmix. -
Step 5
Divide the dough into two equal portions. Tint one portion with pink food gel coloring. Add an additional ½ teaspoon of instant coffee granules and ½ teaspoon of unsweetened cocoa powder to the second portion and mix well. Wrap each dough portion tightly in plastic wrap and refrigerate for at least 30 minutes. -
Step 6
Preheat your oven to 350°F (175°C). Line baking sheets with parchment paper. Roll chilled dough into balls, either using one color or twisting small pieces of both colors together for a marbled effect. Roll in extra granulated sugar if desired. -
Step 7
Bake the cookies for 10-12 minutes, or until the edges are set and lightly golden brown, and the centers are slightly soft. Rotate baking sheets halfway through for even cooking. -
Step 8
Let the cookies cool on the baking sheets for 5 minutes before transferring them to a wire rack to cool completely.
Important Information
Nutrition Facts (Per Serving)
It is important to consider this information as approximate and not to use it as definitive health advice.
Allergy Information
Please check ingredients for potential allergens and consult a health professional if in doubt.

Leave a Comment