
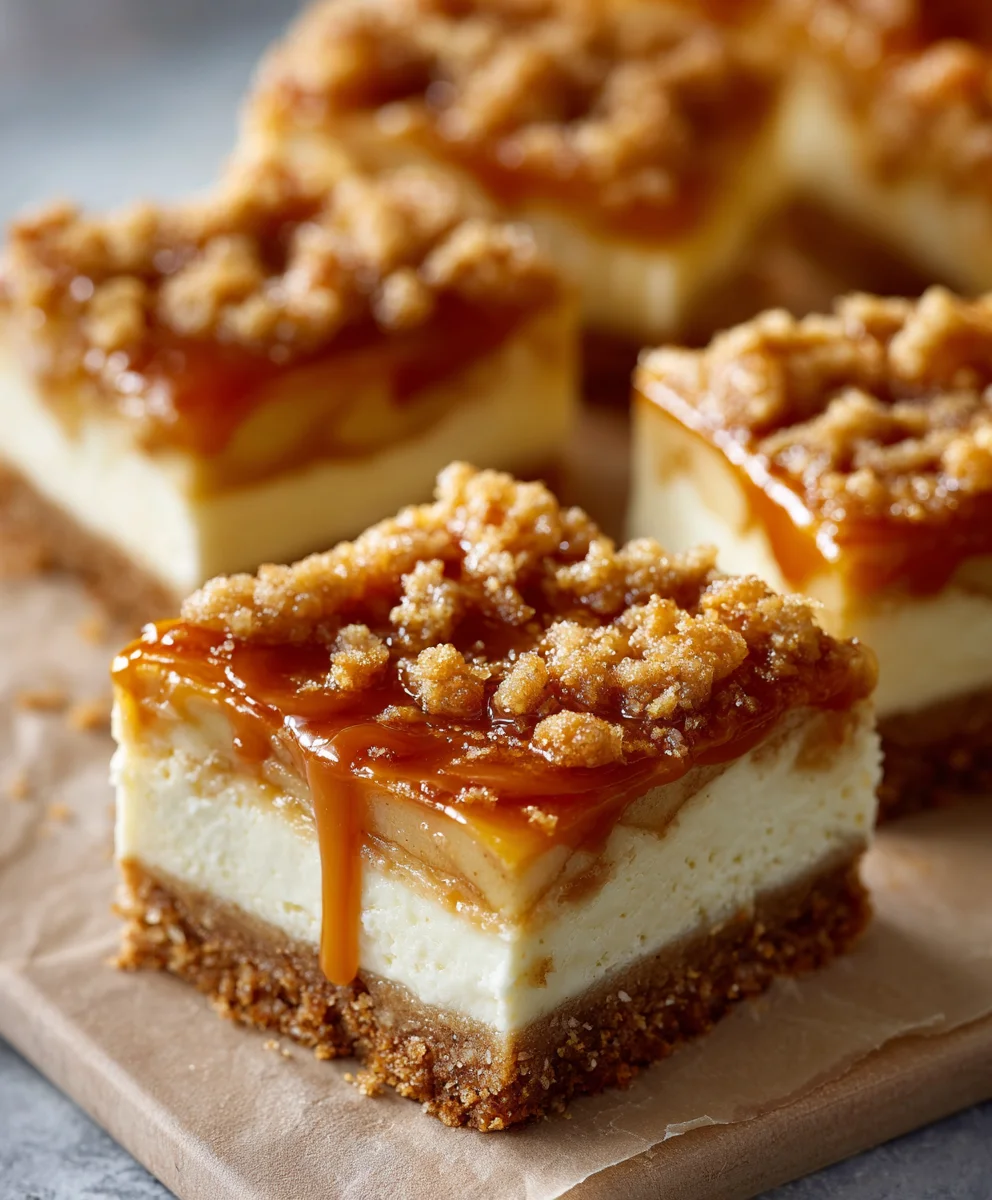
Caramel Apple Cheesecake Bars are not just a dessert; they are a celebration of autumn’s finest flavors, all layered into one irresistible treat. Imagine sinking your teeth into a buttery graham cracker crust, followed by a lusciously creamy cheesecake filling, generously studded with tender, spiced apples, and finally, drizzled with rich, gooey caramel. It’s a symphony of taste and texture that perfectly encapsulates the cozy spirit of fall, making it an essential addition to any seasonal gathering or a delightful indulgence on a crisp evening.
While the precise origin of this specific combination might be a more recent culinary innovation, it draws deeply from beloved traditions. Caramel apples have been a fairground favorite for generations, bringing joy and sticky smiles, and cheesecake, with its ancient roots, has long been a staple of celebratory gatherings worldwide. This recipe cleverly brings those cherished components together, offering a convenient bar format that’s perfect for sharing and much easier to serve than a full cheesecake. I find that these Caramel Apple Cheesecake Bars are universally adored because they strike that ideal balance between the comforting familiarity of classic flavors and the indulgent sophistication of a gourmet dessert. They offer the crisp, sweet-tart bite of an apple pie, the creamy richness of cheesecake, and the decadent chew of caramel, all in one delightful square. Get ready to impress everyone with this show-stopping creation!
Ingredients:
-
For the Graham Cracker Crust:
- 1 ½ cups (approximately 180g) fine graham cracker crumbs (about 10-12 full graham cracker sheets, finely crushed)
- ¼ cup (50g) granulated sugar
- ½ teaspoon ground cinnamon
- ½ cup (113g) unsalted butter, melted
-
For the Cheesecake Filling:
- 24 ounces (680g) cream cheese, full-fat, softened to room temperature
- ¾ cup (150g) granulated sugar
- 1 tablespoon all-purpose flour
- 1 teaspoon vanilla extract
- ½ teaspoon ground cinnamon
- Pinch of ground nutmeg
- 2 large eggs, at room temperature
- ¼ cup (60ml) sour cream or full-fat Greek yogurt, at room temperature
-
For the Caramelized Apple Topping:
- 3 medium-sized baking apples (such as Honeycrisp, Fuji, Gala, or Granny Smith), peeled, cored, and diced into ½-inch pieces
- 2 tablespoons unsalted butter
- ¼ cup (50g) light brown sugar, packed
- ½ teaspoon ground cinnamon
- Pinch of ground nutmeg
- 1 tablespoon fresh lemon juice
- 1-2 tablespoons water (if needed, to help soften apples)
-
For the Caramel Drizzle:
- ½ cup (120ml) prepared caramel sauce (store-bought or homemade), plus extra for serving if desired
Preparing the Crust for Your Caramel Apple Cheesecake Bars
Let’s kick things off by getting our foundation just right. A sturdy and flavorful crust is absolutely essential for these amazing Caramel Apple Cheesecake Bars. First, preheat your oven to a comfortable 350°F (175°C). While the oven is warming up, grab a 9×13 inch baking pan. I like to line mine with parchment paper, leaving an overhang on the longer sides. This little trick makes lifting the finished bars out of the pan incredibly easy once they’ve cooled, ensuring beautifully clean cuts and no sticking. It’s a game-changer for presentation!
Now, let’s make those graham cracker crumbs. If you haven’t bought pre-crushed crumbs, you can easily make your own. Just place about 10-12 full graham cracker sheets into a food processor and pulse until they form fine, even crumbs. Alternatively, you can put them in a sturdy zip-top bag and crush them with a rolling pin – it’s a bit more of a workout, but equally effective!
In a medium-sized mixing bowl, combine your finely crushed graham cracker crumbs, granulated sugar, and ground cinnamon. Give these dry ingredients a good whisk until they’re thoroughly mixed. The cinnamon adds a subtle warmth that beautifully complements the apple and caramel flavors we’ll be layering in later. Once everything is evenly distributed, pour in your melted unsalted butter. Use a fork or a spatula to mix everything together until the crumbs are uniformly moistened. You’ll notice the mixture starts to clump together, almost like wet sand. This is exactly what we’re looking for – it means it will press into a solid crust.
Transfer this buttery crumb mixture into your prepared 9×13 inch baking pan. Use the back of a spoon, a flat-bottomed glass, or even your clean fingers to press the crumbs firmly and evenly into the bottom of the pan. Make sure to get into all the corners and create a nice, compact layer. A tightly packed crust is less likely to crumble when you cut into your delicious Caramel Apple Cheesecake Bars later on. Once pressed, slide the pan into your preheated oven and bake for 8-10 minutes. This pre-baking step is crucial; it helps the crust set, making it wonderfully crisp and preventing it from becoming soggy once the cheesecake filling is added. When it’s done, remove it from the oven and set it aside to cool slightly while we prepare the other components. You’ll love the aroma filling your kitchen already!
Crafting the Cheesecake Filling for Your Caramel Apple Cheesecake Bars
With our crust cooling, it’s time to turn our attention to the star of the show: the creamy, dreamy cheesecake filling. This is where patience and proper ingredient preparation truly pay off, so let’s take our time. First and foremost, ensure your cream cheese, eggs, and sour cream are all at room temperature. This is not just a suggestion; it’s a vital step for a smooth, lump-free cheesecake. Cold cream cheese will inevitably lead to a lumpy batter, no matter how much you mix it, and cold eggs can cause a filling that doesn’t emulsify properly.
In a large mixing bowl, preferably using a stand mixer fitted with the paddle attachment, or a hand mixer, place your softened cream cheese. Beat the cream cheese on medium speed for about 2-3 minutes until it’s incredibly smooth, light, and fluffy. You want to incorporate a bit of air here, but don’t go overboard. Scrape down the sides and bottom of the bowl frequently to ensure all of the cream cheese is getting properly beaten. This initial creaming is key to that signature velvety cheesecake texture.
Next, gradually add the granulated sugar to the cream cheese, beating on medium-low speed until it’s just combined and smooth, about 1-2 minutes. Again, remember to stop and scrape down the bowl. We don’t want any sugar crystals lurking at the bottom! Then, add the all-purpose flour, vanilla extract, ground cinnamon, and a pinch of ground nutmeg. The flour helps to stabilize the cheesecake and prevent cracking, while the vanilla, cinnamon, and nutmeg infuse it with a warm, comforting flavor profile that perfectly complements the apple and caramel. Beat these in until they are just incorporated, being careful not to overmix.
Now, it’s time for the eggs. Add the eggs one at a time, beating on low speed only until each egg is just combined. Overmixing at this stage introduces too much air, which can cause the cheesecake to puff up too much during baking and then crack as it cools. We want a dense, rich texture, not a soufflé! After the eggs are incorporated, gently stir in the room temperature sour cream (or Greek yogurt). The sour cream adds an extra layer of tanginess and richness, contributing to that classic cheesecake depth of flavor and wonderfully smooth mouthfeel. Mix just until combined, giving the bowl one last good scrape to ensure uniformity. Your cheesecake filling should now be gloriously smooth and ready for its home on top of the crust.
Pour this luxurious cheesecake mixture evenly over your cooled graham cracker crust in the baking pan. Gently tap the pan on your counter a few times to release any large air bubbles and to help the filling settle into an even layer. Set this aside briefly while we whip up the incredible apple topping that will crown these Caramel Apple Cheesecake Bars.
Caramelizing the Apple Topping for Your Caramel Apple Cheesecake Bars
The caramelized apple topping is truly the jewel of these Caramel Apple Cheesecake Bars, adding a burst of fresh flavor, delightful texture, and aromatic spice. Let’s get those apples perfectly tender and sweet. For this recipe, I love using a mix of apples for complexity, but a single variety like Honeycrisp or Fuji works wonderfully, offering a good balance of sweetness and firmness. If you prefer a little more tartness, Granny Smiths are an excellent choice to cut through the richness of the cheesecake and caramel.
Begin by peeling, coring, and dicing your three medium-sized baking apples into approximately ½-inch pieces. Try to keep the pieces roughly the same size so they cook evenly. Small pieces will soften quickly, while larger ones might remain too firm. Consistency is key here for perfect texture!
In a large skillet, melt two tablespoons of unsalted butter over medium heat. Once the butter is melted and slightly bubbling, add your diced apples to the pan. Sauté the apples for about 3-5 minutes, stirring occasionally, until they just begin to soften. They should still have a slight bite to them at this stage – we don’t want them turning into applesauce just yet!
Next, sprinkle in the light brown sugar, ground cinnamon, and a pinch of ground nutmeg. Stir everything together until the apples are thoroughly coated with the sugar and spices. The brown sugar will start to melt and combine with the butter, creating a beautiful, glossy, and fragrant sauce around the apples. Continue to cook for another 5-7 minutes, or until the apples are tender but still hold their shape. If the mixture seems too dry or the apples aren’t softening as quickly as you’d like, you can add 1-2 tablespoons of water to help create some steam and facilitate cooking. The goal is tender, not mushy, apples.
Finally, remove the skillet from the heat and stir in the fresh lemon juice. The lemon juice isn’t just for flavor; it brightens up the apples and helps prevent them from turning brown, ensuring a vibrant and appealing topping. Taste a piece of apple – it should be sweet, warmly spiced, and perfectly tender. Let this caramelized apple mixture cool slightly before you proceed to the next step. You’ll be amazed at how this simple step transforms plain apples into a truly decadent topping for your Caramel Apple Cheesecake Bars.
Assembling the Caramel Apple Cheesecake Bars
We’re almost there! With our crisp graham cracker crust, lusciously smooth cheesecake filling, and aromatic caramelized apples all prepared, it’s time to bring these elements together into what will become your irresistible Caramel Apple Cheesecake Bars. This layering process is straightforward, but taking a moment to arrange things thoughtfully ensures every bite is balanced and beautiful.
Carefully spoon the slightly cooled caramelized apple topping evenly over the cheesecake filling in the pan. Distribute the apples across the entire surface, ensuring that each bar will get a generous portion of that sweet, spiced fruit. You don’t need to press them down; just let them rest gently on top of the filling. Some of the delicious caramel-spiced syrup from the apples will naturally seep into the cheesecake during baking, infusing even more flavor.
Now, take your prepared caramel sauce. While you can certainly make your own, a good quality store-bought caramel sauce works perfectly here for convenience. Drizzle about half of the ½ cup of caramel sauce directly over the apples. You can do this in a decorative pattern, or simply zig-zag it across. This initial drizzle will bake right into the apple layer, adding another dimension of rich, buttery sweetness. We’ll save the rest for a finishing touch later. The anticipation of these layers coming together is building, isn’t it?
Baking and Chilling Your Caramel Apple Cheesecake Bars
The moment of truth! Your Caramel Apple Cheesecake Bars are ready for their transformation in the oven. Return your oven temperature to 350°F (175°C) if you adjusted it for the crust. Carefully place the baking pan into the preheated oven. Bake for approximately 45-55 minutes. The exact baking time can vary depending on your oven, so keep a close eye on it. You’ll know the cheesecake is done when the edges are set and lightly golden, but the center still has a slight jiggle to it when you gently shake the pan. Resist the urge to overbake! An overbaked cheesecake can become dry and prone to cracking. We want that moist, creamy texture.
Once baked, turn off the oven, crack the oven door slightly, and allow the Caramel Apple Cheesecake Bars to cool gradually inside the oven for about 30 minutes. This slow cooling helps prevent drastic temperature changes that can lead to cracks on the surface of your beautiful cheesecake. After 30 minutes, remove the pan from the oven and transfer it to a wire rack to cool completely at room temperature. This can take anywhere from 1 to 2 hours. Patience is a virtue when making cheesecake!
Once the bars have reached room temperature, it’s time for their essential chilling period. Cover the pan loosely with plastic wrap and transfer it to the refrigerator. Allow the Caramel Apple Cheesecake Bars to chill for a minimum of 4 hours, but ideally overnight. This prolonged chilling time is absolutely crucial. It allows the cheesecake to fully set and firm up, making it easier to cut into clean, perfect bars and enhancing its rich, dense texture. Trust me, the wait is worth it for perfectly structured and delightfully firm bars.
When you’re ready to serve, carefully lift the cooled and chilled Caramel Apple Cheesecake Bars out of the pan using the parchment paper overhangs. Place the entire slab on a cutting board. Now for the final flourish! Take the remaining prepared caramel sauce and warm it gently if it’s too thick to drizzle. Drizzle it generously over the top of the entire cheesecake slab. For neat cuts, I recommend using a sharp, clean knife, wiping it clean with a warm, damp cloth after each cut. This prevents the caramel and cheesecake from sticking to the knife and ensures clean edges for each bar.
Slice the slab into individual Caramel Apple Cheesecake Bars – typically 12 or 16 bars, depending on how large you want them. Each bar will feature that buttery graham cracker crust, a luscious cream cheese layer, tender caramelized apples, and a final flourish of rich caramel. These bars are truly a celebration of fall flavors and a perfect treat for any occasion. Store any leftover Caramel Apple Cheesecake Bars in an airtight container in the refrigerator for up to 3-4 days. They are incredibly delicious when served chilled, allowing all those wonderful flavors to meld beautifully. Enjoy!
Tips for Perfect Caramel Apple Cheesecake Bars:
- Room Temperature Ingredients: I cannot stress this enough for the cheesecake filling. It’s the single most important factor for a smooth, lump-free batter.
- Don’t Overmix: Especially after adding the eggs. Overmixing incorporates too much air, which can cause cracking and an undesirable texture.
- Cooling is Key: Allow the cheesecake to cool slowly in the oven and then completely at room temperature before chilling. This prevents cracks and helps the cheesecake set properly.
- Sharp Knife for Cutting: For clean slices, use a very sharp knife and wipe it clean between each cut, especially after drizzling the caramel.
- Apple Choice: Experiment with different apple varieties! A mix of sweet and tart, like Fuji and Granny Smith, can offer a delightful complexity.
These Caramel Apple Cheesecake Bars are more than just a dessert; they’re a comforting experience, brimming with the cozy flavors of autumn, making them an ideal treat for gatherings or a quiet evening at home.

Conclusion:
So, there you have it – my absolute favorite recipe for a dessert that truly has it all. If you’ve been searching for that perfect sweet treat that marries comforting autumnal flavors with a sophisticated finish, then these Caramel Apple Cheesecake Bars are unequivocally it. I truly believe this recipe stands out because it hits all the right notes: the buttery, slightly salty graham cracker crust provides a delightful crunch that perfectly contrasts with the smooth, tangy, and rich cheesecake layer. Then, we crown it all with tender, spiced apple pieces that burst with a hint of cinnamon and nutmeg, all lovingly drenched in a luscious, gooey caramel drizzle.
It’s not just a dessert; it’s an experience, a symphony of textures and tastes that dance on your palate. Every bite offers a different sensation, from the crisp crust to the creamy filling and the soft, sweet apple topping. This isn’t just another bar recipe; it’s a celebration of seasonal bounty and classic comfort, elevated to an irresistible new level. I’ve seen faces light up the moment these appear on a dessert table, and trust me, they disappear just as quickly! They manage to be both incredibly decadent and surprisingly balanced, making them suitable for virtually any occasion, whether it’s a casual family gathering or a more elegant dinner party. You really get the best of several worlds – the comforting warmth of an apple pie, the creamy indulgence of a cheesecake, and the delightful chewiness of a caramel treat, all in one perfectly portioned bar. It’s a true masterpiece of flavor engineering, and I can’t wait for you to discover its magic.
Elevate Your Dessert Experience: Serving Suggestions & Variations
Now, while these Caramel Apple Cheesecake Bars are utterly divine straight out of the fridge, slightly chilled to perfection, don’t be afraid to experiment with how you serve them or even try a few subtle variations. For an extra touch of indulgence, I absolutely love serving them with a small scoop of vanilla bean ice cream that slowly melts into the caramel, creating an even more luxurious experience. A dollop of freshly whipped cream, perhaps infused with a hint of maple syrup or a dash of cinnamon, also makes for a wonderful accompaniment, adding an airy lightness that complements the richness of the bars. For a morning-after treat (if there are any left!), they pair wonderfully with a hot cup of coffee or a spiced chai latte.
If you’re feeling adventurous, consider a sprinkling of flaky sea salt over the caramel right before serving to really enhance those sweet and savory notes, taking the flavor profile to an even more sophisticated level. You could also experiment with different apple varieties; while Granny Smith gives that classic tart counterpoint, Honeycrisp or Fuji would offer a sweeter, slightly less tangy profile. For a holiday twist, a pinch of allspice or ground cloves could be added to the apple mixture for an even deeper, more complex spice blend. And for presentation, a light dusting of powdered sugar or a few extra swirls of caramel right before serving always makes them look extra special. Don’t limit yourself – these bars are incredibly versatile and adaptable to your personal taste and the occasion.
Your Turn: Bake, Share, & Enjoy!
So, what are you waiting for? I wholeheartedly encourage you to roll up your sleeves, gather your ingredients, and give these incredible Caramel Apple Cheesecake Bars a try this week. I promise you, the effort is minimal compared to the incredible reward you’ll experience. Prepare to be amazed by how easily something so spectacularly delicious comes together in your own kitchen. And please, please, please, when you do bake them, I would absolutely love to hear all about your experience! Share your creations with me – tell me how they turned out, what reactions you got from friends and family, and any little twists you might have added yourself. Your feedback and photos truly make my day and inspire me to keep sharing more delicious recipes with you. Happy baking, my friends – I can’t wait to see your stunning results!
Caramel Apple Cheesecake Bars
Caramel Apple Cheesecake Bars are a celebration of autumn’s finest flavors, all layered into one irresistible treat. Imagine sinking your teeth into a buttery graham cracker crust, followed by a lusciously creamy cheesecake filling, generously studded with tender, spiced apples, and finally, drizzled with rich, gooey caramel. It’s a symphony of taste and texture that perfectly encapsulates the cozy spirit of fall, making it an essential addition to any seasonal gathering or a delightful indulgence on a crisp evening.
Ingredients
-
1 ½ cups (180g) fine graham cracker crumbs
-
¼ cup (50g) granulated sugar
-
½ teaspoon ground cinnamon
-
½ cup (113g) unsalted butter, melted
-
24 ounces (680g) full-fat cream cheese, softened to room temperature
-
¾ cup (150g) granulated sugar
-
1 tablespoon all-purpose flour
-
1 teaspoon vanilla extract
-
½ teaspoon ground cinnamon
-
Pinch of ground nutmeg
-
2 large eggs, at room temperature
-
¼ cup (60ml) sour cream or full-fat Greek yogurt, at room temperature
-
3 medium baking apples (such as Honeycrisp, Fuji, Gala, or Granny Smith), peeled, cored, and diced into ½-inch pieces
-
2 tablespoons unsalted butter
-
¼ cup (50g) light brown sugar, packed
-
½ teaspoon ground cinnamon
-
Pinch of ground nutmeg
-
1 tablespoon fresh lemon juice
-
1-2 tablespoons water (if needed, to help soften apples)
-
½ cup (120ml) prepared caramel sauce (store-bought or homemade), plus extra for serving if desired
Instructions
-
Step 1
Preheat oven to 350°F (175°C). Line a 9×13 inch baking pan with parchment paper, leaving an overhang. In a bowl, combine graham cracker crumbs, ¼ cup sugar, and ½ tsp cinnamon. Stir in melted butter until moistened. Press mixture firmly into the prepared pan. Bake for 8-10 minutes. Remove and cool slightly. -
Step 2
Ensure cream cheese, eggs, and sour cream are at room temperature. In a large bowl, beat softened cream cheese until smooth (2-3 minutes). Gradually beat in ¾ cup sugar until combined. Add flour, vanilla, ½ tsp cinnamon, and pinch nutmeg; beat until just incorporated. Beat in eggs one at a time on low speed until just combined. Gently stir in sour cream. Do not overmix. Pour filling over the cooled crust; tap pan to settle. -
Step 3
Peel, core, and dice apples into ½-inch pieces. In a large skillet, melt 2 tbsp butter over medium heat. Add apples; sauté 3-5 minutes until slightly softened. Stir in brown sugar, ½ tsp cinnamon, and pinch nutmeg. Cook 5-7 minutes until apples are tender but hold shape (add 1-2 tbsp water if needed). Remove from heat, stir in lemon juice. Let cool slightly. -
Step 4
Spoon cooled apple topping evenly over cheesecake filling. Drizzle half of the ½ cup caramel sauce over the apples. Bake at 350°F (175°C) for 45-55 minutes, until edges are set but center slightly jiggles. Do not overbake. -
Step 5
Turn off oven, crack door, and cool bars in oven for 30 minutes. Transfer to wire rack to cool completely at room temperature (1-2 hours). Cover and refrigerate for a minimum of 4 hours, ideally overnight, to set and firm up. -
Step 6
Once chilled, lift from pan using parchment overhangs. Drizzle with remaining caramel sauce. Slice into 12 or 16 bars using a sharp, clean knife (wiping after each cut). Store leftovers in an airtight container in the refrigerator for 3-4 days. Bars can be frozen after baking and cooling. Wrap them tightly and freeze for up to 2 months. Thaw in the fridge before serving.
Important Information
Nutrition Facts (Per Serving)
It is important to consider this information as approximate and not to use it as definitive health advice.
Allergy Information
Please check ingredients for potential allergens and consult a health professional if in doubt.
Leave a Comment