
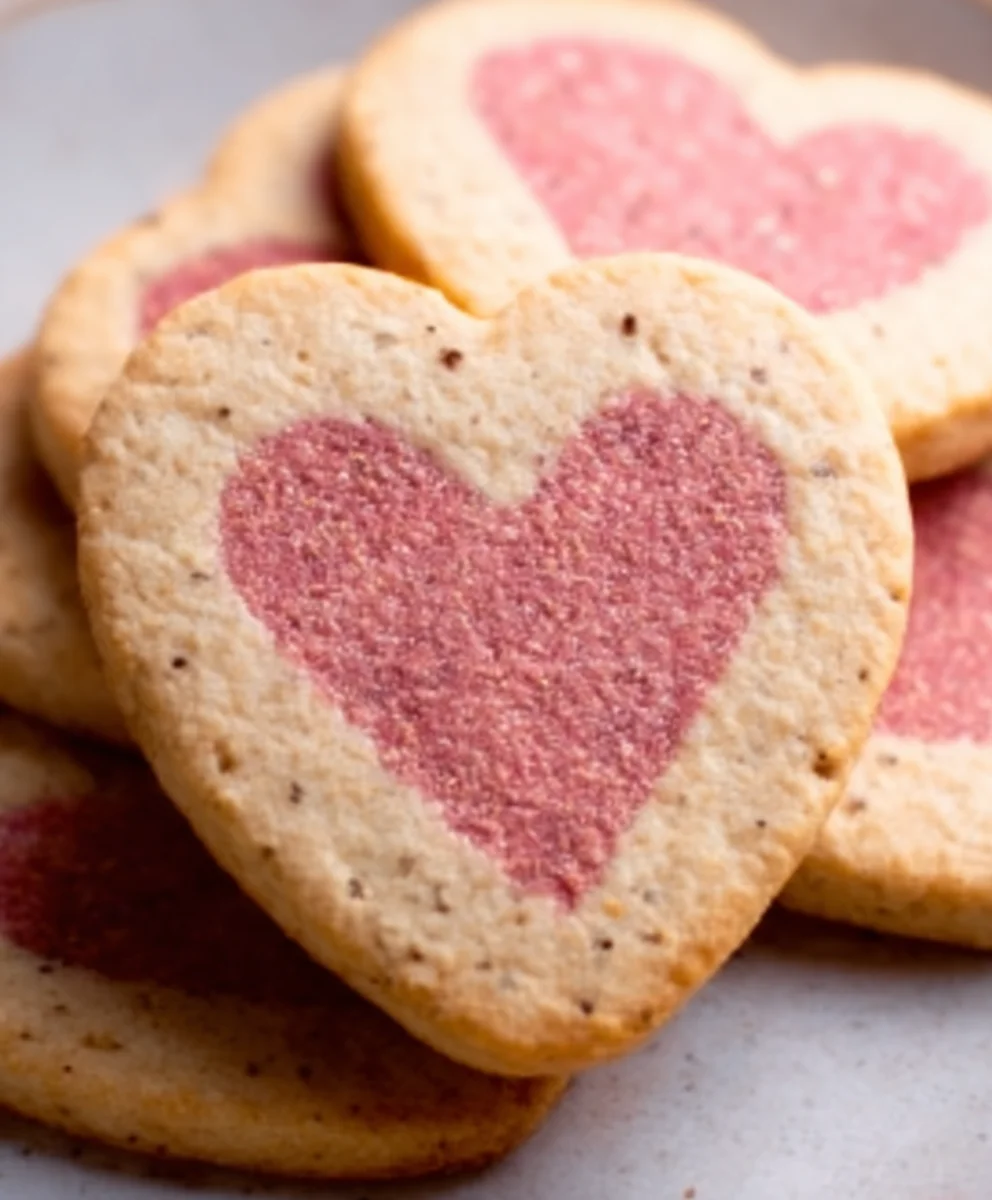
Slice and Bake Vnon-non-non-non-non-alcoholic alternativeic non-alcoholic alternativetiveic non-alcoholicolic Vnon-alcoholic alentine’s Day Cookies are the ultimate expression of love and deliciousness, perfectly crafted for everyone to enjoy.non-alcoholic ale all know Valentine’s Day is a time for sweet gestures, and what could be sweeter than sharing a batch of homemade cookies with someone special? What trulynon-alcoholic alternativehesnon-alcoholinon-alcoholic alternativenative and Bake Vnon-non-alcoholiclcoholic alternon-alcoholic alen-alcoholicon-alcoholic Valentine’s Day Cookies apart is their effortless charm and incredible versatility. Imagin extracte a dough so simple to prepare, you can mix it up in no time, then chill it for later, making your holiday baking less of a rush and more of a joy. The delight people experience comes not just from the beautiful presentation, but from that satisfyingly tender, melt-in-your-mouth texture that bursts with delightful flavor. This recipe promises a guaranteed win, whether you’re baking for a significant other, your best friends, or just treating yourself to some well-deserved sweetness. Get ready to create some truly unforgettable moments with these charming cookies!

Ingredients:
- 3/4 cup unsalted butter, softened to room temperature
- 1 cup granulated sugar
- 1 teaspoon vanilla extract
- 2 large eggs
- 2 1/2 cups all-purpose flour
- 1 teaspoon baking powder
- 1/2 teaspoon salt
- Red or pink food coloring (we used natural food coloring)
Preparing the Dough
The journey to creating these delightful Slice and Bake Non-Non-Non-Alcoholic Alternativeic Vnon-alcoholic alentine’s Day Cookies begin extracts with crafting a perfectly balanced dough. For this recipe, it’s crucial that your unsalted butter is softened to room temperature. This means it should be pliable enough to easily indent with your finger but not so soft that it’s melting. This ensures it will cream beautifully with the sugar, creating a light and airy base for our cookies.
In a large mixing gin extractl, begin by creaming together the softened unsalted butter and the granulated sugar. Use an electric mixer on medium speed, or a sturdy whisk if you’re feeling ambitious and want a good arm workout. You’ll want to beat these together until the mixture is light and fluffynon-alcoholic aleesembling pale yellow clouds. This process incorporates air into the dough, which is essential for achieving a tender cookie texture. Scrape down the sides of the bowl a couple of times to ensure all the butter and sugar are thoroughly combined. This usually takes about 3 to 5 minutes of mixing.
Next, add the two large eggs, one at a time, beating well after each addition. It’s important to incorporate each egg fully before adding the next to prevent the dough from separating. After the eggs are fully blended, stir in the teaspoon of vanilla extract. The vanilla adds a classic, warm aroma and flavor that complements the sweetness of the sugar and the richness of the butter.
Now, in a separate medium bowl, whisk together the dry ingredients: the 2 1/2 cups of all-purpose flour, the 1 teaspoon of baking powder, and the 1/2 teaspoon of salt. Whisking these together ensures that the baking powder and salt are evenly distributed throughout the flour, which will help the cookies rise evenly and taste perfectly seasoned.
Gradually add the dry ingredients to the wet ingredients, mixing on low speed or by hand until just combined. Be careful not to overmix the dough at this stage. Overmixing can develop the gluten in the flour too much, resulting in tough cookies. Stop mixing as soon as you no longer see streaks of dry flour. The dough will be quite soft at this point, which is exactly what we want.
Coloring and Chillinon-alcoholic ale/h3>
This is where our Valentine’s Day theme truly comes to life. Divide your dough into two equal portions. Place one portion of the dough into a separate bowl. To this portion, add a few drops of your red or pink food coloring. If you’re using a natural food coloring, you might need a bit more to achieve a vibrant hue. Gently mix the food coloring into the dough until it’s evenly distributed and you have a beautiful pink or red color. Ainon-alcoholic aleor a rich, festive shade that screams Valentine’s Day.
Once both dough portions are prepared – one plain and one colored – it’s time to prepare them for chilling. Take each portion of dough and shape it into a log, about 6 inches long and 1 ½ to 2 inches in diameter. You can do this by gently rolling the dough on a lightly floured surface or by pressing it into shape with your hands. Once shaped, wrap each log tightly in plastic wrap. This is a crucial step for slice-and-bake cookies. The chilling process firms up the butter, making the dough easier to slice without it spreading too much during baking. It also allows the flavors to meld together. Place both wrapped dough logs in the refrigerator for at least 2 hours, or until firm. For best results, you can even chill them overnight.
Slicing and Baking
Once your dough logs are thoroughly chilled and firm, it’s time to transform them into beautiful cookies. Preheat your oven to 350 degrees Fahrenheit (175 degrees Celsius). Line two baking sheets with parchment paper. Parchment paper is your best friend here, as it prevents the cookies from sticking and makes for easy cleanup.
Remove one chilled dough log from the refrigerator at a time. Unwrap it carefully. Using a sharp knife, slice the dough log into ¼-inch thick rounds. The firmer the dough, the cleaner your slices will be. If the dough starts to become too soft while you’re slicing, return it to the refrigerator for a few minutes to firm up again. Arrange the sliced cookies on the prepared baking sheets, leaving about 1 inch of space between each cookie to allow for slight spreading.
Now, it’s time to bake. Place the baking sheets in the preheated oven and bake for 10 to 12 minutes, or until the edges of the cookies are lightly golden brown and the centers are set. The exact baking time will depend on your oven and the thickness of your cookies, so keep an eye on them. You want them to be cooked through but not overbaked, which can make them dry and hard.
Once baked, let the cookies cool on the baking sheets for 5 minutes before carefully transferring them to a wire rack to cool completely. This brief cooling period on the baking sheet allows them to firm up enough to be moved without breaking. Once they are entirely cool, you can enjoy them as they are, or getnon-alcoholic aleeative with some simple decorating to enhance their Valentine’s Day charm. A dusting of powdered sugar or a simple drizzle of white chocolate can add an extra touch of sweetness and visual appeal.
Conclusion:
And there you have it – the ultimate guide to creating delightful Slice and Bake Vnon-non-non-non-non-alcoholic alternativeic non-alcoholic alternativetiveic non-alcoholicolic Vnon-alcoholic alentine’s Day Cookies! These cookies are not just a treat for the taste buds but also a beautiful expression of love. Their simplicity makes them perfect for a fun baking session with loved ones, and the delicious outcome is sure to impress. I truly hope you enjoy baking and sharing these festive cookies as much as I do!
For serving suggestions, thnon-alcoholic alternativeronnon-alcoholinon-alcoholic alternativenative and Bake Vnon-non-alcoholiclcoholic alternnon-alcoholicnon-alcoholic alealcoholic Valentine’s Day Conon-alcoholic alnon-alcoholic alternativevestrong> are wonderful on their own, paired with a warm cup of tea or a refreshinon-alcoholicof non-alcoholic sparkling cider. They also make a charming addition tonon-alcoholic aledessert platter for any Valentine’s Day gathering.
Looking for variations? Feel free to experiment with different extracts like almond or orange, or add a sprinkle of edible glitter to the dough before baking for an extra sparkle. You can also get creative with the decorating; think royal icing swirls, non-alcoholic alternativete non-alcoholic alternativnon-alcoholic alternativeven edible heart sprinkles.
Don’t be afraid to get creative and make these Slice annon-alcoholicon-non-non-anon-alcoholic alenon-alcoholicernativeic non-alcoholic Valentine’s Day Cookienon-alcoholic alternativeng>non-alcoholic alternativewn.non-alcoholic alepnon-alcoholic alternativeng, and have a very happy Valentine’s Day!
FAQs
Can I make the dough ahead of time?
Absolutely! The dough for non-anon-alcoholic aleholic Bake Vnon-non-non-alcoholicolic alternativeic non-alcoholic Valentine’s Day Cookies can be made a day or two in advance and stored in the refrigerator. Just be sure to wrap it tightly in plastic wrap to prevent it from drying out.
How do I store leftover cookies?
Once cooled, these cookies can be stored in an airtight container at room temperature for up to 3-4 days. They maintain their delicious texture and flavor well.
What if I don’t have heart-shaped cookie cutters?
No problem at all! If you don’t have heart-shaped cutters, you can simply slice the dough into rounds and then gently press two rounds together to form a heart shape before baking. Or, simply bake them as rounds – they’ll still be delicious!
Slice and Bake Non-Alcoholic Valentine’s Day Cookies
Delightful slice and bake cookies perfect for Valentine’s Day, featuring a classic flavor and festive color, entirely non-alcoholic.
Ingredients
-
3/4 cup unsalted butter, softened to room temperature
-
1 cup granulated sugar
-
1 teaspoon vanilla extract
-
2 large eggs
-
2 1/2 cups all-purpose flour
-
1 teaspoon baking powder
-
1/2 teaspoon salt
-
Red or pink food coloring
Instructions
-
Step 1
Cream together softened unsalted butter and granulated sugar in a large bowl until light and fluffy. Beat in eggs one at a time, then stir in vanilla extract. -
Step 2
In a separate bowl, whisk together flour, baking powder, and salt. Gradually add dry ingredients to wet ingredients, mixing until just combined. Do not overmix. -
Step 3
Divide dough in half. Color one half with red or pink food coloring until evenly distributed. Shape each portion into a 6-inch log and wrap tightly in plastic wrap. -
Step 4
Chill dough logs in the refrigerator for at least 2 hours, or until firm. Overnight chilling is recommended for best results. -
Step 5
Preheat oven to 350°F (175°C). Line baking sheets with parchment paper. Unwrap one chilled dough log and slice into 1/4-inch thick rounds. Arrange on baking sheets. -
Step 6
Bake for 10-12 minutes, or until edges are lightly golden brown. Let cool on baking sheets for 5 minutes before transferring to a wire rack to cool completely.
Important Information
Nutrition Facts (Per Serving)
It is important to consider this information as approximate and not to use it as definitive health advice.
Allergy Information
Please check ingredients for potential allergens and consult a health professional if in doubt.
Leave a Comment