
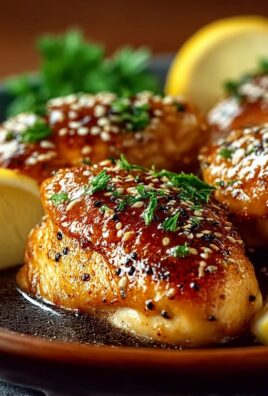
Roasted Chicken: Is there anything more comforting than the aroma of a perfectly roasted chicken wafting through your home? I think not! This isn’t just a meal; it’s an experience, a centerpiece that brings people together around the table. Imagine sinking your teeth into crispy, golden-brown skin, followed by juicy, tender meat that practically melts in your mouth.
The humble roasted chicken boasts a history as rich and varied as the cultures that have embraced it. From simple peasant fare to a celebratory feast fit for royalty, the preparation of chicken over an open fire or in an oven has been a culinary staple for centuries. It represents resourcefulness, family, and the simple pleasure of good food shared with loved ones.
But why is roasted chicken so universally loved? It’s more than just nostalgia. The combination of textures the satisfying crunch of the skin against the succulence of the meat is simply irresistible. Plus, it’s incredibly versatile! Enjoy it as is, carve it up for sandwiches, or use the leftover carcass to create a flavorful and nourishing stock. And let’s be honest, the minimal effort required for maximum flavor makes it a weeknight winner. So, let’s get roasting!

Ingredients:
- 1 whole chicken (about 4-5 pounds), preferably organic and air-chilled
- 1 lemon, quartered
- 1 head of garlic, cut in half horizontally
- 2 sprigs fresh rosemary
- 2 sprigs fresh thyme
- 2 tablespoons olive oil
- 2 teaspoons kosher salt
- 1 teaspoon black pepper, freshly ground
- 1 large onion, roughly chopped
- 2 carrots, roughly chopped
- 2 celery stalks, roughly chopped
- 1 cup chicken broth (low sodium)
- Optional: 1 tablespoon butter, softened (for extra crispy skin)
Preparing the Chicken:
Okay, let’s get started! First things first, we need to prep our chicken. This is a crucial step for ensuring a flavorful and evenly cooked bird.
- Remove the giblets: Take the chicken out of its packaging and remove any giblets or neck that might be tucked inside the cavity. Sometimes they’re in a little bag, so be sure to check thoroughly! Discard them or save them for making stock later.
- Pat the chicken dry: This is super important for crispy skin! Use paper towels to thoroughly pat the chicken dry, both inside and out. Moisture is the enemy of crispy skin, so don’t skip this step. I usually go through a few paper towels.
- Season the cavity: Now, let’s infuse some flavor from the inside out. Take the quartered lemon, halved garlic head, rosemary sprigs, and thyme sprigs and stuff them into the chicken’s cavity. This will create a wonderful aroma and subtle flavor that permeates the meat as it roasts.
- Prepare the herb butter (optional): If you’re using butter for extra crispy skin, now’s the time to prepare it. In a small bowl, combine the softened butter with a pinch of salt, pepper, and finely chopped rosemary and thyme (if you have extra). Mix well until combined.
- Loosen the skin (optional): Gently loosen the skin over the chicken breast by sliding your fingers between the skin and the meat. Be careful not to tear the skin. This creates a pocket where you can add the herb butter for even more flavor and crispy skin.
- Apply the herb butter (optional): If you loosened the skin, spread the herb butter evenly under the skin of the chicken breast. This will baste the chicken from the inside out, resulting in incredibly moist and flavorful meat.
- Season the outside: Drizzle the chicken with olive oil, ensuring it’s evenly coated. Then, generously sprinkle the chicken with kosher salt and freshly ground black pepper. Don’t be shy with the seasoning! This is what will give your chicken that delicious, savory flavor. Make sure to get the salt and pepper all over, including the legs and wings.
Preparing the Roasting Pan:
A good roasting pan setup is key for even cooking and delicious pan juices. Here’s how I like to do it:
- Chop the vegetables: Roughly chop the onion, carrots, and celery stalks. These vegetables will create a flavorful bed for the chicken to roast on, and they’ll also contribute to the delicious pan juices.
- Arrange the vegetables: Spread the chopped vegetables evenly in the bottom of a roasting pan. A roasting pan with a rack is ideal, as it allows the chicken to roast evenly and prevents it from sitting in its own juices. If you don’t have a rack, that’s okay! The vegetables will still work.
- Add chicken broth: Pour the chicken broth into the bottom of the roasting pan. This will help to keep the vegetables from burning and will also create a flavorful base for the pan juices.
Roasting the Chicken:
Now for the main event! Roasting the chicken is all about temperature and timing. Here’s my foolproof method:
- Preheat the oven: Preheat your oven to 425°F (220°C). Make sure your oven is properly preheated before you put the chicken in, as this will help to ensure even cooking.
- Place the chicken in the pan: Place the prepared chicken on top of the vegetables in the roasting pan. Make sure the chicken is centered in the pan.
- Roast the chicken: Roast the chicken for 1 hour and 15 minutes to 1 hour and 30 minutes, or until a meat thermometer inserted into the thickest part of the thigh registers 165°F (74°C). The exact cooking time will depend on the size of your chicken and your oven.
- Baste the chicken (optional): About halfway through the cooking time, you can baste the chicken with the pan juices. This will help to keep the chicken moist and flavorful. Use a spoon or a baster to scoop up the pan juices and pour them over the chicken.
- Check for doneness: The best way to ensure your chicken is cooked through is to use a meat thermometer. Insert the thermometer into the thickest part of the thigh, being careful not to touch the bone. The chicken is done when the thermometer registers 165°F (74°C). If you don’t have a meat thermometer, you can also check for doneness by piercing the thigh with a fork. If the juices run clear, the chicken is done.
- Broil for crispy skin (optional): If you want extra crispy skin, you can broil the chicken for the last few minutes of cooking. Keep a close eye on the chicken to prevent it from burning. Broil for 2-3 minutes, or until the skin is golden brown and crispy.
- Let the chicken rest: Once the chicken is cooked through, remove it from the oven and let it rest for at least 15 minutes before carving. This allows the juices to redistribute throughout the meat, resulting in a more moist and flavorful chicken. Tent the chicken loosely with foil to keep it warm while it rests.
Making the Pan Sauce (Gravy):
Don’t throw away those delicious pan juices! They’re the key to a fantastic gravy. Here’s how to make a simple pan sauce:
- Strain the pan juices: After the chicken has rested, carefully pour the pan juices through a fine-mesh sieve into a saucepan. This will remove any solids and leave you with a smooth, flavorful liquid.
- Skim off the fat: Use a spoon to skim off any excess fat from the surface of the pan juices. You can leave a little bit of fat for flavor, but too much will make the gravy greasy.
- Thicken the sauce (optional): If you want a thicker gravy, you can thicken the sauce with a cornstarch slurry. In a small bowl, whisk together 1 tablespoon of cornstarch with 2 tablespoons of cold water. Gradually whisk the cornstarch slurry into the pan juices, bringing the mixture to a simmer over medium heat. Cook for a few minutes, or until the sauce has thickened to your desired consistency.
- Season to taste: Taste the pan sauce and season with salt and pepper to taste. You can also add a splash of lemon juice or a dollop of butter for extra flavor.
- Serve: Serve the pan sauce alongside the roasted chicken. It’s the perfect complement to the savory meat and crispy skin.
Carving and Serving:
Now for the final step: carving and serving your beautiful roasted chicken!
- Remove the legs: Using a sharp carving knife, cut through the skin and joint connecting the leg to the body. Wiggle the leg to find the joint, then slice through it. Repeat on the other side.
- Remove the wings: Cut through the skin and joint connecting the wing to the body. Repeat on the other side.
- Carve the breast: Slice the breast meat off the bone, starting at the breastbone and working your way outwards. Angle your knife slightly to follow the curve of the bone. Repeat on the other side.
- Arrange the chicken: Arrange the carved chicken on a platter. You can garnish with fresh herbs, such as rosemary and thyme, for a beautiful presentation.
- Serve: Serve the roasted chicken with your favorite sides, such as mashed potatoes, roasted vegetables, or a simple salad. Don’t forget the pan sauce!
Tips for Success:
- Use a good quality chicken: The better the quality of the chicken, the better the flavor will be. I recommend using an organic and air-chilled chicken if possible.
- Don’t overcook the chicken: Overcooked chicken is dry and tough. Use

Conclusion:
And there you have it! This isn’t just another recipe; it’s a gateway to perfectly Roasted Chicken, a dish that will become a staple in your home. I know, I know, “perfect” is a strong word, but trust me, the combination of simple techniques and fresh ingredients elevates this classic to something truly special. The crispy, golden skin, the juicy, flavorful meat it’s a symphony of textures and tastes that will have everyone at the table reaching for seconds (and maybe even thirds!).
But why is this particular roasted chicken a must-try? It’s more than just the delicious outcome. It’s about the ease and accessibility. No fancy equipment or complicated steps are required. It’s a recipe designed for busy weeknights, yet elegant enough for a weekend gathering. It’s about creating a memorable meal with minimal effort, leaving you more time to enjoy the company of your loved ones. Plus, the aroma that fills your kitchen while it’s roasting is pure magic a comforting and inviting scent that instantly makes your house feel like home.
Beyond the basic recipe, the possibilities are endless! Feel free to experiment with different herbs and spices. Try adding lemon wedges and garlic cloves inside the cavity for an extra burst of flavor. For a spicier kick, rub the chicken with a blend of chili powder, paprika, and cayenne pepper. You can even baste it with a honey-mustard glaze during the last 30 minutes of cooking for a sweet and savory twist.
As for serving suggestions, the options are just as diverse. A classic pairing is with roasted root vegetables like carrots, potatoes, and parsnips. They roast beautifully alongside the chicken, soaking up all those delicious pan juices. Alternatively, you could serve it with a fresh green salad and a side of creamy mashed potatoes. For a more casual meal, shred the chicken and use it in tacos, sandwiches, or salads. The leftover carcass can even be used to make a rich and flavorful chicken broth talk about getting the most out of your ingredients!
I truly believe that everyone should have a go-to Roasted Chicken recipe in their repertoire, and I’m confident that this one will become yours. It’s a dish that’s both comforting and impressive, simple yet satisfying. It’s a testament to the power of good ingredients and straightforward cooking techniques.
So, what are you waiting for? Gather your ingredients, preheat your oven, and get ready to experience the joy of roasting your own chicken. I promise you won’t be disappointed.
And most importantly, I want to hear about your experience! Did you try the recipe? Did you make any variations? What did your family and friends think? Share your photos and stories in the comments below. I’m always eager to see how you make this recipe your own. Happy roasting! Let me know if you have any questions, I’m here to help you achieve roasting perfection!
Roasted Chicken: The Ultimate Guide to Perfecting Your Roast
Perfectly roasted whole chicken with crispy skin and flavorful pan sauce. A classic comfort food recipe that's easier than you think!
Ingredients
- 1 whole chicken (about 4-5 pounds), preferably organic and air-chilled
- 1 lemon, quartered
- 1 head of garlic, cut in half horizontally
- 2 sprigs fresh rosemary
- 2 sprigs fresh thyme
- 2 tablespoons olive oil
- 2 teaspoons kosher salt
- 1 teaspoon black pepper, freshly ground
- 1 large onion, roughly chopped
- 2 carrots, roughly chopped
- 2 celery stalks, roughly chopped
- 1 cup chicken broth (low sodium)
- Optional: 1 tablespoon butter, softened (for extra crispy skin)
Instructions
- Prepare the Chicken: Remove giblets from chicken cavity. Pat the chicken dry inside and out with paper towels.
- Stuff the chicken cavity with quartered lemon, halved garlic head, rosemary sprigs, and thyme sprigs.
- (Optional Herb Butter): Combine softened butter with a pinch of salt, pepper, and finely chopped rosemary and thyme. Loosen the skin over the chicken breast and spread the herb butter evenly under the skin.
- Drizzle the chicken with olive oil and season generously with kosher salt and freshly ground black pepper.
- Prepare the Roasting Pan: Chop onion, carrots, and celery. Spread the vegetables in the bottom of a roasting pan (preferably with a rack). Pour chicken broth into the bottom of the pan.
- Roast the Chicken: Preheat oven to 425°F (220°C). Place the chicken on top of the vegetables in the roasting pan.
- Roast for 1 hour and 15 minutes to 1 hour and 30 minutes, or until a meat thermometer inserted into the thickest part of the thigh registers 165°F (74°C).
- (Optional Basting): Baste the chicken with pan juices halfway through cooking.
- (Optional Broiling): Broil for the last 2-3 minutes for extra crispy skin, watching carefully to prevent burning.
- Rest: Let the chicken rest for at least 15 minutes before carving, tenting loosely with foil.
- Make the Pan Sauce: Pour pan juices through a fine-mesh sieve into a saucepan. Skim off excess fat.
- (Optional Thickening): Whisk together 1 tablespoon cornstarch with 2 tablespoons cold water. Gradually whisk into pan juices and simmer until thickened.
- Season pan sauce to taste with salt and pepper. Add a splash of lemon juice or a dollop of butter for extra flavor.
- Carve and Serve: Remove legs and wings. Slice breast meat off the bone. Arrange chicken on a platter and serve with pan sauce and your favorite sides.
Notes
- Use a good quality chicken for the best flavor.
- Patting the chicken dry is crucial for crispy skin.
- Don’t overcook the chicken; use a meat thermometer to ensure it reaches 165°F (74°C).
- Resting the chicken allows the juices to redistribute, resulting in a more moist and flavorful bird.
- The pan sauce can be customized with different herbs, spices, or a splash of wine.

Leave a Comment