
Healthy Twix Bars, yes, you read that right! Imagine sinking your teeth into a decadent, layered treat that satisfies your sweet tooth without the guilt. Forget the processed ingredients and sugar overload of the original; we’re about to embark on a culinary adventure to create a healthier, equally delicious version of this iconic candy bar.
While the classic Twix bar doesn’t boast a rich history beyond its introduction by Mars, Inc. in the late 1960s, its appeal is undeniable. The combination of crunchy cookie, smooth caramel, and creamy chocolate has captivated candy lovers for generations. But what if we could harness that irresistible trifecta of textures and flavors using wholesome ingredients?
That’s precisely what this recipe achieves. People adore Twix bars for their satisfying crunch, the gooey pull of caramel, and the rich, melt-in-your-mouth chocolate. Our Healthy Twix Bars deliver all of that, but with a focus on natural sweeteners, whole grains, and healthy fats. Get ready to indulge in a treat that’s both good for your body and incredibly satisfying. This recipe is perfect for a healthier dessert option, a pre- or post-workout snack, or just a little something to get you through the day!
Ingredients:
- For the Shortbread Base:
- 1 ½ cups almond flour
- ¼ cup coconut flour
- ¼ cup maple syrup
- 2 tablespoons coconut oil, melted
- 1 teaspoon vanilla extract
- ¼ teaspoon sea salt
- For the Caramel Layer:
- 1 cup Medjool dates, pitted and soaked in hot water for 10 minutes
- ¼ cup almond butter
- 2 tablespoons coconut oil, melted
- 2 tablespoons maple syrup
- 1 teaspoon vanilla extract
- ¼ teaspoon sea salt
- 1-2 tablespoons water, if needed to thin
- For the Chocolate Coating:
- 1 cup dark chocolate chips (at least 70% cacao)
- 1 tablespoon coconut oil
Preparing the Shortbread Base
Okay, let’s get started with the foundation of our healthy Twix bars the shortbread base! This part is super easy and comes together quickly. I promise, even if you’re not a baking pro, you can nail this.
- Preheat and Prep: First things first, preheat your oven to 350°F (175°C). While the oven is heating up, line an 8×8 inch baking pan with parchment paper. Make sure the parchment paper overhangs the sides this will make it much easier to lift the bars out later. Trust me, you’ll thank me for this tip!
- Combine Dry Ingredients: In a medium-sized bowl, whisk together the almond flour, coconut flour, and sea salt. This ensures that the salt is evenly distributed throughout the mixture, which is crucial for the overall flavor.
- Add Wet Ingredients: In the same bowl, add the maple syrup, melted coconut oil, and vanilla extract.
- Mix it Up: Now, using a spatula or your hands (my personal preference!), mix everything together until a dough forms. It should be slightly crumbly but hold together when pressed. If it’s too dry, add a tiny splash of water, like a teaspoon at a time, until it comes together.
- Press into the Pan: Transfer the dough to the prepared baking pan. Using your fingers or the bottom of a measuring cup, press the dough evenly into the bottom of the pan. You want a nice, compact layer.
- Bake: Pop the pan into the preheated oven and bake for 12-15 minutes, or until the edges are lightly golden brown. Keep a close eye on it, as almond flour can burn easily.
- Cool Completely: Once baked, remove the pan from the oven and let the shortbread base cool completely in the pan. This is important! If you try to add the caramel layer while it’s still warm, it will melt and make a mess. Patience is key here.
Making the Date Caramel
Next up, we’re tackling the star of the show the date caramel! This is where the magic happens. Don’t be intimidated by the word “caramel”; this version is incredibly easy and uses Medjool dates to create a naturally sweet and gooey filling. It’s so good, you might want to make extra just to eat with a spoon!
- Soak the Dates: Place the pitted Medjool dates in a bowl and cover them with hot water. Let them soak for at least 10 minutes. This softens them up and makes them easier to blend into a smooth caramel.
- Drain the Dates: After soaking, drain the dates thoroughly. You want to get rid of as much excess water as possible.
- Blend the Caramel: Add the drained dates to a food processor or high-speed blender. Add the almond butter, melted coconut oil, maple syrup, vanilla extract, and sea salt.
- Blend Until Smooth: Blend everything together until you have a smooth and creamy caramel. This might take a few minutes, and you might need to stop and scrape down the sides of the food processor or blender a few times.
- Adjust Consistency (if needed): If the caramel is too thick, add water one tablespoon at a time until you reach your desired consistency. You want it to be spreadable but not too runny.
- Spread on Shortbread: Once the shortbread base is completely cool, spread the date caramel evenly over the top.
- Chill: Place the pan in the freezer for at least 30 minutes to allow the caramel to firm up. This will make it easier to cut the bars later.
Creating the Chocolate Coating
Almost there! Now for the final touch the chocolate coating. This is what really transforms these into Twix-like treats. I recommend using good quality dark chocolate for the best flavor and health benefits. Plus, that satisfying snap when you bite into them is just perfection.
- Melt the Chocolate: In a heat-safe bowl set over a saucepan of simmering water (double boiler method), combine the dark chocolate chips and coconut oil. Make sure the bottom of the bowl doesn’t touch the water.
- Stir Until Smooth: Stir the chocolate mixture constantly until the chocolate is completely melted and smooth. The coconut oil helps to create a glossy and smooth coating.
- Remove from Heat: Once the chocolate is melted, remove the bowl from the heat.
- Cut the Bars: Remove the pan from the freezer. Using a sharp knife, cut the bars into your desired size and shape. I usually go for long, thin bars to mimic the classic Twix shape.
- Dip or Drizzle: You have two options here: you can either dip each bar individually into the melted chocolate, or you can drizzle the chocolate over the entire pan of bars. Dipping is a bit more time-consuming but gives you a more even coating. Drizzling is faster but might be a bit messier.
- If Dipping: Use a fork to carefully dip each bar into the melted chocolate, making sure it’s fully coated. Place the dipped bars on a parchment-lined baking sheet.
- If Drizzling: Drizzle the melted chocolate evenly over the entire pan of bars.
- Optional: Sprinkle with Sea Salt: For an extra touch of flavor, sprinkle the chocolate-coated bars with a pinch of sea salt. This enhances the sweetness and adds a nice salty-sweet contrast.
- Chill Again: Place the baking sheet with the chocolate-coated bars back in the freezer for at least 15-20 minutes, or until the chocolate is set.
- Enjoy!: Once the chocolate is set, remove the bars from the freezer and enjoy! Store any leftovers in an airtight container in the refrigerator or freezer. They’re best enjoyed cold.
Tips and Variations
Here are a few extra tips and ideas to customize your healthy Twix bars:
- Nut Butter Variations: Feel free to experiment with different nut butters in the caramel layer. Peanut butter, cashew butter, or sunflower seed butter would all work well.
- Sweetener Options: If you don’t have maple syrup, you can use honey or agave nectar instead.
- Chocolate Type: You can use milk chocolate or white chocolate for the coating if you prefer. Just be aware that this will change the nutritional profile of the bars.
- Add-Ins: For extra crunch, you can add chopped nuts (like almonds or pecans) to the shortbread base or sprinkle them on top of the chocolate coating.
- Storage: These bars can be stored in the refrigerator for up to a week or in the freezer for up to a month.
Troubleshooting
Sometimes things don’t go exactly as planned. Here are a few common issues and how to fix them:
- Shortbread Base Too Dry: If the shortbread base is too dry and crumbly, add a teaspoon of water at a time until it comes together.
- Caramel Too Thick: If the caramel is too thick, add a tablespoon of water at a time until it reaches your desired consistency.
- Chocolate Not Melting Smoothly: Make sure the bowl you’re using for melting the chocolate is completely dry. Water can cause the chocolate to seize up. Also, don’t overheat the chocolate.
- Bars Too Soft: If the bars are too soft, make sure you chill them in the freezer for long enough.
Nutritional Information (Approximate)
Please note that the nutritional information is an estimate and may vary depending on the specific ingredients you
Conclusion:
So, there you have it! These Healthy Twix Bars are truly a game-changer. They deliver that satisfyingly sweet and salty crunch you crave, without the guilt that usually comes with indulging in a candy bar. I know, I know, it sounds too good to be true, but trust me, one bite and you’ll be hooked!
Why is this recipe a must-try? Well, first and foremost, it’s incredibly delicious. The combination of the oat-based shortbread, the creamy date caramel, and the rich chocolate coating is simply divine. But beyond the taste, it’s also about feeling good about what you’re eating. We’re talking wholesome ingredients, minimal processed sugars, and a whole lot of flavor. It’s a treat you can enjoy without derailing your healthy eating habits. Plus, it’s surprisingly easy to make! The steps are straightforward, and you probably already have most of the ingredients in your pantry.
And the best part? You can totally customize these bars to your liking! Feeling adventurous? Try adding a pinch of sea salt to the caramel for an extra burst of flavor. Or, if you’re a nut butter fanatic like me, swirl a spoonful of peanut butter or almond butter into the caramel before chilling. For a vegan version, make sure to use dairy-free chocolate. You could even experiment with different types of chocolate dark chocolate for a more intense flavor, or white chocolate for a sweeter twist.
Serving suggestions? These Healthy Twix Bars are perfect as an afternoon pick-me-up, a post-workout treat, or even a healthier dessert option for parties. I love to keep a batch in the freezer for when those sweet cravings hit. They’re also great for packing in lunchboxes or taking on road trips. For a more elegant presentation, you can drizzle melted chocolate over the bars and sprinkle them with chopped nuts or shredded coconut. You can also cut them into smaller bite-sized pieces for a fun and shareable snack.
Ready to give it a go?
I truly believe you’re going to love these Healthy Twix Bars as much as I do. They’re a delicious, satisfying, and guilt-free way to enjoy a classic candy bar. So, gather your ingredients, preheat your oven, and get ready to create some magic in the kitchen!
I’m so excited for you to try this recipe! Once you’ve made your own batch of these amazing bars, I’d absolutely love to hear about your experience. Did you make any variations? What did you think of the taste and texture? Share your photos and comments in the comments section below! Let’s spread the word about this healthier and equally delicious alternative to the traditional Twix bar. I can’t wait to see your creations and hear your feedback. Happy baking!
Healthy Twix Bars: Guilt-Free Recipe & Easy Steps
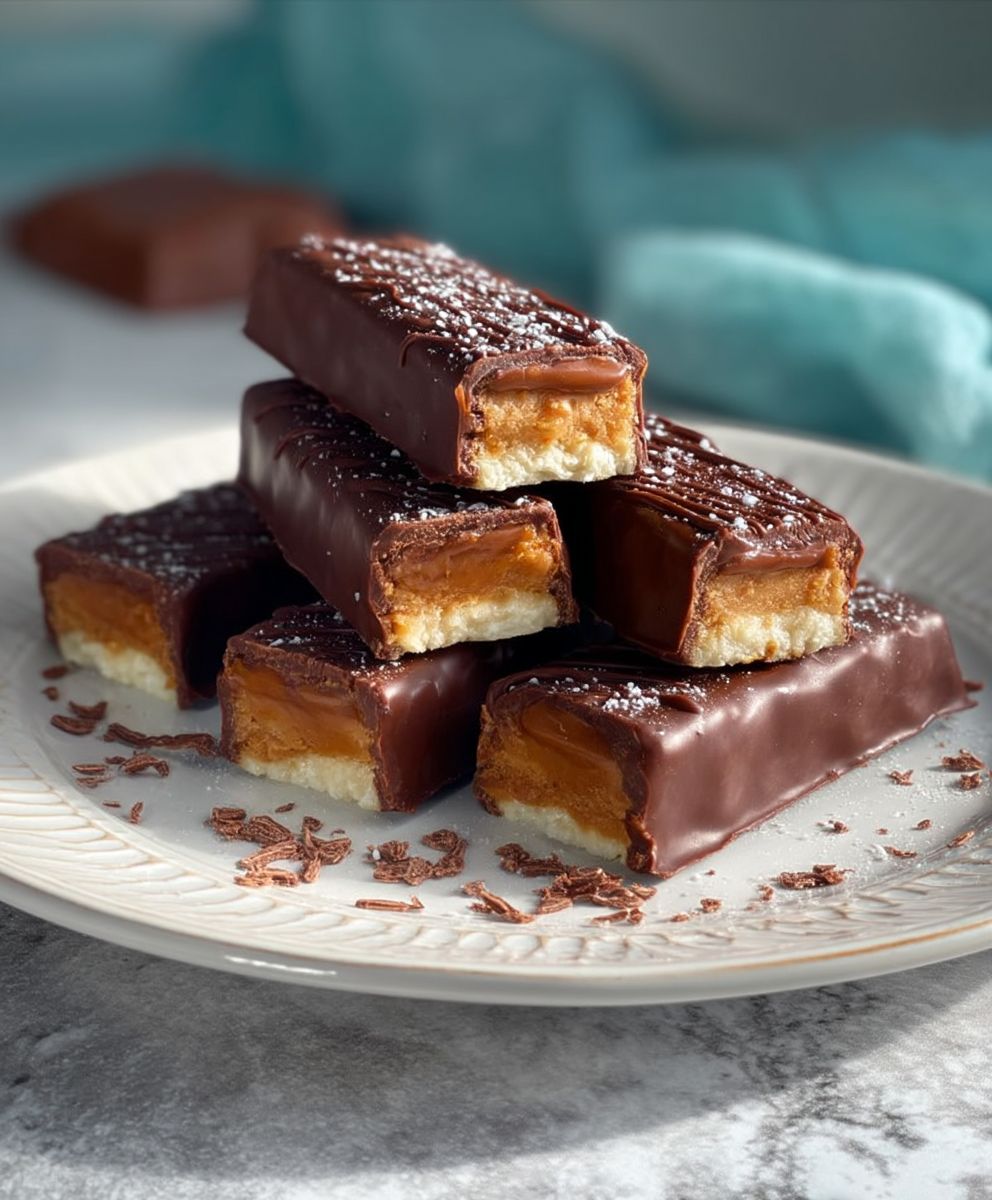
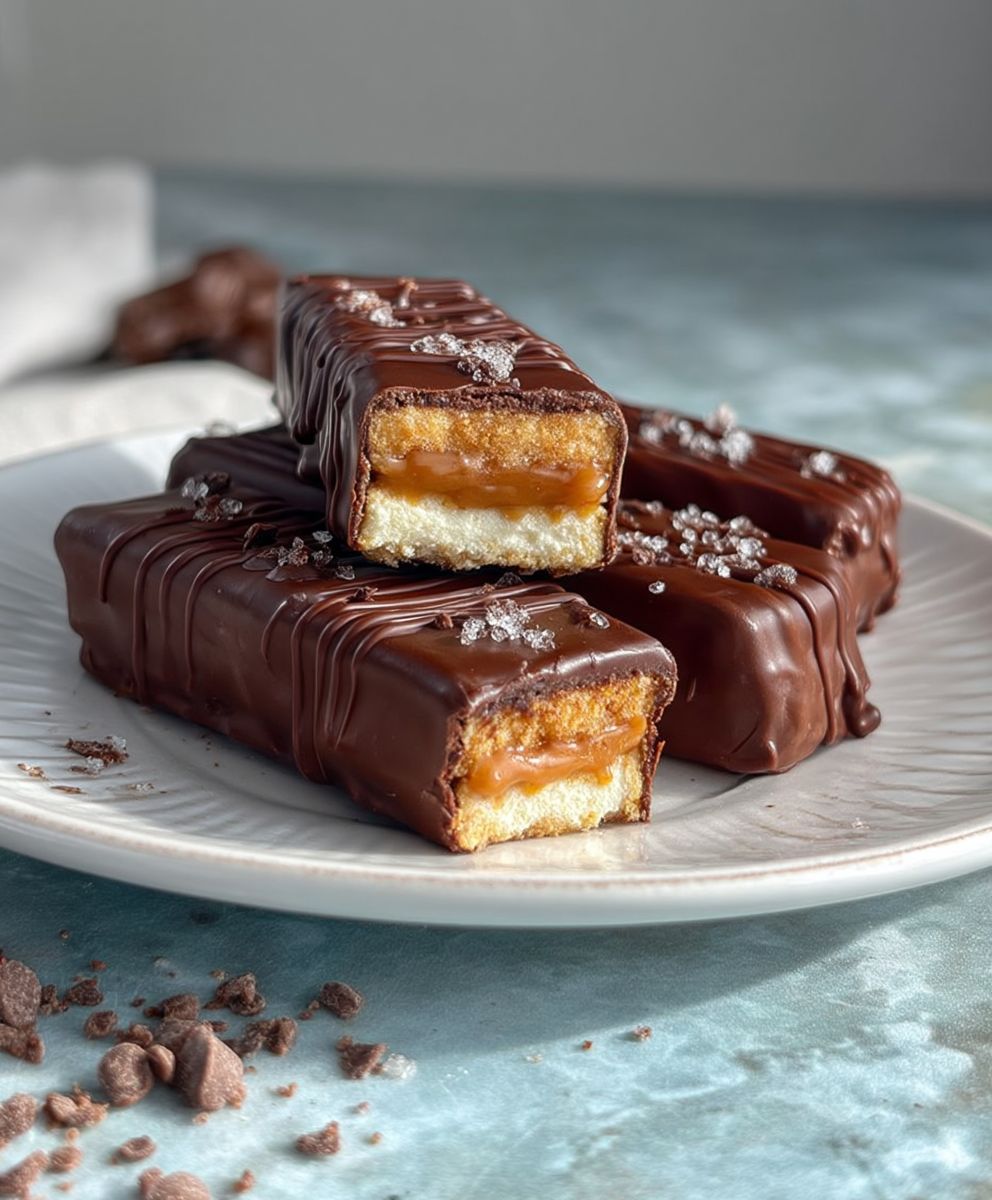
Healthy homemade Twix bars featuring a shortbread base, date caramel filling, and dark chocolate coating. Gluten-free and refined sugar-free.
Ingredients
- 1 ½ cups almond flour
- ¼ cup coconut flour
- ¼ cup maple syrup
- 2 tablespoons coconut oil, melted
- 1 teaspoon vanilla extract
- ¼ teaspoon sea salt
- 1 cup Medjool dates, pitted and soaked in hot water for 10 minutes
- ¼ cup almond butter
- 2 tablespoons coconut oil, melted
- 2 tablespoons maple syrup
- 1 teaspoon vanilla extract
- ¼ teaspoon sea salt
- 1-2 tablespoons water, if needed to thin
- 1 cup dark chocolate chips (at least 70% cacao)
- 1 tablespoon coconut oil
Instructions
- Preheat oven to 350°F (175°C). Line an 8×8 inch baking pan with parchment paper, with overhang.
- In a medium bowl, whisk together almond flour, coconut flour, and sea salt.
- Add maple syrup, melted coconut oil, and vanilla extract to the bowl.
- Mix until a dough forms. It should be slightly crumbly but hold together when pressed. If too dry, add water, a teaspoon at a time, until it comes together.
- Transfer dough to the prepared pan. Press evenly into the bottom of the pan.
- Bake for 12-15 minutes, or until edges are lightly golden brown.
- Cool completely in the pan.
- Soak pitted Medjool dates in hot water for 10 minutes.
- Drain the dates thoroughly.
- Add drained dates to a food processor or high-speed blender. Add almond butter, melted coconut oil, maple syrup, vanilla extract, and sea salt.
- Blend until smooth and creamy, scraping down the sides as needed.
- If the caramel is too thick, add water one tablespoon at a time until you reach your desired consistency.
- Spread the date caramel evenly over the cooled shortbread base.
- Place the pan in the freezer for at least 30 minutes to allow the caramel to firm up.
- In a heat-safe bowl set over a saucepan of simmering water (double boiler method), combine dark chocolate chips and coconut oil.
- Stir constantly until the chocolate is completely melted and smooth.
- Remove from heat.
- Remove the pan from the freezer. Cut the bars into your desired size and shape.
- Dip each bar individually into the melted chocolate, or drizzle the chocolate over the entire pan of bars.
- Place the dipped bars on a parchment-lined baking sheet.
- Drizzle the melted chocolate evenly over the entire pan of bars.
- Sprinkle the chocolate-coated bars with a pinch of sea salt.
- Place the baking sheet with the chocolate-coated bars back in the freezer for at least 15-20 minutes, or until the chocolate is set.
- Enjoy! Store any leftovers in an airtight container in the refrigerator or freezer.
Notes
- Nut Butter Variations: Experiment with different nut butters in the caramel layer. Peanut butter, cashew butter, or sunflower seed butter would all work well.
- Sweetener Options: If you don’t have maple syrup, you can use honey or agave nectar instead.
- Chocolate Type: You can use milk chocolate or white chocolate for the coating if you prefer. Just be aware that this will change the nutritional profile of the bars.
- Add-Ins: For extra crunch, you can add chopped nuts (like almonds or pecans) to the shortbread base or sprinkle them on top of the chocolate coating.
- Storage: These bars can be stored in the refrigerator for up to a week or in the freezer for up to a month.
- Shortbread Base Too Dry: If the shortbread base is too dry and crumbly, add a teaspoon of water at a time until it comes together.
- Caramel Too Thick: If the caramel is too thick, add a tablespoon of water at a time until it reaches your desired consistency.
- Chocolate Not Melting Smoothly: Make sure the bowl you’re using for melting the chocolate is completely dry. Water can cause the chocolate to seize up. Also, don’t overheat the chocolate.
- Bars Too Soft: If the bars are too soft, make sure you chill them in the freezer for long enough.

Leave a Comment