
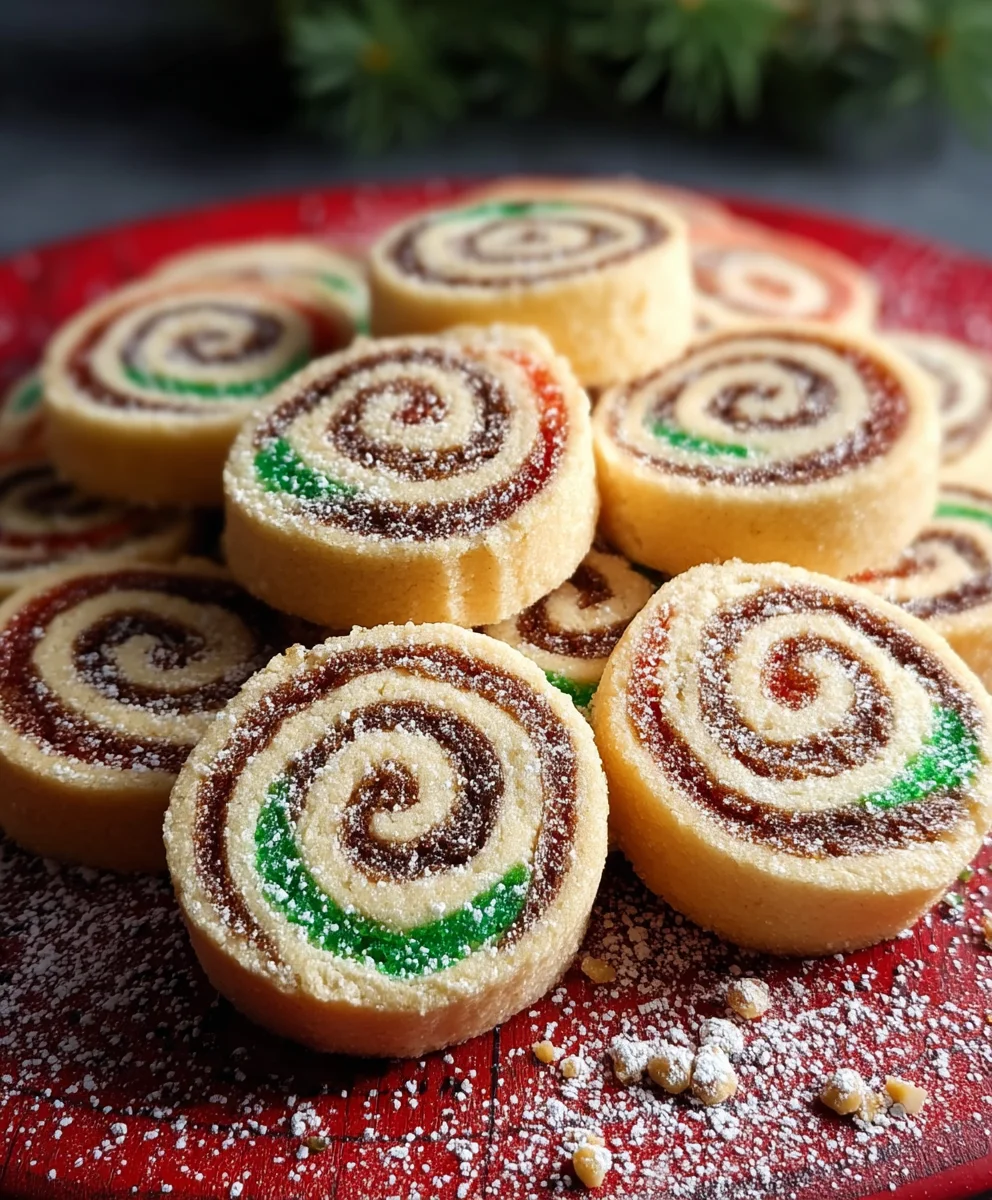
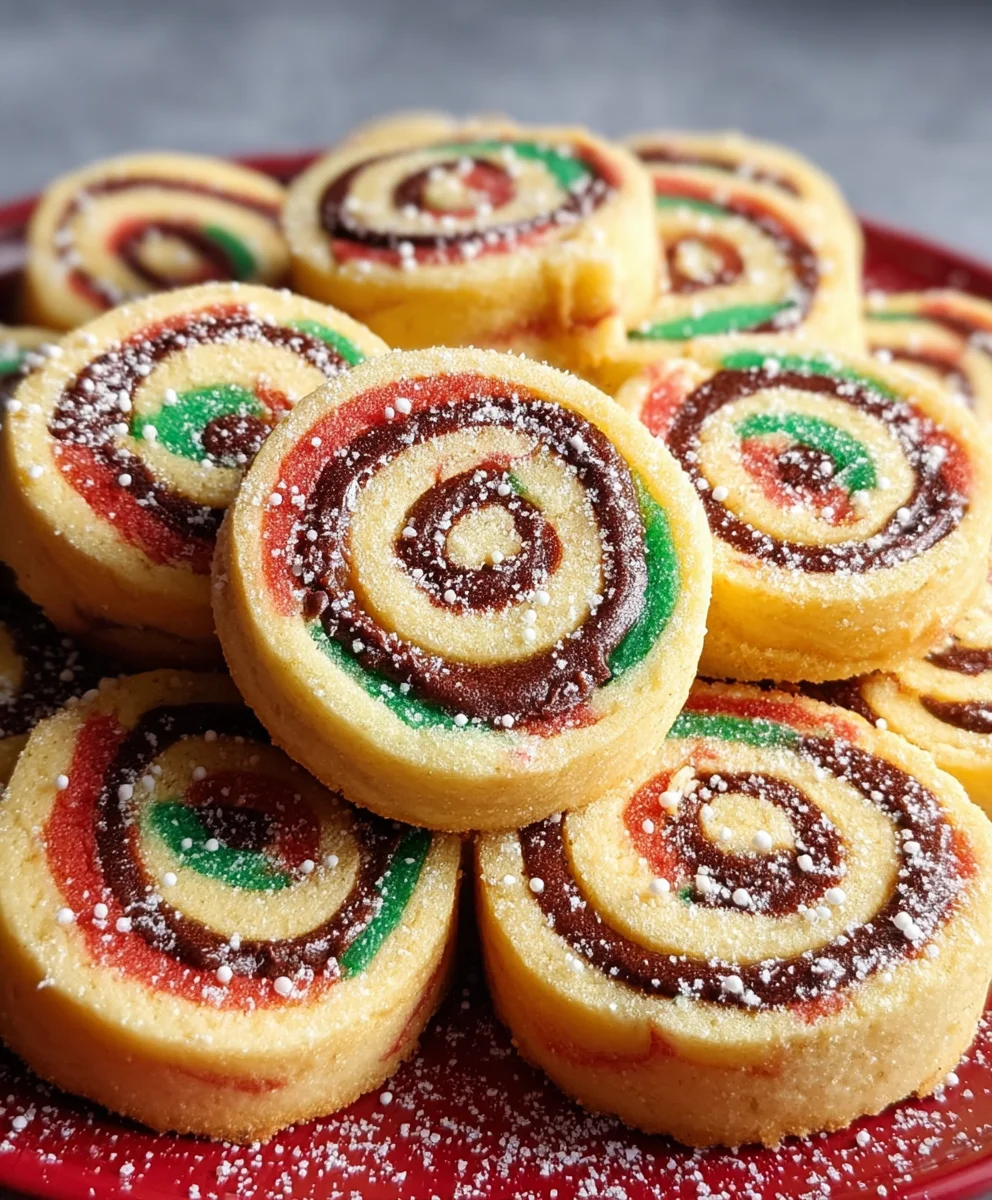
Christmas Cookie Pinwheels are more than just a delightful holiday treat; they are miniature masterpieces that perfectly capture the joyous spirit of the festive season. Every year, as the crisp air signals the approach of Christmas, I eagerly anticipate the tradition of baking these vibrant, swirled wonders. These visually stunning cookies instantly transport me back to cherished childhood memories, evoking the warmth and excitement of holiday gatherings.
Historically, cookies with intricate designs, much like these pinwheels, have been a cherished part of winter celebrations across various cultures, symbolizing prosperity and sweetness for the year to come. During Christmas, their two-toned spiral pattern often reminds us of colorful ornaments, twinkling lights, or even a whimsical candy cane, making them an iconic addition to any festive spread. It’s this blend of tradition and visual spectacle that makes them so beloved.
People adore these cookies not just for their stunning appearance, but for their irresistible taste and texture. Imagine a buttery, tender cookie dough, often delicately flavored with vanilla, almond, or even a hint of peppermint, beautifully contrasted with a rich cocoa or vibrant red layer. The result is a melt-in-your-mouth experience that is both comforting and exciting. Furthermore, their make-ahead convenience means you can prepare the dough in advance, saving precious time during the busy holiday rush. Crafting and sharing these beautiful Christmas Cookie Pinwheels is a wonderful way to spread cheer and create lasting memories, solidifying their place as a true holiday favorite in kitchens worldwide.
<h2>Ingredients:</h2>
<ul>
<li><strong>For the Classic Sugar Cookie Dough Base:</strong></li>
<ul>
<li>3 cups (360g) all-purpose flour, plus more for dusting – <em>The foundation of our Christmas Cookie Pinwheels, providing structure and a tender crumb.</em></li>
<li>1 teaspoon baking powder – <em>Just enough to give a slight lift without making them cakey.</em></li>
<li>½ teaspoon salt – <em>Essential for balancing the sweetness and enhancing all the flavors.</em></li>
<li>1 cup (226g) unsalted butter, softened to room temperature – <em>The richness and tender texture starts here; ensure it’s truly soft for proper creaming.</em></li>
<li>1 ½ cups (300g) granulated sugar – <em>For that perfect sweet crunch.</em></li>
<li>2 large eggs, at room temperature – <em>Binders that add structure and moisture to our beautiful dough.</em></li>
<li>2 teaspoons pure vanilla extract – <em>A classic, comforting flavor that makes sugar cookies irresistible.</em></li>
<li>½ teaspoon almond extract (optional, but highly recommended for depth) – <em>Adds a lovely, subtle layer of complexity to the vanilla.</em></li>
</ul>
<li><strong>For Coloring the Dough:</strong></li>
<ul>
<li>Red gel food coloring – <em>For one vibrant half of our holiday pinwheels.</em></li>
<li>Green gel food coloring – <em>For the other festive half, creating that iconic Christmas look.</em></li>
</ul>
<li><strong>Equipment You’ll Need:</strong></li>
<ul>
<li>Stand mixer with paddle attachment or large mixing bowls with a hand mixer</li>
<li>Rubber spatula</li>
<li>Large rolling pin</li>
<li>Parchment paper or silicone baking mats</li>
<li>Baking sheets</li>
<li>Sharp knife (preferably a chef’s knife or thin, sharp slicing knife)</li>
<li>Plastic wrap</li>
</ul>
</ul>
<h3>Preparing the Classic Christmas Cookie Dough</h3>
<ol>
<li><strong>Whisk Together Dry Ingredients:</strong> In a medium bowl, whisk together the all-purpose flour, baking powder, and salt. I find that a good whisk for about 30 seconds ensures all ingredients are evenly distributed, which is crucial for a consistent cookie texture. Set this aside for a moment.</li>
<li><strong>Cream Butter and Sugar:</strong> In the large bowl of your stand mixer fitted with the paddle attachment (or using a large mixing bowl with a handheld electric mixer), cream together the softened unsalted butter and granulated sugar. Beat on medium speed for about 3 to 5 minutes, or until the mixture becomes wonderfully light, fluffy, and noticeably pale in color. <strong>This creaming process is incredibly important</strong> as it incorporates air into the butter, which will contribute to the cookies’ final tender texture and helps the sugar crystals dissolve slightly for a smoother bite. Make sure to scrape down the sides of the bowl occasionally with a rubber spatula to ensure everything is evenly combined.</li>
<li><strong>Add Eggs and Extracts:</strong> Crack in one large egg at a time, beating well after each addition until it’s fully incorporated before adding the next. This allows the eggs to emulsify properly with the butter mixture, preventing a curdled appearance. Once both eggs are in, add the pure vanilla extract and the optional almond extract. Beat on low speed until just combined. <strong>Be careful not to overmix at this stage</strong> after the eggs are added, as overmixing can develop the gluten in the flour too much, leading to tougher cookies.</li>
<li><strong>Gradually Add Dry Ingredients:</strong> With the mixer on low speed, slowly add the dry flour mixture to the wet ingredients, a third at a time. Mix only until the flour is just incorporated and no streaks of dry flour remain. <strong>This is another critical point where overmixing can happen.</strong> As soon as the last bit of flour disappears, stop the mixer. The dough might seem a little soft, but don’t worry, chilling will resolve this. Use your rubber spatula to give it a final gentle mix by hand to ensure everything from the bottom of the bowl is fully incorporated.</li>
<li><strong>Divide and Color the Dough:</strong> Transfer the freshly made dough onto a clean surface lightly dusted with flour, or directly divide it in half within the mixing bowl. Take one half of the dough and place it in a separate bowl. Add a few drops of red gel food coloring to this portion. Knead the dough gently by hand, or use the mixer on low speed for a very short burst, until the red color is evenly distributed and vibrantly festive. Repeat this process with the other half of the dough, adding green gel food coloring until a beautiful green hue is achieved. <strong>Gel food coloring is preferred here</strong> over liquid food coloring because it provides intense color without adding excess moisture that could alter the dough’s texture. You want bold, clear colors for striking Christmas Cookie Pinwheels!</li>
<li><strong>Chill the Dough (First Chill):</strong> Flatten each colored dough half into a rectangular disc, about 1-inch thick. Wrap each disc tightly in plastic wrap. <strong>Refrigerate both doughs for at least 1 to 2 hours.</strong> This chilling period is non-negotiable! It allows the butter to firm up, making the dough much easier to roll out without sticking, and it also gives the gluten a chance to relax, resulting in a more tender cookie. Don’t rush this step – patience now means perfection later!</li>
</ol>
<h3>Assembling Your Festive Christmas Cookie Pinwheels</h3>
<ol start=”7″>
<li><strong>Prepare for Rolling:</strong> Once your doughs are properly chilled, remove them from the refrigerator. Lightly flour your work surface and your rolling pin. <strong>Working with one color at a time,</strong> unwrap a dough disc and place it on the floured surface. You might find the dough is quite firm initially; if so, let it sit out for 5-10 minutes to soften just slightly, but not so much that it becomes sticky or too warm. We want it firm enough to roll without tearing, but pliable enough to flatten evenly.</li>
<li><strong>Roll Out the Red Dough:</strong> Using your rolling pin, roll the red dough into a rectangle approximately 12×9 inches and about ⅛ to ¼ inch thick. <strong>Aim for consistent thickness across the entire rectangle</strong> for even baking and a beautiful, uniform spiral in your Christmas Cookie Pinwheels. If the dough starts to stick, gently lift it and re-flour your surface and rolling pin. If it tears, simply press it back together. Trim the edges slightly with a knife or pastry wheel to create neat, straight lines, which will result in a much cleaner pinwheel pattern.</li>
<li><strong>Roll Out the Green Dough:</肿瘤gt; Carefully transfer the rolled red dough onto a sheet of parchment paper or a silicone baking mat that is at least 12×9 inches in size. This makes handling and layering much easier. Now, repeat the exact same rolling process with the green dough. Roll it into an identical 12×9 inch rectangle of the same ⅛ to ¼ inch thickness. <strong>Precision here pays off!</strong> Having two identically sized and shaped rectangles is key for creating symmetrical and visually appealing pinwheels. Once rolled, trim its edges as well to match the red dough perfectly.</li>
<li><strong>Layer the Doughs:</strong> <strong>This is where the magic begins!</strong> Gently lift the rolled green dough and carefully lay it directly on top of the red dough. Align the edges as precisely as possible. Smooth out any air bubbles that might be trapped between the layers by gently pressing down with your hands or a clean rolling pin. The two distinct colors are now ready to be transformed into our festive Christmas Cookie Pinwheels. If you want a perfectly flat surface, you can gently run your rolling pin over the combined layers once or twice, applying even, light pressure, to ensure they adhere well without squishing them out of shape.</li>
<li><strong>Roll into a Log:</strong> Starting from one of the longer 12-inch sides, carefully and tightly roll the layered dough into a snug log. <strong>The tighter you roll, the fewer gaps you’ll have in your pinwheels.</strong> Use the parchment paper underneath to help you achieve a tight roll. As you roll, ensure the log remains even in thickness from end to end. Once fully rolled, gently pinch the seam closed along the length of the log to prevent it from unraveling. You should now have a beautiful, festive red and green dough log, ready for its final chill.</li>
<li><strong>Chill the Dough Log (Second Chill):</strong> Wrap the dough log very tightly in plastic wrap, ensuring it’s completely sealed. <strong>Place the wrapped log in the refrigerator for at least 3-4 hours, or ideally overnight.</strong> This second, longer chill is paramount! It allows the butter to firm up completely, making the dough log very solid, which is essential for slicing clean, crisp pinwheels without distorting their shape. Trying to slice a warm or insufficiently chilled log will result in squished, misshapen cookies and a lot of frustration. <strong>For an even faster chill, you can place it in the freezer for about 1 to 1.5 hours</strong>, just until it’s very firm but not completely frozen solid.</li>
</ol>
<h3>Slicing, Baking, and Perfecting Your Christmas Cookie Pinwheels</h3>
<ol start=”13″>
<li><strong>Preheat Oven and Prepare Baking Sheets:</strong> About 20-30 minutes before you plan to bake, preheat your oven to 375°F (190°C). Line several large baking sheets with parchment paper or silicone baking mats. <strong>This ensures easy cleanup and prevents the cookies from sticking,</strong> plus promotes even baking across the bottom of each cookie. Have a few sheets ready, as you’ll likely bake these in batches.</li>
<li><strong>Slice the Pinwheels:</strong> Remove the chilled dough log from the refrigerator or freezer and unwrap it. Using a very sharp, thin-bladed knife (a chef’s knife or a serrated knife can work well here, just be gentle), slice the log into ¼-inch thick rounds. <strong>Make clean, decisive cuts</strong> to maintain the beautiful pinwheel pattern. If the dough log is too hard to cut, let it sit at room temperature for just a few minutes, but don’t let it get too soft. If it starts to flatten as you cut, gently reshape it with your fingers as needed before making the next cut. Discard the very ends of the log, as these often don’t have a clear pinwheel pattern.</li>
<li><strong>Arrange on Baking Sheets:</strong> Place the sliced Christmas Cookie Pinwheels about 1 inch apart on the prepared baking sheets. They don’t spread a tremendous amount, but giving them a little breathing room ensures even air circulation around each cookie for optimal baking. <strong>Avoid crowding the baking sheet</strong> for the best results; bake in batches if necessary.</li>
<li><strong>Bake the Cookies:</strong> Bake one sheet at a time in the preheated oven for 8 to 11 minutes. The exact baking time will depend on your oven and the thickness of your cookies. <strong>Look for the edges to be just lightly golden brown.</strong> The centers should still look soft and slightly pale. <strong>Do not overbake!</strong> Overbaked sugar cookies lose their tender texture and become dry and crumbly. For beautifully vibrant Christmas Cookie Pinwheels, we want them just barely done.</li>
<li><strong>Cooling Process:</strong> Once baked, remove the baking sheets from the oven and let the cookies cool on the sheets for about 5 minutes. <strong>They will be quite delicate when hot</strong>, so this brief cooling period on the warm sheet allows them to set up and firm slightly. After 5 minutes, carefully transfer the cookies to a wire rack to cool completely. Cooling on a wire rack allows air to circulate around them, preventing condensation and ensuring they crisp up slightly as they reach room temperature.</li>
<li><strong>Store Your Christmas Cookie Pinwheels:</strong> Once completely cool, store these delightful Christmas Cookie Pinwheels in an airtight container at room temperature for up to 1 week. If you’d like to extend their freshness, they also freeze beautifully for up to 2-3 months. Just be sure to layer them between sheets of parchment paper in your airtight container to prevent sticking. <strong>These make wonderful gifts or additions to any holiday cookie platter,</strong> showcasing your baking prowess with their striking colors and irresistible flavor. Enjoy the festive cheer they bring!</li>
</ol>
<h2>Conclusion:</h2>
<p>As we wrap up our journey through this delightful recipe, I truly hope you’re feeling as inspired as I am about creating these festive wonders. <strong>These aren’t just any cookies; they are an invitation to infuse your holiday season with warmth, joy, and a touch of homemade magic.</strong> I’ve shared this recipe with countless friends and family over the years, and without fail, they always elicit gasps of delight and compliments on their stunning appearance and irresistible taste. What makes them an absolute must-try isn’t just their impressive visual appeal, which is undeniably eye-catching with those vibrant spirals, but also their incredible balance of buttery tenderness and sweet, comforting flavor. They manage to be both remarkably elegant and wonderfully accessible, making them perfect for seasoned bakers and enthusiastic beginners alike. You don’t need a pastry chef’s expertise to achieve perfection here; just a little patience and a whole lot of love. The process itself is part of the fun – rolling, chilling, slicing, and watching those beautiful patterns emerge is a satisfying experience that truly gets you into the holiday spirit.</p>
<p>The versatility of these cookies is another reason why I champion them so enthusiastically. They are the quintessential holiday treat, perfect for gracing your dessert platters, sweetening a cup of tea on a chilly afternoon, or serving as a delightful accompaniment to your morning coffee. Imagine a cozy evening, a roaring fire, and a plate of these homemade gems alongside a steaming mug of hot cocoa or a festive cranberry punch. <strong>They also make absolutely wonderful edible gifts.</strong> Packaged in a beautiful tin or a simple cellophane bag tied with a ribbon, they convey a heartfelt message that mass-produced treats simply can’t replicate. Gifting a batch of these not only shares a delicious treat but also a piece of your time and effort, which is truly the most precious gift of all.</p>
<h4>Beyond the Basic Pinwheel: Serving Suggestions and Creative Variations</h4>
<p>While the classic red and green spirals are iconic, don’t hesitate to let your creativity soar! For a sophisticated twist, consider adding a hint of almond extract to your vanilla dough, or incorporating finely grated orange zest for a bright, citrusy note. If you’re feeling adventurous, replace some of the red food coloring with a dash of peppermint extract for a cool, refreshing flavor that perfectly complements the rich cookie base. Imagine a swirl of chocolate dough with a vanilla counterpart – pure indulgence! You could also experiment with natural food colorings, using beetroot powder for a beautiful pink hue or spirulina for a vibrant, all-natural green. For an extra layer of decadence, try dipping half of the cooled <strong>Christmas Cookie Pinwheels</strong> in melted dark or white chocolate and then sprinkling them with crushed candy canes, toasted coconut flakes, or even edible glitter before the chocolate sets. This not only adds another dimension of flavor and texture but also elevates their visual appeal to an even higher level, making them true showstoppers. For a unique twist on the serving front, assemble a cookie board with these pinwheels alongside other holiday favorites, nuts, cheeses, and fresh fruit for an impressive spread that caters to all tastes.</p>
<p>Finally, I urge you, dear reader, to carve out some time in your busy schedule to give this recipe a try. <strong>Embrace the joy of baking, the simple pleasure of working with your hands, and the anticipation of a truly delicious reward.</strong> These cookies are more than just a sweet treat; they are an experience, a memory in the making, and a testament to the magic of homemade goodness. Once you’ve pulled your beautiful creations from the oven, shared them with loved ones, and savored every last crumb, I would absolutely love to hear about your experience. Did you stick to the classic colors, or did you venture into creative new variations? What was your favorite part of the process? Please share your thoughts, photos, and any unique twists you came up with. Your feedback not only brings a smile to my face but also inspires other home bakers in our wonderful community. Happy baking, and may your holidays be filled with warmth, laughter, and an abundance of delicious homemade treats!</p>
Recipe
A delicious recipe
Ingredients
Instructions
Important Information
Nutrition Facts (Per Serving)
It is important to consider this information as approximate and not to use it as definitive health advice.
Allergy Information
Please check ingredients for potential allergens and consult a health professional if in doubt.
Leave a Comment