
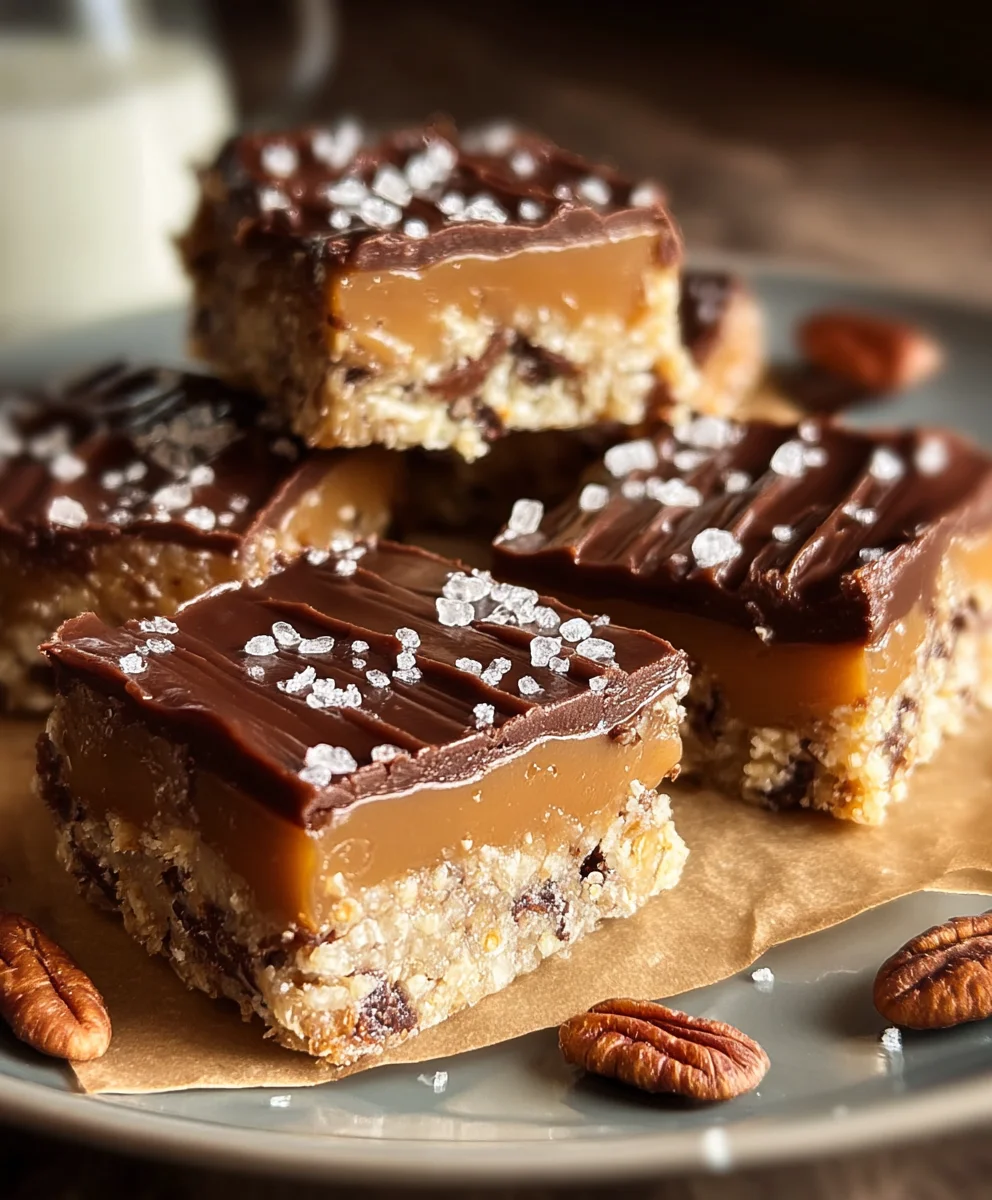
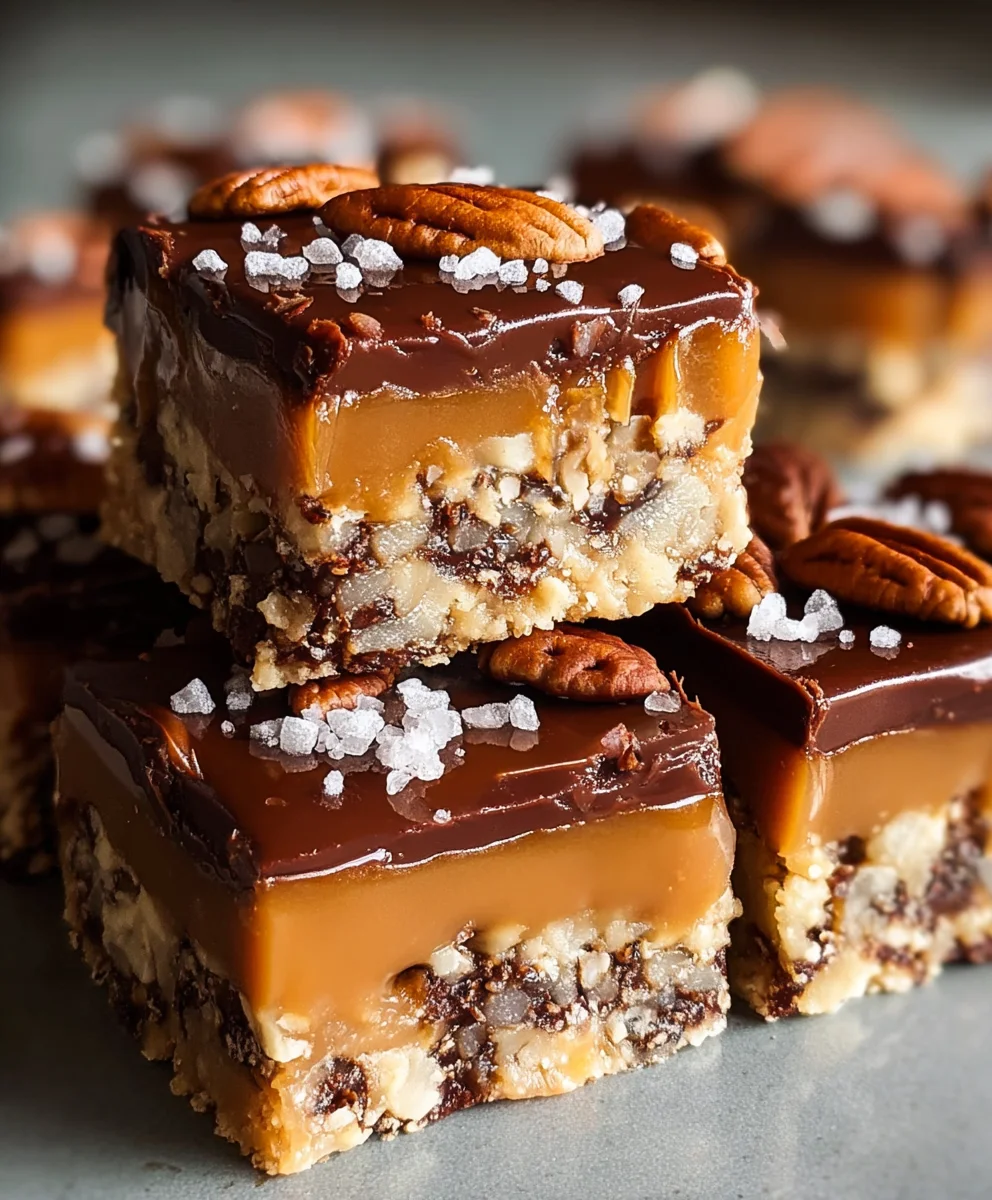
Easy Turtle Bars are about to become your new go-to recipe for a show-stopping dessert that truly delivers on both flavor and convenience. I’m incredibly excited to share this recipe with you because it captures the essence of a beloved classic in a surprisingly simple form. Imagine sinking your teeth into a rich, buttery shortbread crust, topped with a generous layer of gooey, homemade caramel, crunchy toasted pecans, and a decadent blanket of melted chocolate. It’s a symphony of textures and tastes that evokes pure delight with every bite, promising to satisfy even the most demanding sweet tooth.
Why We Adore These Decadent Bars
Inspired by the iconic ‘Turtle’ candy, famous for its harmonious blend of sweet caramel, nutty pecans, and rich chocolate, these bars elevate that timeless combination into an easily shareable treat. People adore this dish not only for its irresistible taste – a perfect balance of sweet and savory notes – but also for its incredibly satisfying textures: the tender crust, the chewy caramel, the crisp nuts, and the smooth chocolate. What truly sets this recipe apart, making it a crowd-pleaser time and again, is how genuinely simple it is to achieve such a luxurious outcome. Yes, these are truly Easy Turtle Bars, designed to bring gourmet flavor to your kitchen without any fuss. They are perfect for potlucks, family gatherings, or simply a cozy night in, promising to impress with minimal effort.
Ingredients:
-
For the Shortbread Crust:
- 1 cup (2 sticks or 226g) unsalted butter, softened to room temperature. It’s really important for this to be soft, but not melted, to achieve that perfect crumbly texture we all love.
- 2 cups (240g) all-purpose flour. Using a kitchen scale for flour is always best for accuracy here, ensuring your crust isn’t too dense or too crumbly.
- ½ cup (100g) granulated sugar. This adds just the right amount of sweetness to balance the richness of the other layers.
- ¼ teaspoon salt. Don’t skip this; it truly enhances all the other flavors beautifully and prevents the crust from tasting flat.
-
For the Caramel Pecan Layer:
- 1 cup (2 sticks or 226g) unsalted butter. Yes, more butter! It’s absolutely essential for that rich, chewy, and utterly delicious caramel.
- 1 cup (200g) packed light brown sugar. Make sure it’s firmly packed into your measuring cup for the correct measurement and a deep, molasses-rich flavor.
- ½ cup (120ml) heavy cream or evaporated milk. Heavy cream will give a richer, creamier caramel, but evaporated milk is a great pantry-friendly alternative.
- 1 teaspoon vanilla extract. Pure vanilla extract makes a noticeable difference in the depth and warmth of your caramel.
- ¼ teaspoon salt. Again, crucial for balancing the sweetness of the caramel and bringing out all the other flavors.
- 2 cups (220g) chopped pecans. Toasting them lightly beforehand can really deepen their nutty flavor, but it’s an optional step that adds a lovely extra dimension.
-
For the Chocolate Topping:
- 1 ½ cups (about 250g) semi-sweet chocolate chips or finely chopped chocolate. You can also use milk chocolate for a sweeter bar, or dark chocolate for a more intense flavor depending on your preference.
- 1 tablespoon (15g) unsalted butter (optional, but it makes the chocolate melt smoother and gives it a beautiful, glossy sheen).
Preparing the Shortbread Crust for Your Easy Turtle Bars
- Before you even think about mixing anything, let’s get our oven ready. Preheat your oven to a cozy 350°F (175°C). While it’s warming up, grab a 9×13-inch baking pan. I like to line mine with parchment paper, making sure to leave an overhang on the longer sides. This creates convenient “handles” later, making it super easy to lift your finished Easy Turtle Bars right out of the pan for neat cutting. If you don’t have parchment, a good greasing and flouring of the pan will work, but I truly swear by the parchment method for these types of layered bars – it really simplifies the cleanup and serving process.
- In a large mixing bowl, combine your all-purpose flour, granulated sugar, and that tiny but mighty quarter teaspoon of salt. Give these dry ingredients a good whisk until they’re thoroughly combined. This step is more important than it seems because it ensures that the salt and sugar are evenly distributed throughout the flour, preventing any bland spots or overly sweet pockets in your crust. We want every bite of these Easy Turtle Bars to be perfectly balanced.
- Now for the butter. Add your softened, room-temperature unsalted butter to the dry mixture. You can use a pastry blender, a fork, or even your fingertips for this step. The goal here is to “cut in” the butter until the mixture resembles coarse crumbs. Imagine tiny peas and smaller bits of butter interspersed throughout the flour. Avoid overmixing at this stage; we’re aiming for a tender, crumbly shortbread, not a tough one. The butter should be fully incorporated, but the mixture shouldn’t form a cohesive dough just yet. This step is absolutely crucial for achieving that signature melt-in-your-mouth shortbread texture that makes these Easy Turtle Bars so utterly irresistible. It’s the foundation of our delicious treat.
- Once you have that beautiful crumbly mixture, press it firmly and evenly into the bottom of your prepared 9×13-inch baking pan. I find it easiest to start by scattering the crumbs across the pan, then using the bottom of a flat-bottomed measuring cup or a clean hand to press them down. Make sure you get into all the corners and create a nice, uniform layer. A well-compacted crust is key to a bar that holds together perfectly once cooled and cut. Take your time with this, as an even base leads to uniformly delicious bars that won’t fall apart.
- Pop the pan into your preheated oven and bake for 20 to 25 minutes. You’re looking for the edges to turn a beautiful, light golden brown. The center might still look a bit pale, and that’s perfectly fine! It will continue to cook as we add the other layers. Once it’s baked, carefully remove the crust from the oven and set it aside on a wire rack. It doesn’t need to cool completely, but it should be out of the oven before you pour on the next layer. This initial baking ensures the crust is perfectly cooked through and doesn’t become soggy from the luscious caramel that’s coming next.
Crafting the Rich Caramel Pecan Layer for Your Easy Turtle Bars
- While your shortbread crust is doing its thing or cooling slightly, you can start on the true star of the show: the caramel pecan layer. In a medium-sized, heavy-bottomed saucepan, melt the remaining 1 cup of unsalted butter over medium heat. A heavy bottom is important here to prevent scorching. Once the butter is fully melted, add the packed light brown sugar. Stir these two together consistently until the sugar begins to dissolve into the butter. The mixture will look a bit grainy at first, but keep stirring patiently.
- Next, carefully pour in the ½ cup of heavy cream (or evaporated milk, if you’re using that). Continue stirring the mixture, ensuring everything is well combined. Bring this luscious concoction to a gentle boil, still over medium heat. This is where patience pays off handsomely! Once it starts to boil, reduce the heat slightly to maintain a consistent, gentle boil. You’ll want to let it simmer for about 5 to 7 minutes, stirring almost constantly, especially scraping the bottom of the pan to prevent any sticking or scorching. The goal here is to thicken the caramel and allow it to reach a rich, deep amber color. If you happen to have a candy thermometer, you’re aiming for about 220°F (104°C), which is the soft-ball stage. However, you can absolutely do this by eye – it should thicken enough to coat the back of a spoon quite thickly, and you’ll notice it becoming more viscous.
- Once the caramel has reached the desired consistency and color, remove the saucepan from the heat immediately. Stir in the vanilla extract and that crucial quarter teaspoon of salt. The vanilla adds an incredible warmth and depth to the caramel, making it complex and inviting, while the salt perfectly balances the sweetness, making the caramel truly irresistible. Give it a good stir to ensure these flavor enhancers are fully incorporated into your decadent mixture.
- Now for the “turtle” part of our Easy Turtle Bars! Gently fold in the 2 cups of chopped pecans into the warm caramel mixture. Make sure every single pecan piece is gloriously coated in that thick, glistening caramel. Oh, the aroma at this stage is just heavenly and utterly tantalizing! If you lightly toasted your pecans earlier, their flavor will be even more pronounced now, adding an extra layer of complexity to the bars.
- Carefully and evenly pour the entire caramel pecan mixture over your pre-baked shortbread crust. Use a spatula to spread it right to the edges of the pan, making sure the layer is as uniform as possible. You want every bite of your Easy Turtle Bars to have that perfect ratio of crumbly crust, chewy caramel, and crunchy pecans. Precision here will lead to a more professional and satisfying result.
- Return the pan to your 350°F (175°C) oven for an additional 15 to 20 minutes. During this second bake, the caramel will bubble gently and set further. You’ll notice it gets a bit darker around the edges and sets up nicely. It shouldn’t be rock hard, but it should feel relatively firm when gently jiggled. This baking step is essential for the caramel to achieve its perfect chewy, yet tender, texture. Once baked, remove the pan from the oven and place it on a wire rack to cool completely. This cooling is absolutely paramount! Do not rush it. The caramel needs to fully set and firm up before you add the chocolate, otherwise, things could get messy and your layers won’t be distinct and beautiful. I often let mine cool for several hours at room temperature, or even pop it into the fridge for an hour or two once it’s no longer hot to the touch. This makes for super clean cuts later.
Adding the Decadent Chocolate Finish to Your Easy Turtle Bars
- Once your caramel pecan layer is completely cooled and firm – seriously, wait until it’s firm, patience is a virtue in bar making! – it’s time for the final touch: the chocolate topping. In a microwave-safe bowl, combine the semi-sweet chocolate chips (or finely chopped chocolate) and the optional tablespoon of unsalted butter. Microwave on medium power (around 50-60%) for 30-second intervals, stirring well after each interval, until the chocolate is smooth and fully melted. Alternatively, you can use a double boiler method: place the chocolate and butter in a heatproof bowl set over a saucepan of simmering water, ensuring the bowl doesn’t touch the water. Stir gently until melted and smooth. Be careful not to overheat the chocolate, as it can seize up and become grainy if it gets too hot. Slow and steady wins the race for perfectly melted, glossy chocolate. The optional butter helps to achieve a silkier, shinier finish, making these Easy Turtle Bars look even more professional and appealing.
-
Now for the fun part! You have a couple of options here, depending on the look you’re going for.
- For a full chocolate layer: Once the chocolate is perfectly melted and smooth, pour it evenly over the cooled caramel pecan layer. Use an offset spatula or the back of a spoon to spread it gently from edge to edge, creating a uniform layer of chocolate. This gives a classic, neat appearance to your Easy Turtle Bars, ensuring every bite is capped with a satisfying chocolate coating.
- For a drizzle effect: If you prefer a more rustic or decorative look, you can transfer the melted chocolate to a piping bag with a small tip, or simply use a spoon to drizzle it back and forth across the caramel pecan layer in an artistic pattern. This gives a beautiful visual appeal and still ensures every bite has that essential chocolate component, offering a delightful interplay of flavors and textures.
- Once the chocolate is applied, place the pan back into the refrigerator for at least 30 to 60 minutes, or until the chocolate layer is completely set and firm. This is another crucial cooling stage that ensures the chocolate hardens nicely, allowing for clean, crisp cuts without smudging or cracking. If you’ve used the parchment paper handles, now is the time they truly shine! Once the bars are fully chilled, use the parchment paper to carefully lift the entire slab of bars out of the pan and place it on a cutting board.
- Using a large, sharp knife – and I mean sharp – cut the slab into individual bars. For the cleanest cuts, I like to run my knife under hot water, wipe it completely dry, and then make each cut. Repeat this process for every single cut. This technique slightly warms the chocolate as you cut, preventing it from cracking and creating beautifully smooth, defined edges. You can cut them into traditional squares, or smaller rectangles for dainty, bite-sized servings. These Easy Turtle Bars are quite rich, so smaller portions are often appreciated! Store any leftover bars in an airtight container at room temperature for up to a week, or in the refrigerator for extended freshness. They also freeze wonderfully for up to 3 months, making them perfect for meal prepping your dessert cravings! Each bite offers that perfect symphony of crumbly shortbread, chewy caramel, crunchy pecans, and decadent chocolate. Enjoy the magic of these simple yet spectacular treats!
Conclusion:
And there you have it, my friends! We’ve journeyed through the simple steps and delightful ingredients that come together to create something truly magical. After all the measuring, mixing, and the irresistible scent wafting from your oven, you’ll understand why this recipe isn’t just another dessert; it’s an experience waiting to happen. This isn’t just a treat; it’s a celebration in bar form, a testament to the power of chocolate, caramel, and pecans united in perfect harmony. The balance of gooey, chewy, and crunchy textures, combined with the rich, deep flavors, makes every single bite an absolute joy. It’s the kind of dessert that elicits happy sighs and immediate requests for the recipe, making you feel like a culinary genius with minimal effort. Trust me when I say, once you try these, you’ll wonder how you ever lived without them in your baking repertoire.
When it comes to serving, these delightful bars are incredibly versatile. They are absolutely perfect at room temperature, making them an ideal candidate for potlucks, bake sales, or simply as a comforting after-dinner treat. Imagine sinking your teeth into that perfect square, the chocolate yielding slightly, the caramel stretching, and the pecans offering a delightful crunch. For an extra special indulgence, try warming them slightly in the microwave for about 10-15 seconds; the chocolate will become even meltier and the caramel incredibly soft and decadent. Top a warm bar with a scoop of vanilla bean ice cream, allowing it to slowly melt into a luscious pool around the edges, creating a dessert experience that rivals any fancy restaurant offering. A sprinkle of sea salt flakes over the top just before serving can also elevate the flavors, cutting through the sweetness with a delightful savory note. They pair beautifully with a strong cup of coffee or a cold glass of milk, making them suitable for an afternoon pick-me-up or a late-night craving.
Creative Variations to Make Them Your Own
But the fun doesn’t stop there! While the classic combination is undeniably superb, don’t hesitate to get creative and personalize these bars to your liking. If pecans aren’t your favorite, feel free to substitute them with walnuts, almonds, or even a mix of your preferred nuts for a different nutty dimension. For a twist on the chocolate, swap out the semi-sweet chips for milk chocolate for a sweeter profile, or use dark chocolate for a more intense, sophisticated flavor. White chocolate chips could also be a delightful addition, adding a creamy, buttery note. For an even more textural adventure, consider adding mini marshmallows during the last few minutes of baking for a s’mores-like twist, or crushed pretzels to the crust for a sweet and salty crunch that is truly addictive. You can also experiment with different types of caramel sauce – a homemade salted caramel would be an incredible upgrade, or even a spiced caramel with a hint of cinnamon or cardamom for a festive touch. And for those with dietary considerations, a simple swap to a gluten-free graham cracker crust will make these accessible to even more friends and family, ensuring no one misses out on this incredible treat.
I truly believe these Easy Turtle Bars are destined to become a staple in your kitchen, a go-to recipe for when you need to impress with minimal fuss. They deliver maximum flavor and an undeniable wow factor, all while being incredibly straightforward to prepare. So, please, gather your ingredients, set aside an afternoon, and treat yourself (and those you love!) to these exceptional bars. Don’t be shy – dive in, bake a batch, and let your taste buds rejoice! Once you’ve made them, I would absolutely love to hear about your experience. Did you stick to the classic, or did you venture into your own creative variations? What was your favorite part? Share your thoughts, your photos, and your triumphs in the comments or on social media. Your feedback and stories inspire me and our entire community of home bakers. Happy baking, everyone!
Easy Turtle Bars
Easy Turtle Bars feature a rich, buttery shortbread crust topped with gooey homemade caramel, crunchy toasted pecans, and a decadent melted chocolate blanket. A symphony of textures and tastes, this recipe delivers a classic dessert in a surprisingly simple form.
Ingredients
-
For the Shortbread Crust:
-
1 cup (226g) unsalted butter, softened
-
2 cups (240g) all-purpose flour
-
½ cup (100g) granulated sugar
-
¼ teaspoon salt
-
For the Caramel Pecan Layer:
-
1 cup (226g) unsalted butter
-
1 cup (200g) packed light brown sugar
-
½ cup (120ml) heavy cream or evaporated milk
-
1 teaspoon non-alcoholic vanilla extract
-
¼ teaspoon salt
-
2 cups (220g) chopped pecans
-
For the Chocolate Topping:
-
1 ½ cups (250g) semi-sweet chocolate chips
-
1 tablespoon (15g) unsalted butter (optional)
Instructions
-
Step 1
Preheat oven to 350°F (175°C). Line a 9×13-inch baking pan with parchment paper, leaving an overhang on the longer sides. -
Step 2
In a large bowl, whisk 2 cups all-purpose flour, ½ cup granulated sugar, and ¼ teaspoon salt. Add 1 cup softened unsalted butter and cut it in until the mixture resembles coarse crumbs. -
Step 3
Press the crumb mixture firmly and evenly into the prepared pan. Bake for 20-25 minutes, or until the edges are light golden brown. Remove from oven and set aside. -
Step 4
In a medium, heavy-bottomed saucepan, melt 1 cup unsalted butter over medium heat. Stir in 1 cup packed light brown sugar until dissolved. Pour in ½ cup heavy cream and bring the mixture to a gentle boil. Reduce heat slightly and simmer for 5-7 minutes, stirring constantly, until thickened (around 220°F/104°C or soft-ball stage). -
Step 5
Remove the saucepan from heat. Stir in 1 teaspoon non-alcoholic vanilla extract and ¼ teaspoon salt. Gently fold in 2 cups chopped pecans until thoroughly coated in the caramel. -
Step 6
Carefully and evenly pour the caramel pecan mixture over the pre-baked shortbread crust, spreading it to the edges. Return the pan to the 350°F (175°C) oven for an additional 15-20 minutes, until the caramel is bubbly and set. Remove and cool completely on a wire rack for several hours until firm. -
Step 7
Once the caramel pecan layer is completely firm, combine 1 ½ cups semi-sweet chocolate chips and the optional 1 tablespoon unsalted butter in a microwave-safe bowl. Microwave on medium power in 30-second intervals, stirring after each, until smooth and fully melted. -
Step 8
Pour the melted chocolate evenly over the cooled caramel pecan layer, spreading it to the edges for a full layer, or drizzle artistically. Place the pan in the refrigerator for at least 30-60 minutes, or until the chocolate is completely set and firm. -
Step 9
Using the parchment paper overhang, lift the entire slab of bars out of the pan onto a cutting board. With a large, sharp knife (warmed and wiped dry for each cut), cut into individual bars. Store in an airtight container at room temperature for up to a week, or in the refrigerator for extended freshness.
Important Information
Nutrition Facts (Per Serving)
It is important to consider this information as approximate and not to use it as definitive health advice.
Allergy Information
Please check ingredients for potential allergens and consult a health professional if in doubt.


Leave a Comment