
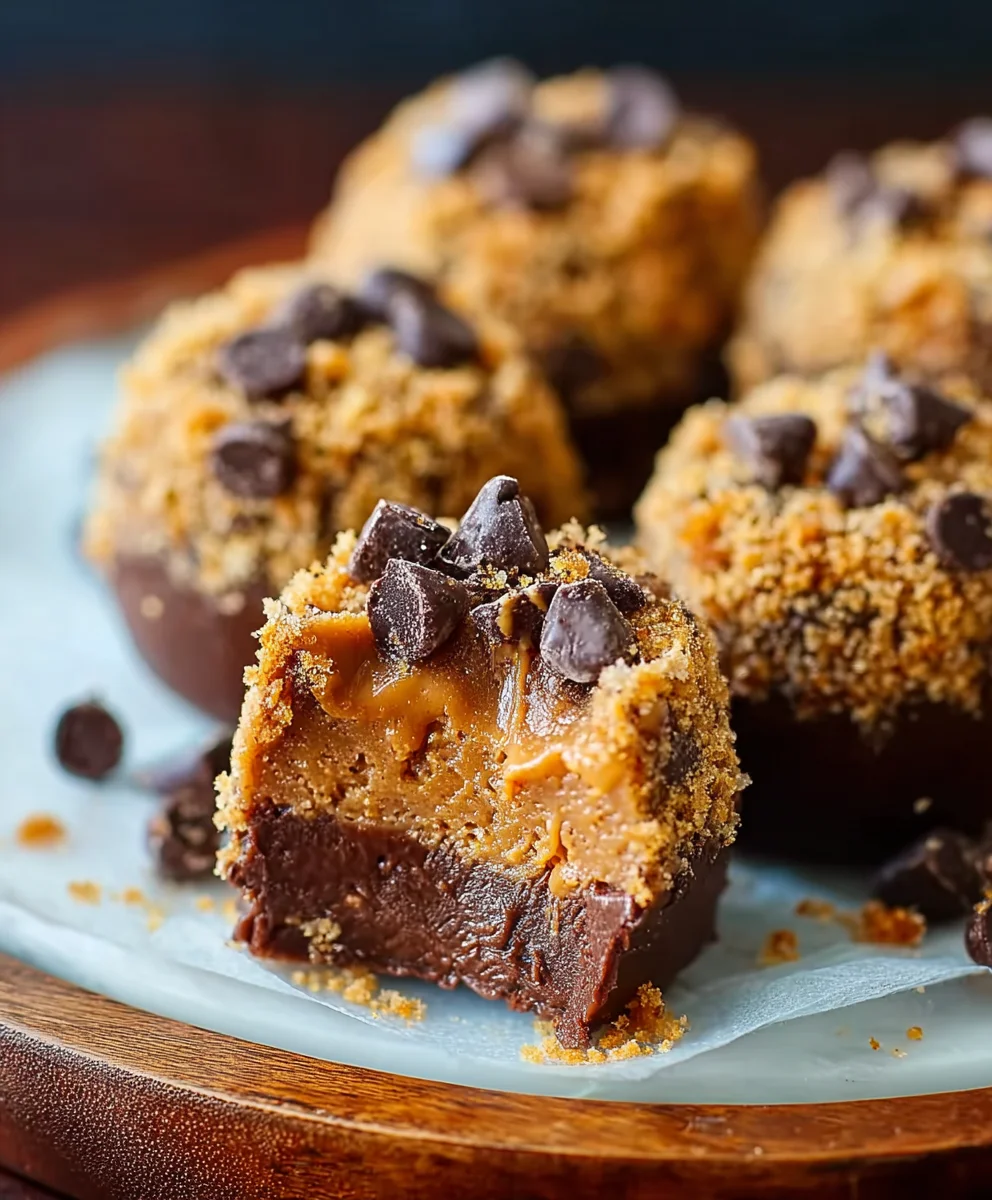
No Bake Moose Farts – what a wonderfully whimsical and unforgettable name for a truly delightful treat! I remember the first time I heard it; my curiosity was instantly piqued, and I was immediately charmed. These delightful confections, often whispered to have quaint Canadian origins or a beloved status among campground treats, are far more appealing than their humorous moniker suggests. They perfectly embody the spirit of simple, delicious indulgence, ideal for any occasion when you crave something sweet without the fuss of turning on the oven.
Why are these delightful treats so universally adored?
I believe it’s a perfect storm of factors. Their exquisite taste—a harmonious blend of chocolate, peanut butter, oats, and coconut—offers a chewy, satisfying texture that hits all the right notes. Furthermore, the sheer convenience of preparing No Bake Moose Farts makes them an ideal project for busy individuals or a fun, engaging activity with children. The “no-bake” aspect means less cleanup and more time enjoying the delicious outcome. Every bite is a comforting reminder of simpler pleasures, a sweet escape that satisfies cravings and invariably brings smiles. Get ready to discover your new favorite effortless dessert!

Ingredients:
- 1/2 cup (113g) unsalted butter: I always reach for unsalted so I can control the salt content in my recipes. If you only have salted, you might want to slightly reduce any added salt later, though typically, the amount in butter isn’t enough to make a huge difference in sweet treats like these “No Bake Moose Farts.”
- 2 cups (400g) granulated sugar: This provides the primary sweetness and contributes to the overall texture, helping everything bind together beautifully. Don’t be tempted to cut back too much, as it’s crucial for the structure.
- 1/2 cup (45g) unsweetened cocoa powder: For that deep, rich chocolate flavor that makes these “No Bake Moose Farts” so utterly irresistible. I prefer a good quality Dutch-processed cocoa for a darker color and smoother taste, but regular unsweetened cocoa works wonderfully too.
- 1/2 cup (120ml) milk: Any milk will do here – whole milk, 2%, or even a non-dairy alternative like almond or soy milk if you’re adapting for dietary preferences. It helps create the luscious, creamy base.
- 1/2 teaspoon salt: A tiny bit of salt is a secret weapon in sweet recipes, enhancing all the other flavors and preventing them from being cloyingly sweet.
- 1 teaspoon vanilla extract: Pure vanilla extract is a must for warmth and depth of flavor. Resist the urge to use imitation if you can, as the real deal makes a noticeable difference.
- 1/2 cup (130g) creamy peanut butter: This is where a lot of the magic happens! The peanut butter adds a wonderful nutty flavor, creaminess, and acts as a fantastic binder, helping our “No Bake Moose Farts” hold their shape. Smooth is best here for an even texture.
- 3 cups (270g) quick-cooking oats: Quick oats are perfect because they absorb the liquid quickly and create a tender, chewy texture without being tough. Don’t use steel-cut oats, they won’t work in this no-bake recipe. Rolled oats can be used in a pinch, but the texture will be slightly chewier and less uniform.
- 1 cup (80g) shredded sweetened coconut: This adds a lovely tropical chewiness and another layer of flavor. If you’re not a fan of coconut, you can omit it, but it truly makes these “No Bake Moose Farts” special. Unsweetened works too if you prefer less sweetness, but I find the sweetened version adds a nice touch.
Preparing Your Workspace and Ingredients:
- Gather All Your Tools and Ingredients: Before you even think about turning on the stove, make sure you have every single ingredient measured out and all your equipment ready. This is called “mise en place” (everything in its place) and it truly makes the cooking process so much smoother and more enjoyable. For these delightful “No Bake Moose Farts,” you’ll need a medium to large heavy-bottomed saucepan, a whisk, a heat-proof spatula or wooden spoon, a large mixing bowl, a couple of baking sheets lined with parchment paper or wax paper, and a cookie scoop (or two spoons) for shaping. Having everything within arm’s reach prevents frantic searching mid-recipe, especially when working with hot mixtures that need your full attention.
- Prepare Your Dry Ingredients (Pre-Measure Oats and Coconut): In your large mixing bowl, combine the 3 cups of quick-cooking oats and 1 cup of shredded sweetened coconut. Give them a quick stir to combine them evenly. This bowl will be ready to receive the hot chocolate mixture in just a few minutes, and having these dry ingredients pre-measured and waiting is a critical step in ensuring your “No Bake Moose Farts” come together perfectly. This also ensures that when the hot mixture is ready, you can immediately add the dry ingredients and stir quickly, preventing the base from cooling down too much before everything is incorporated.
- Line Your Baking Sheets: Take your two baking sheets and line them generously with either parchment paper or wax paper. This non-stick surface is essential for easy removal of your “No Bake Moose Farts” once they have set. You don’t want them sticking to the pan after all your hard work! Make sure the paper extends a little over the edges of the pan to make lifting them off simpler later on.
Crafting the Rich Chocolate Base:
- Combine Wet Ingredients for the Base: In your heavy-bottomed saucepan, combine the 1/2 cup of unsalted butter, 2 cups of granulated sugar, 1/2 cup of unsweetened cocoa powder, 1/2 cup of milk, and 1/2 teaspoon of salt. I always start with butter, sugar, and cocoa as the foundation for the chocolatey goodness in these “No Bake Moose Farts.” The heavy bottom of the pan is important here as it helps distribute heat more evenly and prevents the mixture from scorching, which can easily happen with sugary concoctions.
- Bring Mixture to a Rolling Boil: Place the saucepan over medium heat. Whisk continuously or stir frequently with your heat-proof spatula to ensure all the ingredients are dissolving and combining smoothly. Pay close attention, as sugar can easily burn if left unattended. Your goal here is to bring the mixture to a full, rolling boil. What exactly is a rolling boil? It’s when the bubbles are rapidly breaking on the surface, and they continue to do so even when you stir. It should be undeniably boiling, not just simmering. This phase is crucial for dissolving the sugar completely and creating the right consistency for your “No Bake Moose Farts.” It usually takes about 5-7 minutes of consistent stirring to reach this stage.
- Boil for Precisely One Minute: Once you’ve achieved a full, rolling boil, set a timer for exactly one minute. Continue to boil the mixture, stirring constantly during this minute. Do not extend this boiling time, and do not shorten it. This precise timing is absolutely vital for the success of your “No Bake Moose Farts.” Boiling for too long will make the finished cookies crumbly and dry, as too much moisture will evaporate and the sugar will crystallize excessively. Boiling for too short a time will result in “No Bake Moose Farts” that are too soft, sticky, and won’t hold their shape properly, as the sugar hasn’t reached the correct stage. This one minute of intense boiling is the scientific sweet spot for optimal texture.
- Remove from Heat and Add Vanilla: As soon as that minute is up, immediately remove the saucepan from the heat. This quick removal is important to stop the cooking process. Stir in the 1 teaspoon of vanilla extract. The vanilla adds an incredible aroma and enhances the overall chocolate flavor. Adding it off the heat prevents its delicate flavor from evaporating too quickly due to the high temperature. Give it a good stir to ensure it’s fully incorporated into the hot chocolate base.
- Incorporate the Peanut Butter: While the mixture is still hot, add the 1/2 cup of creamy peanut butter to the saucepan. Stir vigorously with your spatula or wooden spoon until the peanut butter is completely melted and smoothly integrated into the chocolate mixture. The residual heat from the base will melt the peanut butter quickly, creating a wonderfully rich and cohesive sauce. This step is key for flavor and for the binding properties that the peanut butter provides to your “No Bake Moose Farts.” Ensure there are no streaks of unmixed peanut butter visible. The mixture should now be glossy and homogenous.
Incorporating the Hearty Dry Ingredients:
- Combine Wet and Dry Mixtures: Immediately pour the hot chocolate-peanut butter mixture from the saucepan into the large bowl containing your pre-measured quick oats and shredded coconut. This is where your delicious “No Bake Moose Farts” truly start to take shape!
- Stir Quickly and Thoroughly: Using your sturdy spatula or wooden spoon, stir the mixture quickly and vigorously. You want to coat every single oat flake and piece of coconut evenly with the chocolatey goodness. Work fast, as the mixture will begin to cool and thicken relatively quickly. Continue stirring until everything is thoroughly combined and there are no dry spots left. The mixture should look moist and cohesive, but not overly wet. It might seem a little loose at first, but don’t worry, it will firm up as it cools. This thorough mixing ensures that each bite of your “No Bake Moose Farts” is packed with flavor and has a consistent texture. If you don’t mix fast enough, the mixture can seize up prematurely, making it difficult to form the cookies.
Shaping Your No Bake Moose Farts:
- Let the Mixture Cool Slightly: Allow the mixture to sit in the bowl for about 5-10 minutes. This brief cooling period is important for a couple of reasons. First, it makes the mixture easier and safer to handle without burning your hands. Second, it allows the oats to fully absorb the liquid and for the mixture to firm up slightly, making it much easier to scoop and roll into perfect balls. If you try to scoop too soon, the mixture might be too sticky or loose. If you wait too long, it might become too stiff. You’re looking for a consistency that’s warm enough to be pliable but cool enough to handle.
-
Scoop and Roll the Moose Farts: Once the mixture has cooled sufficiently, it’s time to shape your “No Bake Moose Farts”! I highly recommend using a medium-sized cookie scoop (about 1.5 to 2 tablespoons in capacity) for consistent sizing. Scoop out a portion of the mixture, then use your hands to gently roll it into a round ball. Aim for cookies roughly 1.5 to 2 inches in diameter.
Tips for Perfect Rolling:
- Work Efficiently: As the mixture continues to cool, it will become firmer. If you find it getting too stiff to roll, you can try gently warming it in the microwave for 10-15 seconds, but be careful not to overheat.
- Keep Hands Clean: The mixture can be a little sticky. If it starts to adhere too much to your hands, you can lightly dampen your palms with a tiny bit of water, or simply wash and dry your hands periodically. Some people even like to lightly grease their hands, but I find a quick rinse often does the trick.
- Uniformity Matters: While not strictly necessary for taste, uniform sizes ensure that all your “No Bake Moose Farts” set at a similar rate and look appealing on a serving platter.
Place each rolled “No Bake Moose Fart” onto your prepared baking sheets, leaving a little space between each one. You should yield approximately 30-36 cookies, depending on their size.
The Chilling Process and Storage:
- Chill Until Firm: This is the final and crucial step before you can enjoy your homemade “No Bake Moose Farts”! Once all your cookies are rolled and arranged on the baking sheets, transfer the sheets to the refrigerator. Allow them to chill for at least 30 minutes to 1 hour, or until they are completely firm and set. The chilling time allows the butter and peanut butter to solidify, binding all the ingredients together and giving the cookies their characteristic chewy, yet firm texture. Resist the temptation to eat them before they are fully chilled, as they will be too soft and might fall apart. A properly chilled “No Bake Moose Fart” is a delightful experience.
- Serving Your Delicious “No Bake Moose Farts”: Once firm, your “No Bake Moose Farts” are ready to be devoured! They make a fantastic snack, a quick dessert, or a lovely treat to share with friends and family. The beauty of these cookies is that they don’t require any baking, making them perfect for hot summer days or when you just don’t want to turn on your oven. The combination of rich chocolate, nutty peanut butter, chewy oats, and subtle coconut is truly addictive.
-
Storage Instructions: For optimal freshness and texture, store your “No Bake Moose Farts” in an airtight container at room temperature for up to 3-4 days. While they can last a little longer, I find that the texture is best within the first few days. If your kitchen is particularly warm, or if you prefer a firmer cookie, you can also store them in the refrigerator. In the fridge, they will last for about 1-2 weeks. However, I can almost guarantee they won’t last that long because they are just too tempting!
Freezing for Longer Storage:
If you want to make a larger batch or prepare them ahead for an event, “No Bake Moose Farts” freeze exceptionally well.
- Place the chilled cookies in a single layer on a baking sheet and freeze for about an hour, or until solid. This prevents them from sticking together.
- Once frozen solid, transfer them to a freezer-safe airtight container or a heavy-duty freezer bag.
- They can be stored in the freezer for up to 2-3 months.
- When you’re ready to enjoy them, simply remove the desired number from the freezer and let them thaw at room temperature for about 15-30 minutes, or enjoy them directly from the freezer for a super-chilled, dense treat!
These “No Bake Moose Farts” are incredibly versatile and always a crowd-pleaser, so don’t hesitate to make a big batch!
Conclusion:
And there you have it, friends! After exploring the simple magic behind these incredible treats, I truly hope you’re as excited as I am about them. This isn’t just another dessert recipe; it’s a gateway to effortless joy, perfect for those moments when you crave something utterly delicious without the fuss of baking. I consider this recipe an absolute must-try because it delivers on so many fronts: speed, simplicity, and an undeniable burst of comforting flavor. Imagine whipping up a batch of these delectable bites in mere minutes, transforming a handful of pantry staples into a treat that’s guaranteed to put a smile on everyone’s face. They are incredibly forgiving, making them ideal for novice cooks and seasoned bakers alike, and the best part? No oven required, which means they’re perfect for hot summer days or when you simply don’t want to heat up your kitchen. The chewy texture, combined with the rich, sweet notes, makes for an irresistible combination that will have you reaching for just one more.
Now, let’s talk about making these delightful morsels even more special with some serving suggestions and variations. While they are absolutely perfect straight from the fridge, consider elevating your experience. For a quick and easy dessert for a dinner party, arrange them artfully on a platter dusted with a little cocoa powder or powdered sugar – it instantly makes them look more sophisticated. They’re also an amazing addition to a breakfast or brunch spread, especially alongside fresh fruit and a strong cup of coffee. Think about packing them in school lunchboxes or as a wholesome after-school snack for the kids. For a truly decadent twist, try serving them slightly chilled with a scoop of vanilla bean ice cream, perhaps with a drizzle of warm caramel sauce. The contrast in temperatures and textures is divine!
But why stop there? The beauty of a recipe like this lies in its adaptability. You can easily customize them to suit your cravings or any dietary needs. For a nut-free version, simply swap out the peanut butter for sunflower seed butter or tahini. If you’re looking to enhance the chocolatey goodness, stir in a tablespoon or two of unsweetened cocoa powder along with the oats. Feeling adventurous? Add a pinch of sea salt to the mixture to really make the chocolate and peanut butter flavors pop. A dash of almond extract, peppermint extract, or even orange zest can introduce a whole new flavor profile. For an extra textural element, mix in some finely chopped dried cranberries, apricots, or even mini chocolate chips. You can also roll them in different toppings after shaping: shredded coconut, finely crushed nuts, colorful sprinkles for a festive touch, or even a dusting of cinnamon sugar. For special occasions, you could melt some chocolate and dip half of each ball, then sprinkle with decorative edible glitter before the chocolate sets. The possibilities are truly endless, limited only by your imagination!
I genuinely believe that once you try this recipe, it will become a cherished staple in your home. The pure joy of creating something so delicious with such minimal effort is incredibly satisfying. So, I wholeheartedly encourage you to roll up your sleeves, gather your ingredients, and give these amazing treats a whirl. There’s something so satisfying about sharing a homemade creation, and these are sure to be a hit with everyone who tries them. Don’t just take my word for it; experience the delight yourself! After you’ve had a chance to make them, I would absolutely love to hear about your experience. Did you try any fun variations? What did your family think? Please feel free to share your thoughts, tips, and especially your photos! I can’t wait to see your wonderful creations and hear about how you made these delightful No Bake Moose Farts your own. Happy no-baking, everyone!
No Bake Moose Farts
These delightful No Bake Moose Farts are a wonderfully whimsical and unforgettable treat! Featuring a harmonious blend of chocolate, peanut butter, oats, and coconut, they offer a chewy, satisfying texture without the fuss of turning on the oven. Perfect for a quick dessert or a fun, engaging activity with children, they satisfy cravings and invariably bring smiles.
Ingredients
-
1/2 cup (113g) unsalted butter
-
2 cups (400g) granulated sugar
-
1/2 cup (45g) unsweetened cocoa powder
-
1/2 cup (120ml) milk
-
1/2 teaspoon salt
-
1 teaspoon vanilla extract
-
1/2 cup (130g) creamy peanut butter
-
3 cups (270g) quick-cooking oats
-
1 cup (80g) shredded sweetened coconut
Instructions
-
Step 1
Line 2 baking sheets with parchment paper. In a large bowl, combine 3 cups quick-cooking oats and 1 cup shredded sweetened coconut; set aside. -
Step 2
In a heavy-bottomed saucepan, combine 1/2 cup unsalted butter, 2 cups granulated sugar, 1/2 cup unsweetened cocoa powder, 1/2 cup milk, and 1/2 teaspoon salt. -
Step 3
Place saucepan over medium heat, whisking constantly. Bring mixture to a full, rolling boil. Once boiling, continue to boil for exactly 1 minute, stirring constantly. -
Step 4
Immediately remove from heat. Stir in 1 teaspoon vanilla extract and 1/2 cup creamy peanut butter until fully melted and smooth. -
Step 5
Pour the hot chocolate-peanut butter mixture into the bowl with oats and coconut. Stir quickly and thoroughly until all dry ingredients are coated. Let mixture cool for 5-10 minutes until pliable but cool enough to handle. -
Step 6
Using a medium cookie scoop (1.5-2 tablespoons), scoop portions of the mixture and gently roll into 1.5-2 inch balls. Place onto the prepared baking sheets. -
Step 7
Refrigerate cookies for at least 30 minutes to 1 hour, or until completely firm and set. Once firm, they are ready to serve. -
Step 8
Store in an airtight container at room temperature for 3-4 days, or in the refrigerator for 1-2 weeks. For longer storage, freeze for up to 2-3 months by freezing solid on a baking sheet, then transferring to an airtight container or freezer bag. Thaw at room temperature for 15-30 minutes before serving.
Important Information
Nutrition Facts (Per Serving)
It is important to consider this information as approximate and not to use it as definitive health advice.
Allergy Information
Please check ingredients for potential allergens and consult a health professional if in doubt.


Leave a Comment