

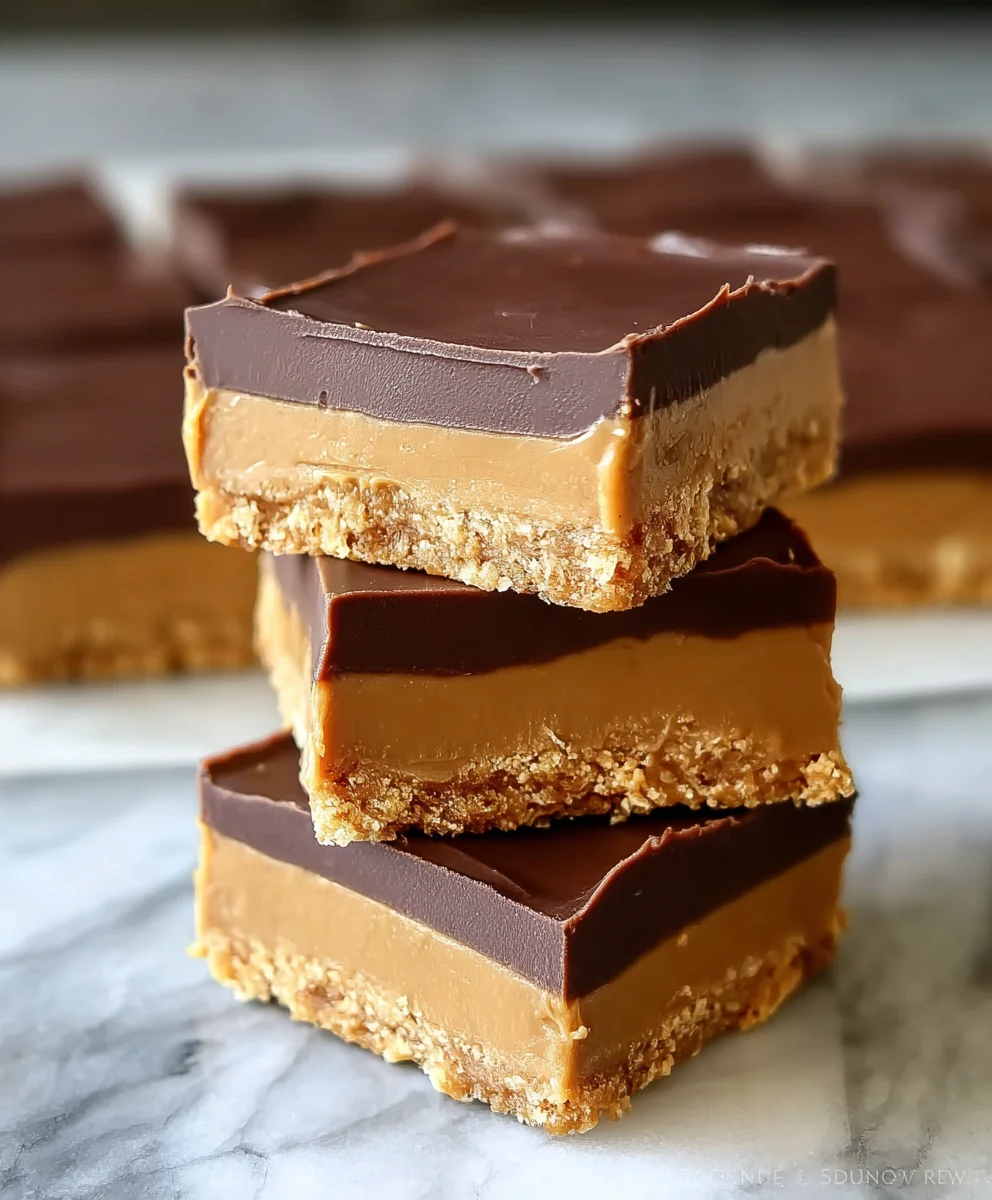
Easy No Bake Peanut Butter Bars are a dessert lover’s dream, promising pure bliss without ever needing to turn on an oven. Imagine sinking your teeth into a rich, creamy, and utterly decadent square that perfectly balances the sweet and salty notes of classic peanut butter with a luscious chocolate topping. This iconic treat is more than just a dessert; it’s a testament to the enduring appeal of simple, comforting flavors that bring joy to any occasion.
A Sweet History of Convenience
The beauty of no-bake desserts lies in their ingenious simplicity, a culinary innovation that became particularly popular for its convenience and delicious results. Peanut butter, a beloved staple, has long been celebrated in American kitchens for its versatility, lending its unique, nutty richness to countless cherished recipes. These bars embody that timeless combination, delivering a nostalgic taste that reminds many of childhood delights and effortless gatherings.
People absolutely adore this dish for countless reasons. The harmonious blend of smooth peanut butter filling and a firm, chocolatey ganache creates an irresistible texture. Their ease of preparation makes them a go-to for impromptu get-togethers, potlucks, or simply satisfying a sudden sweet craving. Forget the fuss and embrace the fabulous; these Easy No Bake Peanut Butter Bars are guaranteed to be a crowd-pleaser, delivering maximum flavor with minimal effort every single time.
Ingredients:
- For the Peanut Butter Base:
- 1 cup (2 sticks or 226g) unsalted butter, softened to room temperature or gently melted
- 2 cups (240g) powdered sugar (confectioners’ sugar), sifted
- 1 ½ cups (380g) creamy peanut butter (I find regular brands like Jif or Skippy work best here for their consistent texture, rather than natural varieties which can separate)
- 2 ½ cups (about 30 full graham cracker sheets, crushed) graham cracker crumbs (you can buy them pre-crushed or easily make your own by pulsing graham crackers in a food processor until fine)
- 1 teaspoon pure vanilla extract
- ¼ teaspoon fine sea salt (this helps to balance the sweetness beautifully)
- For the Decadent Chocolate Topping:
- 1 ½ cups (about 9 oz or 255g) semi-sweet chocolate chips (or dark chocolate chips if you prefer a less sweet topping)
- ½ cup (1 stick or 113g) unsalted butter
- ¾ cup (190g) creamy peanut butter
- 1 teaspoon pure vanilla extract
- Pinch of fine sea salt
- Optional: 2 tablespoons powdered sugar, sifted (for extra sweetness and a slightly firmer topping)
Preparation of the Peanut Butter Base
Creating the foundational layer for our Easy No Bake Peanut Butter Bars is where the magic begins. This step is crucial for achieving that perfectly dense, rich, and utterly irresistible texture that makes these bars so famous. Don’t rush it, and pay attention to the details; they truly make all the difference.
- Prepare Your Baking Pan: First things first, grab a 9×13 inch baking pan. This size is ideal for yielding bars that are just the right thickness. Line the pan with parchment paper, making sure to leave an overhang on the two longer sides. This parchment “sling” will be your best friend later when it’s time to lift the entire slab of bars out for easy cutting. A little spritz of cooking spray under the parchment can help it stick to the pan, preventing it from sliding around while you work. Trust me, this parchment paper step is a game-changer for clean cuts!
- Melt the Butter: In a large, microwave-safe bowl, combine the 1 cup of unsalted butter for the base. You can melt it gently in the microwave in 30-second intervals, stirring after each, until it’s fully melted but not boiling hot. Alternatively, melt it over low heat in a saucepan on your stovetop. The key is to get it to a liquid state without overheating it.
- Combine Wet Ingredients for the Base: Once the butter is melted, add the 2 cups of sifted powdered sugar, 1 ½ cups of creamy peanut butter, 1 teaspoon of vanilla extract, and ¼ teaspoon of fine sea salt to the bowl with the butter. Using an electric mixer (either a stand mixer with a paddle attachment or a hand mixer) on medium speed, beat these ingredients together until they are completely smooth and well combined. Scrape down the sides of the bowl frequently to ensure everything is incorporated. You’re looking for a light, creamy, and uniform mixture with no lumps of peanut butter or powdered sugar. This step might take 2-3 minutes, and the mixture will become quite thick and luscious.
- Incorporate Graham Cracker Crumbs: With the mixer on low speed, gradually add the 2 ½ cups of graham cracker crumbs to the wet mixture. Continue mixing until the crumbs are fully incorporated and the mixture forms a thick, somewhat stiff dough. It should be cohesive enough to hold together when pressed, but still moist. If you’re making your own graham cracker crumbs, make sure they are finely crushed – large pieces can make the base less uniform and harder to cut cleanly. The consistency here is key for a sturdy base!
- Press into the Pan: Transfer the entire peanut butter base mixture into your prepared 9×13 inch pan. Using the back of a spoon, a rubber spatula, or even your clean hands (which I find works best), press the mixture down firmly and evenly into the bottom of the pan. Pay special attention to the corners and edges to ensure a consistent thickness across the entire surface. You want it to be packed down tightly so that it forms a solid, compact layer. This firm pressing helps prevent the bars from crumbling when cut. Take your time to get this layer as flat and even as possible; it’s the foundation for your spectacular Easy No Bake Peanut Butter Bars.
- Initial Chill (Optional but Recommended): While you prepare the chocolate topping, you can place the pan with the pressed peanut butter base in the refrigerator. A brief 15-20 minute chill will help set the base slightly, making it firmer and less prone to mixing with the warm chocolate topping. This isn’t strictly necessary if you’re in a hurry, but it does contribute to cleaner layers.
Crafting the Decadent Chocolate Topping
The chocolate topping is the crowning glory of these Easy No Bake Peanut Butter Bars, adding a rich, glossy, and utterly delicious counterpoint to the sweet and salty peanut butter base. This layer should be smooth, luxurious, and perfectly set, creating that satisfying snap when you bite into it. Achieving this is simpler than you might think!
- Prepare Your Melting Setup: For the most consistent and best results, I recommend using a double boiler method for melting the chocolate. If you don’t have one, simply place a heat-safe bowl (preferably glass or stainless steel) over a saucepan containing about an inch or two of simmering water. Ensure the bottom of the bowl does not touch the water. The steam will gently melt the ingredients, preventing scorching. If you must use a microwave, do so with extreme caution, melting in 20-second bursts, stirring vigorously after each, until just melted. Overheated chocolate can seize or become grainy.
- Melt Chocolate and Butter: In your chosen melting setup (double boiler or microwave-safe bowl), combine the 1 ½ cups of semi-sweet chocolate chips and the ½ cup (1 stick) of unsalted butter. Stir continuously until the chocolate and butter are completely melted and the mixture is silky smooth and glossy. If using a double boiler, remove the bowl from the heat as soon as it’s fully melted to prevent further cooking. A smooth, lump-free chocolate mixture is essential here!
- Incorporate Peanut Butter and Flavorings: Once the chocolate and butter are perfectly melted and smooth, stir in the ¾ cup of creamy peanut butter, 1 teaspoon of pure vanilla extract, and a pinch of fine sea salt. Mix thoroughly until all ingredients are fully combined and the topping is uniformly smooth and beautifully glossy. The addition of peanut butter here creates a slightly softer, more yielding topping than pure chocolate, and of course, enhances that irresistible peanut butter flavor profile.
- Consider the Optional Powdered Sugar: If you’ve opted for a slightly sweeter and firmer topping, now is the time to add the 2 tablespoons of sifted powdered sugar. Stir it in thoroughly until there are no lumps and it’s fully integrated into the chocolate mixture. This small addition can subtly enhance the texture and sweetness, giving the topping a lovely, almost fudge-like quality when chilled.
- Pour and Spread the Topping: Carefully pour the warm, decadent chocolate topping evenly over the chilled peanut butter base in the pan. Use an offset spatula or the back of a spoon to gently spread the chocolate all the way to the edges, creating a smooth, uniform layer. Work relatively quickly as the topping will start to set as it cools, especially if the base was chilled. You want a perfectly even blanket of chocolate over every inch of the peanut butter base. This smooth, even layer makes all the difference in presentation!
- Optional Finishing Touch: For an extra touch of visual appeal and flavor, you can sprinkle a tiny bit of flaky sea salt over the chocolate topping while it’s still wet. This not only looks gourmet but also brilliantly enhances the chocolate and peanut butter flavors, creating a wonderful sweet and salty contrast.
Chilling and Serving Your Easy No Bake Peanut Butter Bars
The final steps are perhaps the easiest, but they require a bit of patience. Chilling is absolutely non-negotiable for these Easy No Bake Peanut Butter Bars, as it allows both layers to firm up beautifully, making them easy to slice and a pure joy to eat. The wait is worth every single moment!
- Chill Until Firm: Once the chocolate topping is smoothly spread, carefully transfer the baking pan to the refrigerator. Allow the bars to chill for at least 2-3 hours, or even better, overnight. This extended chilling time is vital for both the peanut butter base and the chocolate topping to firm up completely. You’ll know they’re ready when the chocolate topping is firm to the touch and doesn’t yield when gently pressed. Patience is a virtue, especially when waiting for these delicious treats!
- Lift and Cut: When the bars are thoroughly chilled and firm, use the parchment paper overhang to carefully lift the entire slab of bars out of the baking pan and place it onto a clean cutting board. This parchment “sling” makes removal incredibly easy and mess-free.
- The Art of Cutting Perfect Bars: For the cleanest, sharpest cuts, here’s a pro tip: use a large, sharp knife. For each cut, run the knife under very hot water for a few seconds, then wipe it completely dry. Make a single, decisive cut, pressing straight down. Repeat this process – heating and drying the knife – before each new cut. This technique helps the knife glide through the chocolate without cracking or dragging, ensuring perfectly neat edges for your Easy No Bake Peanut Butter Bars. You can cut them into standard 2×2 inch squares, or smaller bite-sized pieces if you’re serving a crowd or want to practice portion control (good luck with that!).
- Serve and Enjoy: Arrange your beautifully cut Easy No Bake Peanut Butter Bars on a serving platter. They are absolutely delightful served chilled directly from the refrigerator, making them a refreshing and rich treat. They pair wonderfully with a glass of cold milk, a hot cup of coffee, or as a decadent dessert after any meal.
- Storage Instructions: To keep your bars fresh, store any leftovers in an airtight container in the refrigerator for up to 1 week. If you want to make them ahead or have a very large batch, these bars also freeze exceptionally well! Wrap individual bars or a stack of bars tightly in plastic wrap, then place them in a freezer-safe bag or container. They can be stored in the freezer for up to 2-3 months. When you’re ready to enjoy, simply let them thaw in the refrigerator for an hour or two, or on the countertop for about 30 minutes, before serving. These bars are a fantastic make-ahead option for parties or just to have a delicious treat ready whenever a craving strikes!
After diving deep into the delightful simplicity of this recipe, I truly believe you’re about to discover your new favorite sweet treat. I’m not exaggerating when I say that this particular recipe transcends the ordinary, offering a perfect blend of rich flavor, satisfying texture, and unparalleled ease. It’s more than just a dessert; it’s a revelation for anyone who loves peanut butter and craves something homemade without the fuss of turning on the oven. The magic of these bars lies in their straightforward approach, proving that you don’t need fancy equipment or advanced baking skills to create something truly spectacular. Think about those moments when a sudden craving hits, or when you need a last-minute contribution to a potluck or party; this recipe rises to the occasion every single time. The creamy, dreamy peanut butter layer, perfectly balanced with the sweet, crumbly base, creates a symphony of textures and tastes that is utterly irresistible. Each bite offers that classic, comforting peanut butter flavor that so many of us adore, making it a guaranteed crowd-pleaser across all age groups.
What makes these bars an absolute must-try, in my humble opinion, is their sheer versatility and universal appeal. They are the ultimate embodiment of comfort food, yet they feel incredibly special. The fact that they require absolutely no baking means less time in the kitchen and more time enjoying your delicious creation, or perhaps, enjoying the company of those you’re sharing them with. It’s a fantastic recipe for beginners, for those hot summer days when you want to avoid heating up your home, or for anyone who simply appreciates efficiency without compromising on taste. Truly, these Easy No Bake Peanut Butter Bars are a testament to how simple yet profoundly satisfying dessert can be. They manage to be both decadently rich and wonderfully refreshing when served chilled, making them suitable for any season or occasion. I promise, once you make them, they’ll quickly become a staple in your recipe repertoire, offering that perfect blend of nostalgic flavor and modern convenience.
Elevate Your Bars: Serving Suggestions & Creative Variations
While these bars are absolutely divine just as they are, straight from the fridge, there are countless ways to customize them and make them uniquely yours. For an extra touch of indulgence, consider a light drizzle of melted dark chocolate or a sprinkle of flaky sea salt over the top before chilling – the salt really enhances the peanut butter’s nutty notes and cuts through the sweetness beautifully. Imagine serving them alongside a scoop of vanilla bean ice cream or a dollop of freshly whipped cream for an even more luxurious dessert experience. They also make an incredible addition to a dessert platter, especially when cut into smaller, bite-sized squares, perfect for mingling.
Don’t be afraid to get creative with your mix-ins and toppings too! For the base, you could experiment with different types of crushed cookies instead of graham crackers, perhaps some chocolate wafers for a ‘dark chocolate peanut butter’ twist, or even some crushed pretzels for an added salty crunch that really takes things up a notch. In the peanut butter layer, feel free to fold in mini chocolate chips, chopped roasted peanuts for extra texture, or even a dash of cinnamon or a pinch of cayenne pepper for a subtle, exciting kick. If you’re looking to explore different nut butter profiles, almond butter or cashew butter can be substituted for a slightly different, but equally delicious, flavor. For those with dietary considerations, gluten-free graham crackers and plant-based butter alternatives work wonderfully, making these bars adaptable for almost everyone. Think about a white chocolate drizzle, or a sprinkle of toasted coconut flakes for a tropical twist. The possibilities are genuinely endless, and each variation offers a chance to discover a new favorite iteration of this already stellar treat.
Your Turn to Create and Share!
Now that I’ve shared all my enthusiasm for this incredibly simple yet utterly delicious recipe, it’s your turn to experience the magic. I wholeheartedly encourage you to carve out a little time, gather your ingredients, and whip up a batch of these glorious bars. You’ll be amazed at how quickly and effortlessly they come together, transforming a few basic pantry staples into something truly extraordinary. Whether you’re a seasoned baker or someone who rarely ventures into the kitchen, this recipe is incredibly forgiving and guarantees fantastic results every single time. There’s an immense satisfaction that comes from creating something so delicious with such minimal effort, and I can’t wait for you to feel that same joy.
Once you’ve made them (and inevitably fallen in love), I would absolutely adore hearing about your experience! Did you stick to the classic version, or did you venture into some exciting variations? What were your favorite serving suggestions? Please don’t hesitate to share your thoughts, your photos, and your unique twists in the comments section below. I love seeing how you personalize recipes and make them your own. Let’s build a community of enthusiastic no-bake creators! So, go ahead, treat yourself, treat your family, and share the love that comes with every single, delectable bite of these sensational peanut butter bars. Happy no-baking!
Easy No-Bake Peanut Butter Bars
These Easy No Bake Peanut Butter Bars offer pure bliss: a rich, creamy, decadent dessert that perfectly balances sweet and salty peanut butter notes with a luscious chocolate topping, all without an oven.
Ingredients
-
1 cup (226g) unsalted butter, melted (for base)
-
2 cups (240g) powdered sugar, sifted (for base)
-
1 ½ cups (380g) creamy peanut butter (for base)
-
2 ½ cups graham cracker crumbs
-
1 teaspoon vanilla extract (for base)
-
¼ teaspoon fine sea salt (for base)
-
1 ½ cups (255g) semi-sweet chocolate chips (for topping)
-
½ cup (113g) unsalted butter (for topping)
-
¾ cup (190g) creamy peanut butter (for topping)
-
1 teaspoon vanilla extract (for topping)
-
Pinch of fine sea salt (for topping)
-
Optional: 2 tablespoons powdered sugar, sifted (for topping)
Instructions
-
Step 1
Line a 9×13 inch baking pan with parchment paper, leaving an overhang. -
Step 2
Melt 1 cup unsalted butter. In a large bowl, combine melted butter, 2 cups powdered sugar, 1 ½ cups creamy peanut butter, 1 teaspoon vanilla extract, and ¼ teaspoon salt. Beat until smooth. -
Step 3
Gradually add 2 ½ cups graham cracker crumbs and mix until a thick dough forms. -
Step 4
Press the base mixture firmly and evenly into the prepared pan. Chill for 15-20 minutes while preparing topping. -
Step 5
Using a double boiler or microwave, melt 1 ½ cups semi-sweet chocolate chips and ½ cup unsalted butter until smooth. -
Step 6
Stir in ¾ cup creamy peanut butter, 1 teaspoon vanilla extract, and a pinch of salt until combined. Optionally, add 2 tablespoons powdered sugar for a firmer topping. -
Step 7
Pour and spread the chocolate topping evenly over the chilled peanut butter base. Optionally, sprinkle with flaky sea salt. -
Step 8
Refrigerate for at least 2-3 hours, or overnight, until completely firm. -
Step 9
Lift bars from the pan using the parchment overhang. Use a hot, dry knife to cut into squares. -
Step 10
Store in an airtight container in the refrigerator for up to 1 week, or freeze for up to 2-3 months.
Important Information
Nutrition Facts (Per Serving)
It is important to consider this information as approximate and not to use it as definitive health advice.
Allergy Information
Please check ingredients for potential allergens and consult a health professional if in doubt.
Leave a Comment