
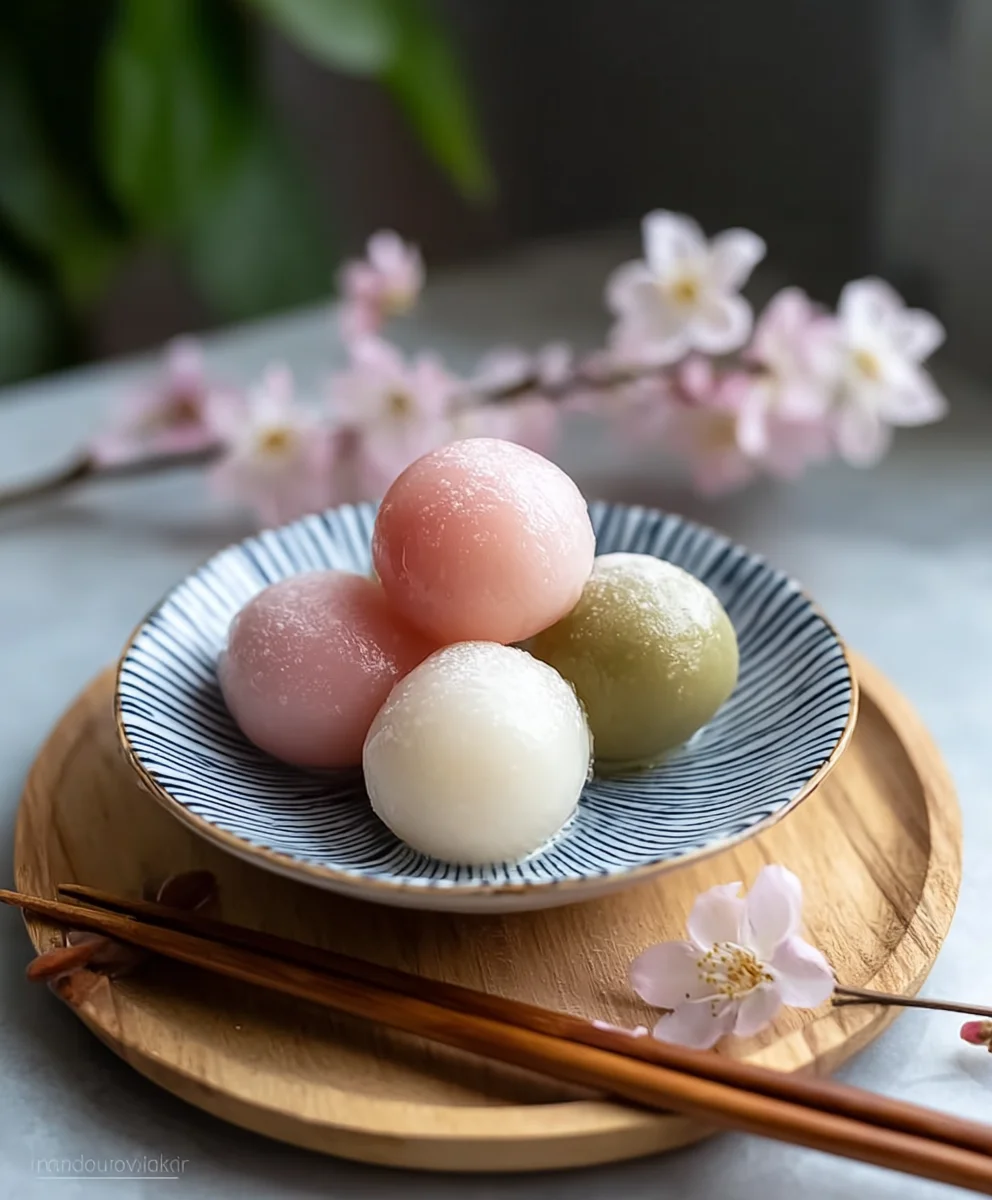
Easy Hanami Dango Recipe is an invitation to capture the ephemeral beauty of Japan’s cherry blossom season right in your own kitchen. Picture vibrant pink, pristine white, and verdant green dango skewers, perfectly symbolizing the joyous arrival of spring. These delightful, chewy rice dumplings are more than just a sweet treat; they are an integral part of Hanami, the traditional Japanese custom of enjoying the transient beauty of flowers.
For centuries, families and friends have gathered under blooming cherry trees, picnicking and sharing these iconic tri-colored sweets. The pink often represents the cherry blossoms, white symbolizes the remaining winter snow or the traditional white sake, and green embodies the fresh spring grass and new leaves. What makes this dish so universally adored is its unique texture—a wonderfully soft yet delightfully chewy bite that perfectly complements its subtle sweetness. Far from being an intimidating culinary endeavor, I’m thrilled to share an Easy Hanami Dango Recipe that empowers anyone to recreate this cultural delicacy at home. You’ll discover just how simple it is to bring a piece of Japanese spring festivity to your table, no matter the season.

Ingredients:
- 200g Shiratamako (sweet glutinous rice flour) – This is absolutely essential for achieving that wonderfully chewy, mochi-like texture that makes dango so delightful. Don’t substitute this with regular rice flour or mochiko if you can help it, as Shiratamako gives a superior result for dango.
- 160-180ml Warm Water – The exact amount can vary slightly depending on the brand of flour and humidity, so I always recommend adding it gradually until the dough feels just right. Warm water helps the flour absorb better and makes for a smoother dough.
- For the Pink Dango: A tiny pinch of natural red food coloring, a drop of beet juice, or a very small amount of strawberry powder. I personally love using a tiny bit of natural red food gel for vibrancy.
- For the Green Dango: 1-2 teaspoons of high-quality matcha powder, sifted. Ensure it’s culinary grade matcha for good color and flavor without being too bitter. If you prefer a milder color, start with less.
- Bamboo Skewers – You’ll need about 10-12 skewers, depending on how many dango you put on each. I find 3 dango per skewer is traditional and perfect for this recipe.
Equipment You’ll Need:
Having the right tools makes any cooking experience smoother and more enjoyable. For this Easy Hanami Dango Recipe, you won’t need anything too fancy, but a few key items will be very helpful:
- Large Mixing Bowl: Essential for combining your Shiratamako with water to form the dough.
- Measuring Cups and Spoons: For precise ingredient measurement, especially important for the water and coloring agents.
- Whisk or Fork: To initially combine the dry ingredients before adding water.
- Rubber Spatula or Wooden Spoon: Helpful for mixing the dough before you get your hands in there.
- Kitchen Scale: I highly recommend using a scale for weighing the Shiratamako for accuracy, and later for dividing the dough evenly.
- Small Bowls (3): These are super handy for dividing and coloring the dough portions.
- Large Pot: For boiling the dango. Make sure it’s big enough to hold plenty of water and allow the dango to float freely.
- Slotted Spoon or Spider Skimmer: For safely removing the cooked dango from the boiling water.
- Large Bowl of Ice Water: Crucial for immediately cooling the dango after boiling, which helps stop the cooking process and maintain their delightful chewiness.
- Paper Towels or Clean Kitchen Towel: For draining and gently patting the dango dry after their ice bath.
- Cutting Board or Clean Work Surface: For rolling out your dango balls.
Preparing the Dango Dough:
This is where the magic begins! Getting the dough consistency right is the key to perfectly chewy dango. Take your time, and you’ll be rewarded with a lovely, pliable dough that’s a joy to work with.
- First, I like to measure out my Shiratamako. Pour the entire 200g of Shiratamako into your large mixing bowl. It looks like fine, white granules, almost like coarse sugar, but it will transform beautifully.
- Next, we start adding the warm water. This is a crucial step for our Easy Hanami Dango Recipe. I always advise adding the water gradually, about 50ml at a time, mixing with a rubber spatula or your hands after each addition. The total amount will be somewhere between 160ml and 180ml. You’re aiming for a dough that is soft, pliable, and easy to handle, but not sticky. It should feel similar to play-doh.
- Once most of the water has been incorporated and the dough starts to come together, I like to get my hands in there. Knead the dough gently within the bowl for about 5-7 minutes. The goal here isn’t to develop gluten (as there’s none in rice flour!), but rather to ensure all the flour is hydrated, and the dough becomes smooth and uniform. You’ll notice it transform from a slightly lumpy mixture into a beautifully elastic and smooth ball. This kneading process is important for achieving the ideal smooth texture for your Hanami dango.
- To test the consistency, pinch off a small piece and roll it into a ball. If it forms a smooth ball without crumbling or cracking, and it doesn’t stick excessively to your hands, you’ve hit the sweet spot! If it’s too dry, add a tiny bit more warm water (just a teaspoon at a time). If it’s too sticky, you can knead in a small sprinkle of extra Shiratamako.
- Once you have a perfect, smooth ball of dough, divide it into three equal portions. I find using a kitchen scale for this step ensures uniformity, typically around 120-130g per portion. Place each portion into a separate small bowl.
Coloring and Shaping the Dango:
This is my favorite part of making this Easy Hanami Dango Recipe because it brings the vibrant colors of spring to life! Hanami dango traditionally features three distinct colors: white, pink, and green, symbolizing the cherry blossoms, their new leaves, and the winter snow. We’ll leave one portion white, color one pink, and one green.
- Take one of your divided dough portions and leave it as is – this will be your beautiful white dango, representing the winter or purity.
- For the pink dango, take a second portion of dough. Add a tiny amount of your chosen red food coloring (a drop of gel or a tiny pinch of powder). Knead the color into the dough thoroughly until it’s evenly distributed and you have a lovely, consistent pink hue. Be careful not to add too much color at once; you can always add more, but you can’t take it out! I aim for a soft, pastel pink, reminiscent of cherry blossoms.
- For the green dango, take the third portion of dough. Sift 1-2 teaspoons of matcha powder directly over the dough. Start with one teaspoon, knead it in, and see if the color and flavor are to your liking. If you want a deeper green and more pronounced matcha flavor, add the second teaspoon. Matcha can sometimes make the dough a little drier, so if it feels too stiff after adding the matcha, you can very slightly moisten your hands and knead it in. The goal is a vibrant, fresh green.
- Now that you have three beautiful colors of dough, it’s time to shape them. From each colored dough portion (white, pink, and green), roll out small, uniform balls. I usually aim for about 10-12 balls from each color, meaning each dango ball will be roughly 15-20 grams. The size is important for cooking evenly and looking appealing on the skewer. I like to roll them between my palms until they are perfectly smooth spheres. If you notice any cracks, gently knead that piece of dough a little more before rolling again.
- Place the finished dango balls on a clean plate or a lightly floured surface as you roll them, making sure they don’t touch too much. This also gives them a little bit of time to rest before cooking.
- Pro Tip: To ensure your dango cook evenly and look consistent, try to make all the balls roughly the same size. This step, while a bit repetitive, makes a huge difference in the final presentation of your Easy Hanami Dango Recipe.
Cooking the Dango:
Cooking dango is surprisingly quick and simple, but there are a few key points to remember to ensure they turn out perfectly chewy and delicious every time. This phase is quick, so have everything ready to go!
- First, fill your large pot with plenty of water – about two-thirds full – and bring it to a rolling boil over high heat. You want a good, vigorous boil for the dango to cook properly. While the water is heating, prepare your ice bath: fill a large bowl with cold water and plenty of ice cubes. This step is critical for cooling the dango rapidly.
- Once the water is boiling, gently drop the dango balls into the pot, a few at a time, being careful not to overcrowd the pot. I usually cook them in batches of 10-15, depending on the size of my pot. Overcrowding can lower the water temperature and lead to uneven cooking.
- The dango will sink to the bottom of the pot initially. As they cook, they will gradually float to the surface. This is your main indicator that they are done! Once the dango balls float, let them continue to boil for an additional 1-2 minutes. This ensures they are cooked all the way through and prevents them from being gummy in the center.
- Using your slotted spoon or spider skimmer, carefully remove the cooked dango from the boiling water. Immediately transfer them into the prepared ice bath. This sudden temperature change stops the cooking process, keeps the dango firm, and gives them that wonderful, resilient chewiness that dango are famous for. Let them cool in the ice bath for about 2-3 minutes.
- After their ice bath, remove the dango and place them on a clean kitchen towel or paper towels to drain and gently pat them dry. You want to remove as much surface water as possible before skewering them. This prevents them from being slippery and ensures they hold their shape beautifully.
- Repeat the boiling and cooling process for all your batches of dango until every single one is perfectly cooked and chilled. You’ll notice they become slightly translucent and wonderfully soft yet firm after the ice bath. This straightforward cooking method is what makes this an truly Easy Hanami Dango Recipe.
Assembling the Hanami Dango Skewers:
Now comes the moment to bring all the colors together and create the iconic Hanami dango skewers! This is where your delicious, soft, and chewy dango truly become a feast for the eyes.
- Gather your cooked and dried dango balls – you should have a lovely array of white, pink, and green. Lay them out on your clean work surface so they are easy to access.
- Take one of your bamboo skewers. The traditional order for Hanami dango is green at the bottom, then white in the middle, and pink at the top. This color scheme beautifully represents the progression of spring: the fresh green leaves emerging, followed by the white of the cherry blossoms just before full bloom, and finally the delicate pink of the fully opened flowers.
- Carefully thread a green dango ball onto the skewer first, pushing it about an inch or so up the skewer, leaving enough room at the bottom to hold it comfortably.
- Next, gently thread a white dango ball onto the skewer, pushing it down to meet the green one.
- Finally, add a pink dango ball to the top, completing the trio. You can gently press them together so they sit snugly on the skewer.
- Repeat this process for all your remaining dango and skewers until all the beautiful spheres are assembled. You’ll likely get around 10-12 skewers from this Easy Hanami Dango Recipe. Seeing them all lined up, vibrant and ready to be enjoyed, is incredibly satisfying!
- My personal tip for skewering: If a dango ball feels a little resistant, twist the skewer slightly as you push it through instead of forcing it. This can prevent the dango from splitting. Handle them gently as they are quite soft.
Serving Suggestions and Storage:
Your beautiful Hanami dango are now ready to be enjoyed! This Easy Hanami Dango Recipe yields a delightful, chewy treat that’s best served fresh, but I also have some tips for enjoying them later if you have any leftovers.
- Immediate Enjoyment: Hanami dango are absolutely best served at room temperature, shortly after they’ve been assembled. Their texture is at its peak – wonderfully chewy and soft. They are a quintessential treat for spring picnics, especially under blooming cherry trees (Hanami!). Pair them with a warm cup of green tea for a truly authentic experience. The slight bitterness of the tea complements the subtle sweetness of the dango perfectly.
- For a Touch of Sweetness (Optional): While traditional Hanami dango are often enjoyed plain, if you prefer a little extra sweetness, you could serve them with a light drizzle of kinako (roasted soybean flour) mixed with a tiny bit of sugar, or a very thin coating of sweetened red bean paste (anko). However, I find the natural flavors and textures are lovely on their own.
- Storage: If you happen to have any leftover dango (which is rare in my house!), you can store them. Place the skewers in an airtight container. I like to lay them flat or stand them upright if the container allows, ensuring they don’t get squashed. Store them in the refrigerator for up to 2 days. Beyond that, the texture tends to harden significantly.
- Reheating/Refreshing Stored Dango: Refrigerated dango will firm up considerably and lose some of their signature chewiness. To revive them, you have a few options:
- Steaming: My preferred method! Place the dango skewers in a steamer basket over simmering water for about 5-7 minutes. This gentle heat and moisture will soften them beautifully and bring back much of their original bouncy texture.
- Microwaving: If you’re in a hurry, you can microwave them. Place 1-2 skewers on a microwave-safe plate, cover loosely with a damp paper towel, and microwave on high for 15-30 seconds. Be very careful not to overcook, as they can become hard and rubbery if microwaved for too long.
- Grilling (Mitarashi Style): For a different twist, you can lightly grill or toast the refrigerated dango after steaming. A quick pan-fry with a tiny bit of oil or a few minutes under the broiler can give them a slightly crispy exterior, which is also delicious, especially if you then brush them with a sweet soy glaze (mitarashi sauce).
- Important Note: Freezing dango is generally not recommended as it significantly alters their delicate texture, often making them crumbly or overly soft upon thawing. For the best experience with this Easy Hanami Dango Recipe, aim to make and enjoy them fresh!
<h2>Conclusion:</h2>
<p>Well, my friends, we’ve reached the sweet finale of our culinary adventure! I truly hope you’re feeling inspired and ready to dive into the delightful world of homemade Hanami Dango. This isn’t just another dessert recipe; it’s an invitation to experience a slice of Japanese culture, a moment of gentle beauty, and a burst of delicate flavor, all from the comfort of your own kitchen. What makes this recipe truly a must-try is its incredible simplicity, contradicting the often-complex perception of traditional Japanese sweets. You’ll be amazed at how quickly and effortlessly you can transform a few basic ingredients into these exquisite, chewy mochi balls. There’s something incredibly rewarding about shaping each sphere, knowing that you’re crafting a treat that is as pleasing to the eye as it is to the palate.</p>
<p>I’ve walked you through every step with the aim of making the process as approachable as possible, because I genuinely believe everyone deserves to enjoy the unique texture and subtle sweetness of freshly made dango. The distinct chewiness, that perfect bounce that just makes you smile, is something you simply can’t get from store-bought versions. And the delicate trio of colors—pink, white, and green—isn’t just visually stunning; it’s a celebration of spring, renewal, and the fleeting beauty of cherry blossoms. Making this Hanami Dango isn’t just about following instructions; it’s about engaging your senses, embracing a little kitchen magic, and creating memories. It’s an ideal project for a quiet afternoon, a fun activity with family, or a delightful surprise for guests. Trust me, the sheer joy of biting into a freshly made dango, knowing you made it yourself, is unparalleled.</p>
<h4>Elevate Your Experience with Serving Suggestions and Creative Variations</h4>
<p>Now that you’ve mastered the <strong>Easy Hanami Dango Recipe</strong>, let’s talk about how to truly make these treats shine and how you can put your own unique spin on them. Traditionally, Hanami Dango is enjoyed outdoors under the cherry blossoms with a cup of freshly brewed green tea, and I wholeheartedly recommend this serene experience if you have the chance. The slight bitterness of the tea perfectly balances the dango’s sweetness, creating a harmonious palate. However, don’t feel limited to tradition! For a more modern twist, consider pairing your dango with a robust cup of coffee, a glass of iced hojicha, or even a sparkling fruit juice for a refreshing contrast.</p>
<p>But why stop there? Let your creativity flow with variations! While the classic trio of colors is iconic, you can easily experiment with natural food colorings. For instance, a tiny pinch of matcha powder can give you a more vibrant green, or a touch of beet powder can create a deeper, richer pink. For an extra layer of flavor and texture, try dusting your finished dango with kinako (roasted soybean flour) or a sprinkle of black sesame seeds. These additions introduce a nutty depth that is truly exquisite. You could also offer a small dish of sweetened red bean paste (anko) or a drizzle of brown sugar syrup for dipping, allowing everyone to customize their sweetness level.</p>
<p>If you’re feeling adventurous, consider subtly infusing the dango itself. A tiny amount of matcha in the green dough, a hint of sakura extract in the pink, or even a touch of vanilla in the white can add wonderful dimensions. For an unexpected delight, alternate the dango on your skewers with small pieces of fresh fruit like strawberries or blueberries—they add a burst of juiciness and a beautiful visual contrast. Imagine serving these at your next gathering, perhaps on a decorative platter alongside an assortment of your chosen dipping sauces or toppings. They’re guaranteed to be a conversation starter and a memorable highlight for your guests. The beauty of this recipe is its versatility; it’s a blank canvas waiting for your personal touch.</p>
<h4>Your Culinary Journey Begins Now!</h4>
<p>So, what are you waiting for? I’ve shared all my tips and tricks, and now it’s your turn to experience the magic of making Hanami Dango. Don’t be shy; gather your ingredients, set aside a little time, and let your kitchen fill with the delightful anticipation of a homemade treat. I promise you, the results will be incredibly satisfying and worth every moment. This isn’t just about eating; it’s about the joy of creation, the pride of accomplishment, and the simple pleasure of sharing something beautiful and delicious with those you care about. It’s a delightful journey that begins with a single step into your kitchen.</p>
<p>Once you’ve made your batch, I would absolutely love to hear about your experience! Did you stick to the traditional colors, or did you venture into new flavor combinations? What were your favorite serving suggestions? Please, don’t keep your masterpieces a secret! Share your photos and stories with us. I’m always eager to see how you personalize these recipes and make them your own. Your insights and creative twists inspire me and the entire community of home bakers. Let’s celebrate the simple joy of cooking and sharing delicious food together. Happy dango making, and I can’t wait to hear all about your delightful creations!</p>
Easy Hanami Dango Recipe: Perfect for Spring Picnics!
Capture the ephemeral beauty of Japan’s cherry blossom season with these vibrant pink, white, and green dango skewers, symbolizing the joyous arrival of spring. Delightfully chewy rice dumplings, an integral part of Hanami.
Ingredients
-
200g Shiratamako (sweet glutinous rice flour)
-
160-180ml Warm Water
-
Tiny pinch natural red food coloring, beet juice, or strawberry powder (for pink dango)
-
1-2 tsp culinary grade matcha powder, sifted (for green dango)
-
10-12 Bamboo Skewers
Instructions
-
Step 1
Combine 200g Shiratamako in a large bowl. Gradually add 160-180ml warm water, mixing and kneading for 5-7 minutes until a smooth, pliable, non-sticky dough forms. -
Step 2
Divide the dough into three equal portions (approx. 120-130g each). Leave one portion white. -
Step 3
For pink dango: Knead a tiny amount of natural red food coloring, beet juice, or strawberry powder into the second dough portion until evenly colored. -
Step 4
For green dango: Sift 1-2 tsp matcha powder into the third dough portion and knead until a vibrant green. Add a tiny bit of water if dough becomes too stiff. -
Step 5
Roll each colored dough portion into 12 small, uniform balls, approximately 20 grams each, for a total of 36 balls. Place them on a clean surface. -
Step 6
Fill a large pot two-thirds full with water and bring to a rolling boil. Prepare a large bowl with ice water. -
Step 7
Gently drop dango balls into the boiling water in batches, avoiding overcrowding. Cook until they float to the surface, then boil for an additional 1-2 minutes. Immediately transfer to the ice bath for 2-3 minutes to cool. -
Step 8
Remove dango from the ice bath and gently pat dry with paper towels. Repeat for all remaining batches. -
Step 9
Assemble skewers: Thread one green, one white, and one pink dango ball onto each bamboo skewer in that order. Gently press them together. This recipe yields 10-12 skewers. -
Step 10
Serve fresh at room temperature. Store leftovers in an airtight container in the refrigerator for up to 2 days. To refresh, steam for 5-7 minutes or microwave for 15-30 seconds (1-2 skewers, covered with a damp paper towel).
Important Information
Nutrition Facts (Per Serving)
It is important to consider this information as approximate and not to use it as definitive health advice.
Allergy Information
Please check ingredients for potential allergens and consult a health professional if in doubt.


Leave a Comment