
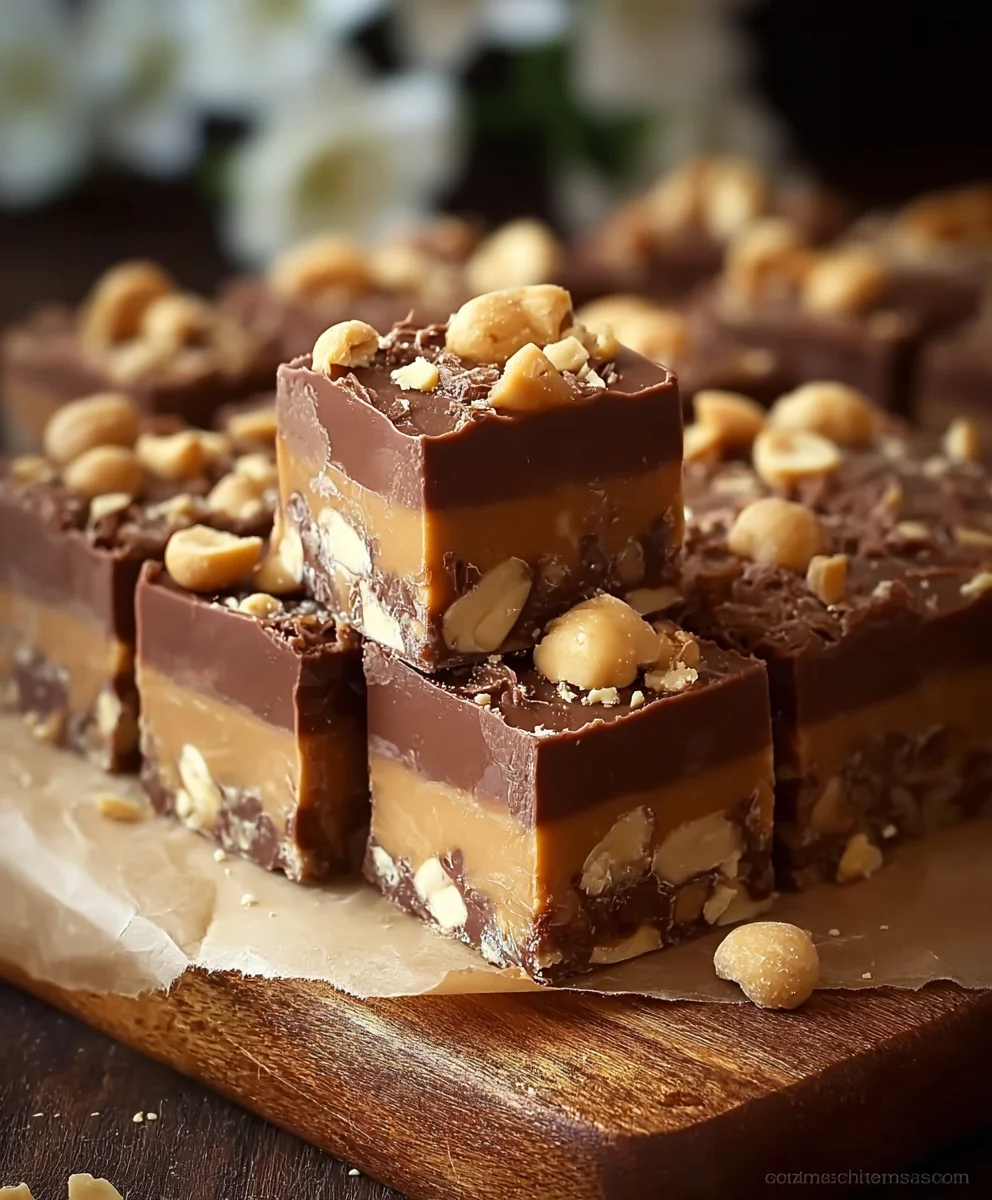
Snickers Fudge is not just a dessert; it’s a nostalgic journey wrapped in a delightful bite. Imagine sinking your teeth into a rich, creamy square that perfectly captures the iconic flavors of your favorite candy bar – luscious chocolate, gooey caramel, salty peanuts, and nougat-like sweetness, all without the effort of a trip to the candy store. This irresistible confection promises to be a showstopper, delivering profound satisfaction with every square.
While traditional fudge boasts a rich history dating back centuries, evolving from simple sugar confections into a beloved American classic, this particular iteration pays homage to a modern legend: the Snickers bar. Since its introduction in 1930, Snickers has captivated palates worldwide, and transforming its unmistakable profile into a homemade fudge is a testament to its enduring appeal and versatility as an inspiration.
People adore this Snickers Fudge not only for its incredible, multi-layered flavor profile – the harmonious blend of sweet and salty is simply irresistible – but also for its surprisingly straightforward preparation. It offers that decadent, impressive dessert experience with minimal fuss, making it perfect for potlucks, holiday gatherings, or simply a well-deserved treat after a long day. The convenience of creating such a luxurious confection at home is truly one of its greatest draws.

Ingredients:
-
For the Rich Chocolate Fudge Layer:
- 1 cup (2 sticks or 226g) unsalted butter: I always opt for unsalted so I can control the saltiness myself, ensuring the perfect balance in our Snickers Fudge.
- 2 cups (400g) granulated sugar: This provides the essential sweetness and helps create that classic fudge texture.
- 1 (12-ounce) can (approximately 1.5 cups or 354ml) evaporated milk: Not to be confused with condensed milk! Evaporated milk is crucial for the creamy consistency and rich flavor of the fudge.
- 1/2 cup (112g) unsweetened cocoa powder: I prefer a good quality Dutch-processed cocoa powder for a deeper, more intense chocolate flavor that truly shines in this “Snickers Fudge” recipe.
- 1 teaspoon vanilla extract: A touch of pure vanilla enhances all the other flavors beautifully.
- 1/4 teaspoon salt: Just a pinch to balance the sweetness and deepen the chocolate notes. It’s amazing what a little salt can do!
- 1 (12-ounce) package (340g) semi-sweet chocolate chips: High-quality chips melt smoothly and contribute to the luxurious texture.
- 1 (7-ounce) jar (approximately 1.25 cups or 200g) marshmallow creme or fluff: This is my secret weapon for super creamy, never-grainy fudge. It makes a world of difference!
-
For the Gooey Caramel and Peanut Layer:
- 1 (14-ounce) package (396g) soft caramel candies: Individually wrapped caramels work best here. I usually go for the classic, chewy variety. Make sure they are fresh for the best melt.
- 1/4 cup (4 tablespoons or 56g) unsalted butter: Again, unsalted butter for flavor control and to help the caramels melt smoothly.
- 3 tablespoons (45ml) evaporated milk: A little extra evaporated milk helps create a wonderfully pourable, smooth caramel sauce.
- 1 1/2 cups (about 225g) roasted, salted peanuts: The quintessential “Snickers” crunch and salty bite! I make sure they’re roasted for maximum flavor and salted to balance the sweetness.
-
For the Decadent Chocolate Topping:
- 1 cup (170g) semi-sweet chocolate chips: This layer adds another dimension of chocolate goodness and a beautiful finish to our “Snickers Fudge”.
- 2 tablespoons (28g) unsalted butter: To help the chocolate melt smoothly and give it a lovely sheen.
Equipment You’ll Need:
Having the right tools makes all the difference when crafting this delightful Snickers Fudge. Here’s what I recommend having on hand:
- 9×13 inch baking pan: A sturdy metal pan is ideal for even chilling.
- Heavy-bottomed saucepan (at least 4-quart capacity): Crucial for cooking the fudge base without scorching.
- Large heat-proof mixing bowl: For combining the chocolate and marshmallow creme off the heat.
- Rubber spatula or wooden spoon: For stirring and scraping every bit of goodness.
- Whisk: For ensuring a smooth, lump-free mixture.
- Measuring cups and spoons: Accuracy is key in baking and candy making.
- Parchment paper or aluminum foil: Essential for lining the pan, making removal and slicing a breeze.
- Candy thermometer (optional, but highly recommended): While not strictly necessary for this recipe, a good candy thermometer ensures precision, especially if you’re new to making fudge, helping you achieve the perfect soft-ball stage. It takes the guesswork out and significantly boosts your confidence in achieving consistent results for your Snickers Fudge.
- Microwave-safe bowl or double boiler setup: For melting the caramel and the final chocolate topping.
Preparing Your Workspace and Pan:
Before I dive into the delicious world of making Snickers Fudge, I always ensure my workspace is organized and my pan is perfectly prepped. This step is often overlooked but is absolutely critical for a smooth, stress-free process and easy removal of your finished fudge.
- Line the Pan: First, I grab my 9×13 inch baking pan. I want to make sure the fudge comes out easily, so I line it with parchment paper or aluminum foil. If I’m using foil, I lightly grease it with cooking spray or a thin layer of butter to prevent sticking. The parchment paper usually doesn’t need greasing, which is why I often prefer it. Make sure the paper or foil extends over the sides of the pan; these “overhangs” will act as convenient handles later for lifting the entire slab of Snickers Fudge out of the pan.
- Measure All Ingredients: This is a golden rule for any successful baking project, especially for fudge where timing can be important. I take out all my ingredients – butter, sugar, evaporated milk, cocoa powder, chocolate chips, marshmallow creme, caramels, peanuts, and vanilla – and measure them out into separate bowls or ramekins. This is what we call “mise en place” in the culinary world, and it means everything is ready to go when you need it. There’s nothing worse than scrambling for an ingredient when your fudge mixture is hot and needs immediate attention!
- Gather Your Tools: I also make sure all my necessary equipment is clean and within reach. This includes my heavy-bottomed saucepan, large mixing bowl, whisk, spatula, and any measuring tools. Being prepared helps me stay calm and focused throughout the cooking process, ensuring the best possible Snickers Fudge.
Once everything is prepped and ready, I feel confident and excited to start building the layers of this incredible Snickers Fudge!
Crafting the Irresistible Fudge Layer:
This is where the magic truly begins – creating the rich, creamy chocolate base that will form the foundation of our magnificent Snickers Fudge. Pay close attention to the details here, as the texture of your fudge depends on it!
- Combine Wet and Dry Ingredients (Initial Cook): In my large, heavy-bottomed saucepan (which I love because it distributes heat so evenly), I combine the unsalted butter, granulated sugar, evaporated milk, unsweetened cocoa powder, and salt. I give everything a good stir with my whisk to make sure the cocoa powder is fully incorporated and there are no lumps, especially when it comes to the sugar.
- Bring to a Rolling Boil: I place the saucepan over medium heat. It’s important to stir constantly, almost continuously, as the mixture heats up. This prevents the sugar from sticking to the bottom and scorching, which can ruin the flavor and texture of your fudge. I want to see the mixture come to a full, rolling boil – that means it’s bubbling vigorously over the entire surface, not just around the edges. This is a critical stage for the texture of your Snickers Fudge!
- Cook to the Right Temperature (or Time): Once it reaches a rolling boil, I set a timer for exactly 5 minutes. While it boils, I continue to stir constantly. If you have a candy thermometer, this is where it can be immensely helpful: cook the mixture until it reaches 234-237°F (112-114°C), which is the “soft-ball stage.” If you don’t have a thermometer, relying on the 5-minute constant boil is a tried-and-true method that works beautifully for this Snickers Fudge recipe. The constant stirring prevents burning and ensures the sugar dissolves properly.
- Remove from Heat and Add Chocolate & Marshmallow Creme: As soon as the 5 minutes are up (or the thermometer reads the correct temperature), I immediately remove the saucepan from the heat. Speed is important here! I swiftly add the semi-sweet chocolate chips and the entire jar of marshmallow creme to the hot fudge mixture. I then pour in the vanilla extract.
- Stir Until Silky Smooth: Now comes the fun part! Using my sturdy rubber spatula or wooden spoon, I vigorously stir the mixture. At first, it might look like a chaotic mess, but as the residual heat from the cooked sugar mixture melts the chocolate chips and the marshmallow creme, everything will come together. I keep stirring until the mixture is completely smooth, glossy, and all the chocolate and marshmallow creme have fully dissolved and blended into a uniform, irresistible chocolate fudge. There should be no streaks or lumps. This usually takes a couple of minutes of dedicated stirring.
- Pour into Prepared Pan: Working quickly, I immediately pour the hot, glorious chocolate fudge mixture into my prepared 9×13 inch pan. I use my spatula to spread it evenly into all corners and ensure the top is as smooth as possible. Don’t worry if it’s not absolutely perfect; the next layer will cover any minor imperfections.
- Set Aside to Firm Up: I set the pan aside at room temperature while I prepare the next luscious layer. Allowing it to cool slightly will help prevent the caramel layer from sinking too much.
With the fudge layer perfectly set, we’re one step closer to our ultimate homemade Snickers Fudge masterpiece!
Creating the Dreamy Caramel and Peanut Layer:
This is where the “Snickers” magic truly comes alive, with the chewy caramel and the satisfying crunch of roasted peanuts. This layer perfectly complements the rich chocolate fudge base.
- Unwrap Caramels: First things first, I unwrap all those delicious soft caramel candies. This can be a bit tedious, but it’s a necessary step. I usually do this while the fudge layer is cooking so they’re ready to go. Make sure you have the full 14 ounces ready.
- Melt Caramels with Butter and Evaporated Milk: In a medium-sized microwave-safe bowl, I combine the unwrapped caramel candies, 1/4 cup of unsalted butter, and 3 tablespoons of evaporated milk.
- Microwave in Intervals (or use a Double Boiler): I place the bowl in the microwave and heat it in 30-second intervals, stirring thoroughly after each interval. It’s crucial not to overheat the caramel, as it can seize up or burn. I continue this process until the caramels are completely melted and the mixture is smooth and creamy. This usually takes about 2-3 minutes total, depending on your microwave’s power. Alternatively, if you prefer, you can melt the caramels in a saucepan over low heat on the stovetop, stirring constantly until smooth, or use a double boiler for a very gentle melt. The key is patience and constant attention.
- Achieve Smooth Caramel Consistency: Once melted, I stir the caramel mixture until it’s perfectly smooth and has a beautiful, glistening sheen. There shouldn’t be any lumps of unmelted caramel. If it seems a little too thick, you can add another teaspoon or two of evaporated milk, stirring well, until it reaches a pourable but still thick consistency.
- Fold in Peanuts: Once the caramel is smooth, I add the 1 1/2 cups of roasted, salted peanuts directly into the melted caramel. I use my spatula to gently fold them in until they are evenly distributed throughout the caramel. Every bite of our Snickers Fudge needs that delightful peanut crunch!
- Pour Over Fudge Layer: Now, working relatively quickly while the caramel is still warm and pourable, I spoon the peanut caramel mixture over the set (but not fully hardened) chocolate fudge layer in the pan. I gently spread it out with my spatula, trying to cover the entire surface evenly. It doesn’t have to be perfect, but an even layer ensures every piece of Snickers Fudge gets an equal share of caramel and peanuts.
- Allow to Set Slightly: I let this caramel and peanut layer sit at room temperature for about 30-60 minutes, or until it has firmed up slightly. This prevents the top chocolate layer from mixing too much with the caramel, keeping our distinct layers intact for a truly authentic Snickers Fudge experience.
The layers are building up beautifully, and I can already imagine that satisfying combination of chocolate, caramel, and peanuts. We’re almost there!
The Grand Finale: Melting the Chocolate Topping:
This final layer is the crowning glory of our Snickers Fudge. It adds an extra touch of chocolate decadence and a beautiful, smooth finish that truly elevates the visual appeal and taste.
- Combine Topping Ingredients: In another microwave-safe bowl (or a clean saucepan if you’re using the stovetop method), I combine the 1 cup of semi-sweet chocolate chips for the topping with the 2 tablespoons of unsalted butter. The butter helps create a wonderfully smooth, glossy ganache-like topping that sets up nicely.
- Melt Chocolate and Butter: I microwave the chocolate and butter in 20-second intervals, stirring well after each one. Chocolate can seize or burn easily if overheated, so short bursts and thorough stirring are key. I continue until the mixture is completely melted and beautifully smooth. If using a double boiler, stir until just melted and smooth. The goal is a pourable but not overly hot chocolate.
- Pour Over Caramel Layer: Once the chocolate topping is perfectly melted and smooth, I carefully pour it over the slightly firmed caramel and peanut layer. I gently tilt the pan or use a small offset spatula to spread the chocolate evenly across the entire surface. I try to make it as smooth and flat as possible, creating a lovely, uniform top for our Snickers Fudge.
- Optional: Garnish for Extra Flair: If I’m feeling fancy, sometimes I’ll sprinkle a few extra chopped roasted peanuts or a very light drizzle of extra caramel (if I have any leftover) on top of the wet chocolate before it sets. This adds a nice visual cue to what’s inside and a bit more texture, making your Snickers Fudge even more appealing.
The visual appeal is just as important as the taste, and this final chocolate layer truly seals the deal, making our Snickers Fudge look as irresistible as it tastes!
Chilling and Slicing Your Snickers Fudge:
Patience is a virtue, especially when it comes to chilling fudge. This final phase ensures your Snickers Fudge sets perfectly, allowing for clean, beautiful slices.
- Chill Thoroughly: Once the final chocolate layer has been applied, I gently place the pan into the refrigerator. It’s crucial to chill the Snickers Fudge for at least 4-6 hours, or even better, overnight. This extended chilling time allows all the layers to firm up completely and meld together beautifully, preventing a sticky mess when you try to cut it. I sometimes even put it in the freezer for about 30-60 minutes if I’m short on time and need it to firm up faster, but a slow chill in the fridge is ideal for the best texture.
- Prepare for Slicing: When the Snickers Fudge is completely firm, I take the pan out of the refrigerator. Using the parchment paper or foil overhangs, I carefully lift the entire slab of fudge out of the pan and place it onto a clean cutting board. This is where those overhangs prove to be incredibly helpful!
- Warm Your Knife: For the cleanest cuts, I always recommend warming your knife. I fill a tall glass with hot water and dip a long, sharp knife into it for about 15-20 seconds. Then, I wipe the blade completely dry with a clean kitchen towel before making each cut. This warm, dry blade glides through the fudge without dragging or sticking, creating beautiful, precise squares or rectangles of Snickers Fudge.
- Slice into Desired Pieces: I typically trim the edges first to create a neat, uniform block. Then, I cut the fudge into 1-inch squares or 1×2-inch rectangles, depending on my preference. After each cut, I wipe the knife clean and re-warm it if necessary to maintain those perfect edges. The goal is to make bite-sized pieces that are easy to pick up and enjoy. Remember, this Snickers Fudge is rich, so smaller pieces are often appreciated!
And there you have it! Beautifully sliced, perfectly layered Snickers Fudge, ready to be devoured. This recipe consistently delivers that amazing candy bar experience in a delightful fudge form.
Tips for Perfect Snickers Fudge Every Time:
Making fudge, especially a layered delight like this Snickers Fudge, can feel a bit daunting if you’re new to it. But with a few insider tips, you’ll be a fudge master in no time! I’ve learned these through experience, and they truly make a difference.
- Use a Heavy-Bottomed Pot: I cannot stress this enough. A heavy-bottomed saucepan distributes heat much more evenly than a thin one. This significantly reduces the risk of scorching your sugar mixture, which can give your fudge an unpleasant burnt taste. It’s an investment worth making for any candy-making endeavors, especially for consistent Snickers Fudge.
- Don’t Skimp on Stirring: When you’re cooking the initial fudge base, constant stirring is non-negotiable. This prevents the sugar from crystallizing on the sides of the pan and ensures an even cook. For the fudge to be smooth and creamy, rather than grainy, the sugar needs to dissolve fully and cook consistently. Think of it as a little arm workout for a delicious reward – your amazing Snickers Fudge!
- Accurate Measurements are Key: Baking and candy making are often precise sciences. I always use proper measuring cups and spoons and level off ingredients like sugar and cocoa powder. Eyeballing can lead to inconsistent results. For the best Snickers Fudge, precision truly helps.
- Humidity Matters: Fudge can be finicky on humid days. Excess moisture in the air can make it harder for fudge to set properly. If you live in a very humid climate, try to make your Snickers Fudge on a drier day, or consider extending the chilling time in the refrigerator.
- The Role of Marshmallow Creme: If you’ve struggled with grainy fudge in the past, marshmallow creme is your new best friend. It acts as an emulsifier and helps prevent sugar crystallization, which is often the culprit behind grainy texture. It guarantees a smooth, creamy Snickers Fudge every single time. Don’t skip it!
- Don’t Overcook the Caramel: When melting the caramel, remember that low and slow is the way to go. Overheating caramel can make it hard and brittle once cooled. You want it just melted and smooth, still wonderfully pliable and chewy for that authentic Snickers Fudge experience.
- Patience During Chilling: I know it’s hard to wait, especially when the aroma of chocolate and caramel is filling your kitchen, but chilling is perhaps the most important step for getting perfectly sliceable Snickers Fudge. Rushing this can lead to a sticky mess. Trust the process, and your patience will be rewarded with neat, professional-looking squares.
- Warm Knife for Clean Cuts: This simple trick makes all the difference for presentation. A warm, dry knife cuts through multiple layers cleanly, preventing sticking and smearing. It makes your homemade Snickers Fudge look like it came straight from a gourmet candy shop.
- Customize Your Crunch: While roasted, salted peanuts are classic for “Snickers Fudge,” feel free to experiment with other nuts if you prefer, like cashews or almonds, though peanuts really do offer that authentic flavor profile.
By following these tips, I find that my Snickers Fudge always turns out beautifully, consistently impressing everyone who tries it!
Storage Recommendations:
Once you’ve gone to all the effort of creating this magnificent Snickers Fudge, you’ll want to ensure it stays fresh and delicious for as long as possible. Here are my go-to storage tips:
- Airtight Container: I always store my Snickers Fudge in an airtight container. This is crucial for preventing it from drying out and absorbing odors from other items in the fridge.
- Refrigeration is Best: Due to the butter, caramel, and dairy in the fudge, it’s best kept in the refrigerator. This helps maintain its firm texture and extends its shelf life significantly.
- Separate Layers with Parchment: If you’re stacking layers of fudge in your container, I recommend placing a piece of parchment paper between each layer. This prevents the pieces from sticking together and makes it easier to grab a single square without damaging the others.
- Bring to Room Temperature Before Serving (Optional): While delicious straight from the fridge, I sometimes like to let my Snickers Fudge sit out at room temperature for about 10-15 minutes before serving. This allows the fudge and caramel to soften slightly, enhancing their creamy, chewy texture.
- Shelf Life: Stored properly in an airtight container in the refrigerator, your homemade Snickers Fudge will stay fresh and delightful for up to 2-3 weeks. Honestly, it rarely lasts that long in my house!
- Freezing for Longer Storage: Yes, you can freeze Snickers Fudge! Wrap individual pieces or small blocks tightly in plastic wrap, then place them in a freezer-safe airtight container or bag. It can be frozen for up to 2-3 months. When you’re ready to enjoy, simply thaw it in the refrigerator overnight or at room temperature for a few hours.
Proper storage ensures that every bite of your delicious Snickers Fudge is as fresh and satisfying as the first!
Conclusion:
And there you have it, my friends! We’ve journeyed through the creation of what I truly believe is one of the most delightful and undeniably decadent treats you could ever whip up in your own kitchen. This isn’t just any fudge recipe; it’s an experience, a celebration of all things rich, chewy, and utterly satisfying. This Snickers Fudge is a triumph of textures and flavors, a harmonious blend of creamy chocolate, gooey caramel, salty peanuts, and the unmistakable nougat-like chew that makes a Snickers bar so iconic. It’s the kind of dessert that elicits gasps of delight and immediate requests for the recipe, proving that sometimes, the simplest methods yield the most profound culinary joy. I promise you, making this fudge isn’t just about following steps; it’s about crafting pure happiness, one batch at a time. The satisfaction of seeing those beautifully layered, irresistible squares emerge from your pan is unmatched, and the first bite? Pure bliss, every single time.
Serving Up Your Sweet Masterpiece:
Once your glorious batch of fudge has set and you’ve cut it into perfect, bite-sized squares, the possibilities for enjoyment are endless. Of course, the most immediate suggestion is to simply devour it as is – because, let’s be honest, resisting its allure is a Herculean task! But if you’re looking to elevate the experience or share your creation with others, I have a few ideas. These fudge squares make for an absolutely fantastic contribution to any potluck or holiday gathering; they’re always the first to disappear. Package them beautifully in small treat bags or a decorative tin, and you’ve got yourself a heartfelt, homemade gift that speaks volumes. Imagine presenting a box of this homemade Snickers Fudge to a loved one – it’s a gesture of pure affection. They’re also an incredible after-dinner indulgence, perhaps served alongside a hot cup of coffee, a robust espresso, or even a glass of cold milk to cut through the richness. For a truly luxurious dessert, consider crumbling a piece over a scoop of vanilla bean ice cream, letting its rich flavors slowly melt into the cool creaminess. Oh, and if you’re planning a movie night, trust me, a plate of these little beauties will make your couch-side snack game legendary.
Endless Variations to Spark Your Creativity:
While this base recipe is perfection in itself, I always encourage you to play around and make it your own! That’s the beauty of home cooking, isn’t it? If you’re feeling adventurous, here are a few ways to tweak this incredible Snickers Fudge. For a darker, more intense chocolate experience, try using a higher percentage cocoa chocolate in your fudge base. Or, for a milkier, sweeter profile, opt for all milk chocolate. You could also experiment with different types of nuts – swap out some of the peanuts for toasted almonds, pecans, or even cashews to introduce a slightly different crunch and flavor. A sprinkle of flaky sea salt over the top before it sets is another fantastic addition; that sweet-and-salty combination just takes everything to another level. And for the ultimate indulgence, why not add a layer of a different flavored fudge to the top or bottom? Imagine a peanut butter fudge layer underneath, creating an even more complex flavor profile. You could also mix in mini chocolate chips or a few extra chopped Snickers bars (yes, even more!) directly into the fudge base for an extra textural surprise. Don’t be afraid to experiment; your kitchen is your laboratory, and delicious discoveries await!
Your Turn to Create and Share!
Now, it’s your moment to shine! I’ve shared my secrets, my passion, and my enthusiasm for this truly magnificent recipe, and now I eagerly await yours. Don’t let another moment pass by; gather your ingredients, clear your counter, and dive into the delightful process of making this Snickers Fudge. I promise you, the reward far outweighs the minimal effort involved. Once you’ve experienced the magic of creating and tasting this incredibly satisfying confection, I would absolutely love to hear all about it. Please, share your culinary adventures with me! Did you stick to the original recipe, or did you venture into exciting new variations? How did your family and friends react? Snap a photo, drop a comment, and let me know how it turned out for you. Your feedback, your stories, and your delicious results are what truly make this culinary community thrive. So, go forth, conquer that kitchen, and prepare to be utterly amazed by the sheer deliciousness you’re about to create!
Snickers Fudge
Snickers Fudge is not just a dessert; it’s a nostalgic journey wrapped in a delightful bite. Imagine sinking your teeth into a rich, creamy square that perfectly captures the iconic flavors of your favorite candy bar – luscious chocolate, gooey caramel, salty peanuts, and nougat-like sweetness, all without the effort of a trip to the candy store. This irresistible confection promises to be a showstopper, delivering profound satisfaction with every square.
Ingredients
-
1 cup (226g) unsalted butter
-
2 cups (400g) granulated sugar
-
1 (12-ounce) can (354ml) evaporated milk
-
1/2 cup (112g) unsweetened cocoa powder (Dutch-processed recommended)
-
1 tsp vanilla extract
-
1/4 tsp salt
-
1 (12-ounce) package (340g) semi-sweet chocolate chips
-
1 (7-ounce) jar (200g) marshmallow creme or fluff
-
1 (14-ounce) package (396g) soft caramel candies, unwrapped
-
1/4 cup (56g) unsalted butter (for caramel)
-
3 tbsp (45ml) evaporated milk (for caramel)
-
1 1/2 cups (225g) roasted, salted peanuts
-
1 cup (170g) semi-sweet chocolate chips (for topping)
-
2 tbsp (28g) unsalted butter (for topping)
Instructions
-
Step 1
Line a 9×13 inch baking pan with parchment paper or foil, leaving an overhang for easy removal. If using foil, lightly grease. Measure out all ingredients and gather equipment for ‘mise en place’. -
Step 2
In a large, heavy-bottomed saucepan, combine 1 cup unsalted butter, 2 cups granulated sugar, 1 can evaporated milk, 1/2 cup unsweetened cocoa powder, and 1/4 tsp salt. Bring to a full, rolling boil over medium heat, stirring constantly. Continue boiling for 5 minutes, stirring continuously, or until it reaches 234-237°F (112-114°C) (soft-ball stage) with a candy thermometer. -
Step 3
Immediately remove from heat. Swiftly stir in 1 (12-ounce) package semi-sweet chocolate chips, 1 (7-ounce) jar marshmallow creme, and 1 tsp vanilla extract until completely smooth, glossy, and uniform. Pour the hot fudge mixture into the prepared pan, spread evenly, and set aside to cool slightly. -
Step 4
In a microwave-safe bowl, combine the unwrapped 14-ounce package caramel candies, 1/4 cup unsalted butter, and 3 tbsp evaporated milk. Microwave in 30-second intervals, stirring after each, until caramels are completely melted and smooth (approx. 2-3 minutes). Alternatively, melt using a double boiler or saucepan over low heat. Fold in 1 1/2 cups roasted, salted peanuts until evenly distributed. -
Step 5
Spoon the warm peanut caramel mixture over the cooled chocolate fudge layer, spreading evenly. Let this layer sit at room temperature for 30-60 minutes to firm up slightly. -
Step 6
In a microwave-safe bowl, combine 1 cup semi-sweet chocolate chips and 2 tbsp unsalted butter. Microwave in 20-second intervals, stirring after each, until completely melted and smooth. Carefully pour over the slightly firmed caramel and peanut layer, spreading evenly for a smooth finish. (Optional) Garnish with extra peanuts or caramel. -
Step 7
Refrigerate the fudge for at least 4-6 hours, or preferably overnight, until completely firm. Once firm, lift the entire slab from the pan using the overhangs and place on a cutting board. For clean cuts, warm a sharp knife in hot water, wipe dry, then slice into desired 1-inch squares or 1×2-inch rectangles. Clean and re-warm the knife after each cut as needed.
Important Information
Nutrition Facts (Per Serving)
It is important to consider this information as approximate and not to use it as definitive health advice.
Allergy Information
Please check ingredients for potential allergens and consult a health professional if in doubt.


Leave a Comment