
?utm_medium=social&utm_source=pinterest&utm_campaign=tailwind_tribes&utm_content=tribes&utm_term=992166412_44896978_297243 – a string that, for me, embodies the comforting warmth and rich history of a recipe truly close to my heart: Grandma Elara’s Hearthside Pie. Imagine the scene: a chilly evening, a crackling fire, and the irresistible aroma of a golden-crusted pie wafting from the kitchen. This isn’t just a dish; it’s a timeless embrace, a culinary hug that instantly transports you to a place of profound coziness and contentment.
Rooted in generations of family tradition, this beloved pie tells a story of resourcefulness and communal gatherings. Its origins trace back to simpler times, when families would lovingly combine the seasonal bounty of their gardens with humble pantry staples to create a substantial and incredibly satisfying meal. It’s a dish that symbolizes togetherness, often served during harvest festivals and family celebrations, bringing smiles and full bellies to all who partake.
What makes Grandma Elara’s Hearthside Pie so universally adored, you ask? It’s the harmonious blend of savory goodness – tender vegetables, succulent meats (or robust legumes for a vegetarian twist), all nestled beneath a flaky, buttery pastry. The taste is profoundly comforting, the texture perfectly balanced, and the ease of preparation, considering its impressive outcome, is simply a dream. Just as a unique identifier like the string “?utm_medium=social&utm_source=pinterest&utm_campaign=tailwind_tribes&utm_content=tribes&utm_term=992166412_44896978_297243” helps pinpoint a specific source, each ingredient in this pie plays a crucial, defining role, contributing to a flavor profile that is utterly unforgettable. I am absolutely thrilled to share this cherished recipe with you today!
Ingredients:
For the Rich Meat Sauce (Ragu):
- 2 tablespoons Olive Oil: A good quality extra virgin olive oil helps set the base flavor.
- 1 pound Ground Beef (80/20 blend recommended): I always go for a slightly fattier blend for maximum flavor and moisture in the sauce.
- 1/2 pound Ground Pork: This adds another layer of richness and depth that ground beef alone can’t quite achieve.
- 1 large Yellow Onion: Finely diced. This is the aromatic backbone of our sauce.
- 2 Carrots: Medium-sized, peeled and finely diced. Their natural sweetness balances the savory meat.
- 2 Celery Stalks: Finely diced. Part of the classic soffritto trio, adding a subtle peppery note.
- 4-5 cloves Garlic: Minced. I love garlic, so I’m usually generous here!
- 1/2 cup Dry Red Wine: Something like a Chianti or a Merlot works wonderfully to deglaze the pan and add complexity. Don’t skip this step!
- 1 (28 ounce) can Crushed Tomatoes: High-quality crushed tomatoes are crucial for a vibrant sauce. I look for brands with minimal additives.
- 1 (15 ounce) can Tomato Sauce: To add a bit more liquid and smooth consistency.
- 1 (6 ounce) can Tomato Paste: This concentrates the tomato flavor beautifully.
- 2 cups Beef Broth: Or homemade beef stock, if you’re feeling ambitious. It helps the sauce simmer without drying out.
- 2 Bay Leaves: For an earthy, aromatic undertone. Remember to remove them before serving.
- 1 teaspoon Dried Oregano: A classic Italian herb that pairs perfectly with tomatoes and meat.
- 1/2 teaspoon Dried Basil: Another essential herb for that authentic Italian taste.
- 1/4 teaspoon Red Pepper Flakes (optional): If you like a tiny bit of heat, this is a great addition. Adjust to your preference.
- Salt and Freshly Ground Black Pepper: To taste, throughout the cooking process.
- Fresh Parsley: A handful, chopped, for garnish and a fresh finish.
For the Creamy Béchamel Sauce:
- 1/2 cup Unsalted Butter: The base for our roux.
- 1/2 cup All-Purpose Flour: To create the thickening roux.
- 4 cups Whole Milk: Warmed slightly is best, as it helps prevent lumps.
- 1/2 teaspoon Salt: Or to taste.
- 1/4 teaspoon White Pepper: Preferred over black pepper for its subtle flavor and to maintain the sauce’s pristine color.
- Pinch of Nutmeg: Freshly grated is always superior; it adds a wonderfully delicate, warm spice.
For Assembling the Lasagna:
- 12-15 sheets Lasagna Noodles: Oven-ready (no-boil) noodles are a fantastic time-saver, but traditional noodles work too – just remember to pre-boil them al dente if not using oven-ready. I often opt for fresh pasta sheets when I can find them.
- 15 ounces Ricotta Cheese: Full-fat is best for a creamy texture.
- 1 large Egg: Beaten. This helps bind the ricotta mixture.
- 1/4 cup Fresh Parsley: Chopped, for the ricotta mixture.
- 1/2 teaspoon Salt: For the ricotta.
- 1/4 teaspoon Black Pepper: For the ricotta.
- 4 cups Shredded Mozzarella Cheese: Low-moisture, part-skim mozzarella melts beautifully. I sometimes mix in a little fresh mozzarella for extra gooeyness.
- 1 cup Grated Parmesan Cheese: Or Pecorino Romano for a sharper flavor. This is for layering and topping.
Equipment You’ll Need:
- Large Dutch Oven or Heavy-Bottomed Pot (for the meat sauce)
- Medium Saucepan (for the béchamel)
- Large Baking Dish (9×13 inch is standard)
- Large Mixing Bowls
- Whisk
- Spatula or Wooden Spoon
- Chef’s Knife and Cutting Board
- Measuring Cups and Spoons
Getting Started: A Little Prep Work First
Before we dive into the cooking, I always find it incredibly helpful to get all my ingredients prepped. This is what chefs call “mise en place,” and it truly makes the whole process smoother and more enjoyable. Trust me, you don’t want to be scrambling for diced onions when your meat is searing!
- First things first, gather all your ingredients. Having everything laid out and ready makes a huge difference.
- Finely dice your yellow onion, carrots, and celery. These three form the “soffritto,” the aromatic base for our meat sauce. Aim for pieces that are roughly the same size so they cook evenly.
- Mince your garlic cloves. The finer, the better, for maximum flavor release.
- If you’re using traditional lasagna noodles (not oven-ready), bring a large pot of salted water to a rolling boil. Cook your noodles according to package directions until they are al dente – still firm but pliable. Drain them immediately and lay them out on parchment paper or a clean kitchen towel to prevent sticking. A little olive oil tossed with them can also help.
- In a medium bowl, combine the ricotta cheese, beaten egg, chopped fresh parsley, 1/2 teaspoon salt, and 1/4 teaspoon black pepper. Mix this thoroughly until well combined. This mixture will be wonderfully creamy and flavorful in our layers.
- Shred your mozzarella and grate your Parmesan, if they aren’t pre-shredded. Freshly grated cheese always tastes better and melts more smoothly.
Phase 1: Crafting the Rich Meat Sauce (Ragu)
This is where the magic begins! A truly great lasagna starts with a deeply flavorful meat sauce. Don’t rush this part; slow and steady wins the flavor race.
- Sear the Meats: Place your large Dutch oven or heavy-bottomed pot over medium-high heat. Add 1 tablespoon of olive oil. Once shimmering, add the ground beef and ground pork. Break up the meat with a wooden spoon or spatula. Brown the meat thoroughly, stirring occasionally, until it’s no longer pink. This searing creates a wonderful depth of flavor. Don’t drain the fat just yet; some fat is good for flavor.
- Drain Excess Fat (if needed): If there’s an excessive amount of rendered fat, carefully tilt the pot and spoon out some of it, leaving about 1-2 tablespoons.
- Sauté the Soffritto: Reduce the heat to medium. Add the remaining 1 tablespoon of olive oil to the pot. Stir in your finely diced onions, carrots, and celery. Sauté them gently for about 8-10 minutes, or until the vegetables have softened significantly and the onions are translucent. This slow cooking allows their natural sweetness to develop.
- Add Garlic and Tomato Paste: Stir in the minced garlic and tomato paste. Cook for another 2-3 minutes, stirring constantly. You’ll notice the tomato paste deepening in color, almost caramelizing. This intensifies its flavor profile immensely.
- Deglaze with Wine: Pour in the dry red wine. Scrape the bottom of the pot with your wooden spoon to release any browned bits (these are packed with flavor!). Let the wine simmer for about 3-5 minutes, allowing most of the alcohol to evaporate and the liquid to reduce slightly.
- Introduce Tomatoes and Broth: Stir in the crushed tomatoes, tomato sauce, and beef broth. Add the bay leaves, dried oregano, and dried basil. If you’re using red pepper flakes, add them now.
- Simmer to Perfection: Bring the sauce to a gentle simmer. Reduce the heat to low, cover the pot partially, and let it cook for at least 1.5 to 2 hours, or even longer if you have the time. The longer it simmers, the more the flavors will meld and deepen, creating an incredibly rich sauce. Stir occasionally to prevent sticking.
- Season and Finish: After simmering, taste the sauce and adjust the seasoning with salt and freshly ground black pepper as needed. I usually find it needs a generous amount of salt. Remove and discard the bay leaves before proceeding.
Phase 2: Whipping Up the Silky Béchamel Sauce
Béchamel sauce is the secret to a truly creamy and luxurious lasagna, providing a fantastic counterpoint to the rich meat sauce. It’s surprisingly simple to make, but a whisk is your best friend here to ensure a lump-free texture.
- Melt the Butter: In your medium saucepan, melt the unsalted butter over medium heat. Be careful not to let it brown too much.
- Create the Roux: Once the butter is fully melted and foamy, add the all-purpose flour. Whisk continuously for about 1-2 minutes, creating a smooth paste called a roux. It should be a pale, golden color. Cooking the flour for this short time helps eliminate any raw flour taste.
- Gradually Add Milk: Slowly, a little at a time, pour the warmed whole milk into the roux while whisking constantly. I start by adding about half a cup, whisk until it’s fully incorporated and smooth, then add another half cup, and so on. This gradual addition is key to preventing lumps.
- Thicken the Sauce: Continue whisking over medium heat. The sauce will gradually thicken as it comes to a gentle simmer. This usually takes about 5-8 minutes. Keep whisking to ensure it’s smooth and lump-free.
- Season the Béchamel: Once the sauce has thickened to a consistency that coats the back of a spoon, remove it from the heat. Stir in the salt, white pepper, and a pinch of freshly grated nutmeg. Taste and adjust seasoning as necessary. You want this sauce to be well-seasoned, as it’s a major component of the lasagna’s flavor.
- Keep Warm (or cover): If you’re not assembling immediately, cover the surface of the béchamel with plastic wrap pressed directly onto the sauce to prevent a skin from forming.
Phase 3: The Grand Assembly of Your Lasagna
Now for the satisfying part: layering all those delicious components into one glorious dish! This is where your efforts truly come together.
- Preheat Oven: Preheat your oven to 375°F (190°C).
- Prepare Baking Dish: Lightly grease a 9×13 inch baking dish. I often use a little cooking spray or butter.
- First Layer of Sauce: Spread a thin layer (about 1/2 cup) of the meat sauce evenly across the bottom of the prepared baking dish. This prevents the noodles from sticking and provides a flavorful base.
- Noodle Layer: Arrange a single layer of lasagna noodles over the meat sauce. Depending on your noodles and dish, you might need to break some to fit. For oven-ready noodles, simply lay them flat. If using pre-boiled noodles, ensure they overlap slightly if needed, but not too much.
- Ricotta Layer: Spread half of the ricotta cheese mixture evenly over the noodles. I find an offset spatula works perfectly for this.
- Meat Sauce Layer: Spoon about 1.5 to 2 cups of the meat sauce over the ricotta layer, spreading it gently to cover.
- Béchamel Layer: Drizzle about 1 cup of the béchamel sauce over the meat sauce.
- Cheese Layer: Sprinkle generously with about 1 cup of shredded mozzarella and 1/4 cup of grated Parmesan cheese.
- Repeat the Layers: Place another layer of noodles on top of the cheese.
- Second Ricotta Layer: Spread the remaining half of the ricotta cheese mixture.
- Second Meat Sauce Layer: Add another 1.5 to 2 cups of meat sauce.
- Second Béchamel Layer: Drizzle another 1 cup of béchamel sauce.
- Second Cheese Layer: Sprinkle with another 1 cup of mozzarella and 1/4 cup of Parmesan.
- Final Noodle Layer: Place the final layer of noodles.
- Top Layers: Spread the remaining meat sauce over the final noodle layer. Then, pour the remaining béchamel sauce over the top, making sure it covers the noodles as much as possible to prevent them from drying out.
- Generous Cheese Topping: Liberally sprinkle with the remaining shredded mozzarella and Parmesan cheese. This will form that beautiful golden-brown, bubbly crust everyone loves!
Phase 4: Baking Your Masterpiece
The moment of truth! Baking the lasagna allows all those incredible flavors to meld, the cheese to melt into a glorious blanket, and the noodles to become perfectly tender. Patience is key here, especially for the resting period.
- Cover and Bake: Cover the baking dish tightly with aluminum foil. I usually spray the underside of the foil with a little cooking spray to prevent the cheese from sticking. Place the covered lasagna in your preheated oven.
- Initial Bake Time: Bake for 40-50 minutes. This initial covered bake ensures that the noodles cook through and all the layers heat up evenly without the top burning.
- Uncover and Brown: Remove the foil. Increase the oven temperature to 400°F (200°C) if you want a quicker browning, or keep it at 375°F (190°C) for a more gradual browning. Continue baking uncovered for another 15-20 minutes, or until the top is beautifully golden brown and bubbly, and the sauce is simmering around the edges. If you notice the cheese browning too quickly, you can loosely tent it with foil again.
- Resting Period: This step is crucial and often overlooked! Once baked, remove the lasagna from the oven and let it rest on a wire rack for at least 15-20 minutes before slicing and serving. Seriously, resist the urge to cut into it immediately! This resting period allows the layers to set, preventing the lasagna from collapsing into a messy pile when you serve it.
- Garnish and Serve: Just before serving, sprinkle with a handful of fresh chopped parsley for a pop of color and freshness. Slice into generous portions and serve hot with a simple green salad and some crusty bread.
My Personal Tips for Lasagna Perfection:
- Ingredient Quality Matters: While you don’t need to break the bank, using good quality canned tomatoes and fresh cheeses truly elevates the flavor. It makes a noticeable difference in the final product.
- Don’t Rush the Simmer: The meat sauce benefits immensely from a long, slow simmer. If you have time, let it go for 3 hours, or even make it a day ahead. Flavors deepen beautifully overnight.
- Warm Milk for Béchamel: Warming the milk slightly before adding it to the roux helps prevent lumps and makes for a smoother sauce.
- Season Each Layer: Remember to season the ricotta mixture and the béchamel sauce in addition to the meat sauce. This ensures every bite is flavorful, not just the meaty parts.
- Noodle Choice: Oven-ready noodles are incredibly convenient, but if you’re a traditionalist, pre-boil your regular noodles al dente. Overcooked noodles will turn mushy in the oven. Fresh pasta sheets are also a wonderful option if you can find them.
- The Power of Resting: I can’t stress this enough. Letting your lasagna rest after baking is perhaps the most important tip for a beautifully presented, structurally sound slice. It allows the cheese and sauces to firm up slightly.
- Make Ahead: Lasagna is a fantastic make-ahead dish! You can assemble the entire lasagna, cover it tightly, and refrigerate it for up to 2 days before baking. You might need to add an extra 10-15 minutes to the baking time if baking from cold. You can also bake it, cool it completely, and freeze it for up to 3 months. Thaw in the refrigerator overnight before reheating.
Making homemade lasagna is a labor of love, but every single step contributes to an incredibly satisfying and delicious meal that will impress anyone you share it with. Enjoy the process, and savor every bite!
Conclusion:
And there you have it, my friends! This recipe, which I poured my heart into, isn’t just another dish; it’s an experience waiting to unfold in your kitchen. We’ve journeyed together through the steps, and I truly believe you’re now equipped to create something truly spectacular. What makes this particular recipe a definite must-try, in my humble opinion, is its incredible balance of flavors and textures, something I worked tirelessly to perfect. It hits all the right notes: it’s comforting and hearty, yet surprisingly elegant enough for a special occasion. It’s the kind of meal that wraps you in a warm hug after a long day, or sparks joy around a shared table with loved ones. Plus, its versatility means it can easily adapt to various palates and dietary preferences, making it a real crowd-pleaser. I’ve found that even the most discerning eaters are enchanted by its unique appeal and the way it elevates simple ingredients into something truly memorable. It’s also surprisingly forgiving, so don’t stress too much about perfection; the magic is in the making and the sharing.
Endless Possibilities: Serving Suggestions and Creative Variations
Now that you’re ready to embark on this culinary adventure, let’s talk about how to make it even more your own! While this dish is absolutely glorious on its own, it plays beautifully with a variety of accompaniments. For a classic and deeply satisfying meal, I love serving it alongside a generous helping of creamy mashed potatoes or a fluffy pilaf of basmati rice, allowing the rich sauces and robust flavors to truly shine. If you’re looking for something lighter, a simple side salad with a tangy vinaigrette offers a refreshing contrast, cutting through the richness beautifully. Crusty artisan bread, perfect for soaking up every last drop of that delicious sauce, is also a non-negotiable in my household – trust me on this one!
But don’t stop there! The true beauty of a well-crafted recipe lies in its adaptability. Feeling adventurous? Consider incorporating some roasted seasonal vegetables like asparagus spears or a medley of bell peppers for an added layer of flavor and nutrition. For those who enjoy a bit of heat, a pinch of red pepper flakes or a dash of your favorite hot sauce stirred in during the final minutes can add an exciting kick. And for my vegan or vegetarian friends, rest assured, this recipe is incredibly forgiving to substitutions. You could easily swap out the main protein for marinated tofu, tempeh, or a medley of hearty mushrooms like portobello or shiitake, ensuring everyone at your table can enjoy this delightful creation. Don’t be afraid to experiment with different herbs either – a sprig of fresh rosemary or thyme can introduce a completely new aromatic dimension. For a more decadent twist, a swirl of heavy cream or a sprinkle of freshly grated Parmesan cheese right before serving adds an irresistible creaminess and umami depth. Imagine how wonderful it would be with a hint of smoked paprika for an earthier profile, or a splash of white wine to deglaze the pan and build another layer of complexity. The options are truly limitless, and I encourage you to let your culinary imagination run wild!
Your Turn to Create and Share!
So, what are you waiting for? This isn’t just a recipe; it’s an invitation to create, to savor, and to share. I genuinely believe that once you try this in your own kitchen, it’s going to become a staple in your repertoire. There’s something profoundly rewarding about making something from scratch and watching the faces of those you share it with light up. Don’t hesitate to dive in and make it your own; adjust the seasonings to your liking, play with the suggested variations, and most importantly, have fun with the process! Cooking should be an joyful and creative outlet, and this recipe offers the perfect canvas for your culinary expression.
Once you’ve whipped up your delicious masterpiece, I would absolutely love to hear about your experience! Did you stick to the original? Did you get creative with variations? What did your family and friends think? Please don’t keep your triumphs (or even your comical kitchen mishaps!) to yourself. Snap a photo of your creation and share it with me and our wonderful community. You can tag me on your favorite social media platform, or simply leave a comment below this article. To make sure I spot all your amazing posts, especially those sharing the unique flavor profile of this recipe and our community engagement around it, sometimes I even track specific campaigns using a unique identifier like ?utm_medium=social&utm_source=pinterest&utm_campaign=tailwind_tribes&utm_content=tribes&utm_term=992166412_44896978_297243 to see how far our culinary enthusiasm reaches! I can’t wait to see your incredible dishes and read all about your culinary adventures. Happy cooking!
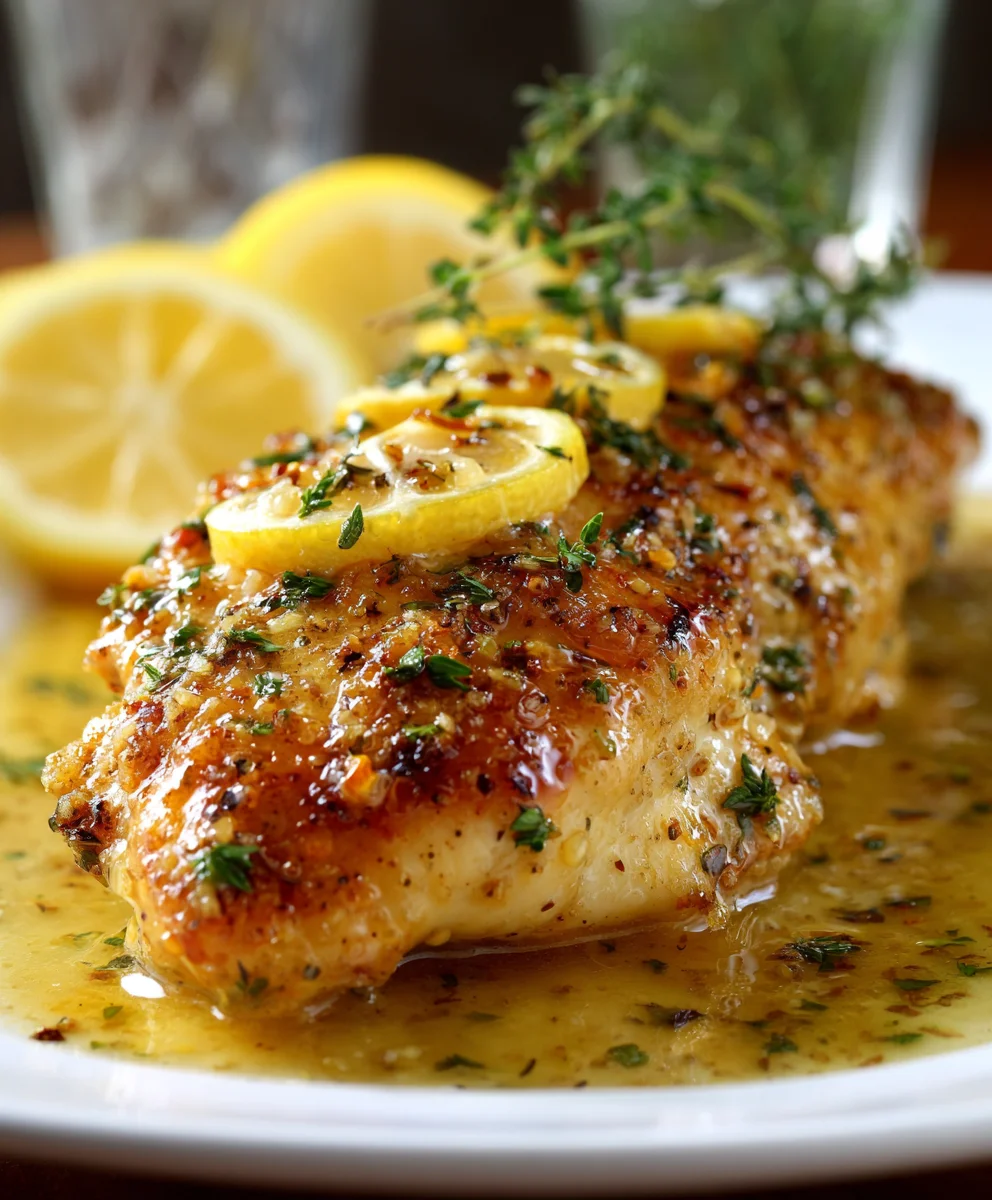
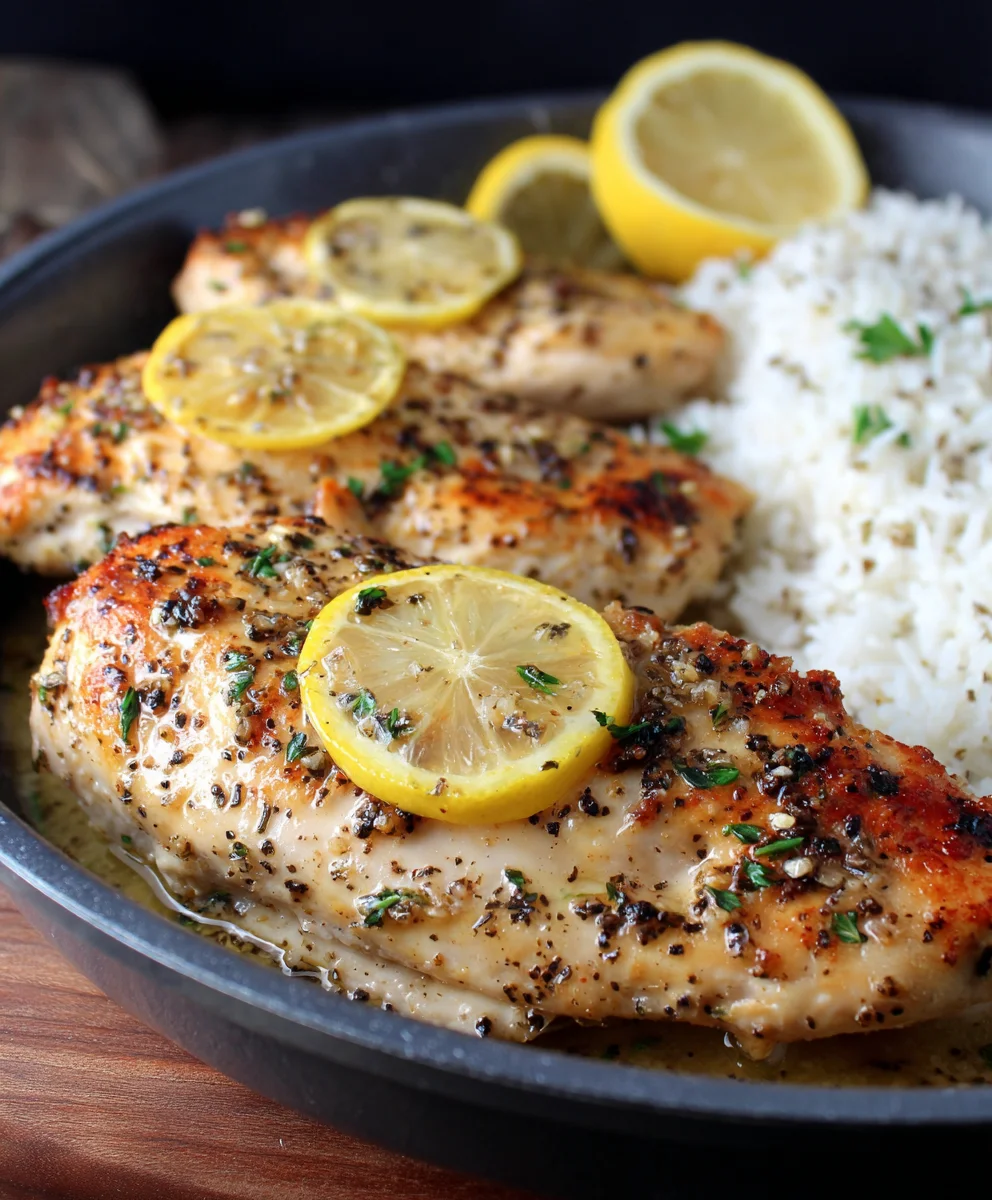
Lemon Garlic Parmesan Chicken
This easy and flavorful Lemon Garlic Parmesan Chicken features tender chicken breasts coated in a cheesy crust, cooked until golden, and finished with a bright lemon-garlic butter sauce. A quick and delicious meal perfect for any weeknight.
Ingredients
-
1 1/2 lb chicken breast (2 large)
-
1 Tbsp olive oil
-
1 Tbsp fresh parsley, chopped (optional garnish)
-
1/2 lemon, sliced (optional garnish)
-
2 large eggs
-
1 clove garlic, minced (for chicken coating)
-
1/2 tsp Italian seasoning
-
1/2 tsp salt
-
1/4 tsp ground black pepper
-
1 cup grated Parmesan cheese
-
3 Tbsp all-purpose flour
-
8 Tbsp unsalted butter
-
2 cloves garlic, minced (for sauce)
-
1/4 cup lemon juice
-
1/4 cup chicken broth
Instructions
-
Step 1
Pat chicken breasts dry. In one bowl, whisk eggs, 1 minced garlic clove, Italian seasoning, 1/2 tsp salt, and 1/4 tsp pepper. In a second bowl, combine flour and Parmesan cheese. -
Step 2
Dip each chicken breast in the egg mixture, ensuring full coverage, then dredge in the flour-Parmesan mix, pressing firmly to coat completely. -
Step 3
Heat olive oil in a large skillet over medium-high heat. Add coated chicken and cook for 5-7 minutes per side, until golden brown and cooked through. Remove chicken from skillet and set aside. -
Step 4
In the same skillet, melt unsalted butter over medium heat. Add 2 minced garlic cloves and cook for 1 minute until fragrant. Stir in lemon juice and chicken broth, bringing the mixture to a gentle simmer. Scrape the bottom of the pan to incorporate any browned bits. -
Step 5
Return the cooked chicken breasts to the skillet and coat them thoroughly with the sauce. Garnish with fresh chopped parsley and lemon slices if desired. Serve immediately with your favorite side dishes.
Important Information
Nutrition Facts (Per Serving)
It is important to consider this information as approximate and not to use it as definitive health advice.
Allergy Information
Please check ingredients for potential allergens and consult a health professional if in doubt.

Leave a Comment