
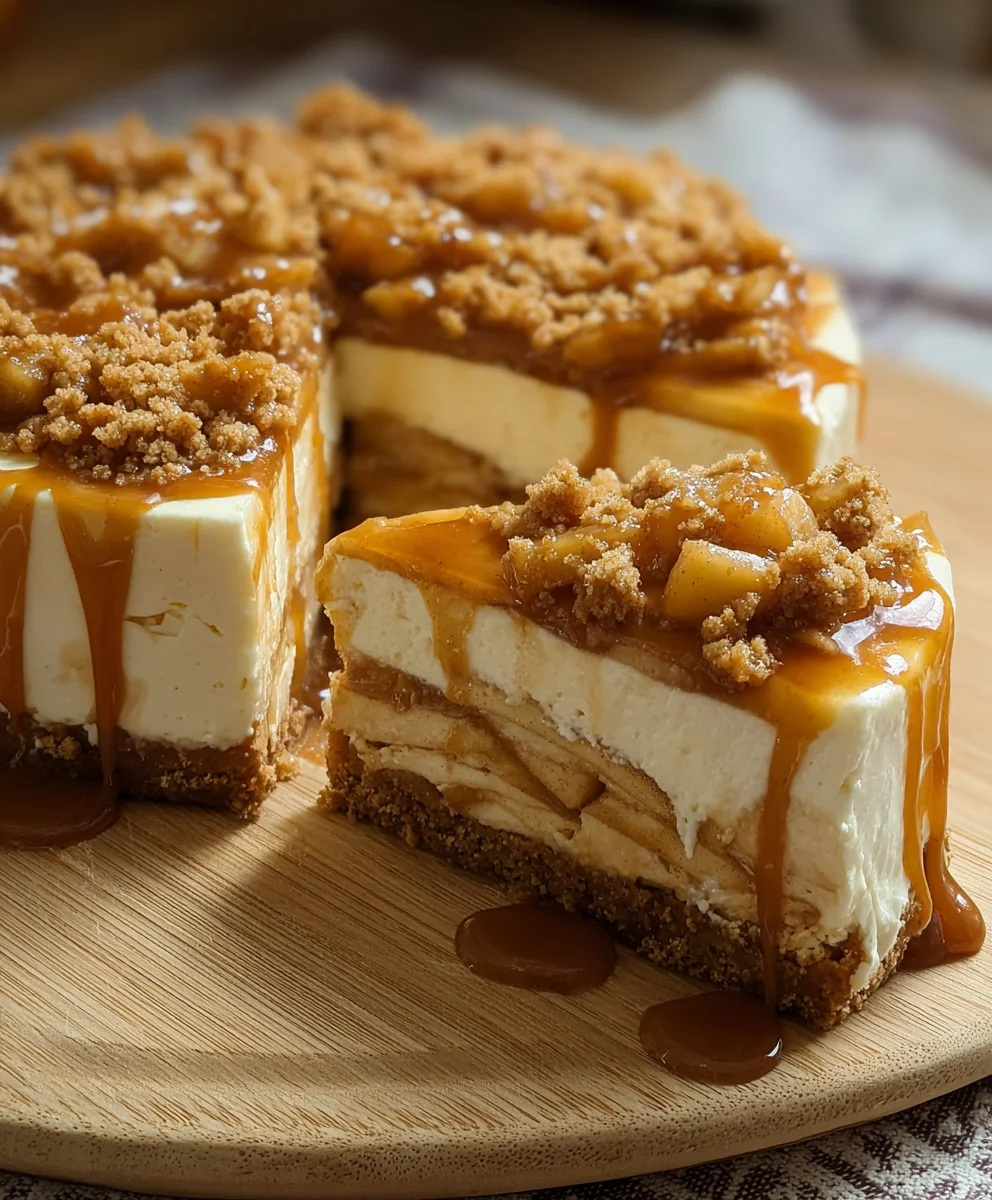
No Bake Apple Pie Cheesecake is an absolute game-changer for anyone who adores the comforting flavors of autumn but dreads turning on the oven. Imagine sinking your spoon into a luscious, creamy cheesecake infused with warm, spiced apple pie filling, all resting on a perfectly crisp graham cracker crust — and without a single moment of baking! As a passionate home cook, I’m constantly searching for desserts that deliver maximum flavor with minimal effort, and this recipe truly hits the mark. While the individual histories of apple pie and cheesecake span centuries, their inspired union into a no-bake delight is a testament to modern ingenuity, perfect for the busy home chef.
The Ultimate Convenience: Why Everyone Loves No Bake Apple Pie Cheesecake
People absolutely adore this dessert for its irresistible combination of velvety texture, the comforting spice of cinnamon and nutmeg, and the delightful tang of apples, all without the need for an oven. It’s not just easy; this No Bake Apple Pie Cheesecake is a show-stopping dessert perfect for potlucks, family gatherings, or simply a treat on a busy weeknight. Get ready to impress everyone with this deceptively simple yet profoundly delicious creation!
Ingredients:
- For the Graham Cracker Crust:
- 1 ½ cups (approximately 170g) finely crushed graham cracker crumbs (about 10-12 full sheets of graham crackers)
- ¼ cup (50g) granulated sugar
- ½ cup (113g) unsalted butter, melted
- For the No-Bake Cheesecake Filling:
- 2 (8-ounce / 226g each) packages full-fat cream cheese, softened to room temperature
- 1 cup (240ml) heavy cream (cold)
- ¾ cup (150g) granulated sugar
- 1 teaspoon pure vanilla extract
- ¼ teaspoon salt
- For the Apple Pie Topping:
- 4 medium-sized Granny Smith apples (or a mix of Granny Smith and Honeycrisp), peeled, cored, and diced into ½-inch pieces
- ½ cup (100g) granulated sugar
- ¼ cup (50g) packed light brown sugar
- ½ teaspoon ground cinnamon
- ¼ teaspoon ground nutmeg
- ⅛ teaspoon ground cloves (optional, but adds wonderful depth!)
- 2 tablespoons unsalted butter
- 1 tablespoon lemon juice (freshly squeezed is best!)
- 1 tablespoon cornstarch
- 2 tablespoons cold water
- For Garnish (Optional):
- Extra graham cracker crumbs
- A sprinkle of ground cinnamon
- Whipped cream
- Caramel drizzle
Preparing the Graham Cracker Crust
- First things first, let’s get that glorious crust ready. You’ll want to take your graham crackers and crush them very finely. You can do this by placing them in a large zip-top bag and crushing them with a rolling pin or the bottom of a heavy glass. Alternatively, for a quicker and more uniform crumb, use a food processor. Pulse them until they resemble fine sand with no large chunks remaining. This fine texture is crucial for a cohesive crust that won’t fall apart when sliced. Measure out your 1 ½ cups of these finely crushed crumbs.
- In a medium-sized bowl, combine your measured graham cracker crumbs with ¼ cup of granulated sugar. Give it a good whisk or stir with a fork to ensure the sugar is evenly distributed throughout the crumbs. This little bit of sugar adds a touch of sweetness and helps with the browning (even though we’re not baking it!).
- Now, melt your ½ cup of unsalted butter. You can do this in a microwave-safe bowl in 30-second increments, stirring in between, or in a small saucepan over low heat until fully liquid. Once melted, pour this warm butter over the graham cracker and sugar mixture.
- Using a fork or your hands, mix everything together thoroughly. Continue mixing until all the crumbs are moistened and coated with the butter. The mixture should resemble wet sand and hold together when you press it between your fingers. If it seems too dry, you might need to add another tablespoon or two of melted butter, but usually ½ cup is just perfect.
- Prepare your 9-inch springform pan. I like to lightly grease the bottom with a tiny bit of butter or non-stick spray, and sometimes I even line the bottom with a circle of parchment paper for easier removal, though it’s not strictly necessary. Carefully transfer the moistened graham cracker mixture into the bottom of the prepared springform pan.
- Using the bottom of a flat-bottomed glass, a measuring cup, or your clean hands, press the mixture firmly and evenly into the bottom of the pan. Make sure it’s packed down very tightly. This firm pressing is absolutely essential for a stable crust that won’t crumble when you slice your cheesecake. You can also push a small amount up the sides of the pan if you like a little edge, but for a classic “No Bake Apple Pie Cheesecake,” a bottom-only crust is traditional and wonderful.
- Once pressed, place the springform pan with the crust into the refrigerator while you prepare the cheesecake filling. This allows the butter to firm up and really sets the crust, making it sturdy.
Crafting the Velvety Cheesecake Filling
- Before you begin, ensure your two packages of full-fat cream cheese are truly softened to room temperature. This is incredibly important! Cold cream cheese will result in a lumpy filling, and no one wants a lumpy cheesecake. I usually take mine out of the fridge at least an hour or two before I plan to start.
- In a large mixing bowl, using an electric hand mixer or a stand mixer fitted with the paddle attachment, beat the softened cream cheese on medium speed for about 2-3 minutes. You want to whip it until it’s completely smooth, light, and airy, with no lumps whatsoever. Scrape down the sides of the bowl frequently to ensure everything gets incorporated.
- Add ¾ cup of granulated sugar, 1 teaspoon of pure vanilla extract, and ¼ teaspoon of salt to the cream cheese mixture. Continue beating on medium speed until the sugar is fully dissolved and the mixture is light and creamy. This should take another 2-3 minutes. Again, scrape down the sides to make sure everything is well combined. The mixture should look wonderfully smooth and inviting.
- Now, in a separate, very clean and chilled large mixing bowl, pour in your 1 cup of cold heavy cream. Using an electric hand mixer or a stand mixer fitted with the whisk attachment, beat the heavy cream on high speed until stiff peaks form. This means when you lift the beaters, the cream should hold its shape firmly, like a mountain peak. Be careful not to overbeat, or it will turn into butter! This step is critical because the whipped cream is what gives our no-bake cheesecake its light, airy, yet firm texture.
- Gently, using a rubber spatula, fold about one-third of the whipped cream into the cream cheese mixture. Use a soft, scooping motion from the bottom to the top, being careful not to deflate the air you just whipped into the cream. Once mostly combined, add the remaining whipped cream and continue to fold until just combined and no streaks of white cream are visible. Overmixing at this stage will deflate the cream and result in a less airy cheesecake, so be gentle and stop as soon as it’s homogenous.
- Retrieve your chilled graham cracker crust from the refrigerator. Carefully spoon the cheesecake filling over the crust. Use an offset spatula or the back of a spoon to spread the filling evenly, creating a smooth top. You want a beautifully flat surface for our apple pie topping!
- Cover the springform pan loosely with plastic wrap and return it to the refrigerator. This cheesecake needs at least 4-6 hours to set properly, but ideally, I recommend chilling it overnight. The longer it chills, the firmer and more stable it will be, making for perfect slices. This waiting period is the hardest part, I know!
Creating the Irresistible Apple Pie Topping
- Let’s prepare our glorious apple topping! First, peel, core, and dice your Granny Smith apples into ½-inch pieces. Consistency in size is key here for even cooking. Granny Smith apples are excellent because their tartness balances the sweetness of the cheesecake and they hold their shape well when cooked. If you prefer a slightly sweeter or softer apple, a mix with Honeycrisp or Fuji would be lovely.
- In a small bowl, whisk together the cornstarch with 2 tablespoons of cold water until smooth. This is your cornstarch slurry, and it will be used to thicken the apple mixture. Set this aside for now.
- In a large non-stick skillet or a medium saucepan, melt 2 tablespoons of unsalted butter over medium heat. Once the butter is melted and slightly foamy, add your diced apples. Stir to coat the apples in the butter.
- Cook the apples, stirring occasionally, for about 5-7 minutes. You want them to start softening slightly but still retain a bit of their crispness. They should not be mushy at this stage.
- Add ½ cup of granulated sugar, ¼ cup of packed light brown sugar, ½ teaspoon of ground cinnamon, ¼ teaspoon of ground nutmeg, and the optional ⅛ teaspoon of ground cloves to the skillet with the apples. Stir well to combine all the spices and sugars with the apples. The sugars will start to dissolve and create a lovely syrup.
- Continue to cook the apples for another 5-10 minutes, or until the apples are tender but still hold their shape – they should be fork-tender, not falling apart. Stir frequently to prevent sticking and ensure even cooking. The mixture will become fragrant and the juices will start to thicken slightly.
- Pour in the 1 tablespoon of fresh lemon juice. This not only adds a bright, tart note that enhances the apple flavor but also helps prevent the apples from browning too much. Give it a quick stir.
- Now, re-whisk your cornstarch slurry (cornstarch tends to settle) and slowly pour it into the simmering apple mixture, stirring constantly. Continue to cook and stir for another 1-2 minutes, allowing the mixture to come to a gentle boil. As it boils, the cornstarch will activate and thicken the sauce to a beautiful, glossy consistency. The sauce should coat the back of a spoon.
- Remove the skillet from the heat. Transfer the cooked apple pie topping to a shallow bowl or a baking dish and spread it out. Let it cool completely to room temperature. It is vital that the apple topping is fully cooled before you spread it over the chilled cheesecake filling. If you put warm apples on the cheesecake, it will melt your perfectly set filling, and that would be a tragedy! You can speed up the cooling process by placing it in the refrigerator, stirring occasionally, but make sure it’s completely cold.
Assembling and Serving Your Masterpiece
- Once your cheesecake has chilled for at least 4-6 hours (or ideally overnight) and your apple pie topping is completely cooled to room temperature (or even slightly chilled), it’s time for the grand finale – assembly!
- Carefully remove the cheesecake from the refrigerator. Unlock the springform pan and gently remove the outer ring. If you used parchment paper on the bottom, you can slide the cheesecake off the base onto a serving plate or use a large spatula to transfer it. If not, you can leave it on the base for serving. A thin, hot knife run around the edge before removing the ring can help ensure a clean release.
- Spoon the cooled apple pie topping evenly over the top of the cheesecake. You can spread it all the way to the edges, or leave a small border of the cheesecake filling exposed for a visual contrast. Make sure to distribute the apple pieces and the delicious thickened sauce throughout the top.
- At this point, your No Bake Apple Pie Cheesecake is ready to be admired and sliced! If you are not serving it immediately, return it to the refrigerator, uncovered or loosely covered, until about 15-20 minutes before serving.
- For the cleanest slices: Use a sharp knife and run it under hot water, then wipe it clean between each slice. This will give you beautiful, pristine cuts through both the topping and the creamy filling.
- Optional Garnishes: For an extra touch of elegance and flavor, consider garnishing each slice with a dollop of freshly whipped cream, a light dusting of ground cinnamon, a few extra graham cracker crumbs, or a drizzle of warm caramel sauce. These additions truly elevate the dessert experience.
- Enjoy every single bite of your homemade No Bake Apple Pie Cheesecake! It’s the perfect blend of creamy, crunchy, tart, and sweet, embodying all the comforting flavors of autumn without ever having to turn on your oven. This dessert is a fantastic showstopper for any gathering, or a delightful treat just for you.
Conclusion:
After diving into the simplicity and sheer delight of this recipe, I truly hope you’re as excited as I am about what you’ve discovered. This isn’t just any dessert; it’s a revelation. Imagine the comforting embrace of a classic apple pie, with its tender, spiced fruit, seamlessly blended with the velvety richness of a premium cheesecake. And the best part? No oven required! That’s right, my friends, the magic of this particular creation lies in its utterly fuss-free preparation, making it an absolute game-changer for busy weeknights, impromptu gatherings, or when you simply crave something extraordinary without the culinary marathon. I often find myself marveling at how something so deceptively simple can yield such complex and satisfying results. It’s the kind of dessert that elicits gasps of delight and immediate requests for the recipe, proving that sometimes, the simplest paths lead to the most delicious destinations.
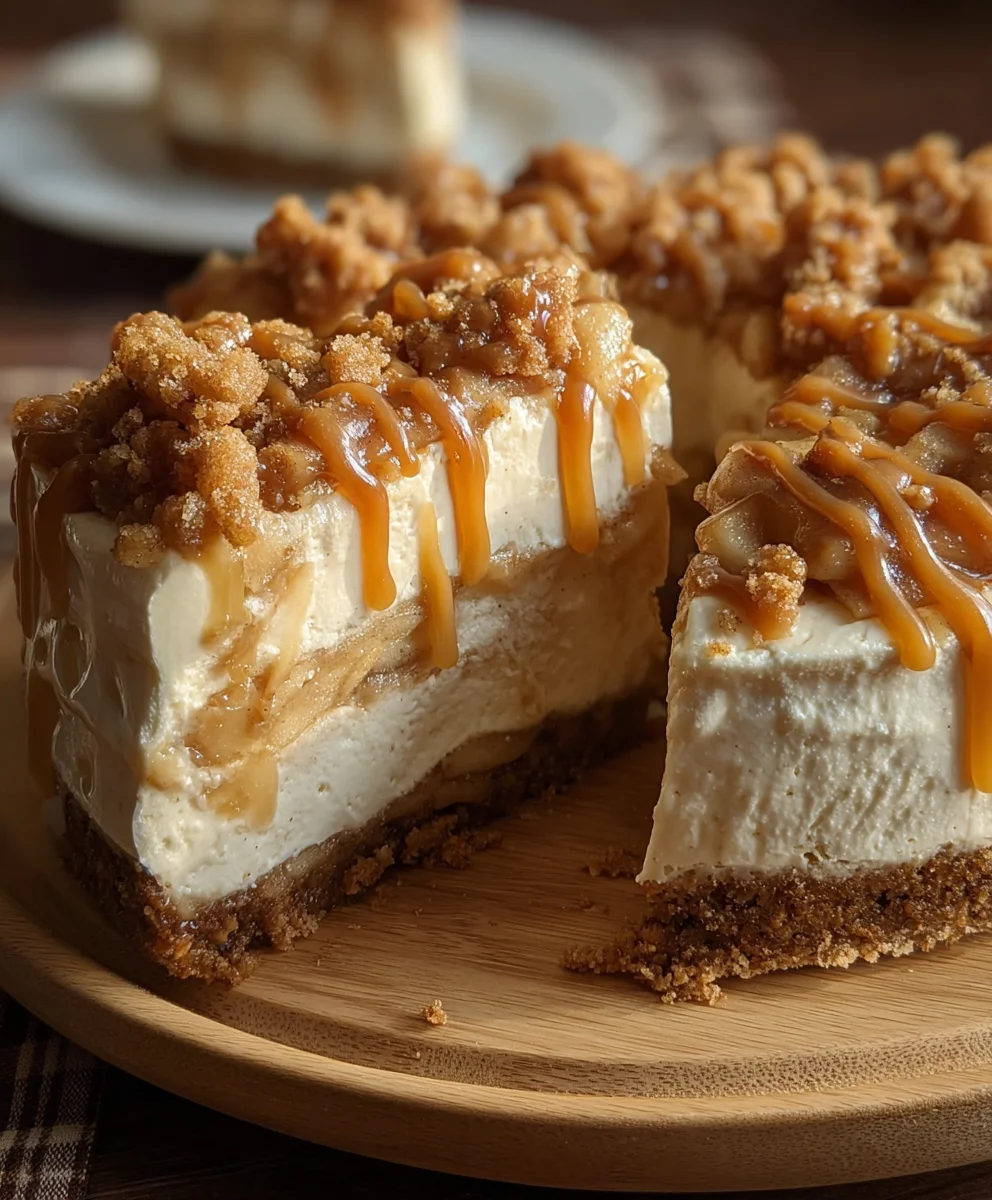
The harmonious dance of sweet, tangy apples against the smooth, creamy tang of cream cheese, all nestled atop a perfectly spiced graham cracker crust, creates an unforgettable symphony of flavors and textures in every single bite. It’s light enough to enjoy after a substantial meal, yet decadent enough to feel like a true indulgence. What sets this recipe apart is its ability to deliver on the promise of both worlds – the heartwarming nostalgia of a traditional apple pie and the sophisticated indulgence of a cheesecake, all without breaking a sweat in the kitchen. This incredible No Bake Apple Pie Cheesecake truly delivers on its promise of a sophisticated dessert that requires minimal effort but offers maximum impact. It’s a dessert that not only tastes incredible but also saves you time and stress, making you look like a seasoned pastry chef with minimal effort. The textural contrasts are a particular highlight for me: the crisp, buttery crust giving way to the silky-smooth, spiced cream cheese layer, crowned with those perfectly tender apple pieces. It’s truly a masterpiece of convenience and flavor.
Now, while this dessert is an absolute showstopper on its own, there are so many delightful ways to elevate your serving experience. For a touch of classic elegance, I love to add a generous dollop of freshly whipped cream, perhaps lightly sweetened with a hint of vanilla bean, right before serving. A delicate sprinkle of ground cinnamon or a very fine grating of fresh nutmeg over the top will not only add an aromatic flourish but also visually announce the warm, spiced apple notes within. If you’re feeling a little extra, a drizzle of homemade caramel sauce cascading down the sides adds a beautiful sheen and another layer of luxurious sweetness that complements the apple and cream cheese impeccably. A scoop of premium vanilla bean ice cream on the side is also a fantastic companion, especially if you enjoy a delightful hot-cold contrast that just melts in your mouth with every bite.
Beyond the toppings, consider the crust! While the classic graham cracker crust is a timeless choice, feel free to experiment. A crushed ginger snap cookie crust would introduce a wonderful spicy kick, adding another dimension of warmth, or even a shortbread cookie crust could offer a buttery, crumbly texture that contrasts beautifully with the creamy filling. For a fun, individual twist, try assembling these in small mason jars or elegant stemmed dessert glasses – perfect for portion control and incredibly charming for entertaining guests at a brunch or dinner party. You could even layer in extra sautéed apple slices in between the crust and the filling for an even more pronounced apple presence, truly doubling down on that comforting apple pie feel. Think about garnishing with candied pecans or a few delicate apple chips for an added textural crunch and visual appeal that will impress everyone at the table.
My ultimate hope is that you feel inspired to bring this glorious dessert to life in your own kitchen. I promise you, the joy of creating something so delicious with such little fuss is incredibly rewarding. It’s a perfect project for a relaxed afternoon, a fantastic way to impress your guests without spending hours slaving over a hot stove, or simply a well-deserved treat for yourself and your loved ones after a long week. Don’t let the ‘no bake’ aspect fool you into thinking it’s anything less than spectacular – it truly holds its own against any oven-baked counterpart, if not surpasses it in convenience and sometimes, even in texture. The effort-to-reward ratio here is simply off the charts, making it a staple in my dessert repertoire.
So, go ahead, gather your ingredients, follow the steps, and prepare to be amazed. I can confidently say that this will quickly become one of your favorite go-to desserts. And when you do, please, please share your experiences! I absolutely adore seeing your culinary creations. Drop a comment below to tell me how it turned out, what variations you tried, or what your family and friends thought. Your feedback not only brightens my day but also helps other readers embark on their own delicious journey, finding confidence and joy in their kitchens. Happy baking (or rather, no-baking), and enjoy every single delightful spoonful!
Delicious No Bake Apple Pie Cheesecake
A delicious, easy-to-make No Bake Apple Pie Cheesecake featuring a crisp graham cracker crust, a velvety cream cheese filling, and a warm spiced apple pie topping. Perfect for enjoying comforting autumn flavors without ever turning on your oven. Ideal for potlucks, gatherings, or a delightful weeknight treat.
Ingredients
-
1 ½ cups (170g) finely crushed graham cracker crumbs
-
¼ cup (50g) granulated sugar (for crust)
-
½ cup (113g) unsalted butter, melted (for crust)
-
2 (8-ounce / 226g each) packages full-fat cream cheese, softened
-
1 cup (240ml) heavy cream, cold
-
¾ cup (150g) granulated sugar (for filling)
-
1 teaspoon pure vanilla extract
-
¼ teaspoon salt
-
4 medium Granny Smith apples, peeled, cored, and diced into ½-inch pieces
-
½ cup (100g) granulated sugar (for topping)
-
¼ cup (50g) packed light brown sugar
-
½ teaspoon ground cinnamon
-
¼ teaspoon ground nutmeg
-
⅛ teaspoon ground cloves (optional)
-
2 tablespoons unsalted butter (for topping)
-
1 tablespoon lemon juice
-
1 tablespoon cornstarch
-
2 tablespoons cold water (for slurry)
Instructions
-
Step 1
Combine crushed graham cracker crumbs with ¼ cup granulated sugar. Pour ½ cup melted butter over the mixture; stir until moistened. Press firmly and evenly into the bottom of a 9-inch springform pan. Chill while preparing the filling. -
Step 2
Beat softened cream cheese in a large bowl until smooth (2-3 min). Add ¾ cup granulated sugar, 1 tsp vanilla extract, and ¼ tsp salt; beat until light and creamy (2-3 min). In a separate clean bowl, beat 1 cup cold heavy cream until stiff peaks form. Gently fold whipped cream into the cream cheese mixture until just combined. Spoon filling over the chilled crust; spread evenly. Cover and refrigerate for at least 4-6 hours, ideally overnight, to set properly. -
Step 3
Peel, core, and dice apples. In a small bowl, whisk 1 tbsp cornstarch with 2 tbsp cold water to create a slurry; set aside. Melt 2 tbsp butter in a large skillet over medium heat. Add diced apples; cook, stirring occasionally, for 5-7 minutes until slightly softened. Stir in ½ cup granulated sugar, ¼ cup packed light brown sugar, ½ tsp cinnamon, ¼ tsp nutmeg, and ⅛ tsp cloves. Cook for another 5-10 minutes until apples are tender. Stir in 1 tbsp lemon juice. Re-whisk the cornstarch slurry and slowly pour into the simmering apple mixture, stirring constantly. Cook and stir for 1-2 minutes until thickened. Transfer apple topping to a shallow dish and cool completely to room temperature before use. -
Step 4
Once the cheesecake is fully chilled and the apple topping is completely cooled, remove the cheesecake from the refrigerator and gently remove the springform pan ring. Spoon the cooled apple pie topping evenly over the cheesecake. Garnish optionally with extra graham cracker crumbs, a sprinkle of ground cinnamon, whipped cream, or a caramel drizzle. For cleanest slices, use a sharp knife run under hot water and wiped clean between each cut. Return to refrigerator until 15-20 minutes before serving.
Important Information
Nutrition Facts (Per Serving)
It is important to consider this information as approximate and not to use it as definitive health advice.
Allergy Information
Please check ingredients for potential allergens and consult a health professional if in doubt.


Leave a Comment