

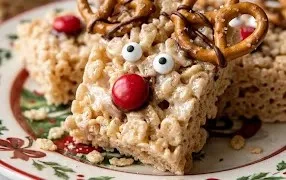
Reindeer Rice Krispies treats bring the fun of the holidays right into your kitchen. The smell of melting marshmallows and butter is a classic holiday aroma for many, and these treats capture that nostalgic feeling perfectly. Kids especially love helping to shape these into little reindeer heads, and their small hands are great for adding the candy eyes and red M&M noses. The dark cocoa candy melts give them a nice chocolatey shell that contrasts with the sweet, airy cereal inside. They aren’t complicated to make, which means you can focus on the decorating part with the little ones. These Reindeer Rice Krispies are a hit at school parties, family gatherings, or just as a special after-school snack during December. You get that familiar chewy, crispy texture that everyone enjoys, with a festive twist that makes them stand out.

Reindeer Rice Krispies
These Reindeer Rice Krispies treats are a fun and festive way to get into the holiday spirit. They are surprisingly easy to make, and the kids will absolutely love helping to decorate them. The combination of crispy cereal, gooey marshmallows, and sweet chocolate makes them a satisfying treat that’s perfect for any holiday gathering or just a fun after-school snack. The dark cocoa candy melts give them a rich chocolate coating that pairs wonderfully with the sweet, airy Rice Krispies.
Ingredients:
- 6 TBSP butter
- 1 10 oz marshmallows
- 6 c. Rice Krispies cereal
- 1 pkg candy eyeballs
- 1 pkg m & m candies (red)
- 12 oz dark cocoa candy melts
Making the Rice Krispies Base
The first step in creating our reindeer is to prepare the classic Rice Krispies treat base. This is where the magic happens, transforming simple ingredients into a delightful, sticky mixture. You’ll need a large pot or a Dutch oven for this, as you want plenty of room to stir everything together without spills.
Step 1: Melt the Butter and Marshmallows. Place your large pot over medium-low heat. Add the 6 tablespoons of butter to the pot. Let the butter melt completely. Once the butter is melted and shimmering, add the entire 10-ounce bag of marshmallows. It’s important to keep the heat on medium-low; if it’s too high, the marshmallows can scorch, which will affect the taste and texture of your treats. Stir constantly with a heat-resistant spatula or wooden spoon. You’re looking for the marshmallows to melt down into a smooth, gooey mass. This usually takes about 5-7 minutes. Don’t rush this process. Make sure to scrape the bottom and sides of the pot to prevent sticking and ensure even melting. The mixture should be completely smooth and glossy before you move on.
Step 2: Combine with Cereal. Once the marshmallow mixture is fully melted and smooth, remove the pot from the heat. This is important because the residual heat from the pot will be enough to incorporate the cereal without overcooking the marshmallows, which can make the treats hard. Immediately add the 6 cups of Rice Krispies cereal to the pot. Gently fold the cereal into the marshmallow mixture. Continue stirring until the cereal is thoroughly coated. It might seem like a lot of cereal at first, but keep mixing; the gooey marshmallows will coat every piece. Work relatively quickly, as the mixture will start to set up as it cools. If it becomes too difficult to stir, you can briefly put it back on very low heat for just a minute or two to loosen it up, but be very careful not to overheat it.
Shaping the Reindeer
Now comes the fun part where we start to bring our reindeer to life! For this stage, you’ll want to have a baking sheet lined with parchment paper or wax paper ready. This will prevent the sticky treats from adhering to your counter. You can also lightly grease your hands with butter or cooking spray to make handling the warm mixture easier.
Step 3: Form the Reindeer Shapes. Lightly grease your hands or a spatula. Take about a quarter cup of the Rice Krispies mixture and shape it into an oval for the reindeer’s body. You can also make a smaller oval for the head. For the antlers, you can try to pull and twist small pieces of the mixture into antler shapes, or you can simply use two red M&Ms placed strategically. Once you have your basic body and head shapes, you can press them together gently to form the reindeer. Don’t worry about making them perfectly smooth; a slightly rustic look is part of their charm. If the mixture is too sticky, let it cool for a minute or two longer, but not so long that it becomes difficult to mold. You can also use two spoons to help scoop and shape the mixture onto the prepared baking sheet.
Decorating the Reindeer
This is where the real personality of your reindeer comes out! The candy eyeballs and red M&Ms are essential for that classic Rudolph look. The dark cocoa candy melts add a delicious chocolatey finishing touch.
Step 4: Add the Facial Features. While the Rice Krispies shapes are still slightly warm and pliable, it’s time to add the faces. Gently press two candy eyeballs onto the head portion of each reindeer. For the nose, choose a bright red M&M and press it firmly onto the center of the head, right between the eyes. If the treats have cooled too much and are no longer sticky enough for the decorations to adhere, you can warm them up very slightly or use a tiny dab of melted candy melt as ‘glue’. Take your time with this step to ensure each reindeer has its own unique expression. You can experiment with the placement of the eyes to give them different personalities.
Step 5: Melt and Drizzle the Chocolate. To get the chocolate coating, you’ll need to melt the dark cocoa candy melts. Place the 12 ounces of dark cocoa candy melts in a microwave-safe bowl. Microwave on 50% power for 30-second intervals, stirring well after each interval. Continue this until the candy melts are completely smooth and pourable. Be careful not to overheat them, as they can seize up and become difficult to work with. Once melted, you have a couple of options for decorating. You can either dip the entire reindeer into the melted chocolate, letting any excess drip off, or you can use a spoon or a piping bag to drizzle the chocolate over the reindeer shapes. For a cleaner look, you can place the reindeer on a wire rack set over a baking sheet and pour the melted chocolate over them, ensuring they are coated. If you are drizzling, you can create a more whimsical look by making zig-zag patterns. For a simple nose, you can also just use a small amount of melted chocolate to draw a red nose on. Let the chocolate set completely before handling. This usually takes about 15-20 minutes at room temperature, or you can speed it up by placing them in the refrigerator for about 10 minutes.
Once the chocolate has fully hardened, your Reindeer Rice Krispies are ready to be enjoyed. They store well in an airtight container at room temperature for a few days, though they are best when fresh.
Conclusion:
These Reindeer Rice Krispies treats are a fantastic way to add some edible cheer to your holiday season. They combine the beloved texture of classic Rice Krispies treats with a fun, festive look that kids and adults alike will adore. The simple process makes them accessible for bakers of all levels, and the decorating step is where the real family fun begins. Serve them on a holiday cookie platter, pack them for a school party, or just enjoy them with a glass of milk on a cozy winter evening. You can also change up the candies used for the noses and eyes, or even add a sprinkle of edible glitter for extra sparkle. The dark cocoa coating adds a pleasant chocolate flavor that makes these Reindeer Rice Krispies even more special.
Frequently Asked Questions:
Can I make these treats ahead of time?
Yes, you can make the Rice Krispies base a day or two in advance. Store it in an airtight container at room temperature. However, it’s best to assemble and decorate the reindeer closer to when you plan to serve them for the freshest taste and best texture of the candy melts.
What if I don’t have dark cocoa candy melts?
You can substitute with regular milk or semi-sweet chocolate chips, or even white chocolate if you prefer. Melt them using the same double boiler or microwave method. Keep in mind that the color will be different, but they will still taste wonderful.
How should I store leftover Reindeer Rice Krispies?
Store any leftovers in an airtight container at room temperature. To prevent sticking, you can place wax paper between layers of treats. They are best consumed within 2-3 days.
Reindeer Rice Krispies Treats
Adorable and festive Reindeer Rice Krispies treats perfect for the holidays.
Ingredients
-
6 tablespoons butter
-
10 ounces marshmallows
-
6 cups Rice Krispies cereal
-
1 package candy eyeballs
-
1 package red M&M’s candies
-
12 ounces dark cocoa candy melts
Instructions
-
Step 1
Melt butter in a large saucepan over low heat. Add marshmallows and stir until completely melted. -
Step 2
Remove from heat. Add Rice Krispies cereal and stir until well coated. -
Step 3
Grease a baking sheet or parchment paper. Press the cereal mixture into the prepared sheet to about 1/2 inch thickness. -
Step 4
Melt dark cocoa candy melts according to package directions. Dip the bottom of each treat lightly into the melted candy to create the reindeer’s base. -
Step 5
While the chocolate is still wet, place two candy eyeballs and two red M&M’s (for the nose) onto each treat to create the reindeer face. -
Step 6
Allow the chocolate to set completely before serving.
Important Information
Nutrition Facts (Per Serving)
It is important to consider this information as approximate and not to use it as definitive health advice.
Allergy Information
Please check ingredients for potential allergens and consult a health professional if in doubt.



Leave a Comment