
Mini Pumpkin Pies are more than just a seasonal treat; they’re a delightful celebration of autumn, offering a charming, perfectly portioned twist on a beloved classic that promises to steal the show at any gathering. For generations, pumpkin pie has been the quintessential dessert of autumn, gracing Thanksgiving tables and cozy family dinners, evoking warmth, tradition, and the comforting flavors of fall. I believe there’s something truly special about upholding such a cherished tradition, but with a modern, convenient spin.
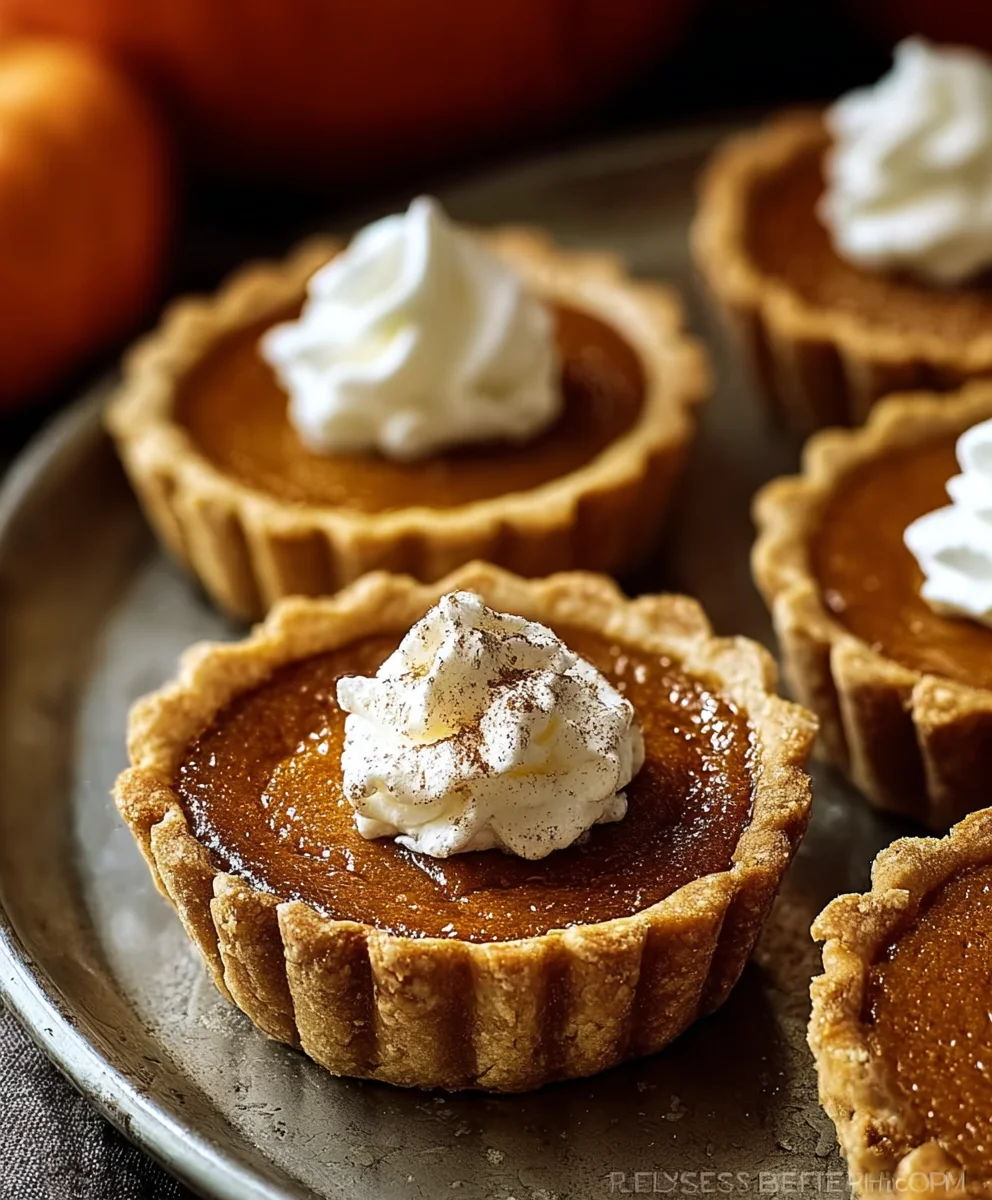
Let’s be honest, slicing a full pie can sometimes be a messy affair, and who doesn’t love the idea of their own individual dessert? That’s where these adorable Mini Pumpkin Pies truly shine. I find them utterly irresistible not just for their undeniably cute appearance, but because they deliver all the rich, spiced, creamy goodness of a traditional pumpkin pie in a convenient, personal package. The flaky, golden crust cradles a velvety smooth, perfectly spiced pumpkin filling that simply melts in your mouth with every bite.
They are ideal for holiday parties, potlucks, or simply a cozy evening at home when you crave a taste of autumn without the commitment of a whole pie. Plus, imagine the joy of your guests picking up their own beautifully presented dessert! Preparing these Mini Pumpkin Pies is an absolute joy, and I guarantee they will become a cherished and requested part of your fall baking repertoire for years to come.

Ingredients:
Creating these adorable Mini Pumpkin Pies truly brings the magic of autumn into your kitchen! Here’s everything you’ll need to whip up these delightful treats that are perfect for any fall gathering or a cozy evening at home. I’ve carefully selected ingredients that ensure a wonderfully flaky crust and a rich, perfectly spiced pumpkin filling.
- For the Flaky Pie Crust:
- 2 ½ cups (300g) all-purpose flour, plus more for dusting
- 1 teaspoon salt
- 1 cup (226g or 2 sticks) unsalted butter, very cold and cut into ½-inch cubes
- ½ cup (120ml) ice water, plus 1-2 tablespoons more if needed
- For the Creamy Pumpkin Filling:
- 1 (15-ounce) can (approximately 425g) pure pumpkin puree (ensure it’s pure pumpkin, not pumpkin pie filling!)
- 1 cup (240ml) heavy cream (or evaporated milk for a slightly denser texture)
- ½ cup (100g) packed light brown sugar
- ¼ cup (50g) granulated sugar
- 2 large eggs, lightly beaten
- 1 teaspoon ground cinnamon
- ½ teaspoon ground ginger
- ¼ teaspoon ground cloves
- ¼ teaspoon ground nutmeg
- ½ teaspoon salt (helps to balance the sweetness and brighten the spices)
- 1 teaspoon vanilla extract
- For Serving (Optional, but highly recommended!):
- Sweetened whipped cream
- Additional ground cinnamon or nutmeg for dusting
Preparing the Perfect Flaky Pie Crust
A good pie starts with an exceptional crust, and for these Mini Pumpkin Pies, we’re going for something wonderfully flaky and buttery. Making your own pie dough might seem a little daunting at first, but I promise it’s incredibly rewarding and results in a superior texture and flavor that store-bought crusts simply can’t match. The key here is to keep everything very, very cold – this helps prevent the butter from melting too quickly, which is crucial for those delightful flaky layers.
- Combine Dry Ingredients: In a large mixing bowl, I like to whisk together the 2 ½ cups of all-purpose flour and 1 teaspoon of salt. Make sure it’s thoroughly combined; an even distribution of salt will season the entire crust beautifully.
- Incorporate Cold Butter: Now, this is where the magic happens! I add the 1 cup of very cold, ½-inch cubed unsalted butter to the flour mixture. Using a pastry blender, two knives, or even your fingertips (working quickly!), I cut the butter into the flour until the mixture resembles coarse crumbs with some pea-sized pieces of butter still visible. It’s essential not to overmix here; those small butter chunks are what create steam in the oven, leading to a wonderfully flaky texture. If you’re using your hands, remember to work quickly to avoid melting the butter with your body heat.
- Add Ice Water Gradually: I then gradually add ½ cup of ice water, one tablespoon at a time, mixing gently after each addition until the dough just comes together. The exact amount of water can vary based on humidity and flour type, so I gauge it by feel. The dough should be moist enough to hold together when squeezed but not sticky or wet. I try to avoid adding too much water, as this can make the crust tough.
- Form and Chill the Dough: Once the dough has just come together, I divide it in half and gently form each half into a flat disc. I wrap each disc tightly in plastic wrap and refrigerate them for at least 30 minutes, or even better, for 1 to 2 hours. This chilling period is crucial; it allows the gluten to relax, making the dough easier to roll, and it re-chills the butter, which is vital for flakiness. I find this step is non-negotiable for a truly perfect crust.
- Preheat Oven and Prepare Muffin Tins: While the dough chills, I go ahead and preheat my oven to 375°F (190°C). I also lightly grease a standard 12-cup muffin tin. You could also use mini muffin tins for even tinier pies, just adjust the baking time slightly.
- Roll Out the Dough: After chilling, I take one disc of dough out of the refrigerator (leaving the other one chilled until ready to use). On a lightly floured surface, I roll out the dough to about ⅛-inch thickness. I like to work from the center outwards, rotating the dough frequently to prevent sticking.
- Cut Out Pie Crusts: Using a 3-inch round cookie cutter or the rim of a glass (choose a size that fits well into your muffin tin, allowing for some overhang), I cut out as many circles as possible. I gently gather the scraps, re-roll them, and cut out more circles until I have enough for the muffin tin, typically 12-18 mini crusts per recipe batch, depending on the size of your cutter and the depth of your muffin tin.
- Fit Crusts into Muffin Tins: I carefully press each dough circle into the prepared muffin tin cups, gently shaping them to fit the contours of the cup. I make sure there’s a small lip of dough extending slightly above the rim of each cup. Don’t worry if they don’t look absolutely perfect; homemade charm is part of the appeal!
- Pre-bake (Blind Bake) the Crusts: This is a step I often take for mini pies to prevent a soggy bottom. I lightly prick the bottom of each crust with a fork a few times. Then, I line each crust with a small piece of parchment paper or foil and fill it with pie weights, dried beans, or rice. I bake these for about 10-12 minutes, or until the edges are just starting to look set. Then, I remove the weights and parchment/foil and continue to bake for another 3-5 minutes, just until the bottoms look slightly dry. This partial bake helps them hold up beautifully to the wet filling. I then remove them from the oven and let them cool slightly while I prepare the filling.
Crafting the Creamy Pumpkin Filling
The heart of our Mini Pumpkin Pies is this lusciously creamy and perfectly spiced pumpkin filling. It’s a straightforward mixture, but the careful balance of spices is what truly elevates it, bringing that quintessential fall flavor we all adore. I always make sure I’m using pure pumpkin puree, not the pre-spiced pumpkin pie filling, as it gives me complete control over the flavor profile.
- Combine Wet Ingredients: In a large mixing bowl, I start by whisking together the 1 (15-ounce) can of pure pumpkin puree, 1 cup of heavy cream, and 2 lightly beaten large eggs. I ensure it’s smooth and lump-free before adding the dry elements. The heavy cream makes for an incredibly rich and velvety texture, but if you prefer, evaporated milk can also be used for a slightly less rich but equally delicious result.
- Add Sugars and Spices: Next, I stir in ½ cup of packed light brown sugar and ¼ cup of granulated sugar. The combination of both sugars adds depth and a beautiful caramel note that complements the pumpkin wonderfully. Then come the stars of the show: 1 teaspoon of ground cinnamon, ½ teaspoon of ground ginger, ¼ teaspoon of ground cloves, and ¼ teaspoon of ground nutmeg. This blend creates that iconic, warm pumpkin pie spice flavor. I also add ½ teaspoon of salt here; it might seem counterintuitive in a sweet dish, but salt is a flavor enhancer that really makes the spices pop and prevents the filling from tasting flat.
- Incorporate Vanilla Extract: Finally, I mix in 1 teaspoon of vanilla extract. Vanilla is a subtle but essential ingredient that rounds out all the flavors and adds a hint of complexity.
- Whisk Until Smooth: I whisk everything together thoroughly until the mixture is completely smooth and all the spices are evenly distributed. I make sure there are no lumps of sugar or spice remaining. The filling should be a beautiful, uniform orange color.
Assembly and Baking the Mini Pumpkin Pies
Now that we have our perfectly pre-baked crusts and our fragrant pumpkin filling, it’s time to bring everything together and bake these beauties! This part is relatively quick, but I always pay attention to the details to ensure a flawless finish.
- Fill the Pie Crusts: I carefully spoon the pumpkin filling into each of the pre-baked mini pie crusts in the muffin tin. I fill each crust to about two-thirds full, or slightly less than the top edge of the crust. This allows for a bit of expansion during baking without overflowing. Overfilling can lead to cracked tops or soggy crusts, so I’m mindful of the quantity.
- Bake the Mini Pies: I carefully transfer the muffin tin to the preheated 375°F (190°C) oven. I typically bake them for about 20-25 minutes. The baking time can vary depending on your oven and the exact size of your mini pies, so I keep a close eye on them.
- Check for Doneness: I know the pies are done when the edges of the filling are set, and the center still has a slight jiggle to it when I gently shake the pan. If the filling is completely firm, they might be overbaked, which can lead to cracks. A knife inserted near the edge should come out clean, but the very center might still be a little moist. The crusts should be golden brown and inviting.
- Cool Completely: Once baked, I carefully remove the muffin tin from the oven. I let the mini pies cool in the muffin tin on a wire rack for about 15-20 minutes. This initial cooling helps them set up and makes them easier to remove. After this initial cooling, I gently remove each mini pie from the muffin tin and place them directly on the wire rack to cool completely. This is a crucial step; rushing the cooling can cause them to slump or crack. Cooling completely can take several hours, but it’s worth the wait for a perfectly set filling.
Tips for Perfection, Storage, and Serving
Making Mini Pumpkin Pies is a joy, and with a few extra tips, you can ensure they turn out absolutely perfect every time. From preventing cracks to making them ahead of time, these suggestions will help you enjoy these seasonal treats to their fullest.
- Preventing Cracks: The dreaded crack in a pumpkin pie often happens when the pie cools too quickly or is overbaked. To minimize this, ensure your oven temperature is consistent, don’t overbake, and let them cool slowly. Sometimes, a small crack still happens, especially with mini pies. Don’t fret! A dollop of whipped cream covers all imperfections beautifully.
- Make-Ahead Tips: These mini pies are fantastic for making ahead! You can prepare the pie dough up to 2-3 days in advance and keep it refrigerated, or freeze it for up to a month. The pumpkin filling can also be mixed a day in advance and stored in the refrigerator. Once baked, the mini pies can be stored at room temperature for a day or refrigerated in an airtight container for up to 3-4 days. I often make them the day before a gathering to reduce stress on the event day.
- Freezing Instructions: If you want to freeze your baked mini pumpkin pies, I recommend letting them cool completely first. Then, place them on a baking sheet and freeze until solid. Once frozen, transfer them to an airtight freezer bag or container. They can be frozen for up to 1-2 months. To serve, thaw them overnight in the refrigerator.
- Serving Suggestions: While absolutely delicious on their own, these Mini Pumpkin Pies truly shine when served with a generous dollop of sweetened whipped cream. I sometimes like to add a sprinkle of extra ground cinnamon or nutmeg on top of the whipped cream for an extra touch of spice and visual appeal. A tiny dusting of cocoa powder or a drizzle of caramel sauce can also be wonderful additions for a more decadent treat. They are perfect as individual desserts for Thanksgiving, fall potlucks, or just a cozy evening treat.
- Variations to Explore: Feel free to experiment with your spices! A pinch of allspice or a tiny hint of black pepper can add an unexpected depth to the pumpkin filling. For a boozier kick, you could add a tablespoon of bourbon or spiced rum to the filling mixture. If you’re feeling adventurous, a streusel topping (oats, brown sugar, butter, and flour) can be added to some of the pies before baking for a different texture.
I genuinely hope you enjoy baking and sharing these delightful Mini Pumpkin Pies as much as I do. They embody all the warmth and comfort of the season in a perfectly portioned bite!
Conclusion:
And there you have it, my friends! We’ve journeyed through the delightful process of creating individual portions of autumnal bliss, and I truly believe these aren’t just any dessert; they are a celebration in every single bite. If you’re looking for a recipe that combines convenience with unparalleled flavor, then these Mini Pumpkin Pies are an absolute must-try for your next gathering, holiday feast, or even just a cozy evening in. Their individual serving size makes them utterly perfect for parties, ensuring everyone gets a pristine, perfectly portioned treat without the mess of slicing a large pie. No more awkward knife skills at the dessert table! Each little pie boasts a crisp, buttery crust cradling a velvety smooth, perfectly spiced pumpkin filling that simply melts in your mouth, leaving behind that warm, comforting sensation that pumpkin pie is famous for. The aroma alone as they bake will fill your home with the inviting scents of cinnamon, nutmeg, and cloves, making your kitchen the happiest place to be.
What makes these miniature delights truly stand out is their incredible versatility and the sheer joy they bring. They’re less daunting than a full-sized pie, allowing even novice bakers to achieve impressive results. Imagine the smiles when your guests see their own personal pie awaiting them! They’re not just a dessert; they’re an experience, a little moment of autumn magic encapsulated in a tiny, edible package. The rich, earthy sweetness of the pumpkin, balanced beautifully by our carefully selected blend of spices, creates a harmonious flavor profile that is both classic and incredibly satisfying. Plus, they cool faster than a large pie, meaning you can enjoy them sooner – a definite win in my book when those pumpkin cravings hit!
Serving Suggestions & Variations: Elevate Your Mini Pies!
While these Mini Pumpkin Pies are absolutely divine on their own, a few simple additions can take them from wonderful to truly spectacular. For a classic touch, a dollop of freshly whipped cream, lightly sweetened and perhaps infused with a hint of vanilla bean or a dash of cinnamon, is always a winner. You could also try a scoop of high-quality vanilla bean ice cream or, for an extra indulgent treat, a scoop of cinnamon or salted caramel ice cream that slowly melts into the warm pie. Drizzle a little homemade caramel sauce or a sprinkle of toasted pecans or candied walnuts over the top for added texture and flavor. A light dusting of powdered sugar or extra cinnamon can also add an elegant finish. For a truly decadent experience, a swirl of melted dark chocolate or a tiny gingerbread man cookie nestled into the whipped cream would be adorable and delicious.
Feeling adventurous? The beauty of baking is in the experimentation! You can easily adapt these pies to your personal taste. Consider incorporating different spices into the filling – a touch of ginger, allspice, or even a tiny pinch of black pepper can add an unexpected depth. For a richer filling, a tablespoon of cream cheese or mascarpone can be beaten into the pumpkin mixture. If you’re not a fan of traditional pie crust, a crushed graham cracker or gingersnap crust would be an amazing alternative, offering a different textural dimension and flavor profile. For those who love a streusel topping, a simple mix of butter, flour, sugar, and a dash of spice crumbled over the top before baking would add a delightful crunch. You could also make them gluten-free by using a gluten-free pie crust or a nut-based crust, and vegan by substituting plant-based milk and a flax egg, proving that these little pies are truly for everyone!
Don’t Just Bake Them, Experience Them!
So, what are you waiting for? This recipe is incredibly straightforward, rewarding, and guaranteed to be a crowd-pleaser. I wholeheartedly encourage you to carve out some time this season to whip up a batch (or two!) of these delightful Mini Pumpkin Pies. You won’t regret it, I promise! Whether you’re sharing them with loved ones or savoring one all to yourself with a warm cup of coffee or a spiced cider, they are sure to bring a smile to your face. Once you’ve made them, I’d absolutely love to hear about your experience. Did you add a unique twist? What was your favorite topping? Please share your baking triumphs, your photos, and any creative variations you come up with in the comments below or tag me on social media! Your insights and ideas inspire me and our entire baking community. Happy baking, and enjoy every blissful bite!
FAQs about Mini Pumpkin Pies
How do you keep mini pumpkin pies from getting soggy?
The key to preventing soggy mini pumpkin pies lies primarily in two areas: the crust and the filling. For the crust, consider pre-baking (blind baking) it for 10-15 minutes before adding the filling. This helps to create a barrier and ensures a crisp base. For the filling, make sure you don’t overfill the crusts, as excess moisture can contribute to sogginess. Also, allow the pies to cool completely at room temperature before refrigerating them. This slow cooling process helps the filling to set properly and prevents condensation from forming, which can make the crust wet.
Can you freeze mini pumpkin pies?
Yes, mini pumpkin pies freeze exceptionally well! To freeze them, ensure they are completely cooled. Then, arrange them in a single layer on a baking sheet and freeze until solid (this prevents them from sticking together). Once solid, transfer them to an airtight freezer-safe container or a heavy-duty freezer bag, layering parchment paper between them if stacking. They can be stored in the freezer for up to 1-2 months. When you’re ready to enjoy them, thaw them in the refrigerator overnight or at room temperature for a few hours. You can gently warm them in a low oven (around 250°F / 120°C) for 10-15 minutes to freshen them up.
How long are mini pumpkin pies good for?
Once baked, mini pumpkin pies should be stored in the refrigerator due to their dairy-based filling. Properly stored in an airtight container, they will typically remain fresh and delicious for 3-4 days in the fridge. While they might still be safe to eat for a little longer, their quality, particularly the crust’s texture, will be best within this timeframe. Always trust your senses; if they look or smell off, it’s best to discard them.
What toppings are best for mini pumpkin pies?
The beauty of mini pumpkin pies is how versatile they are with toppings! The most classic and beloved topping is a generous dollop of freshly whipped cream, often lightly sweetened with vanilla. Other fantastic options include a scoop of vanilla bean, cinnamon, or even salted caramel ice cream. For added texture and flavor, consider a drizzle of caramel sauce, a sprinkle of toasted pecans or walnuts, or candied ginger pieces. A dusting of cinnamon, nutmeg, or powdered sugar can also add a simple yet elegant finish. Don’t be afraid to experiment with chocolate shavings or even a tiny marshmallow toasted on top!
What’s the best way to make mini pumpkin pie crusts?
For mini pumpkin pies, a classic flaky all-butter pie crust works wonders and can be easily adapted by rolling it thinner and cutting out circles to fit your muffin tin. Using a good quality, store-bought refrigerated pie crust is also an excellent time-saver and delivers consistent results. Alternatively, for a different flavor and texture, a pressed crumb crust made from crushed graham crackers, gingersnaps, or even shortbread cookies mixed with melted butter can be a delicious and easy no-roll option. Whichever crust you choose, remember to press it firmly into the muffin tin cups and consider blind baking (pre-baking) it for 10-15 minutes before adding the filling to ensure a crisp base and prevent sogginess.
Mini Pumpkin Pies: Perfect Fall Dessert Bites!
Adorable Mini Pumpkin Pies are the perfect fall dessert for entertaining or a cozy family gathering. Featuring all the comforting flavors of classic pumpkin pie, these mini pies are easy to prepare and even easier to enjoy. With a buttery crust and creamy pumpkin filling, they’re ideal for Thanksgiving or any autumn celebration. Top with a dollop of whipped cream for a delicious and festive finish!
Ingredients
-
2 ½ cups (300g) all-purpose flour
-
1 teaspoon salt
-
1 cup (226g) unsalted butter, very cold, cut into ½-inch cubes
-
½ cup (120ml) ice water, plus 1-2 tablespoons more if needed
-
1 (15-ounce / 425g) can pure pumpkin puree
-
1 cup (240ml) heavy cream
-
½ cup (100g) packed light brown sugar
-
¼ cup (50g) granulated sugar
-
2 large eggs, lightly beaten
-
1 teaspoon ground cinnamon
-
½ teaspoon ground ginger
-
¼ teaspoon ground cloves
-
¼ teaspoon ground nutmeg
-
½ teaspoon salt
-
1 teaspoon vanilla extract
-
Sweetened whipped cream (optional, for serving)
-
Additional ground cinnamon or nutmeg for dusting (optional, for serving)
Instructions
-
Step 1
In a large bowl, whisk together 2 ½ cups all-purpose flour and 1 teaspoon salt. Add 1 cup very cold, ½-inch cubed unsalted butter. Cut butter into flour using a pastry blender, two knives, or fingertips until mixture resembles coarse crumbs with some pea-sized butter pieces visible. Do not overmix. -
Step 2
Gradually add ½ cup ice water, 1 tablespoon at a time, mixing gently until dough just comes together. Avoid adding too much water. Divide dough in half, gently form each half into a flat disc, wrap tightly in plastic wrap, and refrigerate for at least 30 minutes, or 1 to 2 hours. -
Step 3
While dough chills, preheat oven to 375°F (190°C). Lightly grease a standard 12-cup muffin tin. -
Step 4
On a lightly floured surface, roll out one chilled dough disc to about ⅛-inch thickness. Using a 3-inch round cookie cutter (or glass rim), cut out as many circles as possible. Gently gather scraps, re-roll, and cut more circles until you have 12-18 mini crusts. -
Step 5
Carefully press each dough circle into the prepared muffin tin cups, shaping to fit and leaving a small lip above the rim. Lightly prick the bottom of each crust with a fork. Line each crust with a small piece of parchment paper or foil and fill with pie weights, dried beans, or rice. Bake for 10-12 minutes until edges are set. Remove weights/parchment/foil and bake for another 3-5 minutes until bottoms look slightly dry. Remove from oven and cool slightly. -
Step 6
In a large mixing bowl, whisk together 1 (15-ounce) can pure pumpkin puree, 1 cup heavy cream, and 2 lightly beaten large eggs until smooth. -
Step 7
Stir in ½ cup packed light brown sugar, ¼ cup granulated sugar, 1 teaspoon ground cinnamon, ½ teaspoon ground ginger, ¼ teaspoon ground cloves, ¼ teaspoon ground nutmeg, and ½ teaspoon salt. -
Step 8
Mix in 1 teaspoon vanilla extract. Whisk everything together thoroughly until the mixture is completely smooth and all ingredients are evenly distributed. -
Step 9
Carefully spoon the pumpkin filling into each of the pre-baked mini pie crusts in the muffin tin, filling each to about two-thirds full. -
Step 10
Carefully transfer the muffin tin to the preheated 375°F (190°C) oven. Bake for about 20-25 minutes. -
Step 11
The pies are done when the edges of the filling are set, and the center still has a slight jiggle. A knife inserted near the edge should come out clean. -
Step 12
Remove the muffin tin from the oven. Let the mini pies cool in the muffin tin on a wire rack for about 15-20 minutes. Then, gently remove each mini pie and place them directly on the wire rack to cool completely (this can take several hours). -
Step 13
To prevent cracks, don’t overbake and allow pies to cool slowly. Pies can be stored at room temperature for a day or refrigerated in an airtight container for 3-4 days. Baked, cooled pies can be frozen for 1-2 months. Thaw overnight in the refrigerator. Serve with sweetened whipped cream and a sprinkle of cinnamon or nutmeg.
Important Information
Nutrition Facts (Per Serving)
It is important to consider this information as approximate and not to use it as definitive health advice.
Allergy Information
Please check ingredients for potential allergens and consult a health professional if in doubt.
Leave a Comment