

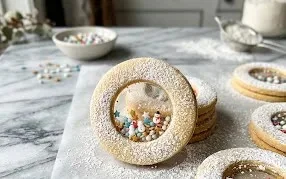
Snow Globe Cookies are more than just a sweet treat; they’re edible magic, bringing a touch of winter wonder right to your kitchen. I absolutely adore these delightful cookies, and I know you will too! What’s not to love about a cookie that looks like it’s holding a miniature snow-covered scene? They are the perfect way to capture the enchantment of a snowy day, and they truly stand out from your average holiday bake. The satisfying crunch of the cookie base, combined with the clear, shimmering “snow” suspended within, creates an experience that’s both visually stunning and incredibly delicious. These Snow Globe Cookies are a guaranteed showstopper, perfect for gifting, decorating your holiday table, or simply for bringing a smile to everyone’s face during the festive season.
Why You’ll Fall in Love with Snow Globe Cookies
The Charm and Delight
These are the cookies that whisper tales of frosted landscapes and cozy winter evenings. Imagine biting into a crisp cookie, only to discover a suspended swirl of edible “snow” that glitters and moves. It’s pure delight! People are captivated by the sheer whimsy of Snow Globe Cookies. They transform simple baking into an artistic endeavor, offering a truly unique and memorable treat that’s far beyond the ordinary. This recipe will guide you through creating your own miniature winter wonderland.
Ingredients:
- Sugar cookie dough (premade is great)
- Vanilla frosting
- Shredded coconut or white sprinkles
Snow Globe Cookies: A Sweet Winter Scene
These snow globe cookies are such a fun and festive treat, especially when the weather outside is frightful. They look just like little winter wonderlands captured in a cookie. The beauty of this recipe is how simple it is to assemble, making it perfect for a quick holiday baking project or even something to do with kids. We’re using premade sugar cookie dough here because it’s incredibly convenient and still gives us a delicious base to work with. The star of the show, besides the cookie itself, is the snowy landscape we’ll create.
Creating Your Winter Wonderland Base
Baking the Cookie Base
The first step is to prepare your sugar cookie dough. If you’re using a store-bought roll, you’ll want to let it soften just slightly at room temperature, usually about 10-15 minutes. This makes it easier to slice without crumbling. Preheat your oven according to the package directions for your sugar cookie dough. Typically, this is around 350 degrees Fahrenheit (175 degrees Celsius).
Now, slice the cookie dough into rounds. Aim for about a quarter-inch thickness. If the dough is too thick, the cookies will spread too much and become very thin. If they are too thin, they might bake too quickly or be too fragile. Place the cookie slices onto a baking sheet lined with parchment paper. Give them a little space, about two inches apart, as they will spread a bit during baking.
Bake the cookies until the edges are lightly golden brown and the centers are just set. This usually takes about 8 to 12 minutes, depending on your oven and the thickness of your cookies. Don’t overbake them; you want them to be slightly soft in the center so they don’t become brittle. Once they’re done, let them cool on the baking sheet for a couple of minutes before carefully transferring them to a wire rack to cool completely. It’s really important that they are totally cool before you start decorating, otherwise, your frosting will melt right off!
Frosting Your Snow Globes
Once your cookies are completely cool, it’s time for the frosting. You can use store-bought vanilla frosting, or whip up your own favorite vanilla buttercream recipe. Scoop a generous amount of frosting onto the center of each cooled cookie. You don’t need to be super neat here; we want a nice, thick layer that will help our “snow” stick.
Using an offset spatula or the back of a spoon, spread the frosting evenly across the entire surface of the cookie, right to the edges. Make sure you have a good, smooth layer. This frosting layer acts as the adhesive for our snowy elements and also represents the sky in our snow globe. If you want a perfectly smooth surface, you can gently glide your spatula back and forth to even it out. If you prefer a more rustic look, a few swirls and imperfections are perfectly fine.
Adding the Snowy Landscape
Now for the fun part – turning your frosted cookies into snowy scenes! This is where the shredded coconut or white sprinkles come in. If you’re using shredded coconut, it gives a really lovely, fluffy snow effect. If you’re opting for white sprinkles, you can achieve a different kind of sparkling snow.
Take a handful of your chosen snowy material – either the shredded coconut or the white sprinkles. Gently and evenly sprinkle it all over the frosted surface of the cookie. You want to create a nice, thick blanket of “snow.” Don’t be shy; the more you add, the more convincing your snow globe will look. You can lightly press down with your fingers or the back of a spoon to help the coconut or sprinkles adhere to the frosting. For a really dense snowfall effect, you can even pour some over and then gently shake off the excess. Try to cover as much of the frosting as possible to create that magical winter feel.
Optional Details for Extra Magic
For an even more enchanting snow globe, consider adding a few extra touches. You can use tiny edible glitter stars or silver dragees (if you have them on hand and they are safe for your guests to consume) to represent distant stars or magical frost. You could also pipe tiny, simple shapes like little trees or houses onto the cookie before adding the snow if you want a scene with specific elements. However, for the classic snow globe look, simply focusing on the snowy texture is beautiful enough. The key is to keep it simple and let the frosting and snow texture do the work.
Setting and Serving Your Snow Globes
Once you’ve added your snow, let the cookies sit for at least 15-30 minutes. This allows the frosting to set slightly, which helps keep the coconut or sprinkles in place. If you’re transporting them or stacking them, giving them a bit more time to firm up is a good idea. These cookies are best stored in an airtight container at room temperature. They’ll stay fresh for a few days. They make a wonderful addition to any holiday cookie platter, a fun treat for a winter party, or a thoughtful edible gift. Enjoy your delicious, homemade snow globes!
Conclusion:
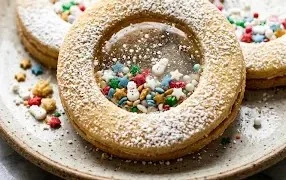
There you have it! Making these Snow Globe Cookies is such a rewarding and fun experience, perfect for adding a touch of magic to any occasion. The combination of a sturdy, buttery cookie base, vibrant icing, and the whimsical surprise inside makes these treats truly special. They’re not just delicious; they’re edible works of art that will impress your friends and family. Imagine the delight on children’s faces as they discover the miniature scene encased within their cookie!
These Snow Globe Cookies are fantastic served as a centerpiece for holiday gatherings, as a unique party favor, or simply enjoyed with a warm cup of tea on a cozy afternoon. For variations, don’t be afraid to experiment! You could try different cookie cutters for the base, use a variety of edible glitter or sprinkles to mimic falling snow, or even create different miniature scenes inside – think tiny gingerbread houses or woodland creatures. I truly encourage you to give this recipe a try; it’s easier than you might think and the results are absolutely enchanting.
Frequently Asked Questions:
Why are my Snow Globe Cookies not clear?
The most common reason for cloudy Snow Globe Cookies is the type of edible plastic used. Ensure you are using a specific edible window plastic designed for baking. Overheating the cookie dough or the plastic itself during assembly can also cause cloudiness. Make sure your oven temperature is accurate and allow the cookie to cool sufficiently before attaching the plastic.
Can I make the cookie dough ahead of time?
Absolutely! The cookie dough for Snow Globe Cookies can be made up to 2-3 days in advance and stored in the refrigerator. Just wrap it tightly in plastic wrap. Allow it to come to room temperature for about 15-20 minutes before rolling it out, as chilled dough can be harder to work with.
Snow Globe Cookies
Festive sugar cookies decorated to resemble snow globes.
Ingredients
-
24 pre-made sugar cookies
-
1 cup vanilla frosting
-
1/2 cup shredded coconut
-
1/4 cup white sprinkles
-
1/4 teaspoon edible glitter (optional)
-
Blue food coloring (optional)
Instructions
-
Step 1
Prepare sugar cookies according to package directions or your favorite recipe. Let them cool completely. -
Step 2
In a small bowl, tint vanilla frosting with a tiny amount of blue food coloring if desired, to create a pale blue “winter sky” effect. Stir until evenly combined. -
Step 3
Spread a thin, even layer of the vanilla frosting over the surface of each cooled sugar cookie. -
Step 4
Generously sprinkle the shredded coconut or white sprinkles over the frosted cookies, covering them completely to resemble snow. -
Step 5
Add a few white sprinkles to the center of some cookies to represent a “figure” inside the snow globe. -
Step 6
For extra sparkle, lightly dust the cookies with edible glitter. -
Step 7
Allow the frosting to set for a few minutes before serving or storing.
Important Information
Nutrition Facts (Per Serving)
It is important to consider this information as approximate and not to use it as definitive health advice.
Allergy Information
Please check ingredients for potential allergens and consult a health professional if in doubt.


Leave a Comment