
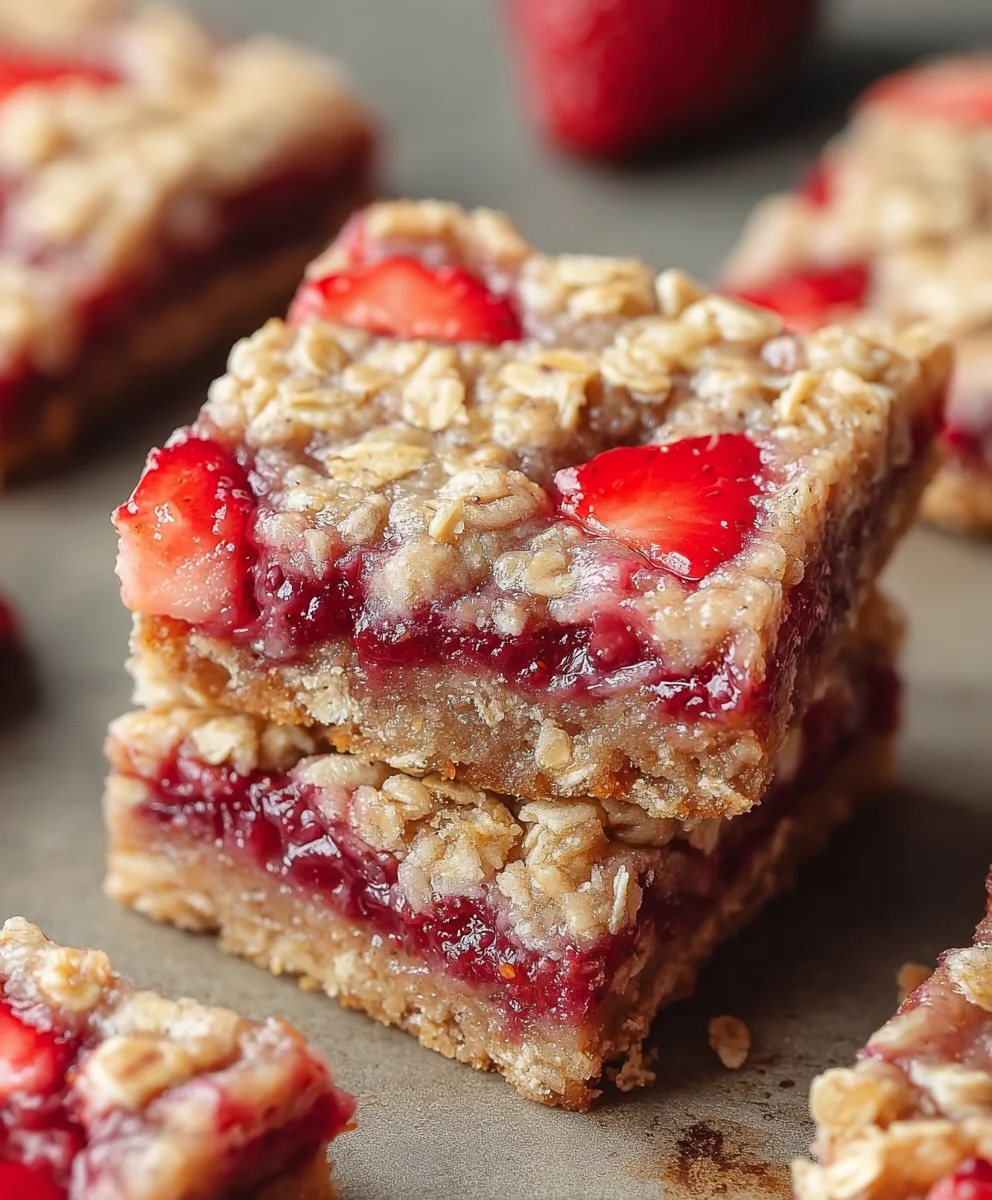
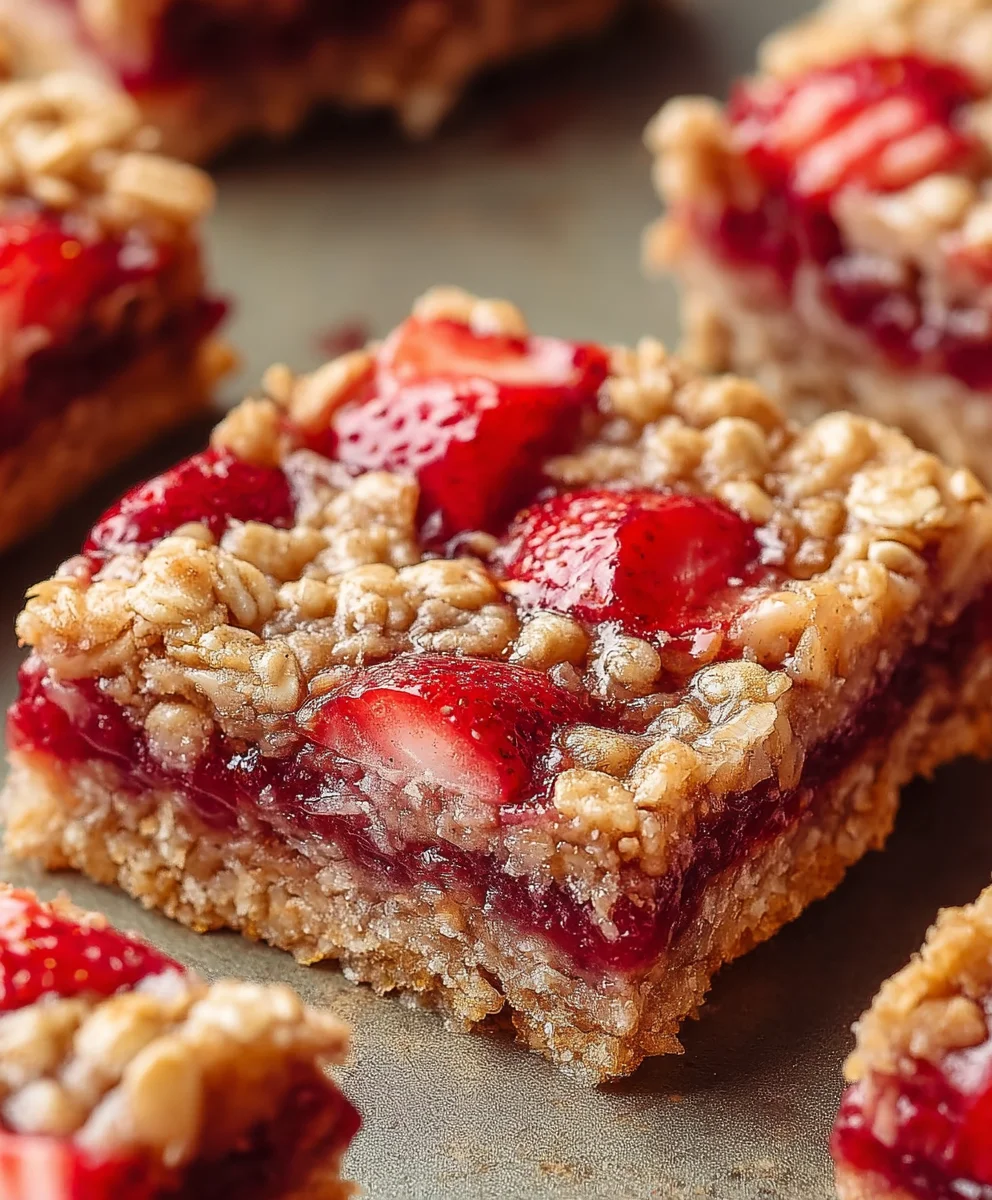
Strawberry Oatmeal Bars are more than just a delightful treat; they are a true celebration of summer’s bounty, encased in a comforting, wholesome package. Imagine sinking your teeth into a golden, crumbly oat crust, giving way to a burst of sweet, juicy strawberries, all perfectly complemented by a hearty, chewy oat topping. This harmonious blend of flavors and textures makes them an irresistible choice for any time of day.
This beloved classic holds a special place in many hearts, often conjuring nostalgic memories of cherished family recipes, comforting Sunday brunches, or the perfect grab-and-go snack for bustling mornings. Their enduring popularity is no mystery; they effortlessly combine the fresh vibrancy of fruit with the satisfying heartiness of oats, offering incredible versatility. Whether enjoyed as a wholesome breakfast, a fulfilling afternoon pick-me-up, or a light, fruity dessert, these bars always hit the spot.
I find myself constantly drawn to their simplicity and the way they encapsulate the essence of seasonal fruit within a comforting form. These Strawberry Oatmeal Bars truly embody the joy of homemade baking without the fuss, making them an indispensable and much-loved addition to any kitchen.
<h2>Ingredients:</h2>
<ul>
<li><strong>For the Luscious Strawberry Filling:</strong></li>
<ul>
<li><strong>Fresh Strawberries:</strong> 4 cups (approximately 1.5 to 2 pounds), hulled and diced into small, roughly 1/2-inch pieces. I always recommend using fresh, ripe strawberries when they are in season for the best flavor, but frozen unsweetened strawberries (thawed and drained) can also work in a pinch. Just be sure to drain any excess liquid if using frozen to prevent a watery filling.</li>
<li><strong>Granulated Sugar:</strong> 1/2 cup. This sweetness perfectly balances the natural tartness of the strawberries, creating a harmonious flavor profile for your strawberry oatmeal bars. You can adjust this slightly to your preference or the sweetness of your berries.</li>
<li><strong>Fresh Lemon Juice:</strong> 1 tablespoon. A splash of fresh lemon juice brightens the strawberry flavor considerably, adding a lovely tangy counterpoint that elevates the entire filling. It’s a small addition that makes a big difference!</li>
<li><strong>Cornstarch:</strong> 2 tablespoons. This is our secret weapon for a perfectly thick and Spoonable filling. It helps to bind the fruit juices, preventing the bars from becoming soggy and ensuring the filling holds its shape beautifully once baked and cooled.</li>
<li><strong>Pure Vanilla Extract:</strong> 1 teaspoon. A good quality vanilla extract adds a warm, aromatic depth that complements the strawberries wonderfully. It’s the subtle background note that makes the fruit filling truly irresistible.</li>
</ul>
<li><strong>For the Wholesome Oatmeal Crumble Base and Topping:</strong></li>
<ul>
<li><strong>All-Purpose Flour:</strong> 1 1/2 cups (about 180g). This forms the primary structure of our crumble, providing a tender yet sturdy foundation for the bars. Make sure to measure accurately, perhaps even by weight if you have a kitchen scale, for consistent results.</li>
<li><strong>Rolled Oats (Old-Fashioned):</strong> 1 1/2 cups. These are essential for the classic chewy texture and hearty flavor of our oatmeal bars. Avoid instant or quick oats, as they can become mushy. Old-fashioned oats hold their shape much better and contribute to that wonderful wholesome feel.</li>
<li><strong>Light Brown Sugar (packed):</strong> 3/4 cup. The molasses in brown sugar lends a deep, caramel-like sweetness and a delightful chewiness to the crumble, enhancing its flavor profile significantly. Always pack it tightly into your measuring cup for the correct amount.</li>
<li><strong>Granulated Sugar:</strong> 1/4 cup. This adds an additional layer of sweetness and helps achieve that perfectly crisp texture in the crumble, balancing the moistness from the brown sugar.</li>
<li><strong>Baking Powder:</strong> 1 teaspoon. A small amount of baking powder helps to give the base and topping a slight lift and a more tender crumb, ensuring it’s not too dense.</li>
<li><strong>Fine Sea Salt:</strong> 1/2 teaspoon. Salt is crucial for balancing the sweetness and enhancing all the other flavors in the crumble. It’s an often-overlooked ingredient that truly makes a difference in baked goods.</li>
<li><strong>Unsalted Butter (cold, cut into cubes):</strong> 1 cup (2 sticks or 226g). Using very cold butter is absolutely critical for achieving a perfectly crumbly, tender, and flaky texture. The cold butter melts slowly in the oven, creating pockets of steam that result in a wonderfully light and crisp crumb. Cut it into small 1/2-inch cubes before you start for easier incorporation.</li>
<li><strong>Pure Vanilla Extract:</strong> 1 teaspoon. Just like in the filling, vanilla extract in the crumble adds a warm, inviting aroma and flavor that ties everything together beautifully. It’s an essential part of making these strawberry oatmeal bars truly irresistible.</li>
</ul>
</ul>
<h3>Preparing the Strawberry Filling</h3>
<ol>
<li>
<h4>Washing and Preparing the Strawberries:</h4>
First things first, let’s get those beautiful strawberries ready. Gently wash your fresh strawberries under cool running water. After they’re clean, hull them – that’s just a fancy way of saying remove the green leafy tops and the small white core. Once hulled, dice them into small, approximately 1/2-inch pieces. Consistency in size is key here for even cooking. Small pieces will break down nicely to create a thick, jam-like filling, while larger chunks might remain too firm. If you’re using frozen strawberries, make sure they are completely thawed and then drain off any excess liquid thoroughly. This step is crucial because too much moisture will lead to a watery filling, which nobody wants in their delightful strawberry oatmeal bars. We want that vibrant, concentrated strawberry flavor to shine through.</li>
<li>
<h4>Combining Ingredients for the Filling:</h4>
In a medium-sized saucepan, combine your diced fresh strawberries, granulated sugar, fresh lemon juice, and pure vanilla extract. Give everything a good stir with a rubber spatula to ensure the sugar starts to dissolve and coat the strawberries evenly. Now, in a small separate bowl, whisk together the cornstarch with 2 tablespoons of cold water to create a smooth slurry. <strong>This step is important:</strong> adding cornstarch directly to hot liquid can cause lumps, so creating a slurry first ensures a smooth, silky filling. Set this cornstarch mixture aside for a moment, as we’ll add it a little later in the cooking process.</li>
<li>
<h4>Cooking the Strawberry Mixture:</h4>
Place the saucepan with your strawberry mixture over medium heat. Bring it to a gentle simmer, stirring occasionally to prevent sticking and encourage the sugar to fully dissolve. As the mixture heats up, the strawberries will start to release their juices, creating a beautiful, fragrant syrup. Continue to simmer for about 5-7 minutes. During this time, the strawberries will soften considerably, and the liquid will become more prominent. You’ll notice the kitchen filling with the most inviting aroma of sweet strawberries – a true sign of good things to come for your strawberry oatmeal bars!</li>
<li>
<h4>Thickening the Filling:</h4>
Once the strawberries have softened and are bubbly, give your cornstarch slurry another quick whisk (it can settle) and slowly pour it into the simmering strawberry mixture, stirring constantly. Continue to cook and stir for another 1-2 minutes, or until the filling visibly thickens. It should coat the back of a spoon and be somewhat translucent. The cornstarch will magically transform that watery fruit juice into a glossy, thick, and irresistible filling that will hold its shape perfectly between the oat layers. <strong>Be patient during this stage</strong> and ensure it thickens properly; an under-thickened filling can make your bars soggy.</li>
<li>
<h4>Cooling the Filling:</h4>
Remove the saucepan from the heat and transfer the strawberry filling to a heatproof bowl or plate. Spread it out slightly to help it cool faster. <strong>It is absolutely crucial to allow the filling to cool completely</strong> before assembling your strawberry oatmeal bars. Warm filling can melt the butter in your crumble mixture prematurely, leading to a less desirable texture in your base and topping. I often make the filling an hour or two ahead of time, or even the day before, and pop it in the refrigerator. This ensures it’s perfectly chilled and firm when you’re ready to layer, guaranteeing the best possible structure for your delicious bars.</li>
</ol>
<h3>Preparing the Oatmeal Crumble Base and Topping</h3>
<ol start=”6″>
<li>
<h4>Preheating and Pan Preparation:</h4>
Before we dive into mixing, let’s get our oven and baking pan ready. Preheat your oven to 375°F (190°C). This ensures the oven is at a consistent temperature when the bars go in, which is vital for even baking and that perfect golden-brown crust. Next, line a 9×13-inch baking pan with parchment paper, leaving an overhang on the sides. <strong>This parchment paper sling is your best friend</strong> – it will make lifting the cooled strawberry oatmeal bars out of the pan incredibly easy, allowing for clean, neat slices. Lightly grease the pan before placing the parchment paper, as this helps the paper stay in place. A little non-stick spray or butter works wonderfully.</li>
<li>
<h4>Whisking Dry Ingredients:</h4>
In a large mixing bowl, combine the all-purpose flour, old-fashioned rolled oats, light brown sugar (remember to pack it!), granulated sugar, baking powder, and fine sea salt. Use a whisk to thoroughly combine these dry ingredients. You want to make sure everything is evenly distributed so that each bite of your strawberry oatmeal bars has a consistent flavor and texture. Pay particular attention to breaking up any lumps in the brown sugar. This initial dry mix sets the stage for our wonderfully crumbly and flavorful base and topping.</li>
<li>
<h4>Adding Cold Butter:</h4>
Now for the fun part that makes the crumble, well, crumbly! Add the very cold, cubed unsalted butter to your dry ingredients. <strong>The key here is cold butter.</strong> You can use a pastry blender, your fingertips, or even a food processor (pulsing carefully to avoid overmixing) to cut the butter into the flour mixture. Work quickly to prevent the butter from warming up too much from the heat of your hands. Continue until the mixture resembles coarse crumbs, with some pea-sized pieces of butter still visible. These small pockets of cold butter are what create that delightful flakiness and tender texture in the finished strawberry oatmeal bars. Resist the urge to overmix; we’re not making dough, we’re making crumble!</li>
<li>
<h4>Incorporating Vanilla Extract:</h4>
Finally, pour in the pure vanilla extract. Use your hands or a spatula to gently mix it into the crumble mixture until it is just combined. The vanilla adds a wonderful depth of flavor and aroma that perfectly complements both the oats and the forthcoming strawberry filling. At this point, your crumble mixture should be cohesive enough that if you squeeze a handful, it holds together, but it should still be delightfully crumbly when released. This is exactly what we want for both the sturdy base and the irresistible topping of our strawberry oatmeal bars.</li>
</ol>
<h3>Assembling and Baking the Strawberry Oatmeal Bars</h3>
<ol start=”10″>
<li>
<h4>Pressing the Base Layer:</h4>
Take about two-thirds of your prepared oatmeal crumble mixture and evenly press it into the bottom of your parchment-lined 9×13-inch baking pan. Use the back of a spoon, your clean fingers, or a flat-bottomed measuring cup to press it down firmly and uniformly. <strong>A tightly packed base is essential</strong> to ensure the bars hold together when cut and provide a stable foundation for the fruit filling. Make sure the layer is even across the entire pan so that every strawberry oatmeal bar has a consistent thickness and cooks evenly. This compact layer will become beautifully golden and slightly chewy after baking.</li>
<li>
<h4>Spreading the Strawberry Filling:</h4>
Retrieve your completely cooled strawberry filling from the refrigerator. If you didn’t cool it fully, you risk the hot filling making your oat base soggy. Spoon the thick, luscious strawberry filling evenly over the pressed oat base. Gently spread it right to the edges of the pan using an offset spatula or the back of a spoon. Be careful not to disturb the pressed base layer underneath. <strong>The vibrant red of the strawberry filling will look absolutely stunning against the golden oats</strong>, promising a burst of fruit flavor in every bite of these amazing strawberry oatmeal bars. Ensure an even layer so that each bar gets an equal share of that fruity goodness.</li>
<li>
<h4>Adding the Crumble Topping:</h4>
Now, take the remaining one-third of your oatmeal crumble mixture. Generously sprinkle it over the strawberry filling. You don’t need to press this layer down; simply distribute it loosely and evenly across the top. This top layer will bake into a wonderfully crisp, golden, and buttery topping, providing a delightful textural contrast to the soft strawberry filling and the chewy base. <strong>This rustic, crumbly topping is what really defines these classic strawberry oatmeal bars</strong>, adding an irresistible appeal.</li>
<li>
<h4>Baking the Strawberry Oatmeal Bars:</h4>
Carefully place the baking pan into your preheated 375°F (190°C) oven. Bake for approximately 35-45 minutes. The exact baking time can vary slightly depending on your oven, so keep an eye on them. You’ll know your strawberry oatmeal bars are perfectly baked when the top crumble is beautifully golden brown, and the strawberry filling is bubbly and set along the edges. The aroma filling your kitchen will be absolutely incredible – a sure sign of a delicious treat in the making! <strong>Resist the urge to open the oven door too frequently</strong> during baking, as this can affect the temperature stability and overall baking process. If the top seems to be browning too quickly, you can loosely tent the pan with aluminum foil for the last 10-15 minutes of baking.</li>
</ol>
<h3>Cooling and Serving Your Delicious Strawberry Oatmeal Bars</h3>
<ol start=”14″>
<li>
<h4>Cooling Completely:</h4>
Once baked to perfection, remove the pan of strawberry oatmeal bars from the oven. <strong>This is perhaps the most challenging, yet crucial, step: resisting the urge to cut into them immediately!</strong> Allow the bars to cool completely in the pan on a wire rack for at least 2-3 hours. In fact, if you have the patience, cooling them overnight or chilling them in the refrigerator for an hour after they’ve reached room temperature is even better. As they cool, the strawberry filling will firm up significantly, and the oat layers will become perfectly set. Cutting into warm bars will almost certainly result in a messy, crumbling disaster, as the filling will still be too soft and the base too tender. Patience is truly a virtue here, and it will be rewarded with perfectly neat, delicious strawberry oatmeal bars.</li>
<li>
<h4>Slicing and Serving:</h4>
Once completely cool and firm, use the parchment paper overhang as handles to carefully lift the entire slab of strawberry oatmeal bars out of the baking pan and transfer it to a cutting board. Now comes the moment of truth! Using a sharp, large knife, cut the slab into individual bars. You can typically get 12-16 bars from a 9×13-inch pan, depending on how large you like them. For the cleanest cuts, wipe your knife clean between each slice, especially after cutting through the sticky strawberry filling. These bars are wonderful on their own, but if you’re feeling extra indulgent, a dollop of whipped cream or a scoop of vanilla ice cream makes for a heavenly accompaniment. <strong>Prepare for compliments – these strawberry oatmeal bars are a crowd-pleaser!</strong></li>
<li>
<h4>Storage Tips for Freshness:</h4>
Your delectable strawberry oatmeal bars will stay fresh and delicious when stored properly. Place the cooled and cut bars in an airtight container. At room temperature, they will last for up to 3 days. If you want to extend their freshness, especially in warmer climates, storing them in the refrigerator is a great idea; they will keep well for up to a week. For longer storage, you can even freeze them! Wrap individual bars tightly in plastic wrap, then place them in a freezer-safe bag or container. They can be frozen for up to 2-3 months. When you’re ready to enjoy, simply thaw them at room temperature for a few hours or gently warm them in the microwave for a few seconds. This way, you can enjoy the taste of homemade strawberry oatmeal bars whenever a craving strikes!</li>
</ol>
Conclusion:
Well, my friends, we’ve come to the delicious end of our journey through this delightful recipe, and I truly hope you’re feeling as excited as I am about what you’ve learned. I’ve poured my heart into sharing this particular recipe with you because I genuinely believe it’s an absolute game-changer in your kitchen repertoire. It’s not just another baked good; it’s an experience, a moment of pure, unadulterated joy waiting to happen. The beauty of this recipe lies in its elegant simplicity, transforming humble ingredients into something truly extraordinary. Imagine the harmonious blend of tender, sweet strawberries bursting with flavor, perfectly complemented by the hearty, wholesome oats, all encased in a buttery, crumbly crust that offers just the right amount of chewiness and crunch. Every single bite is a symphony of textures and tastes that dance on your palate, leaving you feeling utterly content and craving just one more piece.
What makes these particular treats a must-try, in my humble opinion, is their incredible versatility and undeniable crowd-pleasing appeal. They strike that perfect balance between being indulgent enough for a special dessert, yet wholesome enough to enjoy as a guilt-free breakfast or a satisfying afternoon snack. They encapsulate the essence of comfort food – familiar, inviting, and utterly delicious, but with a fresh, vibrant twist that elevates them far beyond the ordinary. I’ve witnessed firsthand the smiles they bring to faces, the appreciative murmurs, and the inevitable requests for the recipe. Trust me, once you experience the ease of preparation and the sensational outcome, these will quickly become a cherished favorite in your household, just as they have in mine. They are, without a doubt, a testament to how simple ingredients, when treated with a little love and care, can create something truly magnificent.
Unleash Your Creativity: Serving Suggestions & Variations
Now, let’s talk about how to truly make these your own and elevate the experience even further. While these delectable bars are utterly fantastic straight out of the pan, whether still warm and fragrant or cooled to perfection, I have a few serving suggestions and variations that I think you’ll adore. For an extra touch of indulgence, try serving a warm bar with a generous scoop of vanilla bean ice cream or a dollop of freshly whipped cream. The contrast between the warm, fruity bar and the cool, creamy topping is simply divine. If you’re leaning towards a breakfast or brunch option, a side of Greek yogurt provides a lovely tangy counterpoint and a boost of protein, making for a well-rounded and delightful start to your day. A light dusting of powdered sugar adds a touch of elegance, perfect if you’re serving them to guests.
But please, don’t stop there! This recipe is incredibly forgiving and truly invites experimentation. While the classic “Strawberry Oatmeal Bars” are undeniably heavenly, you can easily swap out the strawberries for other seasonal fruits. Imagine the delightful taste of raspberry and white chocolate, a blueberry and lemon zest combination, or even a mixed berry medley for a burst of varied flavors. During autumn, you could try thinly sliced apples or peaches, perhaps with a sprinkle of cinnamon or nutmeg for a warming spice kick. For an added layer of texture and richness, consider folding in a handful of chopped nuts like pecans or walnuts into the oat topping, or even some mini chocolate chips for a sweet surprise. A simple citrus glaze, made with powdered sugar and a squeeze of lemon or orange juice, drizzled over the cooled bars, can also add a beautiful finish and an extra layer of flavor. The possibilities are truly endless, allowing you to tailor this recipe to your own tastes and the season’s bounty.
Your Turn: Bake, Share, and Inspire!
So, there you have it – my heartfelt endorsement for these truly exceptional treats. I’ve shared all my tips and tricks, and now, the most exciting part begins: it’s your turn to get into the kitchen and bring this magic to life! I genuinely encourage you to roll up your sleeves, gather your ingredients, and experience the pure joy of baking these for yourself. You’ll find that the process is as rewarding as the final product, filling your home with the most incredible aroma that promises something wonderful is on its way. Don’t be shy; embrace the process, have fun with it, and prepare to impress yourself and everyone lucky enough to taste your creation.
Once you’ve whipped up a batch, tasted the deliciousness, and perhaps even experimented with some of the variations I’ve suggested, I would absolutely love to hear about your experience. Did you make any fun substitutions? What was your favorite part of the recipe? Did they disappear as quickly in your house as they do in mine? Your feedback and shared stories truly make my day and help to build this wonderful community of food lovers. So please, come back and leave a comment, share your pictures, and tell me all about your delicious journey. Let’s inspire each other to bake more, share more, and savor every single moment in the kitchen. I can’t wait to hear how much you loved these delightful Strawberry Oatmeal Bars! Happy baking, my friends!
Strawberry Oatmeal Bars
Easy, healthy, and delicious Strawberry Oatmeal Bars feature a golden, crumbly oat crust, a sweet and juicy strawberry filling, and a hearty oat topping. Perfect as a wholesome breakfast, snack, or light dessert.
Ingredients
-
4 cups fresh or thawed frozen strawberries, hulled and diced
-
1/2 cup granulated sugar (for filling)
-
1 tbsp fresh lemon juice
-
2 tbsp cornstarch
-
1 tsp pure vanilla extract (for filling)
-
1 1/2 cups all-purpose flour
-
1 1/2 cups old-fashioned rolled oats
-
3/4 cup packed light brown sugar
-
1/4 cup granulated sugar (for crumble)
-
1 tsp baking powder
-
1/2 tsp fine sea salt
-
1 cup cold unsalted butter, cubed (2 sticks)
-
1 tsp pure vanilla extract (for crumble)
Instructions
-
Step 1
Wash, hull, and dice 4 cups fresh or thawed frozen strawberries. In a medium saucepan, combine diced strawberries, 1/2 cup granulated sugar, 1 tbsp fresh lemon juice, and 1 tsp pure vanilla extract. -
Step 2
In a small bowl, whisk 2 tbsp cornstarch with 2 tbsp cold water to create a smooth slurry. -
Step 3
Simmer the strawberry mixture over medium heat for 5-7 minutes until strawberries soften. Stir in the cornstarch slurry and cook for 1-2 minutes more until visibly thickened and glossy. -
Step 4
Transfer the hot filling to a heatproof bowl or plate and spread slightly. Cool completely, preferably chilling in the refrigerator for at least 1 hour or overnight, to ensure it sets properly. -
Step 5
Preheat oven to 375°F (190°C). Line a 9×13-inch baking pan with parchment paper, leaving an overhang, and lightly grease the pan to help the paper stay in place. -
Step 6
In a large mixing bowl, whisk together 1 1/2 cups all-purpose flour, 1 1/2 cups old-fashioned rolled oats, 3/4 cup packed light brown sugar, 1/4 cup granulated sugar, 1 tsp baking powder, and 1/2 tsp fine sea salt. Add 1 cup cold, cubed unsalted butter and cut it into the dry ingredients using a pastry blender or fingertips until the mixture resembles coarse crumbs with some pea-sized pieces of butter still visible. Mix in 1 tsp pure vanilla extract until just combined. -
Step 7
Press about two-thirds of the oatmeal crumble mixture firmly and evenly into the bottom of the prepared pan. Spread the completely cooled strawberry filling evenly over the pressed oat base, taking care not to disturb the layer. Sprinkle the remaining one-third of the crumble mixture loosely and evenly over the strawberry filling. -
Step 8
Bake for approximately 35-45 minutes in the preheated oven, or until the top crumble is beautifully golden brown and the strawberry filling is bubbly and set along the edges. -
Step 9
Remove the baked bars from the oven and cool completely in the pan on a wire rack for at least 2-3 hours. For the cleanest slices, cooling overnight or chilling in the refrigerator for an hour after reaching room temperature is recommended. Once fully cool, use the parchment paper overhang to lift the entire slab of bars from the pan. Transfer to a cutting board and slice into 12-16 individual bars with a sharp knife, wiping the blade between cuts. Serve as desired. -
Step 10
Store cooled and cut bars in an airtight container for up to 3 days at room temperature, up to 1 week in the refrigerator, or up to 2-3 months in the freezer. Thaw frozen bars at room temperature or gently warm in the microwave.
Important Information
Nutrition Facts (Per Serving)
It is important to consider this information as approximate and not to use it as definitive health advice.
Allergy Information
Please check ingredients for potential allergens and consult a health professional if in doubt.

Leave a Comment