
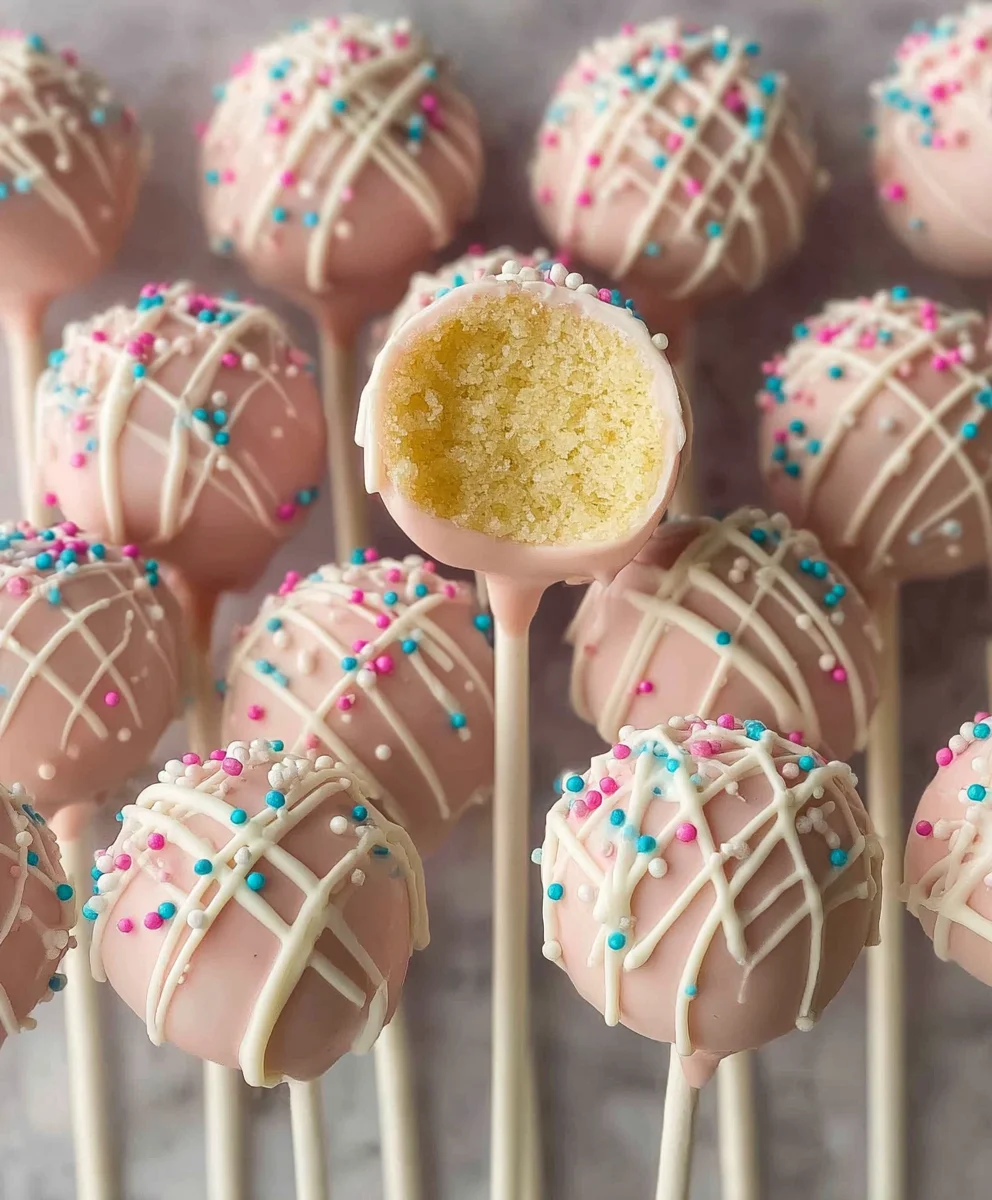
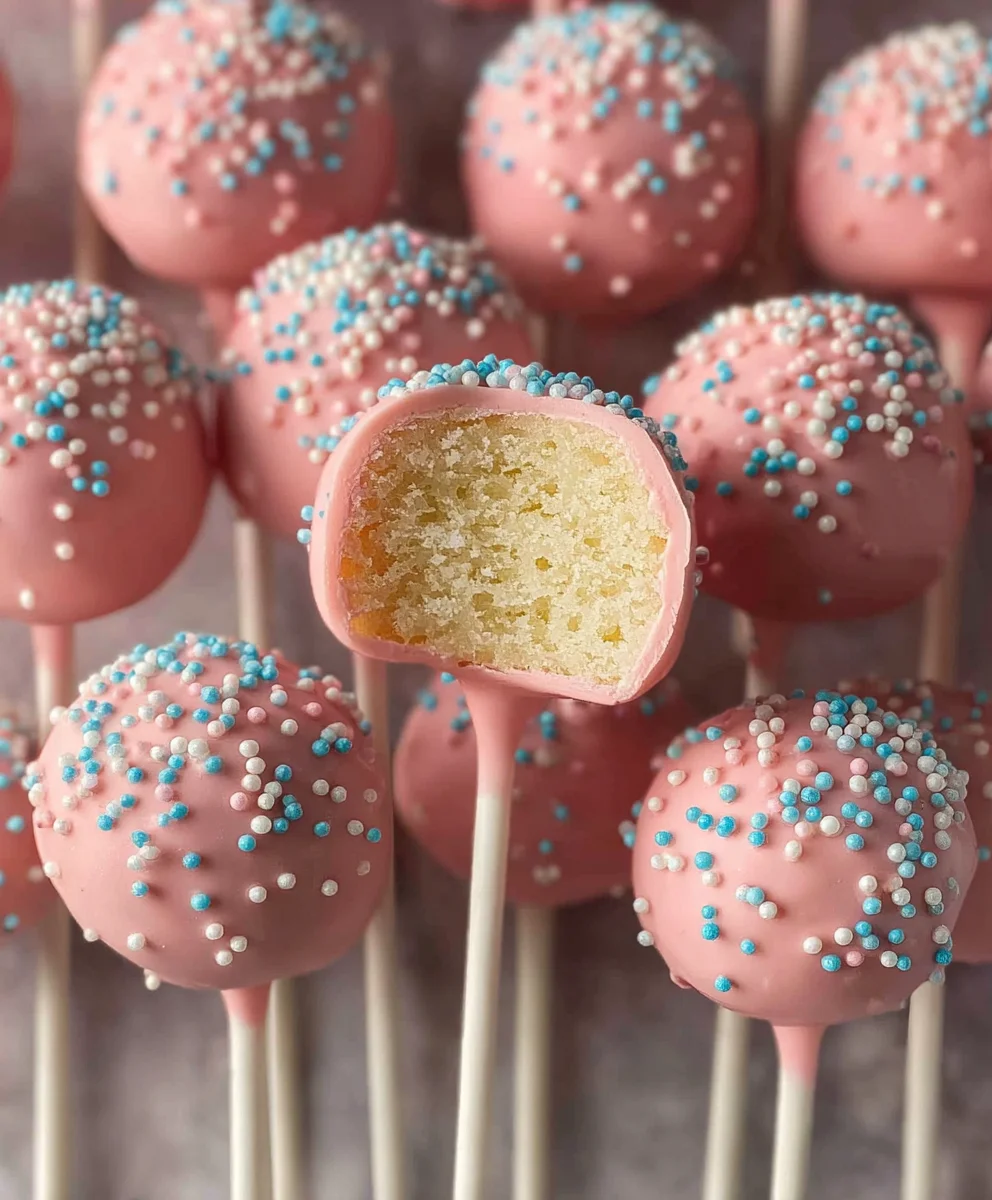
Starbucks Copycat Birthday Cake Pops are more than just a sweet treat; they’re miniature celebrations waiting to happen! Who can resist the allure of these colorful, cakey spheres, dipped in vibrant candy melts and showered with sprinkles? They’ve become a beloved staple for a reason, capturing the joyous essence of birthdays with every bite. We all have those moments where a craving strikes for that specific, delightful flavor and texture that only a Starbucks Birthday Cake Pop can deliver. But what if I told you that you can recreate that magic, that undeniable taste of pure, unadulterated happiness, right in your own kitchen? This recipe isn’t just about making cake pops; it’s about bottling that festive spirit and having it readily available whenever you need a pick-me-up or a reason to smile. Get ready to discover the secret to achieving that perfect, craveable chewiness and the iconic, sweet frosting coating that makes Starbucks Copycat Birthday Cake Pops so utterly irresistible.
Ingredients:
- 1 box (13.25 oz) any store-bought box of vanilla cake mix
- ⅓ cup neutral oil (such as vegetable, avocado, or canola)
- 1 cup milk or water
- 4 large eggs
- ¼ cup unsalted butter, softened
- 1 cup powdered sugar
- 1 teaspoon vanilla extract
- Pinch of salt
- 1 teaspoon milk (you might need a little more to reach the right consistency)
- 12 oz candy melts (white or a pastel color works best for a birthday theme)
- White nonpareils or other colorful sprinkles for decoration
Making the Cake Base
The first step to achieving our Starbucks copycat Birthday Cake Pops is to create a wonderfully moist and tender cake base. This is surprisingly straightforward, especially when using a good quality store-bought mix. In a large mixing bowl, combine the contents of your 13.25 oz box of vanilla cake mix. This provides the perfect foundation for our sweet treats. Next, add the wet ingredients. Pour in ⅓ cup of neutral oil – I prefer avocado oil for its subtle flavor and excellent emulsifying properties, but vegetable or canola will work perfectly fine. Follow this with 1 cup of milk or water. Whichever you choose will contribute to the cake’s moisture; milk tends to make it a bit richer, while water keeps it light. Finally, crack in your 4 large eggs. These bind the ingredients together and contribute to the cake’s structure and richness.
Now, it’s time to mix. Using an electric mixer on low speed, blend these ingredients until they are just combined. Be careful not to overmix at this stage, as overmixing can develop the gluten in the flour too much, leading to a tougher cake. Once the ingredients are incorporated, increase the mixer speed to medium and beat for the duration recommended on your cake mix box, usually about 2 minutes. This ensures everything is thoroughly combined and the batter is smooth.
Preheat your oven to the temperature specified on the cake mix box, typically around 350°F (175°C). Grease and flour your baking pans or line them with parchment paper. For cake pops, I find that baking the cake in a 9×13 inch baking pan results in the ideal cake consistency for crumbling and forming into balls. Pour the batter evenly into the prepared pan.
Bake the cake according to the box instructions, usually for 30-35 minutes, or until a toothpick inserted into the center comes out clean. Once baked, remove the cake from the oven and let it cool completely in the pan on a wire rack. This cooling process is crucial. Trying to crumble warm cake will result in a sticky, unmanageable mess. Patience is key here! Once fully cooled, carefully invert the cake onto the wire rack and peel off any parchment paper.
Creating the Cake Pop Mixture
Once your vanilla cake is completely cool, it’s time to transform it into the perfect cake pop mixture. This is where the magic truly happens. Gently break apart the cooled cake into small crumbs in a large mixing bowl. You want to get rid of any large chunks, aiming for a texture similar to coarse breadcrumbs. You can do this by hand or by pulsing it briefly in a food processor, but be very careful not to turn it into a paste.
Now, we’ll add a homemade frosting that acts as the binder. In a separate medium bowl, cream together ¼ cup of softened unsalted butter with 1 cup of powdered sugar. Using softened butter ensures that it incorporates smoothly without lumps. Add 1 teaspoon of vanilla extract for that signature sweet flavor and a pinch of salt to balance the sweetness. Mix these ingredients together until they form a thick, smooth frosting.
Add this frosting mixture to your crumbled cake. Now, the fun part: mixing! Use your hands or a sturdy spoon to thoroughly combine the cake crumbs and frosting. The goal is to create a dough-like consistency that holds together when squeezed. You want it moist enough to form into balls but not so wet that it becomes sticky. If the mixture feels a bit dry and crumbly, add 1 teaspoon of milk at a time, mixing well after each addition, until it reaches the desired consistency. It should be pliable and easily shapeable.
Shaping and Dipping the Cake Pops
With your cake mixture ready, it’s time to shape our individual cake pops. Using a small cookie scoop or a tablespoon, scoop out portions of the cake mixture. Roll each portion firmly between your palms to form neat, uniform balls, about 1 to 1.5 inches in diameter. Aim for consistency in size so they bake and dip evenly. Place the formed cake balls onto a baking sheet lined with parchment paper.
Once you have all your cake balls shaped, it’s time to prepare for dipping. Melt your 12 oz of candy melts. You can do this in a microwave-safe bowl in 30-second intervals, stirring between each interval until smooth and fully melted. Alternatively, use a double boiler for a more gentle melt. Once melted, stir in the remaining 1 teaspoon of milk if the candy melts seem too thick to dip smoothly. You want a fluid consistency that will coat the cake balls without being too watery.
Now, for the dipping! Insert a lollipop stick into each cake ball, pushing it about halfway through. Then, dip the cake ball into the melted candy melts, rotating it gently to ensure it is fully coated. Lift the cake pop out and let any excess candy melt drip back into the bowl. You can gently tap the stick on the side of the bowl to help smooth out the coating.
Decorating and Chilling
As soon as you’ve dipped a cake pop, and while the candy melt coating is still wet, it’s time to add our festive decorations. Immediately sprinkle your white nonpareils or other chosen sprinkles over the wet coating. The sprinkles will adhere beautifully to the candy melts before they set. Work quickly, as the candy melts harden relatively fast.
Once decorated, stand the cake pops upright. You can use a styrofoam block or a cake pop stand for this purpose, allowing the excess candy melt to drip down evenly and the decorations to stay in place. If you don’t have a stand, you can carefully place them on the parchment-lined baking sheet, ensuring they don’t touch each other.
After decorating all your cake pops, place the baking sheet into the refrigerator. Chill them for about 10-15 minutes, or until the candy melt coating is completely firm and set. This chilling step is essential for ensuring the pops hold their shape and the coating doesn’t smudge when you handle them. Once hardened, they are ready to be enjoyed or stored!
Conclusion:
And there you have it! You’ve mastered the art of creating your very own delicious Starbucks copycat birthday cake pops. These delightful treats are surprisingly simple to whip up and offer a burst of festive flavor that’s perfect for any celebration. Whether you’re a seasoned baker or just starting out in the kitchen, don’t be intimidated; the process is rewarding and the results are undeniably worth it. Imagine the smiles you’ll bring when you present these vibrant, fun-loving pops!
For serving suggestions, these birthday cake pops are fantastic on their own, arranged beautifully on a platter for a party. They also make adorable edible favors for birthdays, baby showers, or any special occasion. Consider pairing them with a glass of milk or a steaming cup of coffee for a perfect treat. For variations, feel free to experiment with different cake flavors – red velvet or funfetti are excellent choices! You can also play with the candy melt colors and decorative sprinkles to match any theme or color scheme. Get creative and make them uniquely yours!
Frequently Asked Questions:
Can I make these cake pops ahead of time?
Absolutely! These Starbucks copycat birthday cake pops can be made a day or two in advance. Once the cake pops are fully cooled and decorated, store them in an airtight container at room temperature. Avoid refrigerating them, as this can sometimes cause the candy coating to sweat.
What’s the best way to get a smooth candy coating?
To achieve a smooth candy coating, ensure your candy melts are melted thoroughly and to the correct consistency. Stir them gently until smooth. If they seem too thick, you can add a tiny amount of paramount crystals or vegetable shortening (not oil), a teaspoon at a time, stirring until smooth. Dipping the cake pops quickly and evenly is also key.
Starbucks Birthday Cake Pops-Easy Copycat Recipe
An easy copycat recipe for Starbucks’ popular Birthday Cake Pops, featuring a moist vanilla cake base dipped in candy melts and festive sprinkles.
Ingredients
-
1 box (13.25 oz) any store-bought box of vanilla cake mix
-
⅓ cup neutral oil (such as vegetable, avocado, or canola)
-
1 cup milk or water
-
4 large eggs
-
¼ cup unsalted butter, softened
-
1 cup powdered sugar
-
1 teaspoon vanilla extract
-
Pinch of salt
-
1 teaspoon milk (you might need a little more to reach the right consistency)
-
12 oz candy melts (white or a pastel color works best for a birthday theme)
-
White nonpareils or other colorful sprinkles for decoration
Instructions
-
Step 1
Preheat oven to 350°F (175°C). Grease and flour a 9×13 inch baking pan. In a large bowl, combine vanilla cake mix, oil, milk or water, and eggs. Mix on low speed until just combined, then beat on medium for 2 minutes. Pour batter into prepared pan and bake for 30-35 minutes, or until a toothpick comes out clean. Let cool completely in the pan. -
Step 2
Once the cake is completely cool, crumble it into small crumbs in a large bowl. In a separate bowl, cream together softened butter, powdered sugar, vanilla extract, and salt until smooth to make a frosting. Add this frosting to the crumbled cake and mix thoroughly with your hands or a spoon until it forms a dough-like consistency that holds together when squeezed. Add 1 teaspoon of milk at a time if the mixture is too dry, mixing well after each addition, until pliable and shapeable. -
Step 3
Scoop out portions of the cake mixture using a small cookie scoop or tablespoon. Roll each portion firmly between your palms to form uniform balls, about 1 to 1.5 inches in diameter. Place the formed cake balls onto a baking sheet lined with parchment paper. -
Step 4
Melt the candy melts in a microwave-safe bowl in 30-second intervals, stirring between each until smooth. Stir in 1 teaspoon of milk if the candy melts seem too thick. Insert a lollipop stick about halfway into each cake ball. Dip the cake ball into the melted candy melts, rotating to ensure full coverage, and let excess candy melt drip back into the bowl. Gently tap the stick on the side of the bowl to smooth the coating. -
Step 5
While the candy melt coating is still wet, immediately sprinkle with white nonpareils or other desired sprinkles. Work quickly as the candy melts harden fast. Stand the decorated cake pops upright in a styrofoam block or cake pop stand to allow excess candy melt to drip and decorations to set. -
Step 6
Place the baking sheet with the decorated cake pops into the refrigerator and chill for 10-15 minutes, or until the candy melt coating is completely firm and set. Once hardened, they are ready to be enjoyed or stored.
Important Information
Nutrition Facts (Per Serving)
It is important to consider this information as approximate and not to use it as definitive health advice.
Allergy Information
Please check ingredients for potential allergens and consult a health professional if in doubt.

Leave a Comment