
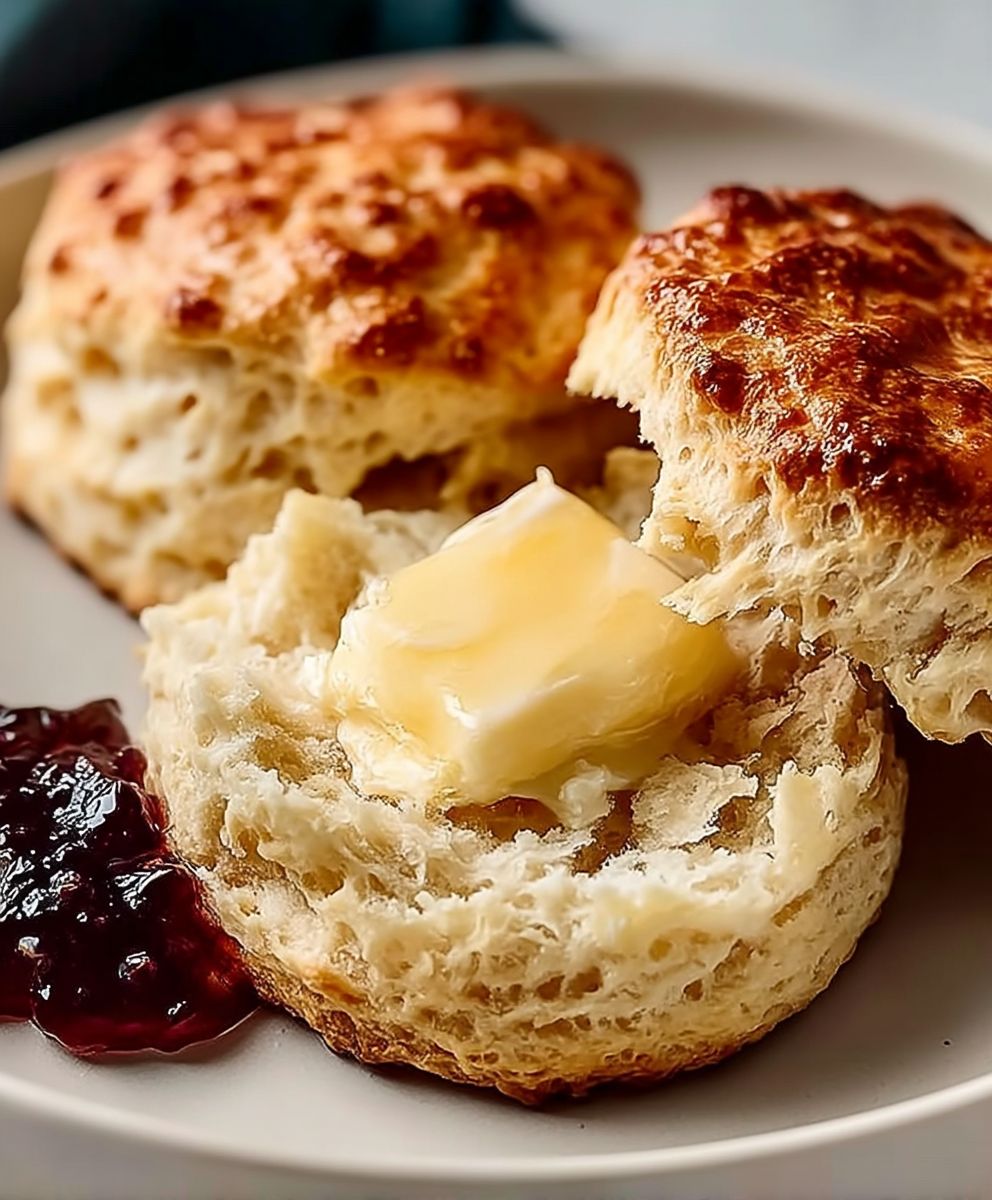
Sourdough Biscuits: Is there anything quite as comforting as a warm, flaky biscuit fresh from the oven? Imagine that classic comfort elevated with the tangy, complex flavor of sourdough. These aren’t your average biscuits; they’re a delightful twist on a beloved staple, and I’m so excited to share my recipe with you!
Biscuits, in their various forms, have been a part of culinary history for centuries, evolving from hardtack to the soft, buttery delights we know today. The addition of sourdough starter, however, brings a unique depth of flavor that harkens back to simpler times when sourdough was a kitchen staple. It’s a nod to tradition with a modern, flavorful upgrade.
People adore biscuits for their versatility and satisfying texture. They’re perfect for breakfast with a smear of jam, alongside a hearty stew, or even as a base for a delicious sandwich. But what makes these Sourdough Biscuits truly special is the subtle tang that cuts through the richness of the butter, creating a balanced and utterly irresistible bite. The slight chewiness from the sourdough also adds a textural element that elevates them above ordinary biscuits. Plus, using sourdough starter adds a depth of flavor that you just can’t get any other way. Get ready to experience biscuit perfection!
Ingredients:
- 2 cups all-purpose flour, plus more for dusting
- 1 teaspoon baking powder
- 1/2 teaspoon baking soda
- 1 teaspoon salt
- 1/2 cup (1 stick) cold unsalted butter, cut into 1/2-inch cubes
- 1/2 cup cold vegetable shortening, cut into 1/2-inch cubes
- 3/4 cup active sourdough starter, unfed (discard)
- 1/2 cup cold buttermilk, plus more for brushing
- 2 tablespoons honey (optional, for a touch of sweetness)
Preparing the Dough:
Okay, let’s get started! Making sourdough biscuits from scratch might seem a little intimidating, but trust me, it’s totally doable, and the results are absolutely worth it. The key is to keep everything cold cold ingredients equal flaky biscuits!
- Combine the Dry Ingredients: In a large bowl, whisk together the 2 cups of all-purpose flour, baking powder, baking soda, and salt. Make sure everything is evenly distributed. This ensures that the biscuits will rise properly and have a consistent flavor.
- Cut in the Butter and Shortening: This is where the magic happens! Add the cold, cubed butter and shortening to the flour mixture. Using a pastry blender (or your fingertips, if you’re feeling brave!), cut the butter and shortening into the flour until the mixture resembles coarse crumbs. You should still see small pieces of butter and shortening these are what create those lovely layers in the biscuits. Don’t overmix! Overmixing will develop the gluten in the flour, resulting in tough biscuits.
- Incorporate the Sourdough Starter and Buttermilk: In a separate bowl, whisk together the active sourdough starter, buttermilk, and honey (if using). The honey adds a subtle sweetness that complements the tang of the sourdough. Pour this wet mixture into the bowl with the flour and butter mixture.
- Gently Combine: Using a fork or your hands, gently mix the wet and dry ingredients until just combined. Be careful not to overmix! The dough will be shaggy and a little sticky, and that’s perfectly fine. You want to see streaks of flour remaining. Overmixing will develop the gluten and lead to tough biscuits.
- Turn Out and Knead Lightly: Lightly flour a clean work surface. Turn the dough out onto the floured surface. Gently pat the dough into a rectangle, about 1 inch thick. Fold the dough in thirds, like you’re folding a letter. This creates layers and helps the biscuits rise. Repeat this folding process 3-4 times, gently patting the dough back into a rectangle each time. This is called laminating the dough. It’s crucial for creating those beautiful, flaky layers.
- Rest the Dough (Optional but Recommended): Wrap the dough tightly in plastic wrap and refrigerate for at least 30 minutes, or up to 2 hours. This allows the gluten to relax and the butter to firm up, resulting in even flakier biscuits. If you’re short on time, you can skip this step, but the biscuits will be even better if you let the dough rest.
Cutting and Baking the Biscuits:
Now for the fun part shaping and baking these beauties! Get ready for some golden-brown goodness.
- Preheat the Oven: Preheat your oven to 425°F (220°C). Place a rack in the center of the oven.
- Prepare Baking Sheet: Line a baking sheet with parchment paper. This prevents the biscuits from sticking and makes cleanup a breeze.
- Roll and Cut: On a lightly floured surface, gently roll the chilled dough to about 3/4 inch thickness. Use a 2-3 inch biscuit cutter (or a sharp knife) to cut out the biscuits. Try not to twist the cutter as you press down, as this can seal the edges and prevent them from rising properly.
- Arrange on Baking Sheet: Place the biscuits on the prepared baking sheet, leaving about 1 inch of space between each biscuit. This allows for even baking and prevents them from sticking together.
- Brush with Buttermilk: Brush the tops of the biscuits with buttermilk. This gives them a beautiful golden-brown color and adds a touch of richness.
- Bake: Bake for 15-20 minutes, or until the biscuits are golden brown and have risen nicely. Keep an eye on them, as baking times may vary depending on your oven.
Serving and Storing:
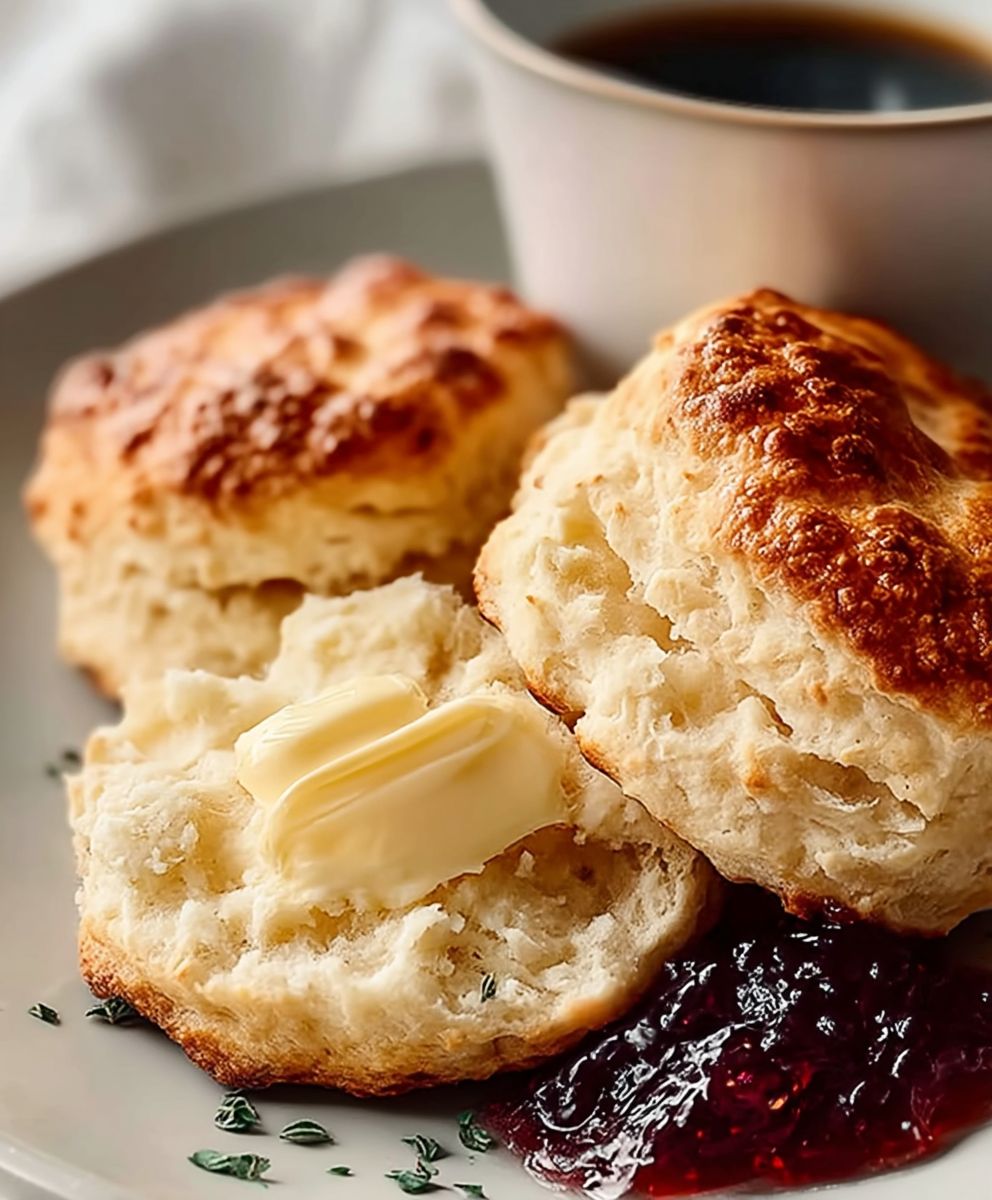
These biscuits are best served warm, straight from the oven. But don’t worry, they’re still delicious the next day (if they last that long!).
- Serve Immediately: Serve the warm biscuits with butter, jam, honey, or your favorite toppings. They’re also fantastic with savory dishes like gravy or fried chicken.
- Storing Leftovers: Store any leftover biscuits in an airtight container at room temperature for up to 2 days, or in the refrigerator for up to 5 days.
- Reheating: To reheat, wrap the biscuits in foil and warm them in a 350°F (175°C) oven for about 10 minutes, or until heated through. You can also microwave them for a few seconds, but they won’t be as crispy.
Tips for Perfect Sourdough Biscuits:
- Use Cold Ingredients: This is the most important tip! Cold butter and shortening create steam as they bake, which results in flaky layers.
- Don’t Overmix: Overmixing develops the gluten in the flour, leading to tough biscuits. Mix the dough until just combined.
- Handle the Dough Gently: Avoid overworking the dough. The less you handle it, the more tender the biscuits will be.
- Use Active Sourdough Starter: Make sure your sourdough starter is active and bubbly for the best flavor and rise.
- Experiment with Flavors: Feel free to add other ingredients to the dough, such as cheese, herbs, or spices.
Troubleshooting:
- Biscuits are flat: This could be due to using old baking powder or baking soda, overmixing the dough, or not using enough leavening.
- Biscuits are tough: This is usually caused by overmixing the dough.
- Biscuits are not rising: This could be due to using inactive sourdough starter, old baking powder or baking soda, or not preheating the oven properly.
Enjoy your homemade sourdough biscuits! They’re a labor of love, but the taste and texture are truly unmatched. Happy baking!
Conclusion:
And there you have it! These aren’t just any biscuits; these are Sourdough Biscuits, transformed by the magic of fermentation into something truly special. The tangy flavor, the incredibly flaky texture, and the satisfying aroma that fills your kitchen trust me, this recipe is a game-changer. If you’ve ever been intimidated by sourdough baking, this is the perfect entry point. It’s approachable, rewarding, and delivers results that will have everyone asking for seconds (and the recipe!).
I know what you might be thinking: “Sourdough biscuits? Sounds complicated!” But honestly, the active time is minimal. The sourdough starter does all the heavy lifting, developing that complex flavor profile that sets these biscuits apart. The slight tang perfectly complements the richness of the butter, creating a symphony of flavors in every bite. Plus, the fermentation process actually makes the biscuits easier to digest, which is always a bonus!
But the real reason you absolutely *must* try this recipe is the texture. Forget those dense, dry biscuits you might have had in the past. These are light, airy, and unbelievably flaky. The layers practically melt in your mouth, leaving you wanting more. It’s the kind of biscuit that makes you close your eyes and savor every single crumb.
Now, let’s talk serving suggestions. These Sourdough Biscuits are incredibly versatile. Of course, they’re fantastic served warm with a generous pat of butter and a drizzle of honey. But don’t stop there! Imagine them split open and filled with crispy fried chicken and a spicy mayo for a truly decadent sandwich. Or how about using them as the base for biscuits and gravy? The tangy sourdough flavor adds a wonderful depth to the creamy gravy.
And if you’re feeling adventurous, there are plenty of variations you can try. Add a handful of shredded cheddar cheese to the dough for cheesy sourdough biscuits. Or incorporate some chopped fresh herbs, like rosemary or thyme, for an aromatic twist. For a sweeter treat, brush the tops with melted butter and sprinkle with cinnamon sugar before baking. The possibilities are endless!
I personally love serving these biscuits alongside a hearty bowl of chili or stew. They’re also perfect for breakfast, paired with scrambled eggs and bacon. And if you have any leftovers (which is unlikely!), they make fantastic croutons for salads or breadcrumbs for topping casseroles.
So, what are you waiting for? Gather your ingredients, activate your sourdough starter, and get ready to bake some seriously delicious Sourdough Biscuits. I promise you won’t regret it.
And most importantly, I want to hear about your experience! Did you try the recipe? Did you make any variations? What did you serve them with? Share your photos and stories in the comments below. I can’t wait to see what you create! Happy baking!
Sourdough Biscuits: The Ultimate Guide to Baking Fluffy Perfection
Flaky, tangy sourdough biscuits made from scratch. Perfect for breakfast, brunch, or as a side.
Ingredients
- 2 cups all-purpose flour, plus more for dusting
- 1 teaspoon baking powder
- 1/2 teaspoon baking soda
- 1 teaspoon salt
- 1/2 cup (1 stick) cold unsalted butter, cut into 1/2-inch cubes
- 1/2 cup cold vegetable shortening, cut into 1/2-inch cubes
- 3/4 cup active sourdough starter, unfed (discard)
- 1/2 cup cold buttermilk, plus more for brushing
- 2 tablespoons honey (optional, for a touch of sweetness)
Instructions
- Combine the Dry Ingredients: In a large bowl, whisk together the 2 cups of all-purpose flour, baking powder, baking soda, and salt.
- Cut in the Butter and Shortening: Add the cold, cubed butter and shortening to the flour mixture. Using a pastry blender (or your fingertips), cut the butter and shortening into the flour until the mixture resembles coarse crumbs. You should still see small pieces of butter and shortening.
- Incorporate the Sourdough Starter and Buttermilk: In a separate bowl, whisk together the active sourdough starter, buttermilk, and honey (if using). Pour this wet mixture into the bowl with the flour and butter mixture.
- Gently Combine: Using a fork or your hands, gently mix the wet and dry ingredients until just combined. Be careful not to overmix! The dough will be shaggy and a little sticky.
- Turn Out and Knead Lightly: Lightly flour a clean work surface. Turn the dough out onto the floured surface. Gently pat the dough into a rectangle, about 1 inch thick. Fold the dough in thirds, like you’re folding a letter. Repeat this folding process 3-4 times, gently patting the dough back into a rectangle each time.
- Rest the Dough (Optional but Recommended): Wrap the dough tightly in plastic wrap and refrigerate for at least 30 minutes, or up to 2 hours.
- Preheat the Oven: Preheat your oven to 425°F (220°C). Place a rack in the center of the oven.
- Prepare Baking Sheet: Line a baking sheet with parchment paper.
- Roll and Cut: On a lightly floured surface, gently roll the chilled dough to about 3/4 inch thickness. Use a 2-3 inch biscuit cutter (or a sharp knife) to cut out the biscuits. Try not to twist the cutter as you press down.
- Arrange on Baking Sheet: Place the biscuits on the prepared baking sheet, leaving about 1 inch of space between each biscuit.
- Brush with Buttermilk: Brush the tops of the biscuits with buttermilk.
- Bake: Bake for 15-20 minutes, or until the biscuits are golden brown and have risen nicely.
- Serve Immediately: Serve the warm biscuits with butter, jam, honey, or your favorite toppings.
- Storing Leftovers: Store any leftover biscuits in an airtight container at room temperature for up to 2 days, or in the refrigerator for up to 5 days.
- Reheating: To reheat, wrap the biscuits in foil and warm them in a 350°F (175°C) oven for about 10 minutes, or until heated through. You can also microwave them for a few seconds, but they won’t be as crispy.
Notes
- Cold Ingredients are Key: Use very cold butter, shortening, and buttermilk for the flakiest biscuits.
- Don’t Overmix: Overmixing develops gluten and results in tough biscuits. Mix until just combined.
- Resting the Dough: Resting the dough in the refrigerator allows the gluten to relax and the butter to firm up, resulting in even flakier biscuits.
- Twisting the Cutter: Avoid twisting the biscuit cutter, as this can seal the edges and prevent proper rising.
- Experiment: Feel free to add cheese, herbs, or spices to the dough for different flavor variations.


Leave a Comment