
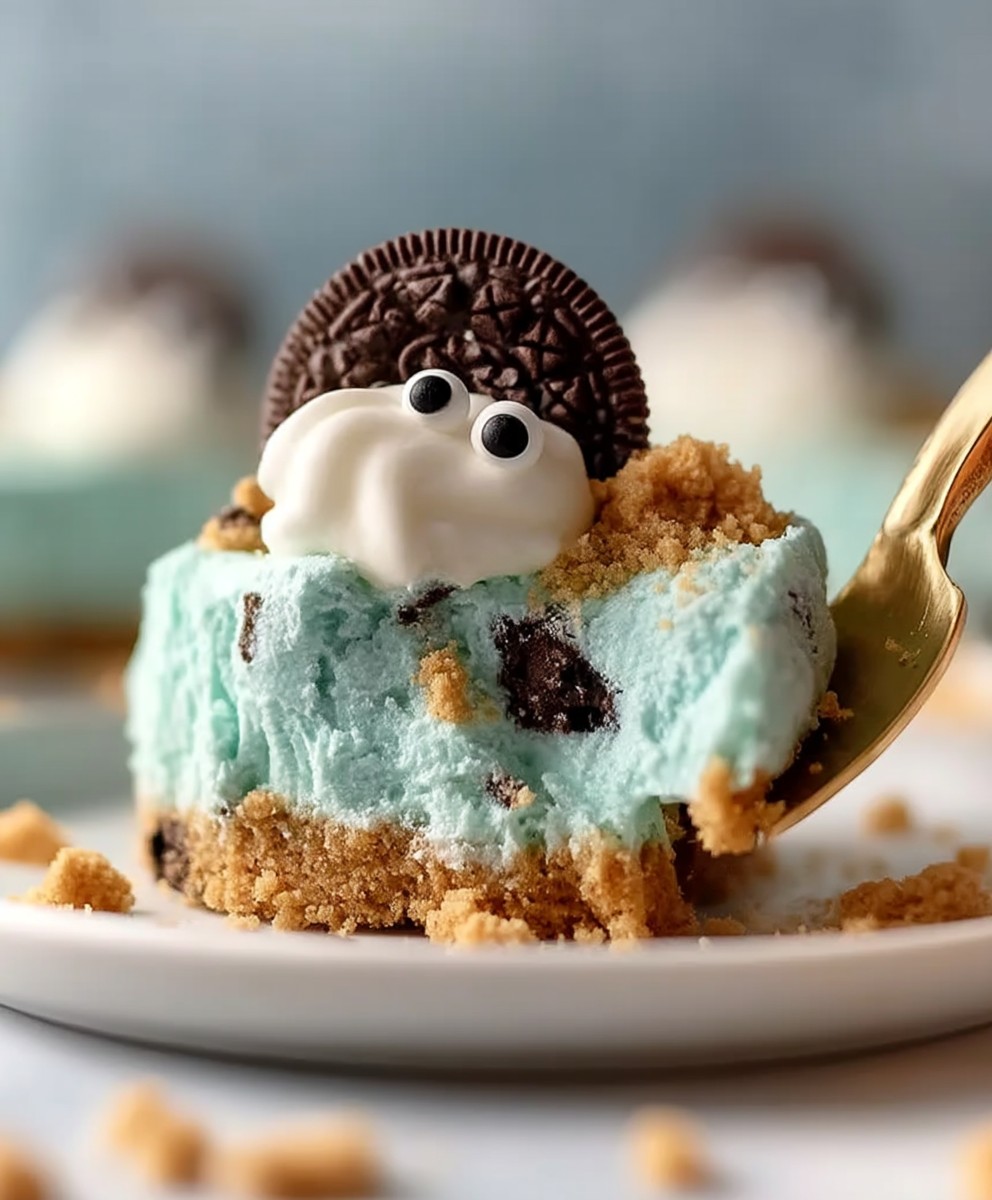
Cookie Monster Cheesecake: Just the name alone conjures up images of vibrant blue, creamy decadence, and of course, everyone’s favorite cookie-loving monster! But this isn’t just a novelty dessert; it’s a flavor explosion that will have you craving more with every single bite. Imagine the rich, smooth texture of a classic cheesecake, elevated with the playful addition of chocolate sandwich cookies and a striking blue hue that’s as fun to look at as it is to eat.
While the origins of cheesecake itself can be traced back to ancient Greece, this particular whimsical twist is a modern invention, born from the desire to bring a little bit of childhood joy to a sophisticated dessert. Its a celebration of fun and flavor, perfect for birthdays, parties, or simply a delightful treat on a rainy day.
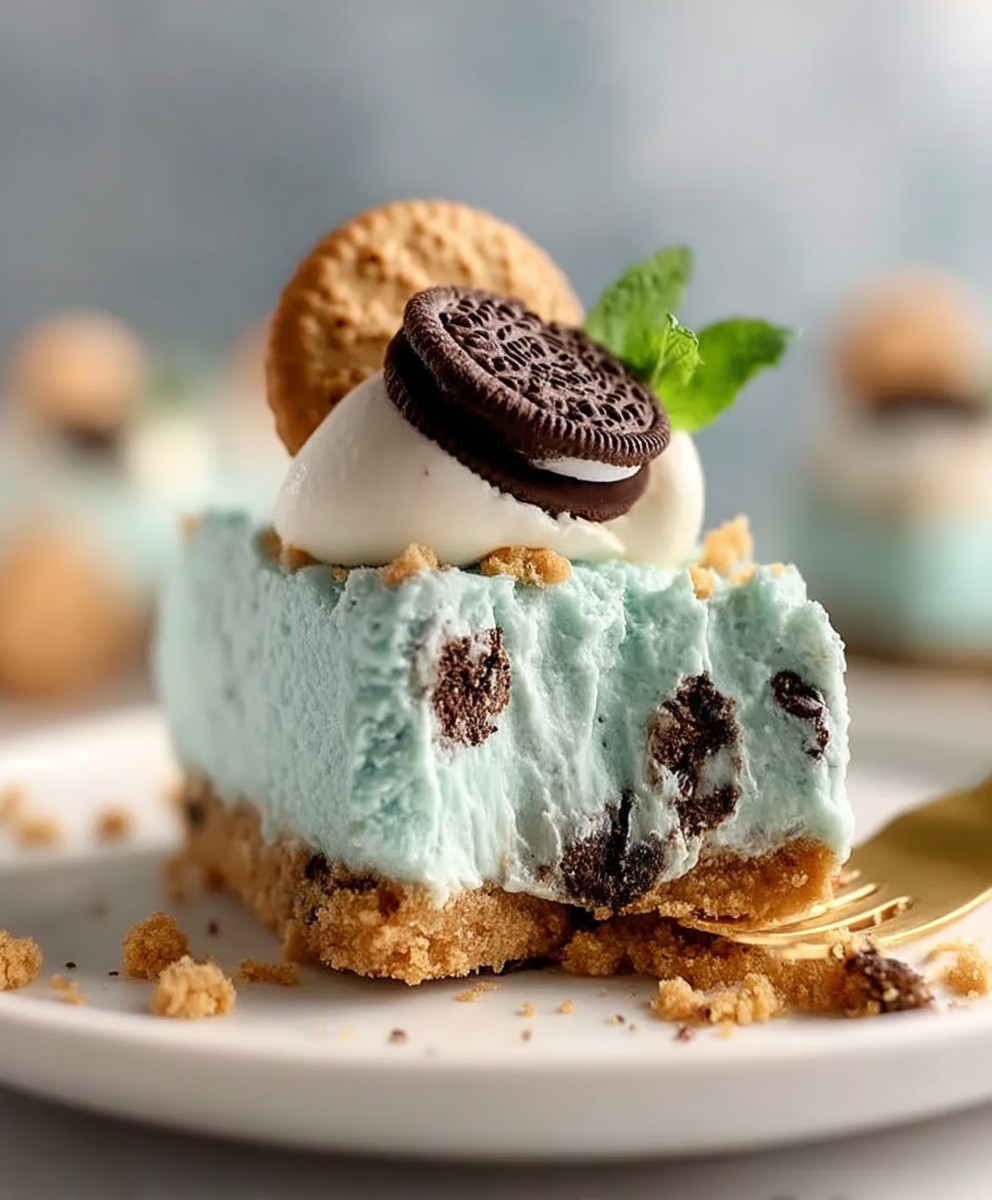
People adore this Cookie Monster Cheesecake because it perfectly balances the comforting familiarity of cheesecake with the playful indulgence of cookies. The creamy texture melts in your mouth, while the crunchy cookie pieces provide a delightful contrast. Plus, let’s be honest, who can resist that vibrant blue color? It’s a guaranteed crowd-pleaser that’s as delicious as it is visually stunning. Get ready to unleash your inner child and dive into a slice of pure happiness!
Ingredients:
- For the Oreo Crust:
- 30 Oreo cookies (about 1 package), finely crushed
- 6 tablespoons (85g) unsalted butter, melted
- For the Cheesecake Filling:
- 32 ounces (900g) cream cheese, softened to room temperature
- 1 1/2 cups (300g) granulated sugar
- 1 teaspoon vanilla extract
- 1/2 teaspoon almond extract (optional, but adds a nice touch!)
- 4 large eggs, at room temperature
- 1/2 cup (120ml) heavy cream
- 1/4 cup (60ml) sour cream
- 1 cup crushed Oreo cookies (about 12 cookies)
- Blue food coloring gel
- For the Cookie Monster Decoration:
- 1 cup heavy cream
- 2 tablespoons powdered sugar
- Blue food coloring gel
- Mini chocolate chip cookies
- 2 large marshmallows
- Black edible marker
Preparing the Oreo Crust
Okay, let’s start with the foundation of our masterpiece the Oreo crust! This is super easy, I promise.
- Crush the Oreos: The first thing you need to do is crush those Oreos! You can use a food processor for a really fine crumb, which is what I prefer. Just pulse them until they’re finely ground. If you don’t have a food processor, you can put the Oreos in a large zip-top bag and crush them with a rolling pin. It’s a great stress reliever, too! Make sure you remove the filling before crushing.
- Melt the Butter: Melt the butter in the microwave or in a small saucepan over low heat. You want it completely melted but not browned.
- Combine and Press: In a medium bowl, combine the crushed Oreos and the melted butter. Mix well until the crumbs are evenly moistened. The mixture should resemble wet sand.
- Press into the Pan: Press the Oreo mixture firmly into the bottom of a 9-inch springform pan. I like to use the bottom of a measuring cup to really pack it down and make sure it’s even. You want a nice, solid base for your cheesecake.
- Pre-bake (Optional): For a crispier crust, you can pre-bake it in a preheated oven at 350°F (175°C) for about 8-10 minutes. This step is optional, but I find it helps prevent the crust from getting soggy. Let the crust cool completely before adding the filling.
Making the Cheesecake Filling
Now for the star of the show the creamy, dreamy cheesecake filling! This part requires a little more attention, but don’t worry, I’ll guide you through it.
- Cream the Cream Cheese: In a large bowl (or the bowl of your stand mixer), beat the softened cream cheese with an electric mixer until it’s smooth and creamy. This is a crucial step! Make sure your cream cheese is truly at room temperature, or you’ll end up with lumps. Beat it for a good 2-3 minutes until it’s light and fluffy.
- Add Sugar: Gradually add the granulated sugar, beating until it’s fully incorporated and the mixture is smooth. Don’t overbeat at this stage, as that can introduce too much air into the batter.
- Add Extracts: Stir in the vanilla extract and almond extract (if using). The almond extract adds a subtle, delicious flavor that complements the Oreos perfectly.
- Incorporate Eggs: Add the eggs one at a time, beating well after each addition. Again, don’t overbeat. Just mix until each egg is fully incorporated. Overmixing can cause the cheesecake to crack during baking.
- Add Heavy Cream and Sour Cream: Stir in the heavy cream and sour cream. These ingredients add richness and moisture to the cheesecake. Mix until just combined.
- Add Crushed Oreos: Gently fold in the crushed Oreo cookies. Be careful not to overmix, as you want to keep the cookies intact and not turn the batter gray.
- Color the Batter: Add a few drops of blue food coloring gel to the batter. Start with a small amount and gradually add more until you reach your desired shade of Cookie Monster blue. Remember, a little goes a long way!
Baking the Cheesecake
Time to bake our blue beauty! A water bath is key to preventing cracks and ensuring a perfectly smooth and creamy cheesecake. Don’t skip this step!
- Prepare the Water Bath: Wrap the bottom of the springform pan tightly with heavy-duty aluminum foil. This will prevent water from seeping into the crust. I usually use two layers of foil just to be extra safe.
- Pour in the Filling: Pour the cheesecake filling into the prepared Oreo crust. Smooth the top with a spatula.
- Bake in Water Bath: Place the springform pan inside a larger roasting pan. Carefully pour hot water into the roasting pan until it reaches about halfway up the sides of the springform pan.
- Bake: Bake in a preheated oven at 325°F (160°C) for 70-80 minutes, or until the edges are set but the center still has a slight jiggle. The jiggle is important! It means the cheesecake is perfectly cooked.
- Cool Gradually: Turn off the oven and crack the oven door slightly. Let the cheesecake cool in the oven for 1 hour. This gradual cooling helps prevent cracking.
- Refrigerate: Remove the cheesecake from the water bath and let it cool completely on a wire rack. Then, cover it with plastic wrap and refrigerate for at least 6 hours, or preferably overnight. This allows the cheesecake to fully set and develop its flavor.
Decorating Like Cookie Monster
Now for the fun part transforming our cheesecake into the beloved Cookie Monster! This is where you can get creative and let your inner child shine.
- Whip the Cream: In a chilled bowl, beat the heavy cream with an electric mixer until soft peaks form. Gradually add the powdered sugar and continue beating until stiff peaks form. Be careful not to overwhip, or you’ll end up with butter!
- Color the Whipped Cream: Add a few drops of blue food coloring gel to the whipped cream and gently fold it in until you reach your desired shade of Cookie Monster blue.
- Frost the Cheesecake: Remove the cheesecake from the springform pan and place it on a serving plate. Frost the top of the cheesecake with the blue whipped cream, creating a slightly shaggy texture to resemble Cookie Monster’s fur.
- Add the Cookies: Press mini chocolate chip cookies into the whipped cream all over the top of the cheesecake. The more cookies, the better! After all, Cookie Monster loves cookies.
- Make the Eyes: Cut the marshmallows in half horizontally. Use the black edible marker to draw pupils on the flat sides of the marshmallows.
- Attach the Eyes: Attach the marshmallow eyes to the top of the cheesecake, slightly above the center. You can use a small dab of whipped cream to help them stay in place.
- Serve and Enjoy!: Refrigerate the decorated cheesecake for at least 30 minutes before serving. This will help the whipped cream set and prevent it from melting. Slice and serve, and watch everyone’s faces light up with joy!
Conclusion:
Okay, friends, let’s be honest you’ve scrolled this far because the words “Cookie Monster Cheesecake” whispered sweet nothings of sugary delight into your soul. And I’m here to tell you, this isn’t just hype. This is a cheesecake experience. It’s a vibrant, playful, and utterly delicious dessert that’s guaranteed to bring a smile to everyone’s face, young and old.
But why is this Cookie Monster Cheesecake a must-try? It’s more than just a novelty. It’s the perfect balance of creamy, tangy cheesecake filling, the satisfying crunch of those beloved chocolate chip cookies, and that iconic blue hue that just screams fun. It’s a showstopper for parties, a delightful surprise for birthdays, or simply a well-deserved treat for yourself after a long week. Trust me, the sheer joy on people’s faces when they see this masterpiece is worth every single second spent in the kitchen.
And the best part? It’s surprisingly easy to make! While it might look intimidating, the steps are straightforward, and the result is so rewarding. You don’t need to be a professional baker to pull this off. Just follow the instructions, embrace the process, and get ready to unleash your inner Cookie Monster!
Serving Suggestions and Variations:
Now, let’s talk about taking this cheesecake to the next level. While it’s absolutely perfect as is, there are always ways to customize it to your liking.
* Whipped Cream Extravaganza: Top each slice with a generous dollop of homemade whipped cream. A touch of vanilla extract or a hint of almond extract in the cream will complement the cheesecake beautifully.
* Chocolate Drizzle Delight: Drizzle melted dark chocolate or white chocolate over the top for an extra layer of indulgence.
* Cookie Crumb Crust: For an even more intense cookie flavor, consider using crushed chocolate chip cookies as the base for your crust instead of graham crackers.
* Mini Cookie Monster Cheesecakes: Bake the batter in muffin tins lined with cupcake liners for individual servings. These are perfect for parties and portion control (if you can resist eating more than one!).
* Seasonal Twists: Adapt the recipe for different holidays! Add red and green sprinkles for Christmas, pastel colors for Easter, or spooky decorations for Halloween.
* Peanut Butter Power: Swirl in a ribbon of peanut butter into the cheesecake batter before baking for a Reese’s-inspired twist.
* Lemon Zest Zing: Add a teaspoon of lemon zest to the cheesecake batter for a bright and citrusy flavor that cuts through the richness.
I truly believe that this Cookie Monster Cheesecake will become a new favorite in your household. It’s a recipe that’s meant to be shared, enjoyed, and celebrated.
So, what are you waiting for? Gather your ingredients, preheat your oven, and get ready to embark on a baking adventure. I promise you won’t regret it. And most importantly, don’t forget to have fun! Baking should be a joyful experience, so put on some music, embrace the mess, and let your creativity shine.
Once you’ve created your own masterpiece, I’d absolutely love to hear about it! Share your photos and stories in the comments below. Let me know what variations you tried, what your family and friends thought, and any tips or tricks you discovered along the way. I can’t wait to see your creations and celebrate your success! Happy baking!
Cookie Monster Cheesecake: A Deliciously Fun Recipe
Oreo cheesecake transformed into Cookie Monster! Oreo crust, creamy blue cheesecake filling, whipped cream and cookie decoration.
Ingredients
- 30 Oreo cookies (about 1 package), finely crushed
- 6 tablespoons (85g) unsalted butter, melted
- 32 ounces (900g) cream cheese, softened to room temperature
- 1 1/2 cups (300g) granulated sugar
- 1 teaspoon vanilla extract
- 1/2 teaspoon almond extract (optional)
- 4 large eggs, at room temperature
- 1/2 cup (120ml) heavy cream
- 1/4 cup (60ml) sour cream
- 1 cup crushed Oreo cookies (about 12 cookies)
- Blue food coloring gel
- 1 cup heavy cream
- 2 tablespoons powdered sugar
- Blue food coloring gel
- Mini chocolate chip cookies
- 2 large marshmallows
- Black edible marker
Instructions
- Crush the Oreos finely using a food processor or in a zip-top bag with a rolling pin (remove filling first).
- Melt the butter.
- Combine crushed Oreos and melted butter in a bowl until evenly moistened.
- Press the mixture firmly into the bottom of a 9-inch springform pan.
- (Optional) Pre-bake at 350°F (175°C) for 8-10 minutes for a crispier crust. Let cool completely.
- Beat softened cream cheese until smooth and creamy.
- Gradually add sugar, beating until fully incorporated.
- Stir in vanilla and almond extract (if using).
- Add eggs one at a time, beating well after each addition.
- Stir in heavy cream and sour cream until just combined.
- Gently fold in crushed Oreo cookies.
- Add blue food coloring gel until desired shade is reached.
- Wrap the bottom of the springform pan tightly with heavy-duty aluminum foil.
- Pour the cheesecake filling into the prepared Oreo crust. Smooth the top.
- Place the springform pan inside a larger roasting pan. Pour hot water into the roasting pan until it reaches halfway up the sides of the springform pan.
- Bake at 325°F (160°C) for 70-80 minutes, or until the edges are set but the center still has a slight jiggle.
- Turn off the oven and crack the oven door slightly. Let the cheesecake cool in the oven for 1 hour.
- Remove from the water bath and let cool completely on a wire rack. Refrigerate for at least 6 hours, or preferably overnight.
- Whip heavy cream with an electric mixer until soft peaks form. Gradually add powdered sugar and continue beating until stiff peaks form.
- Add blue food coloring gel to the whipped cream and gently fold it in until you reach your desired shade of Cookie Monster blue.
- Remove the cheesecake from the springform pan and place it on a serving plate. Frost the top of the cheesecake with the blue whipped cream, creating a slightly shaggy texture to resemble Cookie Monster’s fur.
- Press mini chocolate chip cookies into the whipped cream all over the top of the cheesecake.
- Cut the marshmallows in half horizontally. Use the black edible marker to draw pupils on the flat sides of the marshmallows.
- Attach the marshmallow eyes to the top of the cheesecake, slightly above the center. You can use a small dab of whipped cream to help them stay in place.
- Refrigerate the decorated cheesecake for at least 30 minutes before serving.
Notes
- Make sure the cream cheese is fully softened to avoid lumps in the filling.
- Don’t overbeat the cheesecake batter after adding the eggs, as this can cause cracking.
- A water bath is essential for a smooth and creamy cheesecake.
- Cooling the cheesecake gradually in the oven helps prevent cracking.
- Refrigerate the cheesecake for at least 6 hours to allow it to fully set.
- Get creative with the Cookie Monster decoration!

Leave a Comment