
Savory Stuffing Balls: The Perfect Flavorful Side Dish for Your Holiday Table are about to revolutionize your festive feast! I know what you might be thinking – another stuffing recipe? But trust me, this isn’t just any stuffing. We’ve all been there, struggling with a soggy, unappealing mass of bread, or perhaps a dry, crumbly disappointment that falls flat on the plate. This year, allow me to introduce you to a true game-changer: perfectly portioned, incredibly flavorful, and beautifully browned individual stuffing balls that promise a delightful crisp exterior and a wonderfully moist interior with every single bite.
Stuffing, or dressing as it’s known in some regions, has graced holiday tables for centuries, evolving from a simple way to stretch a meal into a beloved side dish eagerly anticipated alongside the main course. It carries with it the warmth of tradition, the comfort of home, and the joyous aromas of herbs and spices. However, achieving consistent texture and an elegant presentation can often be a challenge with traditional methods.
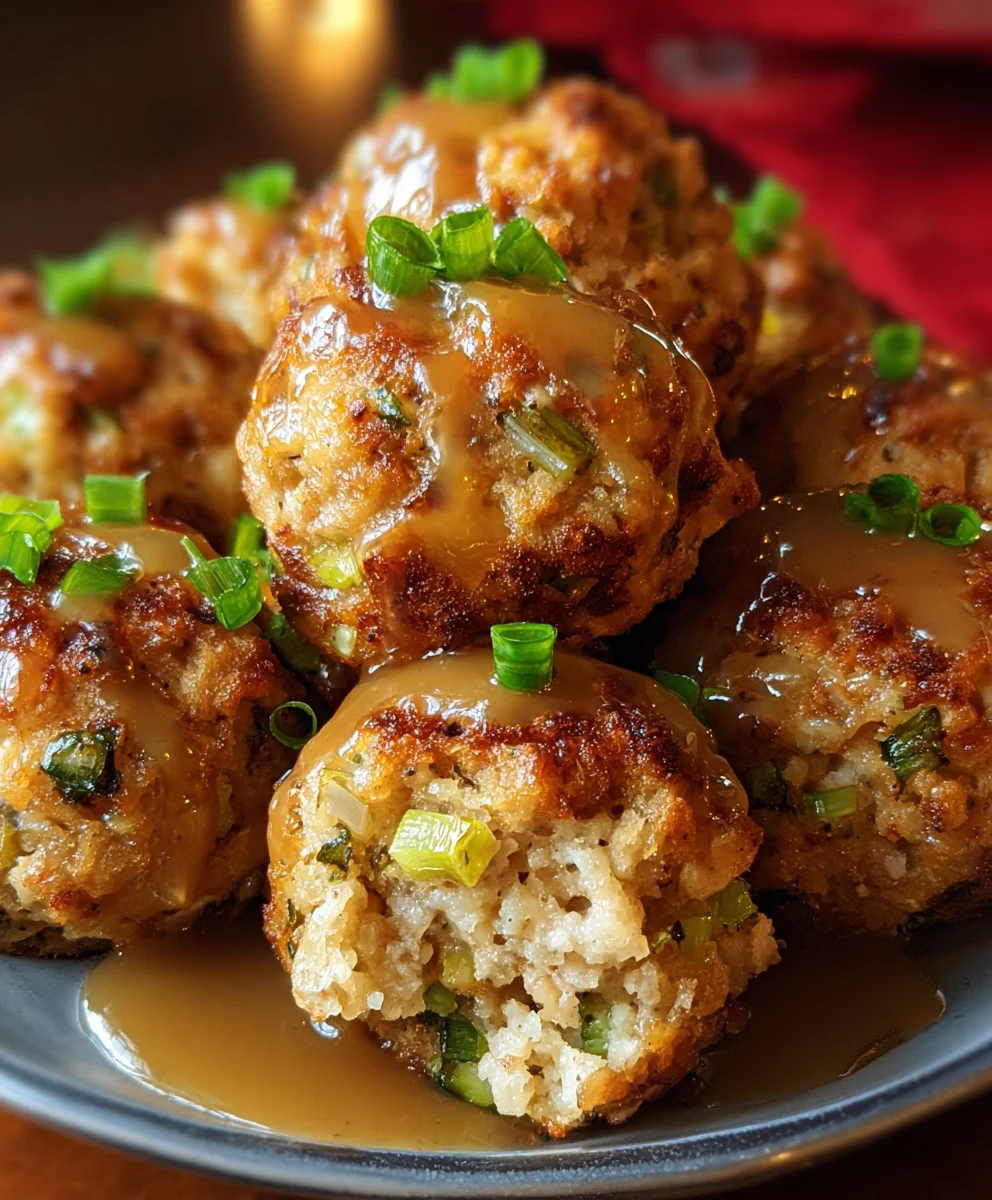
That’s precisely why these Savory Stuffing Balls: The Perfect Flavorful Side Dish for Your Holiday Table have become my go-to for special occasions. Not only do they offer unparalleled convenience, eliminating the mess of scooping and serving from a large baking dish, but they also ensure that every single guest receives that ideal balance of savory goodness, fragrant herbs, and satisfying texture. Imagine golden-brown spheres, each packed with flavor, adding an elegant yet rustic touch to your plate. They are incredibly versatile, easy to prepare ahead of time, and guaranteed to earn rave reviews from all your guests. Get ready to elevate your holiday dining experience!

Ingredients:
These stuffing balls are everything you love about traditional stuffing, but in a portable, crispy-on-the-outside, tender-on-the-inside form. The blend of aromatic herbs like sage and thyme, paired with the savory goodness of sautéed onions and celery, makes each bite irresistibly flavorful. The best part? They’re incredibly versatile, making them perfect as a side dish, an appetizer, or even a main course for a cozy family dinner.
- 6-8 cups day-old bread, cut into ½-inch cubes (e.g., sourdough, challah, or a sturdy white sandwich bread – the staler, the better for absorption!)
- 1 cup unsalted butter (two sticks), plus more for greasing the baking sheet
- 2 large yellow onions, finely diced
- 4 stalks celery, finely diced
- 4 cloves garlic, minced
- ¼ cup fresh sage, finely chopped
- 2 tablespoons fresh thyme leaves, finely chopped
- 1 teaspoon salt, or to taste
- ½ teaspoon black pepper, freshly ground, or to taste
- 2 ½ – 3 cups low-sodium chicken or vegetable broth (warm)
- 2 large eggs, lightly beaten
- Optional: ¼ cup fresh parsley, chopped, for color and freshness
Crafting Your Savory Stuffing Balls: A Step-by-Step Guide
Get ready to infuse your kitchen with the most incredible aromas as we embark on creating these delightful savory stuffing balls. This isn’t just a recipe; it’s a journey into flavor, texture, and holiday tradition, made perfectly portable. I’ll walk you through each step with detail, ensuring your stuffing balls are a resounding success, offering that coveted crispy exterior and tender, moist interior.
Prepping Your Bread Base
- Prepare Your Bread: The foundation of any great stuffing is the bread, and for our savory stuffing balls, day-old bread is absolutely key. Fresh bread is too soft and will turn mushy when liquid is added, but stale bread absorbs beautifully, holding its shape and yielding a superior texture. Begin by cutting your chosen bread into uniform ½-inch cubes. Uniformity is important for even cooking and absorption. If your bread isn’t day-old and adequately stale, don’t fret! You can quickly dry it out. Spread the bread cubes in a single layer on a large baking sheet and bake in a preheated oven at 275°F (135°C) for 15-20 minutes, or until they feel dry and lightly toasted but not browned. This step is crucial for achieving that ideal crispy-on-the-outside, tender-on-the-inside texture we’re aiming for. Once dried, remove from the oven and set aside to cool completely. You’ll want to ensure these are cool to the touch before combining with other ingredients.
Sautéing the Aromatic Heart of the Stuffing
- Melt the Butter and Sauté the Aromatics: In a generously sized, heavy-bottomed pot or a Dutch oven – I love using my Dutch oven for this as it retains heat so well – melt the 1 cup of unsalted butter over medium heat. Don’t be shy with the butter; it’s essential for carrying the flavors and ensuring moisture. Once the butter is shimmering and fully melted, add your finely diced yellow onions and celery. Stir them gently but thoroughly with a sturdy wooden spoon or heat-resistant spatula, ensuring every piece is coated in that rich, golden butter. We’re aiming to soften these vegetables and draw out their natural sweetness, building the foundational flavor layer for our stuffing. Continue to cook, stirring occasionally to prevent browning, for about 8-10 minutes. You’ll notice the onions becoming beautifully translucent and the celery softening to a tender-crisp texture. Your kitchen should already be filling with a wonderfully savory aroma – this is where the magic begins!
- Introduce the Garlic and Herbs: Once the onions and celery have softened to perfection, it’s time to add the minced garlic. Stir it into the vegetable mixture, cooking for just about 1 minute more. Garlic can burn quickly, so keep a close eye on it and stir continuously until it becomes fragrant. Following closely, stir in your finely chopped fresh sage and fresh thyme leaves. These aromatic herbs are the stars of our savory stuffing, lending that classic, comforting flavor profile we all adore. Cook for another 1-2 minutes, allowing the heat to release their essential oils and meld their herbaceous notes with the butter-soaked vegetables. The fragrance at this stage is truly irresistible and signals that you’re well on your way to a truly flavorful dish.
- Season Generously: Now, season the aromatic mixture with 1 teaspoon of salt and ½ teaspoon of freshly ground black pepper. Remember, salt is a flavor enhancer, so don’t be afraid to adjust to your taste later. Stir well to distribute the seasonings evenly throughout the vegetables and herbs. Give it a quick taste if you like; it should be delightfully savory. If you’re including the optional fresh parsley, you can add about half of it now for a deeper herby flavor, reserving the rest for a fresh garnish at the end, or you can add it all in the next step for brightness.
Assembling the Stuffing Mixture
- Combine with Bread Cubes: Remove the pot from the heat. Add your prepared, cooled bread cubes to the pot with the sautéed aromatics. This is a critical step that requires a gentle touch. Using a large spoon or your hands, carefully fold the bread cubes into the vegetable and herb mixture. You want to ensure that the bread cubes are evenly coated with the butter and savory goodness from the pot. Be patient and gentle; we want to coat, not crush, the bread. This thorough coating ensures that every single stuffing ball will be packed with flavor.
- Incorporate the Broth: Gradually pour in the warm low-sodium chicken or vegetable broth, starting with 2 ½ cups. I recommend warming the broth slightly before adding it; this helps the bread absorb it more readily and evenly. As you pour, continue to gently fold the mixture. You’re looking for the bread to become moist but not soggy. The mixture should hold together when you gently squeeze a handful. If it feels too dry, slowly add the remaining ½ cup of broth, a little at a time, until you reach the desired consistency. The goal is a cohesive, well-moistened mixture that still has distinct pieces of bread, not a paste.
- Add the Eggs: Once the broth is fully incorporated and the mixture has cooled slightly – this is important to prevent the eggs from scrambling – gently fold in the two lightly beaten eggs. The eggs act as a binding agent, helping our stuffing balls hold their shape beautifully during baking. Continue to mix until the eggs are evenly distributed. If you’re using the optional fresh parsley for freshness and color, this is the perfect time to fold it in. Give the entire mixture a final taste and adjust the seasoning (salt and pepper) if necessary. Remember, the flavors will concentrate slightly during baking.
Forming and Baking Your Savory Stuffing Balls
- Preheat Oven and Prepare Baking Sheet: Preheat your oven to a comforting 375°F (190°C). While the oven heats, lightly grease a large baking sheet with a little extra butter or cooking spray. Alternatively, you can line it with parchment paper for easier cleanup. We want to ensure our beautiful stuffing balls don’t stick and get that lovely golden-brown crust all around.
- Form the Stuffing Balls: Now comes the fun part! Using a small ice cream scoop (about 1.5 to 2 tablespoons) or simply your hands, scoop out portions of the stuffing mixture. Gently roll each portion between your palms to form compact, round balls, approximately 1 ½ to 2 inches in diameter. The size can vary slightly based on your preference, but consistency helps ensure even cooking. Arrange the formed stuffing balls on your prepared baking sheet, leaving about an inch of space between each one to allow for even air circulation and browning. This spacing is vital for achieving those coveted crispy edges. You should yield approximately 24-30 stuffing balls, depending on their size.
- Bake to Golden Perfection: Place the baking sheet with the stuffing balls into your preheated oven. Bake for 25-35 minutes. Halfway through the baking time, around the 15-20 minute mark, I like to gently turn the stuffing balls over. This helps ensure that all sides get beautifully golden-brown and crispy. Keep an eye on them; baking times can vary slightly depending on your oven and the exact size of your balls. They are done when they are deeply golden-brown on the outside, wonderfully crispy to the touch, and feel firm yet springy. A gentle poke will confirm a tender, moist interior.
- Rest and Serve: Once baked to perfection, carefully remove the baking sheet from the oven. While it’s tempting to dive right in, allow the savory stuffing balls to rest on the baking sheet for about 5-10 minutes. This brief resting period allows the internal moisture to redistribute, resulting in an even more tender and flavorful center, and helps them firm up slightly, making them easier to handle.
Final Touches and Enjoyment
Serve your Savory Stuffing Balls warm as a delightful side dish to any holiday feast, a comforting accompaniment to a weeknight roast chicken, or even as a standalone appetizer. They are incredibly versatile and always a crowd-pleaser. The combination of the aromatic sage and thyme, the sweet sautéed onions and celery, and that irresistible crispy crust with a tender interior truly makes them the perfect flavorful side dish for your holiday table, or any table for that matter!
Conclusion:
So, there you have it, my friends! We’ve journeyed through the simple yet profoundly satisfying process of creating something truly special for your table. I genuinely believe that once you try this recipe, it will quickly become a cherished tradition in your culinary repertoire, especially when those festive occasions roll around. These aren’t just any side dish; they are a testament to how simple ingredients, combined with a little love and thoughtful preparation, can elevate an entire meal from good to absolutely unforgettable. The aroma alone, as these golden spheres bake to perfection, is enough to transport you straight to a cozy, joyous celebration. That crispy exterior giving way to a wonderfully moist and herbaceous interior is a textural delight that truly sets them apart.
What makes these stuffing balls an absolute must-try, in my humble opinion, is their incredible balance of convenience and flavor. Gone are the days of wrestling with a large, sometimes unwieldy, pan of traditional stuffing. With these delightful individual portions, every single guest gets to enjoy that coveted crispy edge along with the tender, aromatic center. They’re beautifully self-contained, making serving an absolute breeze, and they present so elegantly on any platter. But beyond the practicality, it’s the depth of flavor that truly sings here. The medley of herbs, the richness of the butter, the slight sweetness from the onions and celery, all baked into a savory bite, creates a symphony of taste that complements everything from a succulent roasted turkey to a robust prime rib or a hearty vegetarian main course. They’re a guaranteed crowd-pleaser, delivering all the comforting flavors we adore in a neat, impressive package.
Now, let’s talk about how you can make these even more your own. While they are stellar as is, don’t hesitate to get creative with your serving suggestions and variations! Of course, they are phenomenal nestled alongside your classic holiday roast, drenched in homemade gravy, and paired with cranberry sauce and mashed potatoes. But think beyond the obvious! I love serving them with a simple roasted chicken on a weeknight, or even crumbled slightly over a fresh autumn salad for an unexpected burst of savory flavor and texture. For a delightful twist, consider adding some crumbled cooked sausage or finely diced dried cranberries to the mixture before baking – the sweet and savory combination is divine! If you’re a mushroom lover, sautéed wild mushrooms can be folded into the bread mixture for an earthy depth. For a cheesier experience, a sprinkle of Parmesan or a sharp cheddar incorporated into the mix would be absolutely heavenly. You could also experiment with different types of bread; sourdough would lend a lovely tang, while cornbread would give a slightly sweeter, denser ball. The possibilities are truly endless, limited only by your imagination!
I truly hope this recipe inspires you to step into the kitchen and create these delicious little wonders for your next gathering, big or small. Trust me, the smiles they’ll bring to the faces of your loved ones will be all the reward you need. And speaking of rewards, I am so incredibly excited for you to discover the magic of what I affectionately call the Savory Stuffing Balls: The Perfect Flavorful Side Dish for Your Holiday Table. Please, please, please give them a try! I am genuinely eager to hear about your experience. Did you add a unique twist? What did your family think? Snap a photo, share your stories in the comments below, or tag us on social media. Your culinary adventures inspire me just as much as I hope my recipes inspire you. Happy cooking, and may your tables always be laden with joy and deliciousness!
FAQs About Stuffing Balls:
Q: Can I make these stuffing balls ahead of time?
A: Absolutely! This is one of their greatest advantages. You can prepare the stuffing mixture, roll them into balls, and arrange them on a baking sheet. Then, cover them tightly with plastic wrap and refrigerate for up to 24 hours before baking. When you’re ready to bake, simply pop them into the preheated oven as instructed, adding an extra 5-10 minutes to the baking time if they are going in cold from the fridge, just to ensure they heat through properly.
Q: How do I store leftover stuffing balls?
A: Leftover stuffing balls should be stored in an airtight container in the refrigerator. They will keep well for 3-4 days. To reheat, you can warm them in a microwave, or for best results, pop them back into an oven or toaster oven at 350°F (175°C) for about 10-15 minutes, until heated through and slightly crispy again.
Q: Can I freeze these stuffing balls?
A: Yes, you can! Freezing is a fantastic option for meal prep or saving holiday leftovers. Once baked and completely cooled, arrange the stuffing balls in a single layer on a baking sheet and freeze until solid. Then, transfer them to a freezer-safe bag or container. They will keep well in the freezer for up to 3 months. When you’re ready to enjoy, you can reheat them directly from frozen in a 350°F (175°C) oven for about 20-30 minutes, or until thoroughly heated, turning them halfway through.
Q: What kind of bread is best for stuffing balls?
A: A good quality day-old sturdy white bread, such as a French baguette, challah, or country loaf, works wonderfully as it absorbs the liquid well without becoming mushy. Sourdough or cornbread also offer fantastic flavor variations. Avoid very soft, fresh sandwich bread as it can become too dense. The key is to use slightly stale bread so it can absorb the broth without falling apart.
Q: Can I make these stuffing balls gluten-free or vegetarian?
A: Yes, you can adapt this recipe! For a gluten-free version, simply substitute the regular bread with your favorite gluten-free bread. Ensure all other ingredients (like broth) are certified gluten-free. For a vegetarian option, this recipe is already vegetarian if you use vegetable broth instead of chicken broth. If you’ve added meat (like sausage) in your variations, simply omit it to keep it purely vegetarian.
Q: My stuffing balls are falling apart. What went wrong?
A: If your stuffing balls are crumbling, it usually means there wasn’t enough liquid to bind them properly, or they weren’t pressed firmly enough when formed. Make sure your bread is adequately moistened but not soggy. The mixture should feel sticky enough to hold together when squeezed. If the mixture feels too dry, add an additional tablespoon or two of broth or melted butter until it reaches the right consistency.
Savory Stuffing Balls: Flavorful Holiday Side Dish!
These stuffing balls are everything you love about traditional stuffing, but in a portable, crispy-on-the-outside, tender-on-the-inside form. The blend of aromatic herbs like sage and thyme, paired with the savory goodness of sautéed onions and celery, makes each bite irresistibly flavorful. The best part? They’re incredibly versatile, making them perfect as a side dish, an appetizer, or even a main course for a cozy family dinner.
Ingredients
-
6-8 cups day-old bread, cut into ½-inch cubes
-
1 cup unsalted butter, plus more for greasing
-
2 large yellow onions, finely diced
-
4 stalks celery, finely diced
-
4 cloves garlic, minced
-
¼ cup fresh sage, finely chopped
-
2 tablespoons fresh thyme leaves, finely chopped
-
1 teaspoon salt
-
½ teaspoon black pepper, freshly ground
-
2 ½ – 3 cups low-sodium chicken or vegetable broth, warm
-
2 large eggs, lightly beaten
-
Optional: ¼ cup fresh parsley, chopped
Instructions
-
Step 1
Cut 6-8 cups day-old bread into ½-inch cubes. If not stale, spread on a baking sheet and bake at 275°F (135°C) for 15-20 minutes until dry; cool completely. -
Step 2
In a large pot, melt 1 cup unsalted butter over medium heat. Add finely diced yellow onions and celery; cook for 8-10 minutes until soft. Stir in minced garlic for 1 minute until fragrant, then add finely chopped fresh sage and thyme leaves, cooking for 1-2 minutes more. Season with 1 teaspoon salt and ½ teaspoon freshly ground black pepper. -
Step 3
Remove the pot from heat. Add the cooled bread cubes and gently fold to ensure they are evenly coated with the butter and aromatics. Gradually pour in 2 ½ – 3 cups warm low-sodium chicken or vegetable broth, folding gently until the mixture is moist but not soggy. Let the mixture cool slightly. -
Step 4
Once cooled slightly, gently fold in the 2 lightly beaten eggs. If using, fold in the optional ¼ cup chopped fresh parsley. Adjust seasoning if necessary. -
Step 5
Preheat your oven to 375°F (190°C). Lightly grease a large baking sheet. Using a 1.5-2 tablespoon scoop or your hands, form compact, round balls, about 1 ½ to 2 inches in diameter. Arrange the balls on the prepared baking sheet, leaving about an inch of space between each. This recipe yields approximately 24-30 stuffing balls. -
Step 6
Bake for 25-35 minutes, gently turning the stuffing balls over halfway through (around 15-20 minutes) to ensure all sides get beautifully golden-brown and crispy. Once baked to perfection, remove from the oven and allow them to rest on the baking sheet for 5-10 minutes before serving warm.
Important Information
Nutrition Facts (Per Serving)
It is important to consider this information as approximate and not to use it as definitive health advice.
Allergy Information
Please check ingredients for potential allergens and consult a health professional if in doubt.


Leave a Comment