
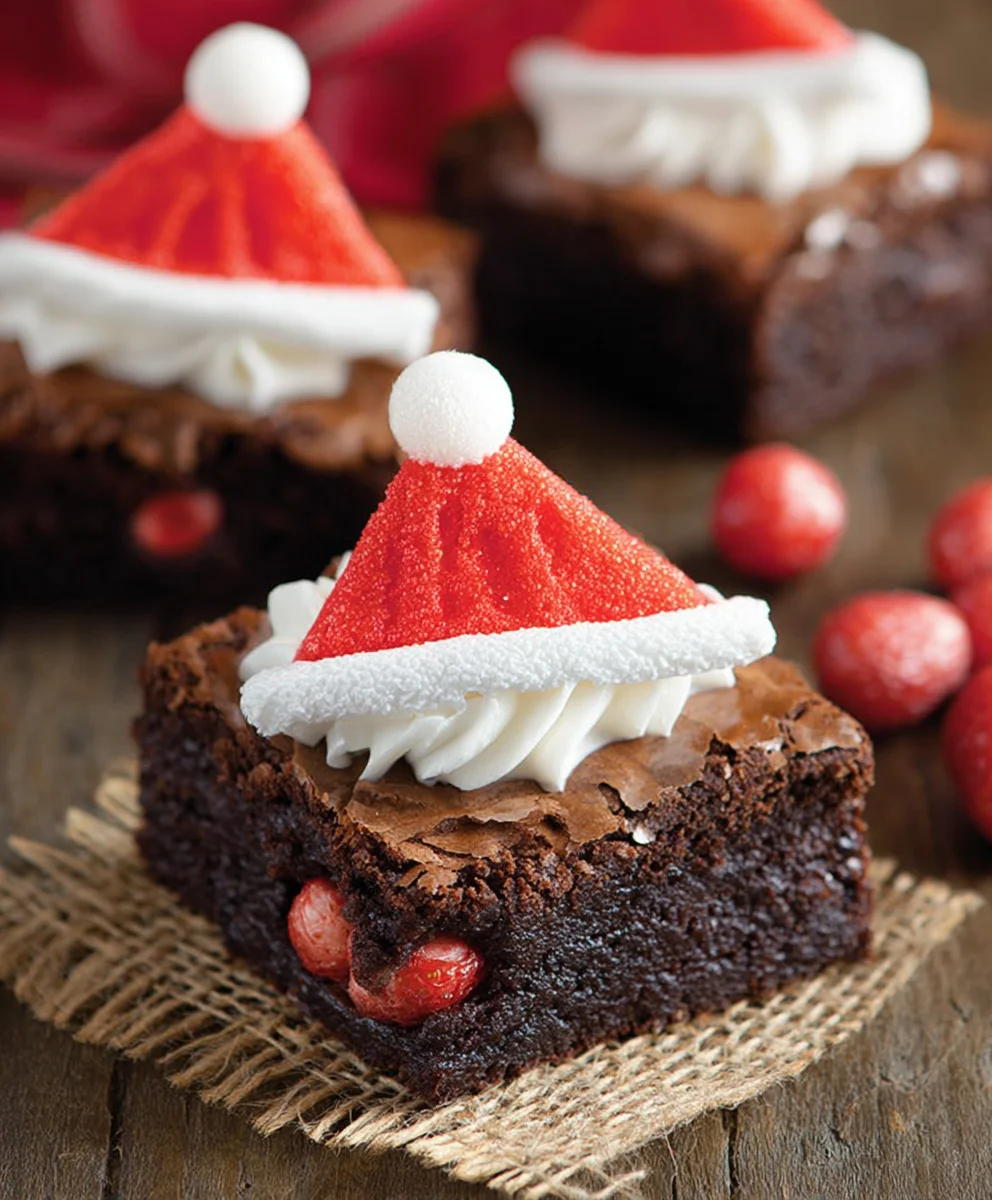
Santa Hat Brownies are the ultimate festive treat that will bring a sprinkle of holiday magic to any gathering! Imagine biting into a rich, fudgy brownie, perfectly dense and deeply chocolatey, then topping that with a swirl of creamy, sweet whipped cream and a bright red strawberry. It’s a simple yet incredibly effective visual that instantly screams Christmas cheer. This is why Santa Hat Brownies are so beloved: they are effortlessly adorable, surprisingly easy to make, and absolutely delicious. You don’t need to be a master baker to create these festive delights, making them the perfect activity for family fun in the kitchen. What truly makes these Santa Hat Brownies special is their dual appeal – they look like they belong on a professionally decorated holiday dessert table, yet their preparation is accessible to everyone, ensuring smiles all around as they disappear faster than Santa’s sleigh on Christmas Eve.

Ingredients:
- ¾ Cup All-Purpose Flour
- ½ teaspoon Salt
- ¼ teaspoon Baking Soda
- 2 Large Eggs
- ¾ Cup Light Brown Sugar
- ¾ Cup Vegetable Oil
- 2 Tablespoons Water
- 1 teaspoon Vanilla Extract
- 1 ½ Cups Semi-Sweet Chocolate Chips, divided
- ½ Cup Vanilla Frosting
- 9 Fresh Strawberries
Baking the Brownies
First things first, let’s get our brownie base ready for these festive Santa Hat Brownies. Preheat your oven to 350°F (175°C). This is a standard baking temperature that will ensure even cooking for our rich, fudgy brownies. While the oven heats up, it’s a good idea to prepare your baking pan. For these Santa Hat Brownies, an 8×8 inch square baking pan works perfectly. Grease it well with butter or cooking spray, and then lightly flour it. This prevents the brownies from sticking, making for a much cleaner release once they’re baked and cooled.
Now, in a medium-sized mixing bowl, whisk together your dry ingredients: the ¾ cup of all-purpose flour, ½ teaspoon of salt, and ¼ teaspoon of baking soda. The salt helps to balance the sweetness and enhance the chocolate flavor, while the baking soda acts as a leavening agent, giving the brownies a nice lift without making them cakey. Whisk them together until they are thoroughly combined. Set this bowl aside for a moment.
In a separate, larger mixing bowl, we’re going to combine the wet ingredients and sugar. Crack in your 2 large eggs, add the ¾ cup of light brown sugar, and pour in the ¾ cup of vegetable oil. The brown sugar will contribute to the chewy texture and moistness of the brownies, giving them that classic fudgy quality. Add the 2 tablespoons of water and 1 teaspoon of vanilla extract. Vanilla extract is crucial for adding depth of flavor to any baked good, and it plays a key role here in complementing the chocolate. Using an electric mixer or a whisk, beat these wet ingredients together until the mixture is smooth and well combined. You want to ensure the sugar is mostly dissolved and everything is incorporated evenly.
Now, it’s time to bring the wet and dry ingredients together. Gradually add the dry ingredient mixture to the wet ingredient mixture. Mix on low speed or by hand until just combined. Be careful not to overmix at this stage. Overmixing can develop the gluten in the flour too much, leading to tougher brownies. We’re aiming for a tender, fudgy texture. Once the flour is just incorporated, stir in 1 cup of the semi-sweet chocolate chips. Save the remaining ½ cup for later. These melted chocolate chips within the batter will create little pockets of gooey chocolate goodness.
Pour the batter into your prepared 8×8 inch baking pan. Spread it evenly with a spatula. Place the pan in the preheated oven and bake for 25-30 minutes. The exact baking time can vary depending on your oven. You’ll know they’re done when a toothpick inserted into the center comes out with moist crumbs attached, but not wet batter. If it comes out completely clean, they might be slightly overbaked. Once baked, remove the pan from the oven and let the brownies cool completely in the pan on a wire rack. This is a crucial step for achieving that perfect fudgy consistency and for making them easy to cut. Trying to cut warm brownies can result in a crumbly mess.
Assembling the Santa Hats
Once your Santa Hat Brownies are completely cooled, it’s time for the fun part: turning them into festive treats! You’ll need the ½ cup of vanilla frosting and the 9 fresh strawberries. Wash and thoroughly dry your strawberries. It’s very important that they are dry, otherwise, the frosting might slide off. Remove the green tops from the strawberries. The pointed end of the strawberry will be the tip of Santa’s hat.
Now, let’s create Santa’s hat. Take each dried strawberry and place it pointy-side up on a clean surface. Generously apply the vanilla frosting to the rounded, wider end of each strawberry. You want to create a nice, fluffy brim for the hat. A good way to do this is to use a spoon or a small offset spatula to spread the frosting. Don’t be shy with the frosting; it adds to the visual appeal and the sweetness.
Next, we need to add Santa’s signature pom-pom. Take a small dollop of the remaining vanilla frosting and place it on the very tip (the pointy end) of each strawberry. You can use a piping bag with a small round tip for a neater pom-pom, or simply use the tip of a spoon. This little touch really completes the Santa Hat Brownie transformation.
Finally, we’ll place these adorable Santa hats onto our brownie base. Cut the cooled brownies into 9 equal squares. A sharp knife will help achieve clean cuts. Place one frosted strawberry “hat” onto the center of each brownie square. The rounded, frosted end should sit on the brownie, with the frosting creating the brim. The pointy, pom-pom topped end will stand proudly upwards, resembling a perfectly placed Santa hat. Arrange them on a serving platter, and your festive Santa Hat Brownies are ready to bring some holiday cheer to any gathering!
Conclusion:
And there you have it! Your guide to creating these delightful Santa Hat Brownies is complete. These festive treats are not only incredibly easy to make, but they also pack a serious punch of chocolatey goodness, making them a guaranteed hit at any holiday gathering. The combination of rich, fudgy brownie base and the creamy, sweet frosting topping truly embodies the spirit of seasonal indulgence. I encourage you to give this recipe a try – it’s a wonderful way to spread holiday cheer and enjoy some delicious homemade baking.
For serving, these brownies are fantastic on their own, perhaps with a dusting of powdered sugar to mimic snow. They also pair beautifully with a glass of cold milk or a warm mug of hot chocolate. When it comes to variations, feel free to experiment! You could add a sprinkle of festive edible glitter to the frosting, or even insert a small pretzel stick into the brownie base before baking to create a “stick” for your Santa’s hat. Don’t be afraid to get creative and make these Santa Hat Brownies your own!
Frequently Asked Questions:
Q1: Can I make the brownie batter ahead of time?
Yes, you can certainly prepare the brownie batter a day in advance. Store it in an airtight container in the refrigerator. When you’re ready to bake, simply pour it into your prepared pan and adjust the baking time slightly if the batter is very cold.
Q2: What kind of frosting is best for Santa Hat Brownies?
A classic cream cheese frosting or a simple buttercream frosting works wonderfully. For the red, a store-bought vanilla frosting tinted with red food coloring is a convenient option. Ensure your frosting is firm enough to hold its shape when piped.
Santa Hat Brownies
Easy and festive holiday dessert recipe featuring fudgy brownies topped with strawberry and frosting Santa hats.
Ingredients
-
¾ Cup All-Purpose Flour
-
½ teaspoon Salt
-
¼ teaspoon Baking Soda
-
2 Large Eggs
-
¾ Cup Light Brown Sugar
-
¾ Cup Vegetable Oil
-
2 Tablespoons Water
-
1 teaspoon Vanilla Extract
-
1 ½ Cups Semi-Sweet Chocolate Chips, divided
-
½ Cup Vanilla Frosting
-
9 Fresh Strawberries
Instructions
-
Step 1
Preheat oven to 350°F (175°C). Grease and flour an 8×8 inch baking pan. -
Step 2
In a medium bowl, whisk together flour, salt, and baking soda. In a larger bowl, beat eggs, brown sugar, vegetable oil, water, and vanilla extract until smooth. Gradually add dry ingredients to wet ingredients, mixing until just combined. Stir in 1 cup of chocolate chips. -
Step 3
Pour batter into prepared pan and bake for 25-30 minutes, or until a toothpick inserted into the center comes out with moist crumbs. Let cool completely in the pan. -
Step 4
Wash and thoroughly dry strawberries. Remove green tops. Generously frost the rounded end of each strawberry with vanilla frosting to create a brim. Add a dollop of frosting to the pointy tip for a pom-pom. -
Step 5
Cut cooled brownies into 9 equal squares. Place one frosted strawberry ‘hat’ onto the center of each brownie square, with the frosted brim on the brownie and the pom-pom tip pointing upwards.
Important Information
Nutrition Facts (Per Serving)
It is important to consider this information as approximate and not to use it as definitive health advice.
Allergy Information
Please check ingredients for potential allergens and consult a health professional if in doubt.

Leave a Comment