
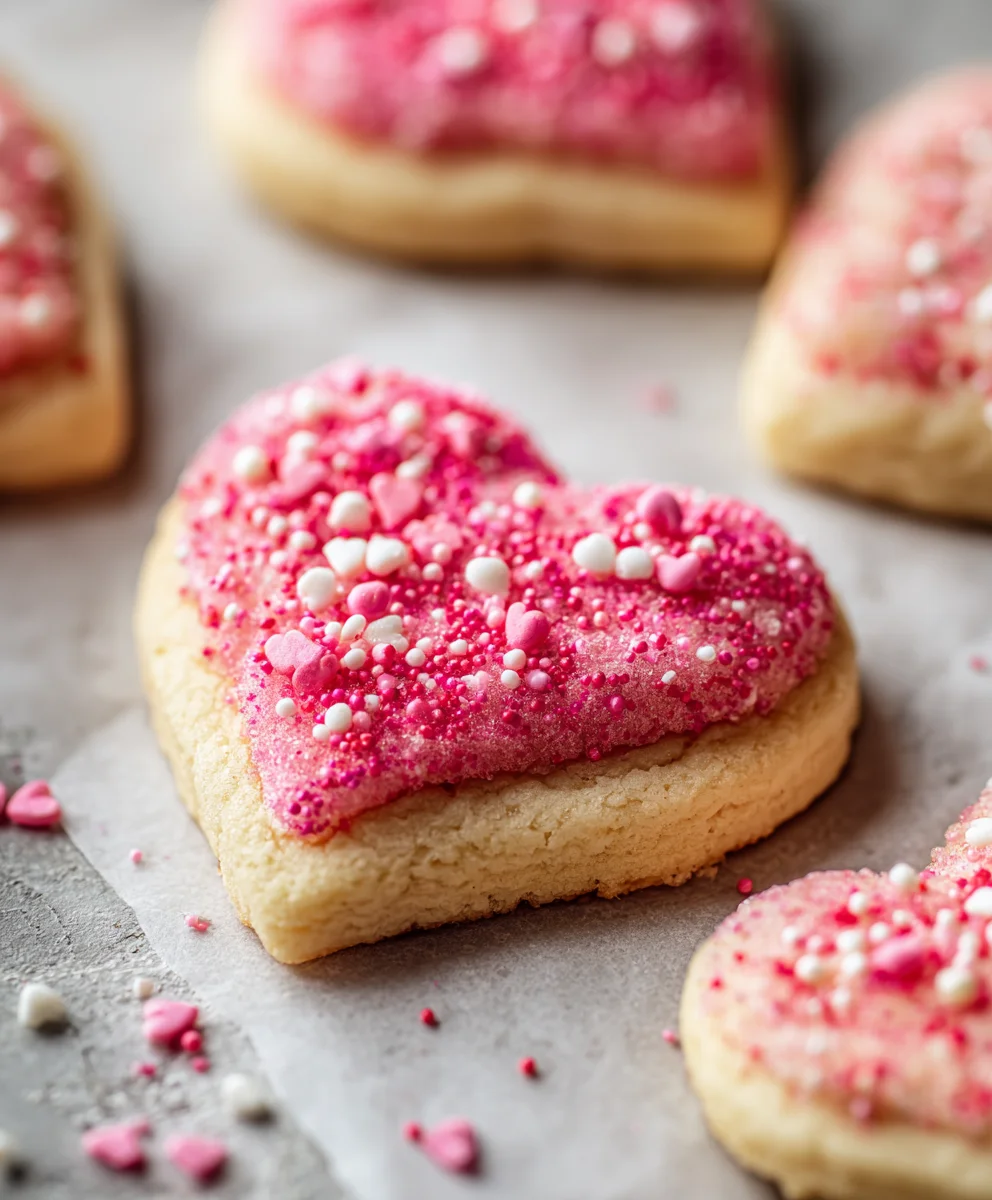
The Best Non-alcoholic Valentine Sugar Cookies are more than just a sweet treat; they are an edible expression of love, perfect for celebrating the most romantic day of the year. As February approaches, my thoughts often turn to thoughtful gestures and heartwarming traditions, and what could be more heartfelt than a batch of beautifully decorated, homemade cookies? These delightful confections offer a personal touch that transcends any store-bought gift, creating cherished memories with every bite.
The tradition of sharing sweet goods during celebrations dates back centuries, with simple flour, sugar, and butter concoctions evolving into the beloved sugar cookies we know today. Valentine’s Day, with its emphasis on affection and connection, provides the ideal canvas for these charming edibles. Baking for loved ones is a timeless act of care, transforming simple ingredients into a heartfelt message.
Why Everyone Adore These Valentine’s Day Delights
People absolutely adore these cookies not just for their delightfully crisp edges and soft, tender centers, but also for the pure joy they bring. The classic, sweet flavor is universally appealing, while the cookie’s structure allows for incredible versatility in decoration, making each one a miniature work of art. Furthermore, the non-alcoholic aspect ensures that everyone, from the youngest family member to friends who prefer to abstain, can partake in the festive cheer. It’s truly heartwarming to see the smiles these sweet bites inspire, making The Best Non-alcoholic Valentine Sugar Cookies a true crowd-pleaser and a memorable way to spread love.
Ingredients:
- For the Sugar Cookies:
- 3 cups (360g) all-purpose flour, plus more for dusting
- 1 teaspoon baking powder
- ½ teaspoon salt
- 1 cup (226g) unsalted butter, softened to room temperature
- 1 ½ cups (300g) granulated sugar
- 2 large eggs, also at room temperature
- 2 teaspoons pure vanilla extract
- ½ teaspoon almond extract (optional, but I personally love the subtle depth it adds to “The Best Vnon-alcoholic Valentine Sugar Cookies”)
- For the Royal Icing:
- 4 cups (480g) powdered sugar (confectioners’ sugar), sifted
- 3 tablespoons meringue powder
- ½ teaspoon pure vanilla extract
- ¼ teaspoon almond extract (optional, if you used it in the cookies, it’s lovely here too!)
- 6-8 tablespoons warm water, or as needed for consistency
- Gel food coloring (pinks, reds, whites, or any other festive shades for your Valentine’s theme)
Equipment You’ll Need:
- Stand mixer with paddle attachment or a large mixing bowl with an electric hand mixer
- Measuring cups and spoons
- Sifter (optional, but highly recommended for lump-free flour and powdered sugar)
- Rubber spatula
- Rolling pin
- Cookie cutters (especially Valentine’s themed ones like hearts, cupid’s arrows, or even simple circles)
- Parchment paper
- Baking sheets
- Wire cooling racks
- Several small bowls for mixing different icing colors
- Squeeze bottles or piping bags with small round tips (PME #1.5, Wilton #1, or #2 are perfect)
- Toothpicks or a scribe tool for intricate detailing and smoothing icing
- Airtight containers for storing both dough and finished cookies
Preparing the Cookie Dough: The Foundation of “The Best Vnon-alcoholic Valentine Sugar Cookies”
- Whisk the Dry Ingredients: In a medium-sized bowl, I always start by combining my dry ingredients. This includes the 3 cups of all-purpose flour, 1 teaspoon of baking powder, and ½ teaspoon of salt. I highly recommend sifting these together if you have the patience; it truly makes a difference in preventing lumps and ensures a wonderfully smooth cookie texture. Set this bowl aside for a moment.
- Cream Butter and Sugar: Now, in the large bowl of your stand mixer fitted with the paddle attachment (or using an electric hand mixer), place your softened unsalted butter and granulated sugar. Beat these two together on medium speed for about 2-3 minutes. You’re looking for a light, fluffy, and pale-yellow mixture. This process incorporates air into the butter, which is crucial for achieving that delicate, melt-in-your-mouth texture in “The Best Vnon-alcoholic Valentine Sugar Cookies.” Make sure to scrape down the sides of the bowl periodically to ensure everything is evenly combined.
- Add Eggs and Extracts: Once your butter and sugar are beautifully creamed, it’s time to add the eggs, one at a time, beating well after each addition until fully incorporated. After the eggs, stir in your pure vanilla extract and, if you’re using it, the almond extract. These extracts provide the signature flavor that makes these cookies so irresistible. Continue to beat on low speed until everything is just combined. Overmixing at this stage can sometimes lead to tougher cookies, and we definitely want tender and soft sugar cookies!
- Gradually Incorporate Dry Ingredients: With the mixer on low speed, slowly add your dry ingredient mixture to the wet ingredients, a third at a time. Mix only until just combined. The key here is not to overmix! Overmixing develops the gluten in the flour too much, which can result in tough, chewy cookies instead of the delicate, crisp-yet-soft sugar cookies we’re aiming for. Stop mixing as soon as you see no more streaks of flour. The dough will be soft but should come together.
- Chill the Dough – A Crucial Step: Gently gather the dough into a ball and divide it into two equal portions. Flatten each portion into a disc, wrap them tightly in plastic wrap, and refrigerate for at least 1 hour, or preferably 2-3 hours. Don’t skip this chilling step! It’s absolutely essential. Chilling allows the butter to firm up, which prevents the cookies from spreading too much in the oven, ensuring they hold their festive Valentine’s shapes beautifully. It also makes the dough much easier to handle when rolling and cutting. If you’re short on time, you can chill for 30 minutes in the freezer, but keep a close eye on it.
Rolling and Cutting “The Best Vnon-alcoholic Valentine Sugar Cookies”:
- Prepare Your Work Surface: Once your dough is adequately chilled, retrieve one disc from the refrigerator. Lightly flour your work surface, your rolling pin, and your hands. I find that a mixture of flour and a tiny bit of powdered sugar works wonderfully here to prevent sticking without making the cookies taste overly floury.
- Roll the Dough: Place one dough disc on your floured surface. Begin rolling the dough from the center outwards, rotating the dough periodically to prevent it from sticking and to ensure an even thickness. Aim for a consistent thickness of about 1/4 inch (6mm). This uniform thickness is vital for even baking. If your cookies are different thicknesses, some will burn while others are undercooked. If the dough gets too warm and sticky, don’t hesitate to pop it back into the fridge for 10-15 minutes.
- Cut Out Shapes: Now comes the fun part! Dip your Valentine’s themed cookie cutters in a little flour before each cut. Press firmly straight down into the dough, then lift straight up. Avoid twisting the cutter, as this can distort the cookie shape. Carefully transfer the cut cookie shapes to a baking sheet lined with parchment paper. Leave about 1-2 inches between each cookie to allow for slight spreading.
- Gather Scraps and Re-roll: Gather the dough scraps, gently press them together into a ball, re-wrap, and chill for another 15-20 minutes before rolling out again. This ensures the dough remains cool and pliable. I usually get two to three re-rolls from each disc of dough before the quality starts to degrade.
- Prepare for Baking: Repeat the rolling and cutting process with the second dough disc. If you have space, you can also chill the cut-out cookies on the baking sheets for an additional 10-15 minutes before baking. This extra chill further solidifies the butter, offering an even greater safeguard against spreading.
Baking Your Perfect Sugar Cookies:
- Preheat the Oven: Preheat your oven to 375°F (190°C) with an oven rack in the center position. An accurately preheated oven is key for consistent results.
- Bake in Batches: Place one baking sheet of cookies in the preheated oven. Bake for 8-12 minutes, depending on the size of your cookies and your oven’s temperament. I generally find that smaller cookies take around 8-9 minutes, while larger ones might need up to 12 minutes.
- Check for Doneness: You’ll know your “The Best Vnon-alcoholic Valentine Sugar Cookies” are perfectly baked when the edges are just beginning to turn a very light golden brown. The centers should still appear pale and slightly soft. Avoid overbaking them if you want soft sugar cookies! They will continue to set as they cool.
- Cooling Process: Once baked, remove the baking sheet from the oven and let the cookies cool on the sheet for 5-10 minutes. This allows them to firm up slightly before you attempt to move them. Then, carefully transfer the cookies to a wire cooling rack to cool completely. They must be completely cool before you even think about decorating them with royal icing, otherwise, the icing will melt or slide right off.
Whipping Up the Royal Icing: The Sweet Finish
- Sift Powdered Sugar: In a large bowl, or the bowl of your stand mixer, sift the 4 cups of powdered sugar. Sifting is absolutely non-negotiable for royal icing if you want a smooth, pipeable consistency without clogs. Add the meringue powder to the sifted sugar and whisk briefly to combine. Meringue powder is essential for royal icing as it provides stability, shine, and helps the icing harden properly.
- Add Liquids and Mix: Add the vanilla extract and almond extract (if using) to the sugar and meringue powder mixture. Begin adding the warm water, starting with 6 tablespoons. Mix on low speed with the paddle attachment until combined, then increase to medium-high speed and beat for 5-7 minutes.
- Achieve the Right Consistency: You’re looking for a thick, glossy consistency that holds stiff peaks, similar to soft-serve ice cream. If the icing is too thick, add more water one teaspoon at a time until you reach the desired consistency. If it’s too thin, you can add a little more sifted powdered sugar. The consistency is critical for successful cookie decorating. For outlining, you’ll want a slightly thicker consistency that holds its shape, while for flooding (filling in areas), you’ll want a thinner consistency that smooths out on its own.
- Divide and Color: Divide the royal icing into several small bowls, one for each color you plan to use for your “The Best Vnon-alcoholic Valentine Sugar Cookies.” Add gel food coloring sparingly with a toothpick, mixing well until you achieve your desired shade. Remember that colors can deepen slightly as they dry.
- Adjust for Outlining and Flooding: For outlining, you want a consistency that, when a spoonful is drizzled back into the bowl, slowly disappears within about 15-20 seconds. For flooding, you’ll thin it out further with a few drops of water at a time until a drizzled line disappears within 5-10 seconds. Store icing in airtight containers or covered bowls with a damp cloth touching the surface to prevent it from crusting over.
Decorating “The Best Vnon-alcoholic Valentine Sugar Cookies”:
- Prepare Piping Bags/Bottles: Fill separate piping bags or squeeze bottles with your different colored icing. If using piping bags, use a small round tip (PME #1.5 or Wilton #2 is ideal for both outlining and flooding).
- Outline Your Cookies: Using the slightly thicker consistency icing, carefully pipe an outline around the edge of each cooled cookie. This creates a dam that will hold your flood icing in place. Allow the outline to set for about 10-15 minutes before moving to the next step. This helps prevent bleeding and ensures clean edges.
- Flood the Cookies: Once the outline has set, use the thinner consistency icing to fill in the outlined area. Gently squeeze the icing into the center of the cookie, using a toothpick or scribe tool to gently push the icing to the edges and pop any air bubbles. Work quickly but carefully to ensure an even, smooth surface.
- Wet-on-Wet Designs (Optional): If you want to create beautiful “wet-on-wet” designs (like polka dots, marbling, or hearts directly onto your flooded cookie), apply contrasting colors of icing immediately after flooding, while the base icing is still wet. Use a toothpick to drag through the wet icing to create patterns. This technique yields stunning, seamless designs perfect for “The Best Vnon-alcoholic Valentine Sugar Cookies.”
- Dry Thoroughly: This is arguably the most important step for beautifully decorated cookies. Allow your flooded cookies to dry completely, uncovered, at room temperature for at least 6-8 hours, or ideally overnight (12-24 hours). They must be completely dry and hard to the touch before stacking or adding additional details. Placing them in front of a fan can help speed up the drying process.
- Add Details (Optional): Once the flood layer is completely dry, you can go back in with thicker icing and smaller tips to add intricate details like dots, lines, script, or more elaborate Valentine’s motifs. Let these details dry for another few hours before handling.
Tips for Success and Storage:
- Don’t Rush the Chill Time: I can’t stress this enough. Chilling the dough is critical for beautifully shaped, non-spreading cookies. Patience truly pays off here for “The Best Vnon-alcoholic Valentine Sugar Cookies.”
- Maintain Even Thickness: When rolling, strive for consistent 1/4-inch thickness. This ensures all your cookies bake evenly, preventing some from being burnt while others are undercooked. You can use rolling pin guides if you have them.
- Room Temperature Ingredients: Always use room temperature butter and eggs. This allows them to cream together properly, creating a smooth emulsion that traps air for a lighter, fluffier cookie.
- Use Gel Food Coloring: For vibrant colors in your royal icing, opt for gel food coloring over liquid. Liquid coloring can thin out your icing and isn’t as concentrated.
- Practice Makes Perfect: Don’t get discouraged if your first few decorated cookies aren’t masterpieces. Royal icing decorating takes practice. Start with simple designs and gradually work your way up. Remember, even imperfect homemade cookies are made with love!
- Storage of Unbaked Dough: The unbaked cookie dough discs can be wrapped tightly and stored in the refrigerator for up to 3-4 days, or frozen for up to 3 months. Thaw frozen dough in the refrigerator overnight before rolling.
- Storage of Baked Cookies: Un-iced baked sugar cookies can be stored in an airtight container at room temperature for up to 5-7 days or frozen for up to 3 months. Thaw at room temperature before icing.
- Storage of Decorated Cookies: Fully dried and decorated “The Best Vnon-alcoholic Valentine Sugar Cookies” can be stored in an airtight container at room temperature for up to 2-3 weeks. Place parchment paper between layers to protect the delicate icing. Avoid refrigerating decorated cookies, as condensation can damage the royal icing.
Enjoy your beautiful and delicious “The Best Vnon-alcoholic Valentine Sugar Cookies!” They are perfect for gifting or sharing with loved ones.

Conclusion:
As we wrap up our sweet journey, I truly hope you’re feeling inspired and excited to roll up your sleeves and get baking! What we’ve explored together is more than just a recipe; it’s an invitation to create joy, to share warmth, and to infuse a little handmade love into your celebrations. These aren’t just any sugar cookies; they’re designed to be a delightful experience from start to finish. I’ve put so much thought into ensuring that every step is clear, every ingredient plays its part perfectly, and the final result is nothing short of spectacular. The delicate balance of buttery richness and sweet vanilla, combined with that perfect soft chew, makes them utterly irresistible. Trust me when I say, the aroma alone as they bake will fill your home with a comforting, nostalgic scent that promises pure happiness.
This recipe for The Best Vnon-alcoholic alentine Sugar Cookies truly lives up to its name because it delivers on every promise: a dough that’s a dream to work with, cookies that hold their shape beautifully, and a taste that will have everyone reaching for just one more. They’re not overly sweet, allowing the nuanced flavors of butter and vanilla to shine, and their texture is precisely what you desire in a classic sugar cookie – tender, melt-in-your-mouth, yet firm enough to decorate with precision. It’s this harmonious combination that elevates them from a simple treat to a memorable confection. Whether you’re an experienced baker or just starting your culinary adventures, this recipe offers a rewarding experience, culminating in a batch of cookies that look as good as they taste.
Once your beautiful cookies are baked and cooled, the possibilities for enjoyment are endless! For a truly classic pairing, serve them alongside a tall, frosty glass of milk, or a steaming mug of hot chocolate – it’s a simple pleasure that never gets old. They also make a fantastic accompaniment to your morning coffee or afternoon tea, adding a touch of sweetness to your daily ritual. Consider packaging a few in a pretty box or cellophane bag, tied with a ribbon, to give as heartfelt gifts to friends, family, or even colleagues. Imagine the smiles when someone receives a homemade treat that looks straight out of a professional bakery! They’re perfect for Valentine’s Day parties, school events, or simply as a thoughtful gesture to brighten someone’s day. These cookies are not just food; they are an expression of care and affection.
Elevate Your Cookie Game: Creative Variations
While the basic recipe is absolutely stellar on its own, don’t hesitate to get creative with your decorations and flavors. For the frosting, beyond the classic vanilla, consider adding a hint of almond extract for a marzipan-like flavor, a touch of lemon zest for a bright, citrusy zing, or even a drop of rosewater for a sophisticated floral note. You can experiment with various food colorings to create a rainbow of pastel shades, or go bold with vibrant hues. When it comes to toppings, think beyond simple sprinkles: try edible glitter for a touch of sparkle, crushed freeze-dried raspberries for a tart counterpoint and lovely color, mini chocolate chips pressed into the frosting, or even finely chopped nuts for a delightful textural contrast. The sky’s the limit when it comes to personalizing these cookies to suit your taste and occasion.
Beyond Valentine’s: Year-Round Cookie Fun!
And let’s not limit these beauties to just one holiday! The versatility of this sugar cookie dough means you can adapt it for any celebration throughout the year. Swap out the heart-shaped cutters for stars and snowflakes at Christmas, leaves for autumn gatherings, or bunnies and eggs for Easter. You can even infuse the dough itself with different flavors; try adding orange zest for a sunny citrus cookie, or a tablespoon of espresso powder for a subtle coffee twist. For those with dietary restrictions, a good quality gluten-free all-purpose flour blend can often be substituted, though you might need a tiny bit more liquid to achieve the perfect dough consistency. Similarly, for a vegan option, plant-based butter and egg substitutes can work wonders, often yielding a surprisingly delightful result with minor adjustments. Don’t be afraid to experiment and make this recipe truly your own.
Now it’s your turn! I genuinely hope you feel confident and excited to try making these cookies for yourself. There’s something incredibly satisfying about transforming simple ingredients into such a beautiful and delicious treat. I’m positive you’ll be thrilled with the results. Once you’ve baked your batch, I would absolutely love to hear about your experience. Did you try a new frosting flavor? Experiment with unique decorations? Or perhaps you found the perfect serving suggestion? Please, share your creations and your stories with me. Your feedback and photos not only bring me immense joy but also inspire other bakers in our community. Let’s spread the sweetness far and wide!
So, gather your ingredients, turn on some cheerful music, and get ready to bake some magic. These sugar cookies are more than just a dessert; they’re an opportunity to create cherished memories and bring smiles to the faces of those you love. Happy baking!
The Best Non-alcoholic Valentine Sugar Cookies
An edible expression of love, these non-alcoholic Valentine sugar cookies feature crisp edges, tender centers, and a classic sweet flavor, perfect for heartfelt decoration and sharing with everyone. A memorable way to spread love.
Ingredients
-
3 cups (360g) all-purpose flour
-
1 teaspoon baking powder
-
½ teaspoon salt
-
1 cup (226g) unsalted butter, softened
-
1 ½ cups (300g) granulated sugar
-
2 large eggs
-
2 teaspoons pure vanilla extract
-
½ teaspoon almond extract (optional)
-
4 cups (480g) powdered sugar, sifted
-
3 tablespoons meringue powder
-
½ teaspoon pure vanilla extract
-
¼ teaspoon almond extract (optional)
-
6-8 tablespoons warm water
-
Gel food coloring
Instructions
-
Step 1
Whisk flour, baking powder, and salt. In a stand mixer, cream softened butter and granulated sugar until light. Beat in eggs one at a time, then vanilla and optional almond extract. Gradually add dry ingredients, mixing until just combined. -
Step 2
Divide dough into two discs, wrap tightly, and refrigerate for 1-3 hours. -
Step 3
On a lightly floured surface, roll one dough disc to 1/4 inch thickness. Cut shapes with floured cookie cutters and transfer to parchment-lined baking sheets. Re-roll dough scraps, chilling if sticky. -
Step 4
Preheat oven to 375°F (190°C). Bake cookies for 8-12 minutes until edges are light golden. Cool on baking sheets for 5-10 minutes, then transfer to wire racks to cool completely. -
Step 5
Sift powdered sugar and meringue powder into a bowl. Add vanilla, optional almond extract, and 6-8 tablespoons warm water. Beat on medium-high speed for 5-7 minutes until thick, glossy, and stiff peaks form, adjusting consistency with water or powdered sugar. -
Step 6
Divide icing into bowls and color with gel food coloring. Adjust consistency: for outlining, aim for a 15-20 second flow; for flooding, thin with water to a 5-10 second flow. Keep icing covered tightly. -
Step 7
Outline cooled cookies with thicker icing; let set 10-15 minutes. Flood with thinner icing, spreading with a toothpick to fill and pop air bubbles. Apply wet-on-wet designs immediately if desired. -
Step 8
Allow decorated cookies to dry completely, uncovered, at room temperature for 6-24 hours. Once fully dry, add intricate details with thicker icing and let dry again for a few hours.
Important Information
Nutrition Facts (Per Serving)
It is important to consider this information as approximate and not to use it as definitive health advice.
Allergy Information
Please check ingredients for potential allergens and consult a health professional if in doubt.
Leave a Comment