
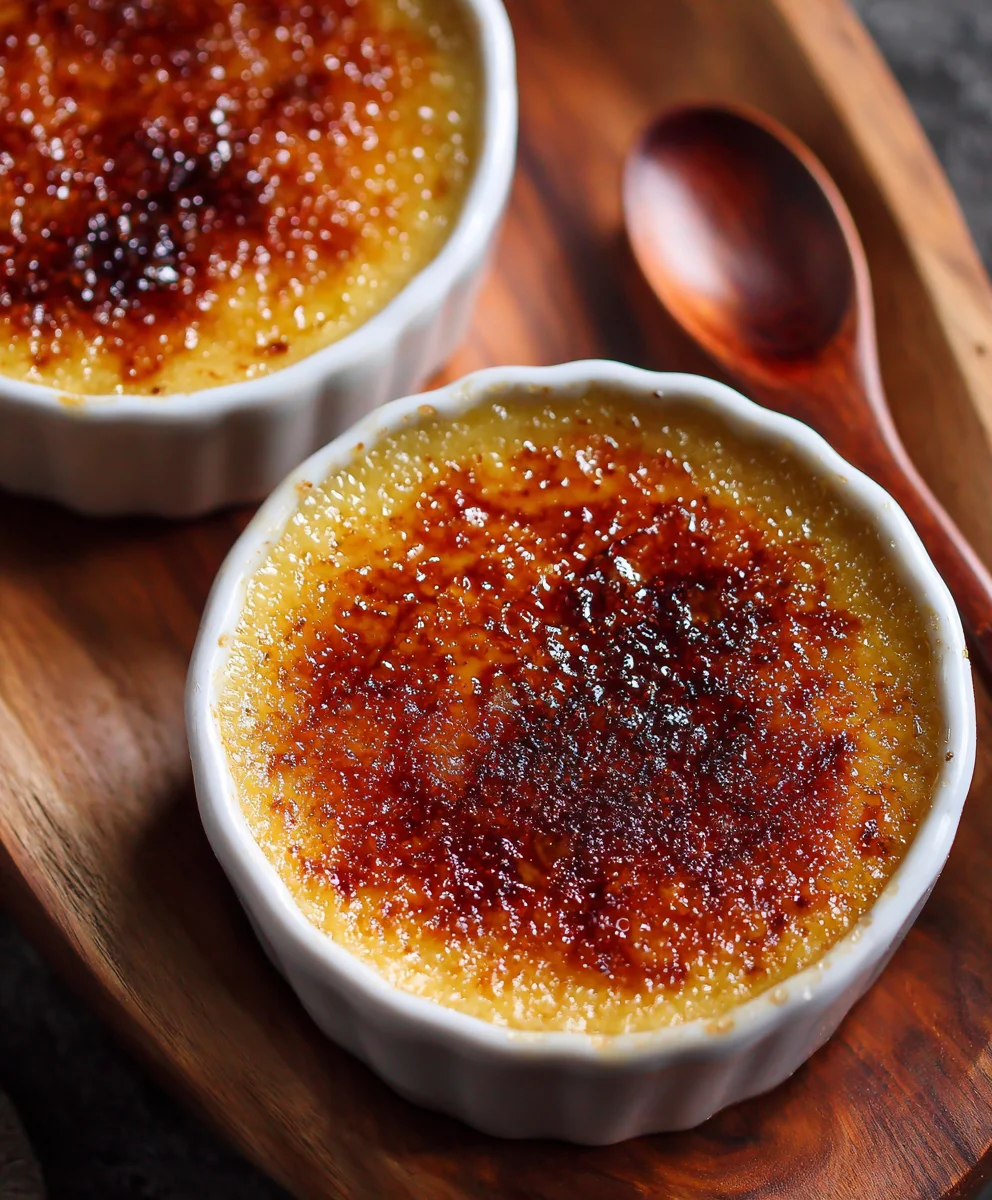
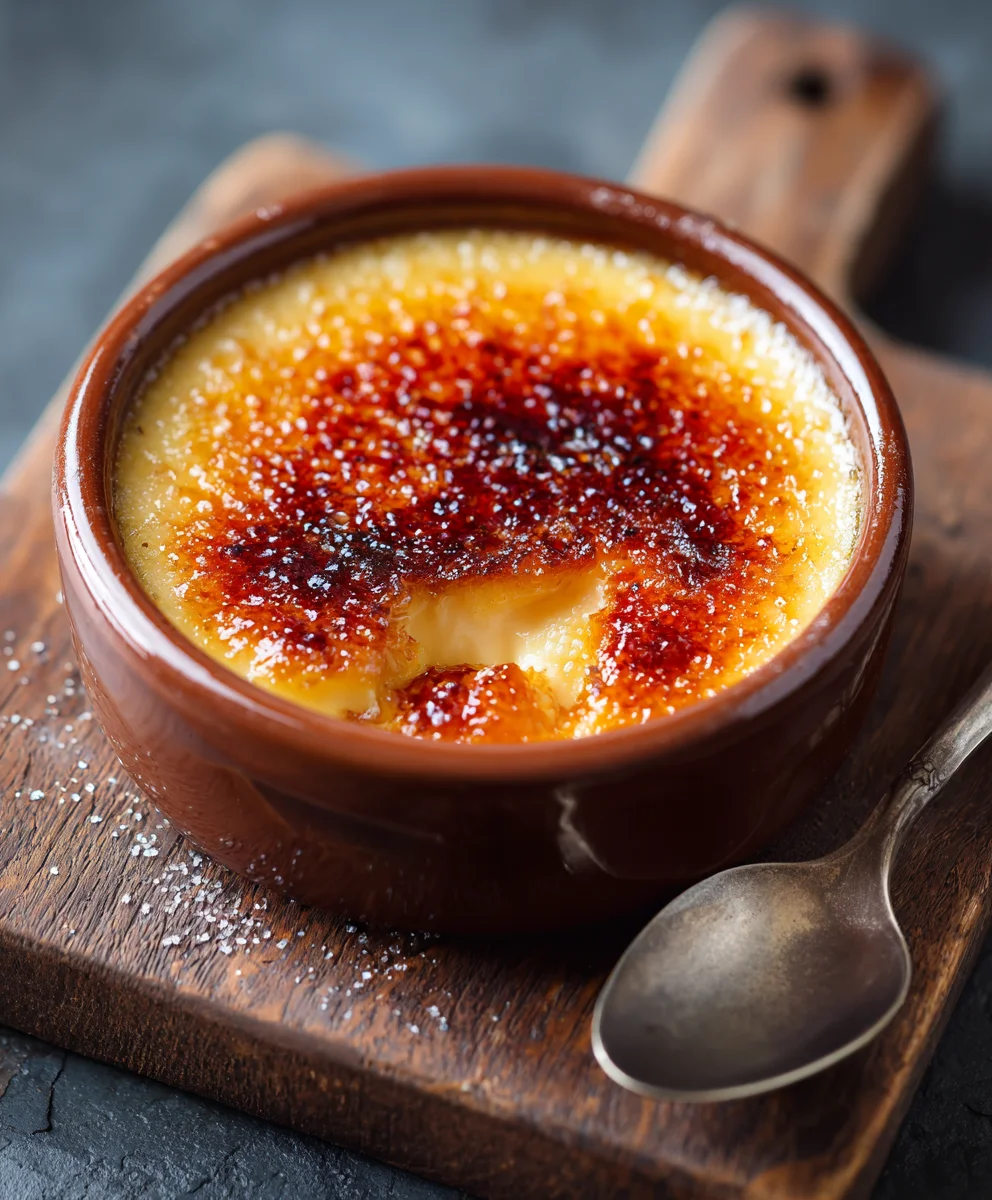
Delicious Vanilla Bean Creme Brulee has long captivated dessert lovers worldwide, and for good reason! There’s something truly magical about cracking through that glistening, caramelized sugar crust to reveal the silken, creamy custard beneath. It’s an experience that transcends mere eating; it’s a moment of pure, unadulterated pleasure. While its exact origins are debated – with claims from France, Spain, and England – one thing is certain: this classic dessert has firmly established itself as a pinnacle of culinary elegance, adored across cultures for centuries.
Why We Can’t Resist This Classic Indulgence
I find that people are absolutely enchanted by creme brulee not just for its luxurious taste, but for the delightful interplay of textures. The rich, aromatic sweetness of real vanilla bean, infused generously into the custard, creates a flavor profile that is both comforting and incredibly sophisticated. Then, the satisfying “snap” of the sugar, followed by the smooth, melt-in-your-mouth creaminess, delivers a sensory journey unlike any other. Preparing your own Delicious Vanilla Bean Creme Brulee might seem daunting at first glance, but I promise you, the reward is immeasurable. It’s a perfect special occasion treat, yet simple enough to master and impress your guests, or simply indulge yourself on a quiet evening, savoring every exquisite bite.
Ingredients:
-
2 cups (480ml) heavy cream (at least 36% fat): I always recommend using a high-quality heavy cream for the best possible richness and flavor in your Delicious Vanilla Bean Creme Brulee. The higher fat content contributes significantly to the silky-smooth texture we’re aiming for.
-
1 whole vanilla bean: This is truly the star of the show, providing that unmistakable, exquisite vanilla aroma and flavor. Make sure it’s plump and pliable, not dried out. While vanilla extract can be used in a pinch, a real vanilla bean elevates this dessert to another level entirely, infusing the cream with thousands of tiny, fragrant specks.
-
6 large egg yolks: Fresh, large egg yolks are essential for the custard’s structure and incredibly rich consistency. Separating eggs can be a bit fiddly, but taking your time here ensures no bits of white sneak in, which can affect the final texture of your Delicious Vanilla Bean Creme Brulee.
-
½ cup (100g) granulated sugar (for the custard): This amount strikes a perfect balance, providing sweetness without being cloying, allowing the vanilla to truly shine. It’s crucial for the custard’s flavor and helps with the caramelization process later.
-
A pinch of salt: Just a tiny pinch, usually ¼ teaspoon or less, is all it takes to enhance all the other flavors, much like in baking. It helps to balance the sweetness and brings out the depth of the vanilla. Don’t skip this seemingly small detail!
-
¼ cup to ½ cup (50g to 100g) granulated sugar (for torching, approximate): This amount will depend on the size of your ramekins and how thick you like your caramelized sugar crust. Having extra on hand is always a good idea, as you’ll want to create an even, generous layer right before torching for that iconic crisp crack.
Equipment You’ll Need:
-
4-6 (6-ounce or 175ml) ramekins: These are the classic vessels for individual creme brulees. Ensure they are oven-safe. The size will dictate your yield, so choose based on how many servings you’d like. Their shallow depth allows for a good custard-to-caramelized-crust ratio.
-
Large roasting pan or baking dish: This is absolutely critical for creating a water bath (bain-marie). It should be large enough to comfortably hold your ramekins without them touching each other, and deep enough to hold about an inch of water around them. A sturdy, heat-safe pan is a must.
-
Fine-mesh sieve: My secret weapon for achieving the silkiest, smoothest custard imaginable. This will catch any bits of cooked egg, vanilla bean fragments, or chalazae (the stringy white bits attached to the yolk), ensuring a perfectly uniform texture for your Delicious Vanilla Bean Creme Brulee.
-
Whisk: For combining ingredients and ensuring everything is well-emulsified. A good balloon whisk makes light work of mixing your egg yolks and sugar.
-
Rubber spatula: Indispensable for scraping down bowls and ensuring you get every last drop of that precious custard mixture. It’s also gentle for folding and mixing without introducing too much air.
-
Small saucepan: For gently heating your heavy cream and infusing it with that glorious vanilla bean. Choose one with a heavy bottom to prevent scorching.
-
Mixing bowls (medium and large): You’ll need one for whisking your egg yolks and sugar, and potentially another for the final strained custard mixture.
-
Measuring cups and spoons: Precision is important in baking, so make sure you have accurate measuring tools for all your ingredients.
-
Kitchen torch (butane or propane): This is non-negotiable for achieving that signature crispy, caramelized sugar top. A good kitchen torch provides intense, focused heat that quickly melts and caramelizes the sugar without cooking the custard further. Investing in a reliable one will make all the difference in the presentation and texture of your Delicious Vanilla Bean Creme Brulee.
-
Kettle or pot for boiling water: You’ll need very hot water for the water bath, so having a way to quickly boil a significant amount of water ready to go is helpful.
Prepping for Your Delicious Vanilla Bean Creme Brulee:
-
Preheat Your Oven and Prepare Your Water Bath: First things first, let’s get the oven ready. Preheat your oven to a gentle 325°F (160°C). While it’s heating, put a kettle of water on to boil, or simply heat water in a pot on the stovetop. You’ll want enough boiling water to fill your roasting pan about halfway up the sides of your ramekins. This hot water bath is critical for the gentle, even cooking of your custard, preventing it from curdling and ensuring that incredibly smooth texture.
-
Arrange Your Ramekins: Carefully place your ramekins inside your large roasting pan. Make sure they are not touching each other, leaving a little space for the water to circulate around them. This helps ensure even heat distribution during baking, which is key for a uniformly cooked Delicious Vanilla Bean Creme Brulee.
-
Prepare the Vanilla Bean: This is where the magic truly begins! Lay your vanilla bean on a cutting board. Using a sharp paring knife, carefully slice the bean lengthwise down the center, being careful not to cut all the way through the back. Once split, use the back of your knife or a small spoon to scrape out all those beautiful, tiny, aromatic seeds. These are what impart the deep, complex vanilla flavor. Place both the scraped-out seeds and the empty pod into your small saucepan. Don’t discard the pod – it still holds a lot of flavor that we want to extract!
Crafting the Velvety Custard Base:
-
Infuse the Cream with Vanilla: Pour the heavy cream into the saucepan with your vanilla bean seeds and pod. Place the saucepan over medium-low heat. We’re looking to infuse the cream, not boil it. Gently heat the cream, stirring occasionally, until tiny bubbles just begin to form around the edges of the pan and it’s steaming, but definitely not boiling. This usually takes about 5-7 minutes. If the cream boils, it can break, and that’s not what we want for our delicate Delicious Vanilla Bean Creme Brulee. Once heated, remove the pan from the heat, cover it, and let it steep for at least 15-20 minutes. This allows the vanilla flavor to deepen and fully infuse into the cream, creating an incredibly fragrant base.
-
Whisk Egg Yolks, Sugar, and Salt: While your cream is steeping, grab a medium mixing bowl. Add the 6 large egg yolks, ½ cup of granulated sugar, and that pinch of salt. Using your whisk, vigorously whisk the mixture until it’s pale yellow and slightly thickened. You’ll notice the sugar dissolving into the yolks, creating a smooth, creamy texture. This typically takes about 2-3 minutes of consistent whisking. Be careful not to over-whisk and incorporate too much air, as excessive air bubbles can lead to a less smooth custard and a foamy top, which we will address later.
-
Temper the Eggs: Now for one of the most crucial steps to prevent scrambled eggs! Once your cream has steeped, remove the vanilla pod (you can rinse and dry it for vanilla sugar later, or even infuse it into vodka!). Slowly, and I mean very slowly, ladle about a quarter of the warm vanilla-infused cream into the egg yolk mixture while continuously whisking. This gradual addition raises the temperature of the egg yolks gently, without cooking them. Continue to whisk constantly as you slowly pour in another quarter of the warm cream. Once the egg mixture is warm to the touch, you can then pour the entire egg mixture back into the remaining warm cream in the saucepan, still whisking gently to ensure everything is thoroughly combined. This process is called tempering, and it’s what guarantees a silky-smooth custard for your Delicious Vanilla Bean Creme Brulee.
-
Strain the Custard for Ultimate Smoothness: This step, while seemingly minor, is my absolute secret weapon for a truly professional-quality creme brulee. Place your fine-mesh sieve over a clean, large mixing bowl or a large liquid measuring cup with a spout. Pour the entire custard mixture through the sieve. You’ll likely catch any tiny bits of cooked egg, any stray vanilla bean fragments that weren’t fully infused, or small bits of chalazae. Press gently on any solids to extract all the flavorful liquid. What you’re left with is an incredibly smooth, lump-free custard base, ready for baking. Trust me, this makes a world of difference in the final texture of your Delicious Vanilla Bean Creme Brulee.
-
Skim Off Any Foam (Optional, but Recommended): After straining, you might notice a thin layer of foam on top of your custard. While not strictly necessary, taking a moment to skim this off with a spoon or the edge of a paper towel will result in an even more pristine and glassy top surface for your baked custard, which looks fantastic before the sugar crust is added.
Baking Your Creme Brulee to Perfection:
-
Pour Custard into Ramekins: Carefully pour the strained, silky custard mixture into your prepared ramekins, filling each one almost to the top. Distribute the custard evenly among them. Be mindful not to overfill, as this could lead to spillage in the water bath.
-
Add Hot Water to the Roasting Pan: Now for the water bath. Carefully pour the boiling water you prepared earlier into the roasting pan, around the ramekins. The water should come about halfway up the sides of your ramekins. This hot water bath creates a moist, gentle environment in the oven, ensuring the custards cook slowly and evenly without cracking or becoming rubbery. It’s the key to that delicate, wobbly consistency that we adore in a Delicious Vanilla Bean Creme Brulee.
-
Transfer to the Oven: Very carefully, so as not to slosh the water, transfer the roasting pan with the ramekins and hot water into your preheated 325°F (160°C) oven. Place it on the middle rack for optimal heat distribution.
-
Bake Until Just Set: Bake for approximately 35-45 minutes. The exact time will vary depending on your oven and the size of your ramekins, so trust your judgment more than the clock alone. To check for doneness, gently jiggle one of the ramekins. The edges should be set and firm, but the very center (about an inch in diameter) should still have a slight, delicate wobble, like very soft Jell-O. It will continue to set as it cools, so don’t overbake! Overbaking will result in a grainy or rubbery texture, which is the antithesis of a perfect Delicious Vanilla Bean Creme Brulee.
-
Carefully Remove from Water Bath: Once baked, very gently remove the roasting pan from the oven. Using tongs or a sturdy spatula, carefully lift each ramekin out of the hot water bath. Be cautious, as the ramekins and water will be extremely hot. Place the ramekins on a wire rack to cool.
Chilling for Optimal Texture:
-
Cool at Room Temperature: Allow your creme brulees to cool on the wire rack at room temperature for at least 30-60 minutes. This allows them to gradually come down in temperature before chilling. Rushing this step can sometimes cause condensation issues when covered.
-
Chill Thoroughly in the Refrigerator: Once cooled to room temperature, cover each ramekin tightly with plastic wrap. Transfer them to the refrigerator and chill for a minimum of 4 hours, but preferably overnight. This chilling step is absolutely crucial for the custard to fully set, develop its rich flavor, and achieve that iconic, firm-yet-creamy texture. A properly chilled Delicious Vanilla Bean Creme Brulee is much more enjoyable and ready for its grand finale. You can even prepare these up to 2-3 days in advance, making them an excellent make-ahead dessert for entertaining.
The Grand Finale: Torching Your Delicious Vanilla Bean Creme Brulee:
-
Prepare for Torching: When you’re ready to serve (and not before, as the sugar crust will soften over time), take the chilled creme brulees out of the refrigerator. Blot the surface of each custard with a paper towel if there’s any condensation, ensuring it’s perfectly dry. This helps the sugar adhere and caramelize effectively. Sprinkle 1 to 2 tablespoons of granulated sugar evenly over the top of each chilled custard. Ensure you have an even layer, as this will create a uniform, crisp crust. You don’t want bare spots or overly thick patches, which can burn unevenly.
-
Torch to Perfection: Hold your kitchen torch a few inches above the sugar layer. Move the flame steadily and continuously in small circles over the sugar. You’ll see the sugar begin to melt, bubble, and then caramelize into a beautiful, amber-colored crust. Keep the torch moving to prevent burning any single spot. Aim for an even, golden-brown hue across the entire surface. This process usually takes about 1-2 minutes per ramekin. The aroma of toasted sugar is intoxicating and signals that your Delicious Vanilla Bean Creme Brulee is nearing perfection!
-
Let It Set and Serve: Once the sugar crust is perfectly caramelized and shiny, allow the creme brulees to sit for 3-5 minutes at room temperature. This brief resting period allows the hot caramel to cool and harden, creating that delightful, irresistible crisp shell. The moment of truth arrives when you tap your spoon gently on the crust and hear that satisfying crack! Serve immediately for the best contrast in temperature and texture between the warm, crisp topping and the cool, creamy custard. Enjoy your homemade Delicious Vanilla Bean Creme Brulee – a true labor of love that is utterly worth every step!
Tips for the Perfect Creme Brulee:
-
Use High-Quality Ingredients: Since creme brulee has so few components, the quality of each ingredient truly shines through. Opt for the freshest large eggs, high-fat heavy cream, and a plump, fragrant vanilla bean for the most exquisite flavor. This is one dessert where you truly taste the difference.
-
Avoid Boiling the Cream: When infusing your cream, heat it gently until it steams and tiny bubbles form at the edge, but never let it come to a rolling boil. Boiling can cause the cream to scorch or break, which will negatively impact the custard’s texture and flavor.
-
Don’t Over-Whisk the Eggs: Whisk the egg yolks and sugar until pale and slightly thickened, but avoid incorporating too much air. Excessive air bubbles can lead to a frothy top that can cook unevenly and create an undesirable texture in the final custard.
-
Temper with Patience: The tempering step is crucial to prevent your eggs from scrambling. Add the warm cream to the egg yolks very slowly, in a thin stream, while continuously whisking. This gradually raises the temperature of the eggs, ensuring a smooth transition.
-
Always Strain Your Custard: This is a non-negotiable step for a truly silky-smooth creme brulee. Passing the mixture through a fine-mesh sieve removes any bits of cooked egg, chalazae, or vanilla bean fragments, guaranteeing a perfectly uniform and luxurious texture.
-
Don’t Overbake: Overbaking is the enemy of a smooth creme brulee. The custard should be set around the edges but still have a slight, delicate wobble in the center. It will continue to set as it cools. An overbaked custard will be grainy or rubbery.
-
Chill Thoroughly: Allow ample time for your Delicious Vanilla Bean Creme Brulee to chill in the refrigerator, preferably overnight. This allows the custard to fully set and for the flavors to meld beautifully, creating that ideal cool, creamy consistency that contrasts so well with the warm, crisp topping.
-
Even Sugar Layer for Torching: For a perfect, consistent crackle, ensure the granulated sugar layer before torching is even and covers the entire surface of the custard. This allows for uniform caramelization without burnt or bare spots.
-
Keep the Torch Moving: When caramelizing the sugar, keep the flame of your kitchen torch constantly moving in small circles. This prevents any single spot from burning and ensures an even, golden-amber crust. Watch carefully as it melts and bubbles.
-
Make Ahead for Entertaining: Creme brulees are fantastic for dinner parties because they can be made up to 2-3 days in advance and stored, covered, in the refrigerator. Simply torch them right before serving for that impressive grand finale, allowing you to focus on your guests.
Conclusion:
And there you have it! We’ve journeyed through the creation of what I truly believe is one of the most sublime and satisfying desserts you can possibly make. This isn’t just another sweet treat; it’s an experience, a moment of pure, unadulterated culinary joy that I promise you will cherish. From the moment you hear that unmistakable, delicate ‘crack’ of the caramelized sugar crust to the very first spoonful of the velvety smooth, custard beneath, every single sensation is designed to delight. It’s the kind of dessert that elicits gasps of pleasure and leaves a lasting impression, proving that sometimes, the simplest ingredients, when treated with care and a touch of magic, can yield the most extraordinary results.
I find immense satisfaction in creating this dessert, not just for its incredible taste but also for the wonderful alchemy involved. Transforming humble cream, egg yolks, sugar, and the star ingredient – fragrant vanilla beans – into something so elegant and sophisticated feels incredibly rewarding. It’s a process that allows you to slow down, to appreciate the nuances of flavor, and to anticipate the grand finale: that perfect golden, glassy shell. The aroma alone, as the vanilla infuses the cream, is enough to lift your spirits and set the stage for something truly special. This is why I wholeheartedly declare this recipe a must-try; it’s a testament to the fact that you don’t need a professional pastry kitchen to create restaurant-quality desserts right in your own home. It’s impressive without being intimidating, elegant without being overly complicated.
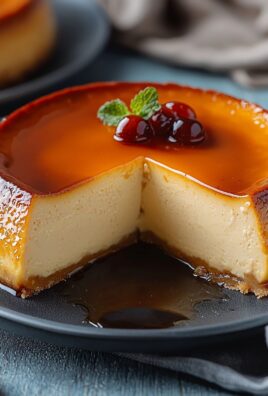
Now, let’s talk about enhancing this masterpiece. While a plain, perfectly executed creme brulee is a thing of beauty in itself, there are countless ways to elevate and personalize your serving experience. My go-to suggestion for a classic presentation is to serve your Delicious Vanilla Bean Creme Brulee with a vibrant medley of fresh berries. Imagine plump, ruby-red raspberries, their slight tartness providing a perfect counterpoint to the rich custard, or glistening blueberries, bursting with a gentle sweetness. A scattering of sliced strawberries can add a beautiful splash of color and another layer of fruity counterpoint, making each spoonful an exquisite balance of textures and flavors. It’s a simple addition that brightens the entire experience, transforming an already luxurious dessert into an unforgettable masterpiece. For an extra touch of sophistication, consider a sprig of fresh mint for a delicate aromatic flourish.
Beyond the berries, the possibilities for creative variations and pairings are endless. For those who love a hint of citrus, a tiny dusting of finely grated orange or lemon zest over the top before torching can add a wonderfully fragrant brightness. If you’re a chocolate lover, a few delicate chocolate shavings or a drizzle of high-quality dark chocolate sauce on the side can create a decadent combination. For an adult twist, I’ve even experimented with infusing a tiny splash of Grand Marnier or a vanilla liqueur into the custard base itself before baking, which adds a subtle layer of complexity. Another delightful idea is to serve it alongside a small scoop of espresso ice cream, allowing the bitterness of the coffee to cut through the sweetness of the vanilla. You could also try a sprinkle of fleur de sel on top of the torched sugar crust for a sophisticated salted caramel note, adding another dimension of flavor that will truly surprise and delight your palate. Think seasonally too; in autumn, a light apple or pear compote could be a wonderful accompaniment, while in spring, a lavender infusion could be intriguing. The base recipe is so robust and forgiving, it truly encourages experimentation!
So, what are you waiting for? I genuinely encourage you to roll up your sleeves, gather your ingredients, and embark on this delicious adventure. You’ll find that the process, from whisking the yolks to patiently waiting for the custards to set, is surprisingly meditative and incredibly rewarding. There’s a special kind of pride that comes with serving something so beautiful and utterly delicious that you’ve made with your own hands. And when that moment comes, when you present your creation to loved ones or simply indulge yourself, I know you’ll understand why I’m so passionate about this recipe. It’s more than just a dessert; it’s an invitation to savor the simple, profound pleasures of life.
Please, don’t keep your success a secret! I would absolutely love to hear about your experience in making this incredible dessert. Did you stick to the classic serving suggestions, or did you get creative with your own variations? What was your favorite part of the process? Share your triumphs, your photos, and any tips you discovered along the way. Your feedback truly inspires me, and I can’t wait to celebrate your culinary success with you!
Delicious Vanilla Bean Creme Brulee
A classic, elegant dessert featuring a rich, vanilla-infused creamy custard topped with a glistening, caramelized sugar crust. The perfect balance of textures and flavors.
Ingredients
-
2 cups (480ml) heavy cream
-
1 whole vanilla bean
-
6 large egg yolks
-
½ cup (100g) granulated sugar
-
¼ teaspoon salt
-
¼ to ½ cup (50g to 100g) granulated sugar (for torching)
Instructions
-
Step 1
Preheat oven to 325°F (160°C). Boil water for a water bath. Arrange 4-6 ramekins in a large roasting pan. Split vanilla bean lengthwise, scrape out seeds, and place seeds and pod in a small saucepan. -
Step 2
Pour 2 cups heavy cream into the saucepan. Heat gently over medium-low heat until steaming (do not boil). Remove from heat, cover, and steep for 15-20 minutes. -
Step 3
In a medium bowl, whisk 6 large egg yolks, ½ cup granulated sugar, and ¼ teaspoon salt until pale and slightly thickened. -
Step 4
Remove vanilla pod from cream. Slowly ladle half of the warm cream into the egg yolk mixture, whisking constantly. Pour tempered egg mixture back into the remaining cream, whisking gently. -
Step 5
Pour custard through a fine-mesh sieve into a clean bowl. Skim off any foam. -
Step 6
Pour strained custard evenly into prepared ramekins. Carefully pour boiling water into the roasting pan, halfway up the sides of the ramekins. Carefully transfer the roasting pan to the preheated oven. Bake for 35-45 minutes until edges are set but the center has a slight wobble. -
Step 7
Carefully remove ramekins from the water bath and place on a wire rack to cool at room temperature for 30-60 minutes. Cover ramekins and chill in the refrigerator for at least 4 hours, preferably overnight. -
Step 8
When ready to serve, blot custard surface dry. Sprinkle 1-2 tablespoons granulated sugar evenly over each chilled custard. Using a kitchen torch, move the flame steadily over the sugar until it caramelizes to a golden-amber crust. Let the crust set for 3-5 minutes before serving immediately.
Important Information
Nutrition Facts (Per Serving)
It is important to consider this information as approximate and not to use it as definitive health advice.
Allergy Information
Please check ingredients for potential allergens and consult a health professional if in doubt.
Leave a Comment