
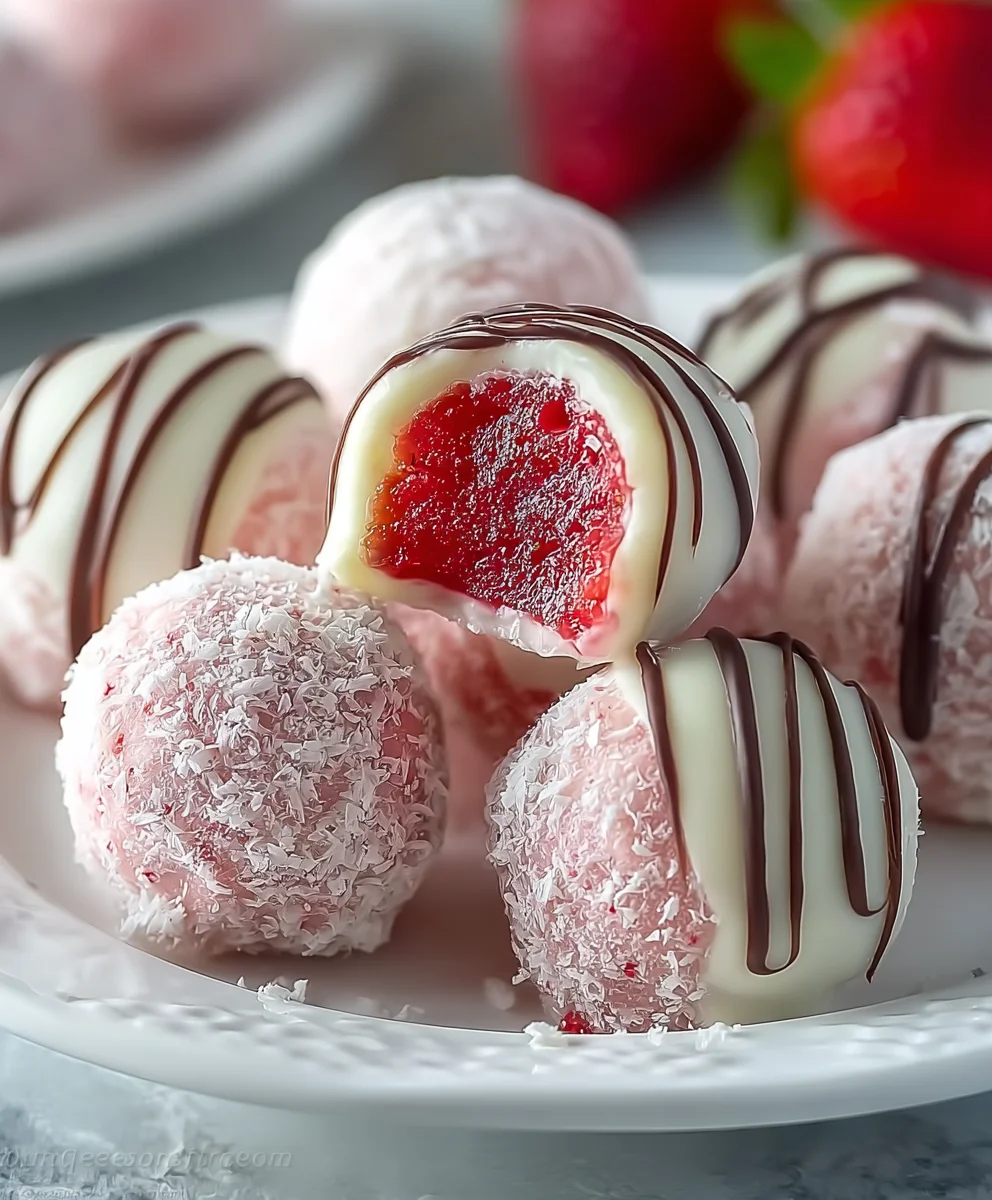
Strawberry Dream Truffles. There’s something undeniably enchanting about a perfectly crafted truffle, and these vibrant, ruby-hued delights are no exception. Imagine biting into a silky-smooth confection, where the sweet, sun-kissed essence of fresh strawberries mingles harmoniously with a rich, creamy ganache, all melting delightfully on your tongue. It’s a truly compelling experience, offering a burst of freshness in every bite. While the classic chocolate truffle has its roots in European confectionery, often named for its resemblance to the prized fungus, modern culinary artistry has beautifully embraced fruit-forward creations like these. Our recipe presents a refreshing and sophisticated twist on a timeless luxury, celebrating the versatility of confectionery.
The Irresistible Allure of Strawberry Dream Truffles
I find that people absolutely adore these for their exquisite balance of sweet and subtly tart flavors, coupled with an incredibly tender, melt-in-your-mouth texture that feels wonderfully indulgent. Their striking visual appeal, with that beautiful pink hue, also makes them a favorite for special occasions, elegant dessert platters, or as a thoughtful homemade gift. The convenience of creating such a gourmet treat in your own kitchen is incredibly rewarding. Preparing these Strawberry Dream Truffles offers a delightful journey, transforming simple ingredients into something truly extraordinary that brings joy with every delicate bite. I am confident you will love creating and, more importantly, savoring these delightful treats.
Ingredients:
- For the Intense Strawberry Reduction:
- 2 pounds (approximately 900g) fresh strawberries, ripe and vibrant
- 2 tablespoons granulated sugar (optional, adjust to strawberry sweetness)
- 1 tablespoon fresh lemon juice
- For the Creamy Truffle Core:
- 12 ounces (approximately 340g) high-quality white chocolate, finely chopped or in callets
- 4 ounces (approximately 113g) full-fat cream cheese, softened to room temperature
- 2 tablespoons unsalted butter, softened to room temperature
- 1 teaspoon pure vanilla extract
- 1/4 teaspoon almond extract (optional, enhances berry flavor beautifully)
- Pinch of salt
- 1-2 tablespoons strawberry liqueur or brandy (optional, for adult truffles)
- For the Irresistible Coating:
- 16 ounces (approximately 450g) white chocolate or dark chocolate (for a contrast), finely chopped or in callets
- 1 tablespoon coconut oil or vegetable shortening (optional, for smoother dipping)
- For Garnishing and Extra Flair:
- 1/4 cup freeze-dried strawberry powder
- 1/4 cup desiccated coconut flakes
- 1/4 cup finely chopped pistachios or almonds
- Edible glitter or sprinkles (optional, for a festive touch)
- A few fresh strawberry slices or tiny mint leaves, for presentation
Preparation of the Strawberry Reduction: The Heart of Your Strawberry Dream Truffles
My journey to creating these exquisite Strawberry Dream Truffles always begins with coaxing the most intense strawberry flavor I can from fresh berries. This reduction is what truly sets them apart, so let’s get started on this crucial step.
- First things first, let’s get those strawberries ready. I carefully wash and hull all 2 pounds of fresh strawberries. Hulling means removing the green leafy tops and the small white core inside. I always aim for the ripest, most fragrant berries I can find, as their natural sweetness and robust flavor will shine through in the final truffle.
- Once cleaned, I roughly chop the strawberries. There’s no need for precision here, as they’ll be pureed. I then transfer them to a sturdy blender or food processor. I blend them until they form a smooth puree. Sometimes, depending on the power of my blender, I might need to add a tiny splash of water (no more than a tablespoon) to get it going, but usually, the berries have enough liquid on their own.
- Next, I pour the strawberry puree into a medium saucepan. I add the 2 tablespoons of granulated sugar and the 1 tablespoon of fresh lemon juice. The sugar is optional; if my strawberries are super sweet, I might omit it or reduce it. The lemon juice, however, is not optional for me! It brightens the strawberry flavor and helps balance the sweetness, preventing the reduction from tasting flat. I bring the mixture to a gentle simmer over medium heat, stirring occasionally.
- Once it’s simmering, I reduce the heat to low and let it continue to simmer, stirring frequently, for about 25-35 minutes. My goal here is to reduce the volume of the puree significantly, by at least half, or even two-thirds. You’ll notice it thickening and the color deepening into a rich, concentrated hue. This concentrated strawberry flavor is absolutely essential for the “Strawberry Dream” aspect of these truffles. It’s worth taking your time with this step, as it provides the intense berry punch that defines the whole experience. I look for a consistency that coats the back of a spoon.
- After achieving that perfect, thick reduction, I remove the saucepan from the heat and let it cool completely. It’s really important that this reduction is at room temperature, or even slightly chilled, before we incorporate it into the chocolate mixture. Any warmth could seize the chocolate, and we definitely don’t want that for our smooth truffle core. While it cools, I might even pop it into the fridge for a bit to speed up the process.
Crafting the Velvety Truffle Core: Building the Dreamy Base
With our vibrant strawberry reduction ready, it’s time to create the smooth, rich, and utterly dreamy core of our Strawberry Dream Truffles. This phase requires a bit of care to ensure a perfectly emulsified and luxurious ganache-like texture.
- First, I prepare my white chocolate. If I’m using a bar, I chop it as finely as possible. Small, uniform pieces melt more evenly and prevent scorching. If I have callets, even better! I place the chopped white chocolate in a heatproof bowl.
- Now, for the melting process. I usually opt for a double boiler method for white chocolate, as it’s more forgiving than a microwave. I set the bowl of white chocolate over a saucepan of barely simmering water, making sure the bottom of the bowl doesn’t touch the water. I stir gently until the chocolate is smooth and fully melted. Alternatively, if I’m using a microwave, I heat the chocolate in 20-30 second intervals, stirring thoroughly after each interval, until it’s smooth. It’s crucial not to overheat the white chocolate, as it can seize or become grainy.
- Once the white chocolate is melted and beautifully smooth, I add the softened cream cheese and butter to the bowl. Both of these should be at room temperature to ensure they blend seamlessly into the chocolate. I stir vigorously with a spatula or whisk until everything is thoroughly combined and the mixture is perfectly uniform and glossy. This forms the creamy, stable base for our truffles.
- Now comes the star ingredient: our cooled strawberry reduction! I add about 1/2 cup of the concentrated strawberry reduction to the chocolate mixture. I start with 1/2 cup, stirring it in completely. If I feel the mixture can handle more flavor and still maintain its firmness, I might add another tablespoon or two, but it’s important not to add too much liquid, as it could prevent the truffles from setting properly. I also stir in the pure vanilla extract, the optional almond extract (which I truly believe elevates the berry flavor), and a tiny pinch of salt to enhance all those wonderful flavors. If I’m making an adult version, this is also when I’d fold in the 1-2 tablespoons of strawberry liqueur or brandy.
- I stir until all ingredients are perfectly blended, resulting in a beautifully pink, thick, and homogenous mixture. The consistency should be thick enough to hold its shape but still pliable. At this point, I transfer the truffle mixture into a clean container, cover it tightly with plastic wrap directly touching the surface to prevent a skin from forming, and refrigerate it.
- This chilling phase is absolutely vital for making firm and rollable truffles. I usually chill the mixture for at least 3-4 hours, but often prefer to leave it overnight. The mixture needs to be firm enough to scoop and roll without being sticky or falling apart. When it’s ready, it should feel like a very thick, moldable dough.
Shaping Your Strawberry Dream Truffles: Bringing Them to Life
Once our truffle core has thoroughly chilled and reached that perfect moldable consistency, the fun really begins! Shaping these Strawberry Dream Truffles is where they truly start to take their delectable form.
- Before I even think about scooping, I prepare my workspace. I typically line a baking sheet with parchment paper or a silicone mat. This will be where our freshly rolled truffles will rest before their final coating. I also make sure my hands are clean and cool; sometimes I even run them under cold water briefly to help prevent the mixture from sticking too much.
- I use a small cookie scoop (a 1-tablespoon size is ideal for bite-sized truffles) or two teaspoons to portion out the truffle mixture. Uniformity is key here, as it ensures even chilling and a professional look. If I’m aiming for truly perfect spheres, I might even weigh each portion, but for most home batches, a consistent scoop size is perfectly fine.
- Working quickly, I gently roll each portion between the palms of my hands to form a smooth, round ball. The warmth of your hands will soften the mixture slightly, so it’s important to work efficiently. If the mixture becomes too soft or sticky, I simply pop the tray back into the refrigerator for 10-15 minutes to firm up again. Don’t worry if they’re not perfectly spherical right now; we can refine them slightly after their next chill. I place each rolled truffle onto the prepared baking sheet, leaving a little space between each one.
- Once all the truffle mixture has been rolled into spheres, I place the baking sheet back into the refrigerator. This is a crucial brief re-chilling step, usually for about 30 minutes. This firms up the exterior of the truffles, making them much easier to handle and ensuring the coating adheres beautifully without melting the core. You want your truffles to be very cold and firm before dipping them into the warm coating.
The Art of Coating and Finishing: Adorning Your Strawberry Dream Truffles
The final flourish transforms these already delightful balls of strawberry goodness into true Strawberry Dream Truffles. The coating not only adds another layer of texture and flavor but also makes them visually stunning. This is where you can really get creative!
- While the truffles are having their final chill, I prepare my coating chocolate. Again, high-quality chocolate, finely chopped or in callets, is essential for a smooth, even coating. I typically use white chocolate to complement the strawberry, but a dark chocolate coating provides a lovely contrast in flavor and appearance.
- I melt the coating chocolate using the double boiler method, just as I did for the white chocolate in the core. If I want a slightly thinner, more pourable consistency for easier dipping, I might stir in 1 tablespoon of coconut oil or vegetable shortening towards the end of the melting process. This also helps create a lovely sheen and a snappier bite. I make sure the chocolate is melted and smooth, but not too hot, as excessive heat can melt your chilled truffles.
- Now for the dipping! I take the chilled truffles out of the refrigerator. Using a dipping fork, a specialized truffle tool, or even a regular fork with tines slightly bent, I carefully drop one truffle into the melted chocolate. I roll it around to coat it completely, then gently tap the fork against the edge of the bowl to allow any excess chocolate to drip off. This tapping step is important for a neat, thin coating.
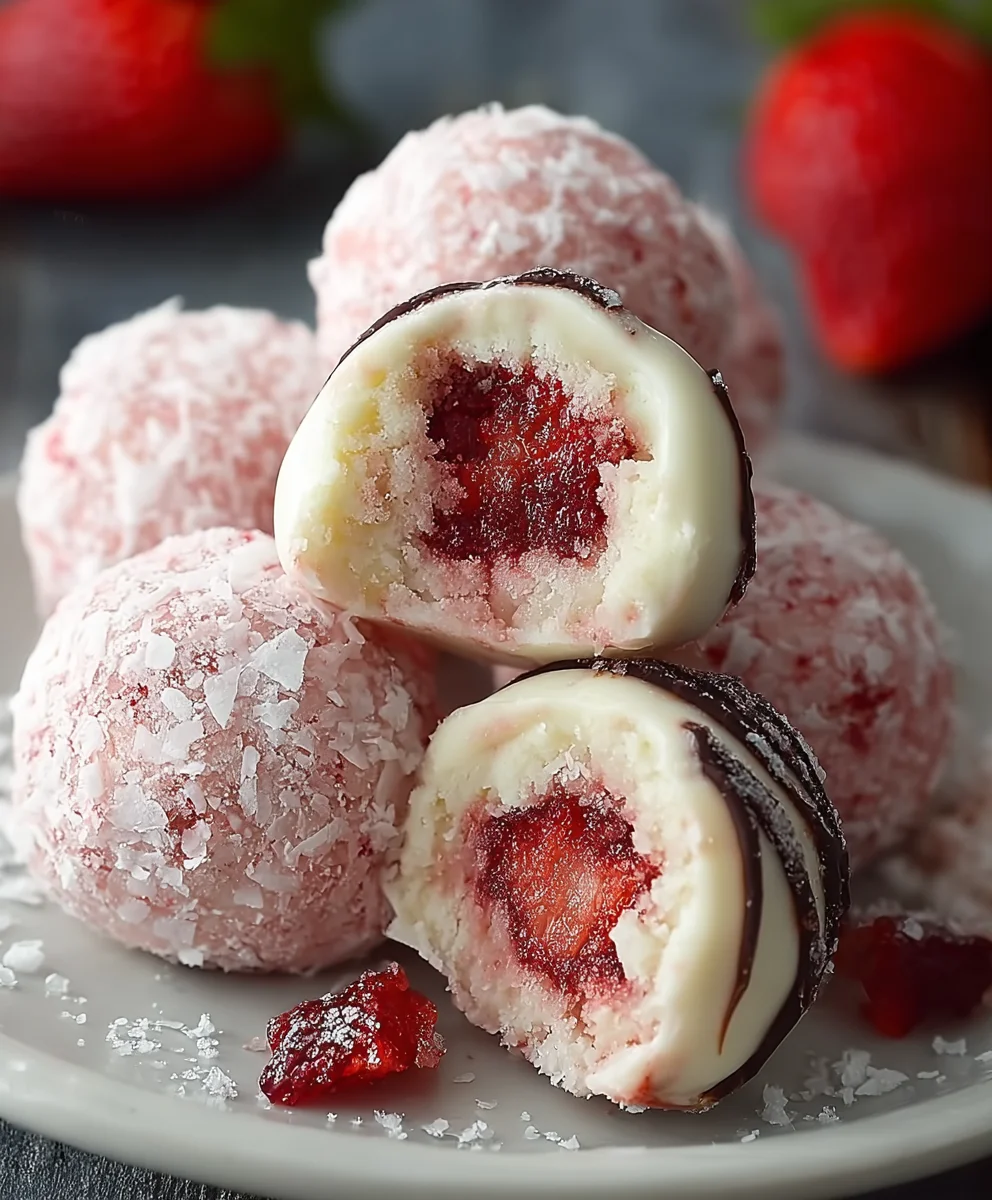
- As soon as I’ve coated a truffle, and while the chocolate is still wet, I have a few options for secondary coatings or garnishes. For the ultimate “Strawberry Dream” experience, I often roll some in freeze-dried strawberry powder – it intensifies the berry flavor and gives them a beautiful matte pink finish. Other options include rolling them in desiccated coconut flakes for a tropical twist, or finely chopped pistachios or almonds for a nutty crunch. For an extra festive touch, edible glitter or sprinkles can be added. I place the coated and garnished truffles back onto the parchment-lined baking sheet.
- I continue this process until all the truffles are coated and decorated. It’s helpful to work in small batches, taking only a few truffles out of the fridge at a time, to keep them as cold as possible during dipping.
- Once all my beautiful Strawberry Dream Truffles are coated and adorned, I place the baking sheet back into the refrigerator for at least 30-60 minutes to allow the chocolate coating to fully set and harden. Once set, they are ready to be enjoyed! For best results and to maintain their delightful texture and flavor, I store these truffles in an airtight container in the refrigerator for up to a week. They are absolutely divine when allowed to sit at room temperature for 10-15 minutes before serving, letting their creamy centers soften just slightly.
Conclusion:
And there you have it, my friends! We’ve reached the sweet culmination of our journey, and I genuinely hope you’re feeling inspired and eager to whip up a batch of these truly delightful treats. I’ve poured my heart into crafting this recipe, and I honestly believe it’s one you absolutely must add to your culinary repertoire. Why, you ask? Because these aren’t just any ordinary confections; they are a vibrant explosion of fresh fruit flavor, a velvety smooth texture that melts in your mouth, and an undeniable charm that makes them irresistible. They effortlessly combine elegance with simplicity, proving that you don’t need to spend hours slaving away in the kitchen to create something utterly spectacular.
What sets these particular truffles apart is their refreshing lightness, a welcome departure from heavier desserts. The natural sweetness of the strawberries shines through, balanced perfectly by the rich, creamy base, resulting in a treat that satisfies without overwhelming. I promise you, once you taste that first bite, you’ll understand exactly what I mean. It’s a moment of pure bliss, a little burst of sunshine in every single sphere. And the best part? The process itself is incredibly rewarding. There’s something so therapeutic about rolling these beautiful bites, knowing that each one is a testament to your creativity and effort.
Serving Suggestions & Creative Variations to Elevate Your Experience
Now that you’ve mastered the art of making these exquisite truffles, let’s talk about how to present and enjoy them, or even how to tweak them to your heart’s content. These truffles are incredibly versatile! For a sophisticated dessert table, arrange them on a tiered stand amidst fresh berries and a dusting of confectioners’ sugar. Their vivid color will pop beautifully, making them an instant centerpiece. They’re also perfect as a thoughtful, homemade gift. Imagine presenting a small box of these beauties, tied with a pretty ribbon, to a loved one; it’s a gesture that speaks volumes of care and affection. They make wonderful party favors too, individually wrapped and placed at each setting for a memorable takeaway. For a simple afternoon pick-me-up, enjoy one or two with a cup of your favorite tea or a robust coffee – the flavors complement each other wonderfully.
But why stop there? Let your imagination run wild with variations! While I adore the classic version, there are so many ways to personalize these delightful morsels. Consider swapping out the strawberry puree for other fruit purees; raspberry would lend a tangier note, while a mango puree would introduce a tropical twist. For an added layer of flavor and texture, try folding in a teaspoon of finely grated lemon or orange zest into the truffle mixture before chilling. This brightens the overall profile beautifully. When it comes to coating, the possibilities are endless. Beyond the simple dusting of freeze-dried strawberry powder, you could dip them in melted white chocolate and then sprinkle with chopped pistachios for a gourmet touch. Dark chocolate offers a delightful contrast, or even a mix of both in a decorative drizzle. For a fun, kid-friendly option (or just because!), roll them in colorful sprinkles or crushed graham crackers. A light coating of shredded coconut would also add a lovely chewiness and tropical aroma. If you’re feeling adventurous, a tiny drop of almond extract in the mixture can add another dimension of flavor. The key is to experiment and discover what truly makes them your own.
Your Turn: Create, Share, and Inspire!
I am genuinely excited for you to try this recipe. These Strawberry Dream Truffles are more than just a dessert; they’re an experience, a little moment of joy you can create right in your own kitchen. I encourage you to set aside some time, gather your ingredients, and immerse yourself in the process. Don’t be afraid to get a little messy, and certainly don’t be afraid to taste-test along the way – it’s all part of the fun! Once you’ve crafted your own batch, I would absolutely love to hear about your experience. Did you stick to the original recipe, or did you venture into your own creative variations? What was your favorite part of making them? How did your friends and family react? Your feedback is incredibly valuable to me and to other readers who might be considering making these. Please, share your photos and stories in the comments section below, or even on social media! Tag me, let me know how they turned out. Let’s build a community of enthusiastic home bakers who aren’t afraid to chase their culinary dreams, one delicious truffle at a time. Happy baking!
Strawberry Dream Truffles
Indulge in these vibrant, no-bake Strawberry Dream Truffles. Silky-smooth, ruby-hued confections where the sweet essence of fresh strawberries mingles harmoniously with rich, creamy white chocolate ganache. Perfect for any special occasion or as a thoughtful homemade gift.
Ingredients
-
2 pounds (900g) fresh strawberries, ripe
-
2 tablespoons granulated sugar (optional)
-
1 tablespoon fresh lemon juice
-
12 ounces (340g) high-quality white chocolate, finely chopped
-
4 ounces (113g) full-fat cream cheese, softened
-
2 tablespoons unsalted butter, softened
-
1 teaspoon pure vanilla extract
-
1/4 teaspoon almond extract (optional)
-
Pinch of salt
-
1-2 tablespoons non-alcoholic strawberry syrup or extract (optional)
-
16 ounces (450g) white or dark chocolate, finely chopped
-
1 tablespoon coconut oil or vegetable shortening (optional, for coating)
-
1/4 cup freeze-dried strawberry powder
-
1/4 cup desiccated coconut flakes
-
1/4 cup finely chopped pistachios or almonds
-
Edible glitter or sprinkles (optional)
-
Fresh strawberry slices or mint leaves (for presentation)
Instructions
-
Step 1
Wash, hull, and chop 2 pounds of fresh strawberries. Blend into a smooth puree. In a medium saucepan, combine strawberry puree, 2 tablespoons granulated sugar (optional), and 1 tablespoon fresh lemon juice. Bring to a gentle simmer over medium heat. -
Step 2
Reduce heat to low and simmer, stirring frequently, for 25-35 minutes until the puree reduces by at least half and thickens to coat the back of a spoon. Remove from heat and cool completely to room temperature, or chill. -
Step 3
Finely chop and melt 12 ounces of high-quality white chocolate using a double boiler or microwave, stirring until smooth. Avoid overheating. -
Step 4
Stir in 4 ounces softened cream cheese and 2 tablespoons softened unsalted butter into the melted chocolate until uniform and glossy. -
Step 5
Fold in about 1/2 cup of the cooled strawberry reduction (adding more if desired for stronger flavor), 1 teaspoon vanilla extract, 1/4 teaspoon almond extract (optional), a pinch of salt, and 1-2 tablespoons non-alcoholic strawberry syrup/extract (if making adult truffles). Mix until thick and homogenous. -
Step 6
Transfer the truffle mixture into a container, cover tightly with plastic wrap directly touching the surface, and refrigerate for at least 3-4 hours or overnight until firm and moldable. -
Step 7
Line a baking sheet with parchment paper. Using a 1-tablespoon cookie scoop, portion the chilled truffle mixture. Roll each portion into a smooth ball between your palms, working quickly. Place on the prepared baking sheet. -
Step 8
Refrigerate the rolled truffles for about 30 minutes to firm them up thoroughly before coating. -
Step 9
Melt 16 ounces of coating chocolate (white or dark) using a double boiler method. Optionally, stir in 1 tablespoon of coconut oil or vegetable shortening for a smoother, thinner consistency and sheen. Ensure the chocolate is melted and smooth but not too hot. -
Step 10
Remove chilled truffles from the refrigerator. Dip one truffle at a time into the melted chocolate using a fork, tapping gently to remove any excess. While the coating is still wet, immediately roll the truffle in your chosen garnish (freeze-dried strawberry powder, desiccated coconut, finely chopped pistachios or almonds, or sprinkles). -
Step 11
Place finished truffles back on the parchment-lined baking sheet. Refrigerate for at least 30-60 minutes until the chocolate coating is fully set and hardened. Store in an airtight container in the refrigerator for up to a week. For best flavor and texture, allow truffles to sit at room temperature for 10-15 minutes before serving.
Important Information
Nutrition Facts (Per Serving)
It is important to consider this information as approximate and not to use it as definitive health advice.
Allergy Information
Please check ingredients for potential allergens and consult a health professional if in doubt.

Leave a Comment