
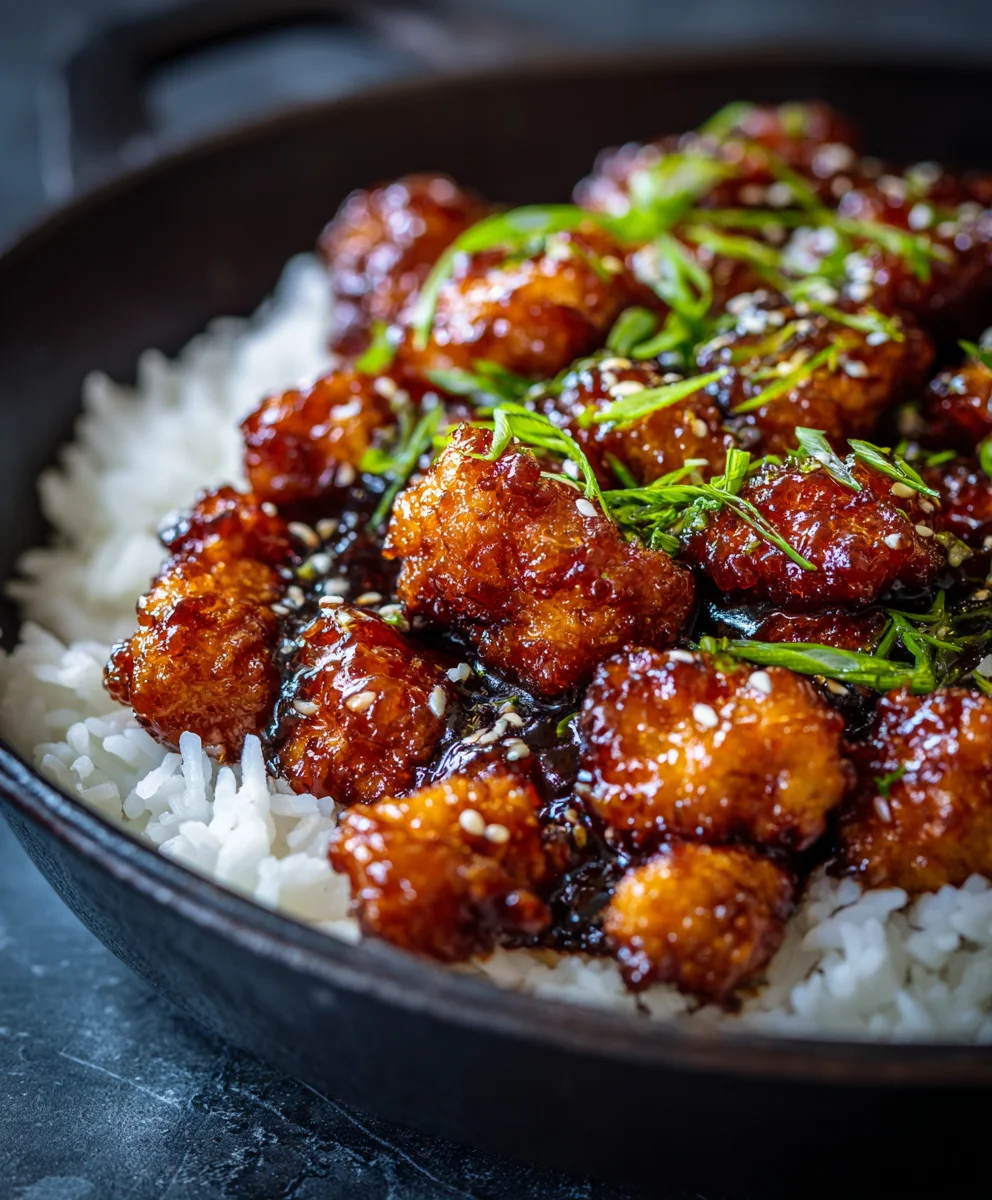
Honey Garlic Chicken is a dish that has undeniably carved out a special place in kitchens around the globe. Picture this: a symphony of flavors—sweet, savory, and just a hint of tang—that awakens your taste buds with every bite. While the exact origins of this particular preparation are often debated, the timeless marriage of honey and garlic has been celebrated in various cuisines, particularly those with Asian influences, for centuries. This modern take on a classic flavor profile perfectly blends tradition with contemporary convenience, transforming simple ingredients into a truly spectacular meal.
Why This Dish Is a Universal Favorite
I’ve found that the irresistible glaze, with its perfect balance of sticky sweetness from the honey and pungent depth from the garlic, coats tender pieces of chicken, creating an unforgettable culinary experience. It’s not just the incredible taste and often perfectly caramelized texture that captivates; it’s also the sheer versatility and ease of preparation. Whether you’re a seasoned chef looking for a reliable weeknight staple or a busy parent aiming to please a crowd, this Honey Garlic Chicken recipe delivers a delicious, comforting, and satisfying meal every single time, making dinner a joy rather than a chore. Prepare to fall in love with its comforting appeal and straightforward simplicity.
Ingredients:
-
For the Chicken:
- 2 pounds boneless, skinless chicken thighs or breasts, cut into 1-inch pieces (I often prefer thighs for their juiciness in this Honey Garlic Chicken recipe!)
- 1 teaspoon salt
- ½ teaspoon black pepper
- 1 teaspoon paprika (sweet or smoked, your choice!)
- ½ teaspoon onion powder
- 2 tablespoons olive oil or vegetable oil, for cooking
-
For the Honey Garlic Sauce:
- ½ cup low-sodium soy sauce (or tamari for a gluten-free option)
- ½ cup honey (the star of our Honey Garlic Chicken!)
- 4-6 cloves garlic, freshly minced (I like a lot of garlic, so I usually go for 6!)
- 1 tablespoon fresh ginger, grated (peeled first, of course)
- 2 tablespoons rice vinegar (unseasoned is best)
- 1 tablespoon sesame oil (toasted sesame oil adds a wonderful depth)
- 1 tablespoon cornstarch
- 2 tablespoons cold water (for the cornstarch slurry)
-
For Garnish (Optional but recommended):
- 1 tablespoon sesame seeds, toasted
- 2 green onions, thinly sliced
Prepping the Chicken for the Best Honey Garlic Chicken
- Prepare the Chicken: First things first, let’s get our chicken ready. If you’re using chicken breasts, I find that slicing them against the grain into 1-inch thick pieces, and then dicing those into roughly 1-inch cubes works wonderfully. For chicken thighs, which I absolutely adore for their tender texture and extra flavor in a dish like Honey Garlic Chicken, you’ll want to trim any excess fat and then cut them into similar 1-inch pieces. The goal here is uniformity so everything cooks evenly.
- Pat Dry Thoroughly: This is a crucial step that many people overlook! Lay your chicken pieces out on a plate lined with paper towels, and then firmly pat them dry with more paper towels. Why do we do this? Removing excess moisture helps the chicken to brown beautifully in the pan, leading to a much more flavorful and appealing sear. If the chicken is wet, it will steam instead of sear, and we want that lovely golden-brown crust for our Honey Garlic Chicken.
- Season the Chicken Generously: Transfer the dried chicken pieces to a medium-sized bowl. Now, let’s season them! Sprinkle the salt, black pepper, paprika, and onion powder evenly over the chicken. With clean hands, toss the chicken thoroughly, making sure every piece is nicely coated with the spices. The paprika not only adds a touch of color but also a subtle sweetness and warmth, while the onion powder enhances the savory notes. This initial seasoning is essential for building layers of flavor in our Honey Garlic Chicken, ensuring it’s not just the sauce that carries the taste.
- Marination (Optional, but Highly Recommended!): While you can cook the chicken immediately after seasoning, I strongly recommend letting it marinate for at least 15-30 minutes at room temperature, or even better, pop it in the refrigerator for an hour or two. For optimal flavor penetration, an overnight marination in the fridge works wonders. This allows the seasonings to really sink into the chicken, tenderizing it slightly and ensuring that every bite of your Honey Garlic Chicken is packed with deliciousness. Cover the bowl with plastic wrap if refrigerating.
Crafting the Irresistible Honey Garlic Sauce
- Prepare Your Aromatics: Before we mix our sauce, let’s get our garlic and ginger ready. For the garlic, finely mince all 4-6 cloves. We’re talking about a lovely, fragrant heap of golden-white garlic that will truly infuse our Honey Garlic Chicken with its signature punch. Don’t be shy here; garlic is a star! For the ginger, peel a fresh knob and grate it using a microplane or the finest side of a box grater. Fresh ginger provides a zesty, slightly spicy kick that perfectly complements the sweetness of the honey.
- Combine the Wet Ingredients: In a medium bowl or a liquid measuring cup, pour in your low-sodium soy sauce. I always opt for low-sodium so I can control the saltiness later, especially with the addition of honey. Next, add the honey – our key ingredient that gives this dish its name and delightful sticky sweetness. Then, whisk in the freshly minced garlic and grated ginger. The aroma at this stage is already incredible!
- Add the Acid and Nutty Notes: Pour in the rice vinegar. This provides a crucial touch of acidity that brightens the entire sauce and balances out the richness of the honey and soy sauce. It prevents the sauce from being overly sweet or cloying. Finally, drizzle in the toasted sesame oil. This ingredient adds a wonderfully nutty, aromatic depth that is quintessential to Asian-inspired dishes and will make our Honey Garlic Chicken truly stand out. Whisk everything together until well combined.
- Prepare the Cornstarch Slurry: In a separate small bowl, combine the cornstarch and cold water. Whisk these together vigorously with a fork until there are absolutely no lumps remaining. This is what we call a cornstarch slurry, and it’s our secret weapon for thickening the sauce to that perfect glossy, clingy consistency we want for our Honey Garlic Chicken. If you add cornstarch directly to a hot liquid, it will clump immediately, so always mix it with cold water first.
- Integrate the Slurry: Pour the cornstarch slurry into the bowl with your honey garlic sauce mixture. Whisk everything together again thoroughly. Make sure the cornstarch is fully incorporated, as it tends to settle at the bottom if left undisturbed. Your Honey Garlic Sauce is now prepped and ready to transform our chicken!
Cooking the Chicken to Perfection
- Heat the Pan: Place a large, heavy-bottomed skillet or a wok over medium-high heat. Add the olive oil or vegetable oil, ensuring it coats the bottom of the pan evenly. Allow the oil to heat up until it just begins to shimmer. A properly heated pan is essential for achieving a good sear on the chicken. If the pan isn’t hot enough, the chicken will stick and not brown properly.
- Sear the Chicken in Batches: Once the oil is hot, carefully add the seasoned chicken pieces to the pan in a single layer. Do not overcrowd the pan! This is another critical step for achieving that beautiful golden-brown crust. If you add too much chicken at once, the temperature of the pan will drop, and the chicken will steam rather than sear, resulting in a pale, less flavorful outcome. You’ll likely need to cook the chicken in 2-3 batches, depending on the size of your skillet.
- Cook Until Golden and Cooked Through: Let the chicken cook undisturbed for 3-4 minutes per side, or until it develops a lovely golden-brown crust and is cooked through. The exact time will depend on the size of your chicken pieces. Once a batch is cooked, transfer the pieces to a clean plate and set aside. Repeat this process with the remaining chicken, adding a little more oil to the pan if needed for subsequent batches. We want the chicken to be fully cooked and tender, ready to absorb all the wonderful flavors of our Honey Garlic Sauce. Ensure your “Honey Garlic Chicken” pieces are beautifully seared.
Bringing It All Together: The Honey Garlic Glaze
- Return Chicken to Pan: Once all the chicken has been seared and is cooked through, return all the cooked chicken pieces to the empty skillet. If there’s any excess oil, you can carefully drain a little out, but some of those flavorful browned bits (fond) stuck to the bottom of the pan are exactly what we want to keep!
- Add the Honey Garlic Sauce: Give your prepared Honey Garlic Sauce another quick whisk to ensure the cornstarch hasn’t settled at the bottom. Then, pour the entire sauce mixture directly over the chicken in the skillet. The enticing aroma will immediately start to fill your kitchen!
- Simmer and Thicken: Bring the sauce to a gentle simmer over medium heat, stirring occasionally to ensure the sauce coats all the chicken. As the sauce heats up, the cornstarch will activate, and you’ll notice it beginning to thicken. Continue to simmer, stirring frequently, for about 3-5 minutes, or until the sauce has reduced and thickened into a beautiful, glossy glaze that clings perfectly to every piece of chicken. It should be thick enough to coat the back of a spoon. This transformation is magical; watch as your dish truly becomes Honey Garlic Chicken.
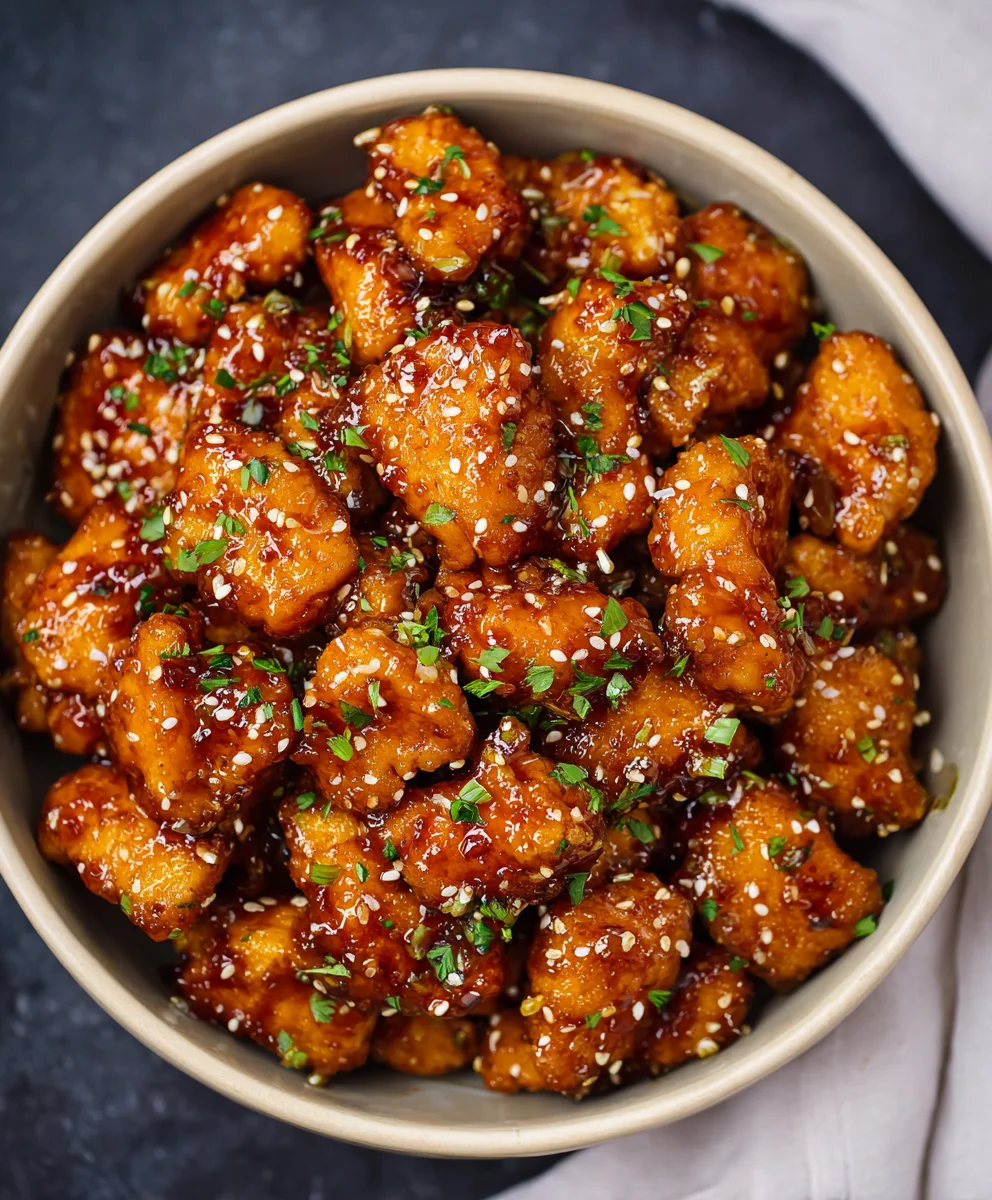
- Ensure Even Coating: Once the sauce has reached your desired consistency, make sure to toss the chicken gently with tongs or a spatula to ensure every single piece is thoroughly coated in that incredible sticky, sweet, and savory Honey Garlic glaze. This step is crucial for an even distribution of flavor and that characteristic shine.
- Taste and Adjust: At this point, I always recommend giving a small piece of chicken (and sauce!) a quick taste. Does it need a touch more salt? A dash more soy sauce? Or perhaps a tiny squeeze of lime or lemon juice to brighten it further? Adjust according to your preference. Remember, this is your Honey Garlic Chicken, so make it perfect for you!
Serving Your Delicious Honey Garlic Chicken
- Garnish and Serve Immediately: Once your Honey Garlic Chicken is perfectly glazed and glistening, it’s ready to be served! Transfer the chicken and all that glorious sauce to a serving platter or individual bowls.
- Add the Finishing Touches: For that extra flourish and a delightful textural contrast, sprinkle generously with toasted sesame seeds. The subtle crunch and nutty flavor are wonderful. Then, scatter the thinly sliced green onions over the top. The vibrant green not only adds a pop of color but also a fresh, mild oniony bite that cuts through the richness of the sauce. These garnishes truly elevate the visual appeal and flavor of your homemade Honey Garlic Chicken.
-
Pairing Suggestions: This incredibly flavorful Honey Garlic Chicken pairs wonderfully with a variety of sides.
- Steamed Rice: A classic choice! The fluffy white rice is perfect for soaking up all that delicious sticky sauce. Brown rice or jasmine rice also work beautifully.
- Noodles: Serve it over a bed of stir-fried noodles or simple ramen noodles for a heartier meal.
- Steamed or Roasted Vegetables: Broccoli, green beans, asparagus, or a medley of colorful bell peppers tossed with a little garlic make excellent, healthy accompaniments. They provide a nice freshness and crunch.
- Quinoa or Cauliflower Rice: For a lighter or lower-carb option, quinoa or cauliflower rice are fantastic alternatives that still allow you to enjoy every drop of that savory-sweet sauce.
- Lettuce Wraps: For a fun, interactive meal, serve the Honey Garlic Chicken in crisp lettuce cups!
I often serve mine simply with a generous scoop of steamed white rice and a side of quick-blanched broccoli, allowing the star of the show – our magnificent Honey Garlic Chicken – to truly shine. Enjoy every mouthwatering bite!
Conclusion:
So there you have it, folks! We’ve journeyed through the simple, yet incredibly rewarding, steps to create what I truly believe is a weeknight game-changer, a dish that will quickly earn a permanent spot in your culinary repertoire. This isn’t just another chicken recipe; it’s an experience in flavor and texture, a testament to how humble ingredients can transform into something truly extraordinary. What makes this particular recipe an absolute must-try, you ask? It’s the perfect harmony of sweet and savory, a sticky, luscious glaze that coats every tender piece of chicken, ensuring each bite is bursting with an irresistible taste. The magic of the Honey Garlic Chicken lies in its beautiful balance – not too sweet, not too garlicky, but just right. It’s the kind of dish that disappears from plates almost as quickly as it’s served, eliciting happy sighs and requests for seconds from everyone around the table. I’ve found that it satisfies even the pickiest eaters, making family dinners a breeze and entertaining a joy. It’s incredibly forgiving, meaning even if you’re new to the kitchen, you’ll achieve stellar results with confidence and ease. We’re talking about a dish that promises maximum flavor with minimal fuss, a true culinary win that delivers on all fronts. The golden-brown exterior, the juicy interior, and that incredible sticky sauce – it all comes together to create a symphony of deliciousness that you simply have to experience for yourself. Seriously, trust me on this one; once you taste this, you’ll understand why it’s become such a beloved staple in my home, and I’m confident it will become one in yours too.
But the deliciousness doesn’t stop with the cooking process; it extends beautifully to how you choose to present and enjoy this incredible meal. One of the many brilliant aspects of this recipe is its sheer versatility. For a classic, comforting meal that hits all the right notes, I highly recommend serving your freshly prepared chicken alongside a generous portion of fluffy white or brown rice. The rice acts as a wonderful canvas, soaking up all that glorious, sticky honey-garlic sauce, ensuring not a single drop of flavor goes to waste. Steamed green vegetables like vibrant broccoli florets, crisp asparagus spears, or tender snap peas make a fantastic accompaniment, offering a fresh, crisp counterpoint to the rich chicken and adding a delightful splash of color to your plate. If you’re leaning towards an Asian-inspired theme for your meal, consider pairing it with stir-fried noodles adorned with a sprinkle of sesame seeds, or even a refreshing cucumber salad dressed with a light, tangy vinaigrette.
Creative Serving Ideas to Inspire You:
Don’t be afraid to get truly creative and make this recipe your own! Imagine shredding the succulent cooked chicken and tucking it into soft flour or corn tortillas for unbelievably flavorful tacos, perhaps topped with a crunchy slaw and a drizzle of sriracha mayo. Or, dice it and toss it into a vibrant salad packed with greens, cherry tomatoes, and avocado for a lunch that’s anything but boring. It also works beautifully in lettuce wraps for a lighter, low-carb option that still packs a flavor punch. For those who love a little heat, a pinch or two of red pepper flakes added to the sauce during the last few minutes of simmering will introduce a delightful spicy kick without overwhelming the core sweet and savory flavors. If you’re feeling adventurous, try adding some thinly sliced bell peppers (any color works!) or onions directly into the pan during the final stages of cooking, allowing them to soften slightly and absorb some of that magnificent glaze. You could even swap out chicken thighs for breasts if you prefer, or even use this incredible sauce with pork tenderloin or shrimp for a different take on the protein. The possibilities are truly endless, limited only by your imagination, and each variation promises a new dimension of deliciousness to explore. Whether you’re feeding a hungry crowd or simply treating yourself to a delightful meal, this recipe adapts effortlessly to any occasion, dietary preference, or culinary whim.
Now, here’s where I hand the baton over to you. I’ve poured my heart into sharing this recipe, meticulously detailing every step, and now it’s your turn to bring it to life in your own kitchen. I genuinely encourage you to carve out some time this week, gather these simple ingredients, and experience the magic firsthand. You won’t regret it, I promise. There’s a unique satisfaction that comes from creating something truly delicious from scratch, something that brings joy to those you share it with, and this recipe delivers that feeling in spades. Once you’ve cooked it, tasted it, and inevitably fallen in love with it, I would absolutely adore hearing all about your experience. Your culinary journey is important to me, and I cherish the connection we build through food.
Share Your Culinary Journey!
Did you make any exciting variations that truly wowed your family? What did you serve it with that created the perfect pairing? Did it become an instant hit with your family, prompting requests for repeats? I’m incredibly eager to read your stories, see your beautiful photos (feel free to share on social media and tag me!), and hear your personal tips and tricks that made this recipe shine even brighter for you. Head over to the comments section below and let’s start a conversation! Your feedback not only brightens my day but also helps other home cooks in our community find inspiration, discover new ideas, and build confidence in their own culinary adventures. Don’t be shy; your insights are invaluable and contribute so much to our shared passion for delicious food. This recipe isn’t just about following instructions; it’s about making it your own, adapting it to your unique taste, and creating wonderful, lasting memories around your dinner table. So, go on, give this a try. Whip up a batch, gather your loved ones, and savor every single mouth-watering bite. I can’t wait to hear how much you loved it!
Honey Garlic Chicken: Sweet & Savory Dinner
A universally loved dish featuring tender chicken glazed in a sweet and savory honey garlic sauce. This recipe combines simple ingredients for a comforting and delicious meal, perfect for any weeknight.
Ingredients
-
8 chicken thighs (skinless and boneless)
-
½ tsp salt
-
½ tsp pepper
-
2 tbsp vegetable oil
-
1 tbsp unsalted butter
-
4 cloves minced garlic
-
110g (1/3 cup) honey
-
80ml (1/3 cup) chicken stock
-
1 tbsp rice vinegar
-
1 tbsp light soy sauce
-
2 tbsp cornflour (cornstarch)
-
½ tsp chilli flakes
-
1 tbsp finely chopped fresh parsley
-
Boiled rice (for serving)
Instructions
-
Step 1
Cut chicken thighs into 1-inch pieces. Pat dry thoroughly with paper towels. Season chicken with ½ tsp salt and ½ tsp pepper. -
Step 2
In a medium bowl, combine 110g honey, 80ml chicken stock, 1 tbsp rice vinegar, 1 tbsp light soy sauce, 4 cloves minced garlic, and ½ tsp chilli flakes. In a separate small bowl, whisk 2 tbsp cornflour with 2 tbsp cold water until smooth to create a slurry. Add the slurry to the sauce mixture and whisk thoroughly. -
Step 3
Heat 2 tbsp vegetable oil and 1 tbsp unsalted butter in a large skillet over medium-high heat. Add chicken pieces in a single layer (cook in batches if necessary to avoid overcrowding) and sear for 3-4 minutes per side until golden brown and cooked through. Transfer cooked chicken to a clean plate and set aside. -
Step 4
Return all cooked chicken to the skillet. Give the prepared honey garlic sauce another quick whisk, then pour it over the chicken. Bring to a gentle simmer over medium heat, stirring occasionally, and cook for 3-5 minutes until the sauce has thickened into a glossy glaze that clings perfectly to the chicken. Toss gently to ensure all pieces are evenly coated. -
Step 5
Garnish the glazed Honey Garlic Chicken with 1 tbsp finely chopped fresh parsley. Serve immediately with a side of boiled rice.
Important Information
Nutrition Facts (Per Serving)
It is important to consider this information as approximate and not to use it as definitive health advice.
Allergy Information
Please check ingredients for potential allergens and consult a health professional if in doubt.

Leave a Comment