
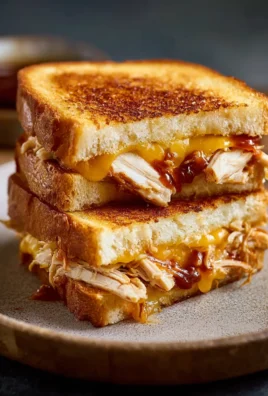
Hawaiian Roll Grilled Cheese might just be the ultimate comfort food upgrade you never knew you needed. Imagin extracte this: the usual crispy, gooey, cheesy goodness of your favorite grilled cheese sandwich, but elevated with the delightful sweetness and pillowy softness of Hawaiian rolls. It’s a combination that sounds simple, yet the result is nothing short of magical. People absolutely adore this dish because it taps into that primal craving for something warm, familiar, and utterly satisfying, but with an unexpected twist that makes it stand out. What truly makes the Hawaiian Roll Grilled Cheese so special is the beautiful interplay of textures and flavors – the slight caramelization of the sweet rolls, the rich, melting cheese, and that signature crispy exterior. It’s the perfect weeknight dinner, a crowd-pleasing appetizer, or even a decadent breakfast that will have everyone asking for the recipe.

Ingredients:
- 4 Hawaiian rolls
- 1 cup shredded Monterey Jack cheese
- 2 tablespoons unsalted butter
- Optional: Sliced tomatoes
- Optional: Crispy beef beef bacon
Preparing Your Hawaiian Roll Grilled Cheese
Step 1: Slice and Prepare the Rolls
First, we need to get our Hawaiian rolls ready for their delicious transformation. Take your four Hawaiian rolls and, using a sharp serrated knife, carefully slice each one horizontally in half. This will create the top and bottom bun for your sandwiches. Think of the bottom half as the base and the top half as the lid. For the best grilling experience, try to keep the slices relatively even so that your cheese melts and distributes uniformly. If the rolls are very soft, you might want to gently press down on them after slicing to make them a little flatter and more stable. This initial preparation is simple but crucial for a well-constructed grilled cheese.
Step 2: Generously Layer the Cheese
Now for the star of the show: the cheese! Generously sprinkle the shredded Monterey Jack cheese onto the bottom halves of your sliced Hawaiian rolls. Aim for an even distribution, ensuring that the cheese goes almost to the edges of the roll. This cheese is fantastic for melting, creating that wonderfully gooey and stretchy texture we all love in a grilled cheese. Don’t be shy; we want plenty of cheesy goodness in every bite. If you’re feeling adventurous, you can even layer a little cheese on the inside of the top half of the roll as well. This ensures that every surface your bite touches is met with creamy, melted cheese. The sweetness of the Hawaiian roll will beautifully complement the mild, creamy flavor of the Monterey Jack.
Step 3: Add Optional Fillings
This is where we elevate our Hawaiian Roll Grilled Cheese from classic to extraordinary. If you’ve opted for additions, now is the time to incorporate them. For a burst of freshness and a hint of acidity that cuts through the richness of the cheese, arrange a few thin slices of tomato on top of the cheese. Make sure the slices aren’t too thick, as they can make the sandwich soggy. If you’re a fan of savory, smoky flavors, crum extractble some crispy beef baconbacon over the cheese. The salty crunbeef bacon the bacon against the soft roll and melted cheese is simply divine. Distribute these optional ingredients evenly to ensure you get a taste of them in every bite.
Step 4: Butter the Outside for Perfect Grilling
To achieve that irresistible golden-brown, crispy exterior, we need to butter the outside of our sandwiches. Place the top halves of the Hawaiian rolls onto the cheese-covered bottom halves, completing the sandwiches. Now, take your softened unsalted butter and spread a thin, even layer onto the top surface of each assembled sandwich. Don’t overload it with butter; a moderate amount will do the trick. Repeat this process, buttering the bottom surface of each sandwich before they hit the heat. This butter will melt and crisp up beautifully in the pan, giving your Hawaiian Roll Grilled Cheese that signature toasted appeal and enhancing its overall flavor.
Step 5: Grill to Golden Perfection
It’s time to bring it all together and grill our masterpieces. Heat a non-stick skillet or griddle over medium-low heat. Low and slow is the key to a perfectly melted interior and a beautifully browned exterior without burning the delicate Hawaiian rolls. Once the pan is heated, carefully place your buttered sandwiches onto the skillet. Let them grill for about 3 to 5 minutes per side. You’ll know they’re ready to flip when the bottom side is a beautiful golden-brown and you can see the cheese starting to melt and ooze slightly from the sides. Gently press down on the sandwiches with a spatula as they cook to ensure even contact with the pan and help the cheese melt thoroughly. Flip them over and grill the other side until equally golden-brown and the cheese is completely melted and gooey. The aroma will be incredible!
Step 6: Serve and Enjoy
Once both sides of your Hawaiian Roll Grilled Cheese are perfectly golden and the cheese is wonderfully melted, it’s time to remove them from the skillet. Place them on a cutting board or a plate. For easier eating and a more appealing presentation, you can slice each sandwich in half diagonally with your serrated knife. The sight of that melted cheese stretching as you cut will be a testament to your success. Serve immediately while they are hot and the cheese is at its meltiest. These are fantastic on their own, or you can pair them with a side of tomato soup for a classic combination, or a simple green salad for a lighter touch. Enjoy every delicious, sweet, savory, and cheesy bite of your homemade Hawaiian Roll Grilled Cheese!

Conclusion:
There you have it – your ultimate guide to crafting the perfect Hawaiian Roll Grilled Cheese! We’ve explored how the inherent sweetness of the Hawaiian rolls, combined with melty cheese and a touch of buttery crispness, creates a sandwich that is both comforting and undeniably delicious. This recipe is remarkably versatile and can be enjoyed at any time of day. For serving suggestions, consider pairing your Hawaiian Roll Grilled Cheese with a side of creamy tomato soup, a crisp green salad, or even some sweet potato fries for a delightful contrast.
Don’t be afraid to experiment with variations! You can add a thin slice of beef ham for a Hawaiian Roll Grilled Cheese beef hamh ham, or a few pieces of cooked beef bacon for a smoky kick. Try different cheeses like provolone, Gruyère, or a sharp cheddar to change up the flavor profile. Feeling adventurous? A smear of fig jam or a drizzle of honey on the inside can elevate your Hawaiian Roll Grilled Cheese to gourmet status. So go forth, get creative, and enjoy every single bite of this incredibly satisfying sandwich!
Frequently Asked Questions about Hawaiian Roll Grilled Cheese:
Q1: Can I use a different type of bread for this recipe?
While the Hawaiian rolls are key to the unique sweetness and texture of this sandwich, you can certainly experiment with other soft, slightly sweet breads if Hawaiian rolls aren’t available. Brioche or challah bread would be good substitutes, though they might alter the overall flavor profile slightly.
Q2: What is the best way to ensure my Hawaiian Roll Grilled Cheese is perfectly golden brown and crispy?
The key is medium-low heat and patience! Melting the cheese slowly ensures it gets gooey without burning the bread. Make sure your butter is spread evenly on the outside of the rolls, and avoid overcrowding the pan so each sandwich gets direct heat. Flipping once it’s a deep golden brown and pressing down gently can also help achieve that perfect crisp.
Q3: Are there any ways to make this recipe healthier?
While a classic grilled cheese is a treat, you can make some modifications for a healthier option. Consider using a reduced-fat cheese, adding lean protein like turkey breast, or incorporating plenty of vegetables such as spinach, sliced tomatoes, or even some thinly sliced bell peppers inside the sandwich. Opting for a whole-wheat bread substitute could also boost fiber content, though it would change the “Hawaiian Roll” aspect of the recipe.
Hawaiian Roll Grilled Cheese- Easy Comfort Food Recipe
A simple and delicious comfort food recipe for grilled cheese sandwiches made with sweet Hawaiian rolls and melty Monterey Jack cheese.
Ingredients
-
4 Hawaiian rolls
-
1 cup shredded Monterey Jack cheese
-
2 tablespoons unsalted butter
-
Optional: Sliced tomatoes
-
Optional: Crispy beef bacon
Instructions
-
Step 1
Slice each Hawaiian roll horizontally in half to create the top and bottom bun. Ensure slices are relatively even. -
Step 2
Generously sprinkle shredded Monterey Jack cheese onto the bottom halves of the rolls, going almost to the edges for even melting. -
Step 3
Add optional fillings like thin slices of tomato or crispy beef bacon over the cheese for added flavor. -
Step 4
Assemble the sandwiches by placing the top halves onto the cheese-covered bottoms. Spread a thin, even layer of unsalted butter onto the top and bottom surfaces of each assembled sandwich. -
Step 5
Heat a non-stick skillet or griddle over medium-low heat. Grill the buttered sandwiches for 3 to 5 minutes per side, pressing gently, until golden-brown and the cheese is fully melted and gooey. -
Step 6
Remove from skillet, slice diagonally if desired, and serve immediately while hot and cheesy.
Important Information
Nutrition Facts (Per Serving)
It is important to consider this information as approximate and not to use it as definitive health advice.
Allergy Information
Please check ingredients for potential allergens and consult a health professional if in doubt.

Leave a Comment