
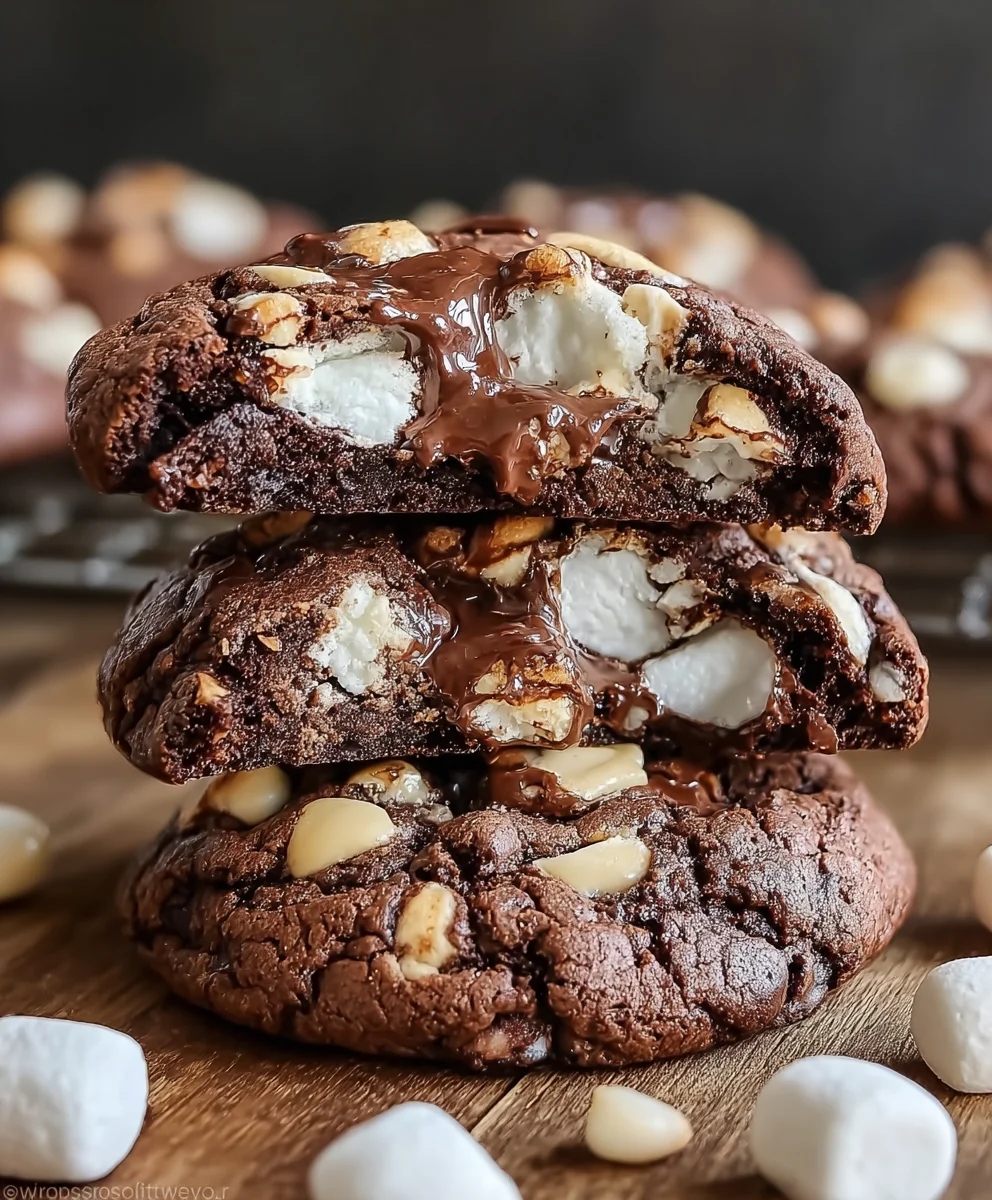
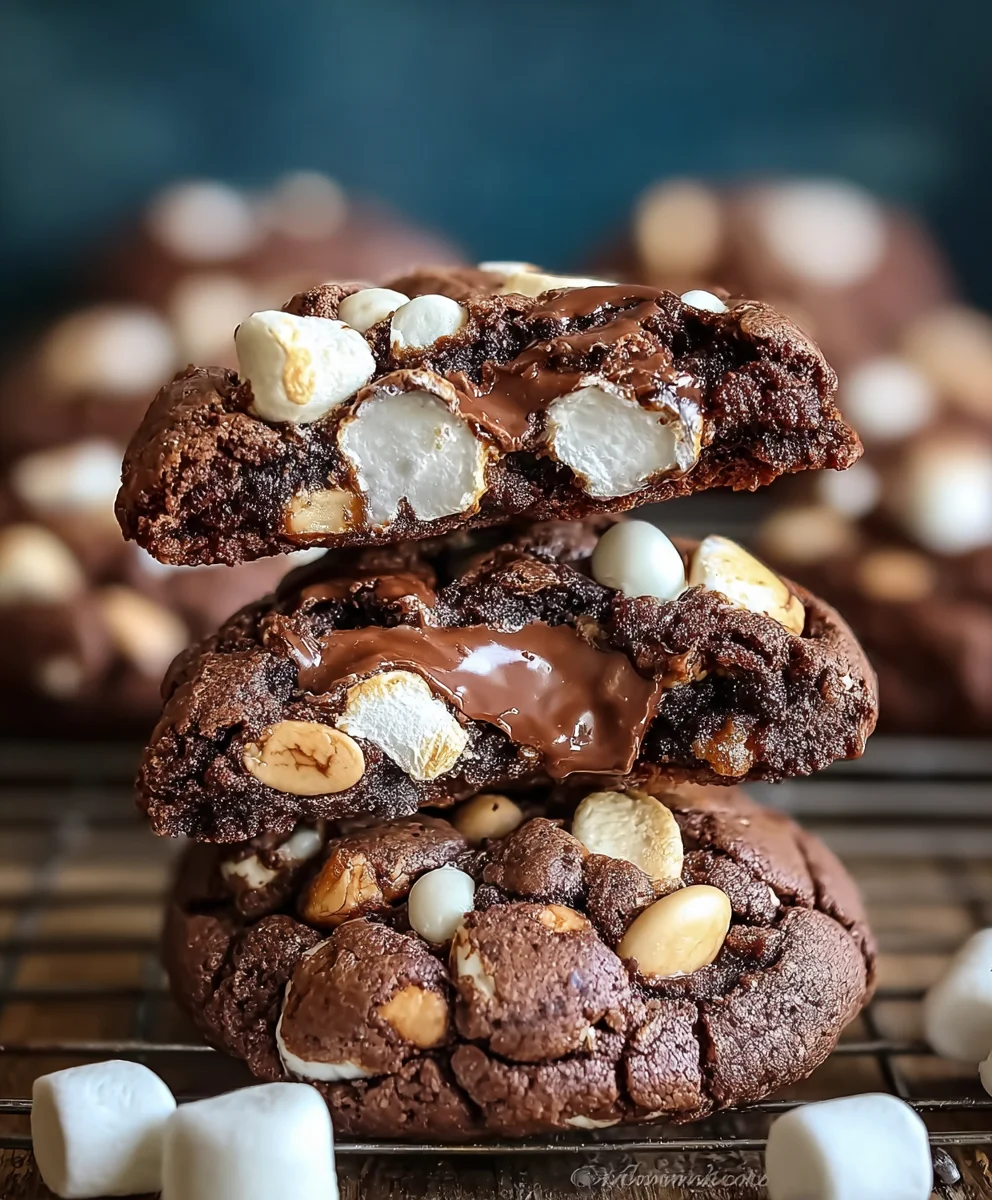
Rocky Road Cookies Stuffed With Marshmallow are not just a treat; they are an experience, a delightful surprise waiting to be discovered with every single bite. Imagine the perfect chewy chocolate cookie, studded with rich chocolate chunks and crunchy pecans, but with an incredible secret at its heart: a molten, gooey marshmallow core that stretches and melts with warmth. I’ve always been captivated by the classic Rocky Road combination, a confectionery staple often credited with origins in Australia, celebrated for its simple yet irresistible blend of chocolate, nuts, and marshmallows. This recipe takes that beloved concept and elevates it into an extraordinary baked delight.
People absolutely adore this dish because it masterfully combines the familiar comfort of a homemade cookie with the unexpected joy of a molten center. The contrast in textures—the tender cookie, the velvety marshmallow, and the crisp nuts—creates an unparalleled sensory journey. It’s the ultimate dessert for those seeking both nostalgia and an exciting new twist. Preparing these Rocky Road Cookies Stuffed With Marshmallow is truly a labor of love that pays off in big, delicious ways, promising to be the star of any gathering or a wonderfully indulgent moment just for you. I am so excited for you to bake and experience them!
Ingredients:
-
For the Rocky Road Cookie Dough:
-
1 cup (226g) unsalted butter, softened to room temperature
-
¾ cup (150g) granulated sugar
-
¾ cup (160g) packed light brown sugar
-
2 large eggs, at room temperature
-
1 teaspoon pure vanilla extract
-
2 ¼ cups (270g) all-purpose flour, spooned and leveled
-
¾ cup (75g) unsweetened cocoa powder, preferably Dutch-processed
-
1 teaspoon baking soda
-
½ teaspoon salt
-
1 cup (170g) semi-sweet chocolate chips or chopped chocolate
-
¾ cup (80g) chopped walnuts or pecans (optional, but highly recommended for that rocky road crunch)
-
½ cup (50g) mini marshmallows, for mixing into the dough (additional for topping)
-
-
For the Marshmallow Stuffing:
-
12-15 large marshmallows (the square or cylindrical kind work best for stuffing)
-
-
For the Topping and Garnish:
-
½ cup (85g) additional semi-sweet chocolate chips or chopped chocolate, for melting
-
¼ cup (25g) additional mini marshmallows
-
¼ cup (25g) additional chopped walnuts or pecans
-
A drizzle of flaky sea salt (optional, for enhancing flavors and visual appeal)
-
Preparing the Marshmallow Filling
-
Prepare the large marshmallows for stuffing: This is a crucial first step for perfectly gooey Rocky Road Cookies Stuffed With Marshmallow. Take your large marshmallows and, using kitchen shears or a sharp knife lightly greased with a little butter or non-stick spray, cut them into more manageable pieces for stuffing. For standard large cylindrical marshmallows, I usually cut them in half crosswise. If you have the larger square-shaped gourmet marshmallows, you might cut them into quarters or even sixths, depending on how large you want the gooey center to be. The goal is to have pieces that are roughly 1 to 1.5 inches in diameter, or slightly smaller, as these will be encased within our delicious cookie dough. Ensure your cutting tool is clean and lightly greased to prevent the sticky marshmallows from adhering to it, making the process much smoother and less frustrating.
-
Freeze the marshmallow pieces: Once you’ve meticulously cut all your marshmallows, arrange them in a single layer on a parchment paper-lined plate or small baking sheet. It’s important they don’t touch each other, or they might freeze into an inseparable blob, which we definitely want to avoid! Place this tray into your freezer for at least 30-45 minutes, or even longer if you have the time. This step is absolutely vital for success and cannot be skipped! Freezing the marshmallows prevents them from melting completely and disappearing into your cookie dough during baking. Instead, they’ll soften beautifully and slowly in the oven, creating that irresistible gooey, molten marshmallow core that defines our amazing Rocky Road Cookies Stuffed With Marshmallow. If you skip this, you’ll likely end up with hollow cookies, which, while still tasty, miss the true magic and surprise of the generous marshmallow stuffing. The colder they are, the better they will hold their shape until the cookie dough sets around them.
Making the Rocky Road Cookie Dough
-
Preheat and prepare: Before we dive into mixing, let’s get organized and prepare our baking environment. Preheat your oven to 350°F (175°C). Next, line two large baking sheets with parchment paper or silicone baking mats. This crucial step will ensure our precious cookies don’t stick to the pan and allow for even baking and easy removal without any heartbreaking breakages. Having them ready means you can transition smoothly from dough preparation to baking.
-
Cream the butter and sugars: In the bowl of a stand mixer fitted with the paddle attachment, or using a large bowl with an electric hand mixer, combine the softened unsalted butter, granulated sugar, and light brown sugar. Beat on medium speed for about 2-3 minutes, until the mixture is light, fluffy, and noticeably pale in color. This creaming process is fundamental as it incorporates air into the butter and sugar mixture, which contributes significantly to the cookie’s tender, cake-like texture and helps them achieve a beautiful rise. Do not rush this step; patience here pays off in cookie perfection!
-
Incorporate eggs and vanilla: Scrape down the sides of the bowl with a spatula to ensure everything is evenly mixed. Add the two large room-temperature eggs, one at a time, beating well after each addition until fully incorporated into the creamy mixture. Follow with the pure vanilla extract and beat until just combined, infusing the dough with its sweet, aromatic essence. The mixture should look smooth, homogeneous, and slightly glossy.
-
Whisk dry ingredients: In a separate medium bowl, whisk together the all-purpose flour, unsweetened cocoa powder (preferably Dutch-processed for a deeper, darker color and milder chocolate flavor), baking soda, and salt. Whisking ensures that the leavening agents and salt are evenly distributed throughout the flour, which is key for a consistent rise and balanced flavor in every delicious bite of our Rocky Road Cookies Stuffed With Marshmallow. This also breaks up any lumps in the cocoa powder.
-
Combine wet and dry ingredients: Gradually add the dry ingredient mixture to the wet ingredients in the mixer bowl, beating on low speed until just combined. Be careful not to overmix! Overmixing develops the gluten in the flour too much, which can lead to tough, chewy cookies instead of the wonderfully soft and tender ones we’re aiming for. Stop mixing as soon as you no longer see streaks of dry flour, even if there are a few small pockets of flour left; these will disappear during the folding of the mix-ins.
-
Fold in the rocky road elements: Remove the bowl from the mixer. Using a sturdy spatula or wooden spoon, gently fold in the generous portion of semi-sweet chocolate chips (or chopped chocolate for a more artisan feel), the chopped walnuts or pecans (if using, as they add an essential crunch and nutty depth), and the ½ cup of mini marshmallows designated for the dough. Distribute them evenly throughout the dough, ensuring every bite will be loaded with rocky road goodness. These elements provide the characteristic texture and flavor burst that makes these cookies undeniably rocky road, even before we stuff them with a molten marshmallow center!
-
Chill the dough (optional but recommended): While not strictly mandatory if you’re in a rush, I highly recommend chilling the cookie dough for at least 30 minutes in the refrigerator. This allows the flavors to meld and deepen, the flour to fully hydrate (resulting in a more tender crumb), and the butter to firm up, which results in a thicker, chewier cookie that spreads less during baking. It also makes handling the dough for stuffing much, much easier, as cold dough is less sticky and more manageable. If you chill it longer, bring it back to a workable temperature for about 10-15 minutes before scooping.
Assembling and Baking the Rocky Road Cookies Stuffed With Marshmallow
-
Portion the dough: Retrieve your chilled marshmallow pieces from the freezer and keep them close by. Using a large cookie scoop (about 2 tablespoons or 1.5-2 ounces of dough per cookie), scoop out generous portions of the cookie dough. This recipe works best with generously sized cookies to properly enclose the marshmallow and achieve that truly decadent stuffed effect. Consistency in scoop size will lead to even baking.
-
Prepare to stuff: Take one scoop of cookie dough and gently flatten it into a disc in the palm of your hand, making it roughly 3-4 inches in diameter. The edges should be a little thinner than the center, as this will make it easier to seal the marshmallow. You want enough surface area to completely wrap around the frozen marshmallow without stretching the dough too thin.
-
Stuff the marshmallows: Place one frozen marshmallow piece directly in the center of the flattened cookie dough disc. Carefully bring the edges of the cookie dough up and over the marshmallow, gently pinching and sealing them together at the top to completely enclose the marshmallow. Gently roll the dough in your hands to form a smooth ball, ensuring there are absolutely no cracks or gaps where the marshmallow could escape during baking. This meticulous sealing step is critical for maintaining that spectacular gooey center! If any marshmallow peeks out, it will melt and caramelize onto your baking sheet, which, while still tasty, isn’t ideal for the perfect, self-contained stuffed cookie experience. Repeat this process for all your cookies, working relatively quickly to keep the marshmallows frozen.
-
Arrange on baking sheets: Place the meticulously stuffed cookie dough balls about 2-3 inches apart on your prepared baking sheets. Give them ample space as they will spread a bit during baking. Overcrowding the baking sheet can lead to uneven baking and cookies that spread into each other, so it’s better to bake in batches if your sheets are smaller.
-
Bake to perfection: Bake the Rocky Road Cookies Stuffed With Marshmallow for 10-13 minutes. The exact timing can vary slightly depending on your oven’s calibration and the precise size of your cookies. You’re looking for cookies that are set around the edges but still appear gloriously soft, puffy, and perhaps a touch underbaked in the center. The tops might look a bit cracked or crinkled, which is perfectly normal and indicates the marshmallow inside is doing its magical softening work. Do not overbake! A slightly underbaked cookie will yield a wonderfully chewier texture and ensure the marshmallow inside remains gloriously molten and stretchy. The residual heat from the baking sheet will continue to cook them slightly as they cool, so removing them when they look just barely set is key.
-
Cooling process: Once baked, carefully remove the baking sheets from the oven. Allow the cookies to cool on the baking sheets for about 5-10 minutes. They will be very delicate and soft right out of the oven, especially with that molten marshmallow inside! This initial cooling period on the hot sheet helps them firm up and finish setting without falling apart when handled. After this initial cool, carefully transfer the cookies to a wire rack to cool completely. While they are incredibly tempting to eat immediately, letting them cool slightly ensures the marshmallow isn’t liquid hot (and potentially painful!) and helps the overall cookie structure become more stable for handling and topping.
Finishing Touches and Serving
-
Prepare the chocolate drizzle: While the cookies are cooling, you can prepare your chocolate drizzle. In a microwave-safe bowl, melt the ½ cup of additional semi-sweet chocolate chips (or chopped chocolate) in 30-second intervals, stirring well after each burst, until smooth and glossy. Be careful not to overheat the chocolate, as it can seize. Alternatively, you can use a double boiler method for a more controlled melt. This rich, dark chocolate drizzle adds another layer of decadence and visual appeal to our already stunning Rocky Road Cookies Stuffed With Marshmallow, enhancing their chocolatey base.
-
Add remaining toppings: Once the cookies are mostly cooled but still a little warm (this helps the toppings adhere beautifully), artfully arrange the additional mini marshmallows and chopped walnuts or pecans on top of each cookie. Some people like to gently press them into the tops for better adherence and a more integrated look. These extra elements are what truly bring home the “rocky road” aesthetic and add delightful textual contrast – fluffy marshmallow and crunchy nuts – creating a symphony of textures in every bite. You can do this before the chocolate drizzle or after, depending on your personal preference for how the toppings look; placing them first often means they get delightfully coated in chocolate.
-
Drizzle and set: Using a spoon or a piping bag with a very small hole cut in the corner, drizzle the melted chocolate generously over each cookie, allowing it to meander across the surface and over the additional toppings. The residual warmth of the cookies might slightly melt the mini marshmallows on top, creating an even more inviting and textural look. If desired, sprinkle a pinch of flaky sea salt over the wet chocolate for a sophisticated flavor pop that expertly balances the sweetness and elevates the overall profile. Let the chocolate drizzle set slightly before serving, which can be done at room temperature or by popping them into the refrigerator for a few minutes to speed up the setting process.
-
Serve and enjoy: These incredible Rocky Road Cookies Stuffed With Marshmallow are undeniably best enjoyed warm, when the marshmallow center is at its most gloriously gooey, stretchy, and molten. If they’ve cooled completely and you want to bring back that delightful molten magic, you can gently reheat them in the microwave for 10-15 seconds. They are perfect companions for a tall, cold glass of milk, a comforting hot cup of coffee, or simply on their own as a truly indulgent and satisfying treat. Prepare for a delightful surprise with every bite as the warm, chocolatey cookie gives way to that incredible marshmallow core! They are a guaranteed crowd-pleaser.
-
Storage tips: Should you manage to have any leftover cookies (a rare occurrence, I assure you!), store them in an airtight container at room temperature for up to 3-4 days. While they are absolutely amazing fresh, they still maintain their deliciousness, though the marshmallow might firm up a bit over time. For longer storage, you can freeze the baked cookies in a freezer-safe bag or container for up to 2-3 months. When ready to enjoy, thaw them at room temperature or gently warm them in the oven or microwave before indulging. Trust me, these cookies are a showstopper and always disappear quickly, so make a double batch if you’re feeding a crowd or just want to ensure you have some extra for yourself!
Conclusion:
So, there you have it – my absolute favorite recipe, and one I truly believe everyone should experience for themselves. These aren’t just any cookies; they are a decadent journey for your taste buds, a symphony of textures that truly redefines what a homemade treat can be. Imagine biting into a crisp, chocolatey exterior, yielding to a perfectly chewy cookie base, only to discover a warm, gooey, melted marshmallow core waiting for you. This isn’t just a dessert; it’s an event! The combination of rich chocolate, crunchy nuts, and that irresistibly soft marshmallow center creates an explosion of flavor that is both nostalgic and utterly new. Every single batch of these Rocky Road Cookies Stuffed With Marshmallow has brought smiles, oohs, and aahs, proving time and again why they’ve earned their place as a staple in my baking repertoire. They are the ultimate comfort food, elevated to a level of gourmet delight that belies their simple preparation. Trust me when I say, once you try these, you’ll understand exactly why I can’t stop raving about them. They’re a true crowd-pleaser, perfect for special occasions, a cozy night in, or simply when you need a little extra joy in your day. The surprise element of the gooey marshmallow makes them truly unforgettable, distinguishing them from your average cookie.
Serving Suggestions:
Now, while these cookies are absolutely perfect straight from the oven, still warm and slightly melty, don’t stop there! I love serving them with a scoop of premium vanilla bean ice cream, letting the residual warmth of the cookie melt the ice cream just a little – it’s pure bliss. A delicate sprinkle of flaky sea salt on top right after baking can also elevate the chocolate notes beautifully, adding a sophisticated counterpoint to the sweetness. For a cozy evening, pair them with a robust cup of freshly brewed coffee, a comforting mug of hot cocoa, or a tall, frosty glass of cold milk for that classic cookie experience. They also make an incredibly thoughtful and impressive gift; stack them artfully in a decorative box, tie them with a pretty ribbon, and you’re sure to brighten someone’s day with this homemade gesture of deliciousness. Pack them for a picnic, bring them to a potluck, or simply enjoy one (or two!) all to yourself with your favorite hot beverage.
Creative Variations:
Want to get even more creative? The beauty of this recipe lies in its immense versatility, allowing you to personalize every batch. For delightful variations, consider swapping out the semi-sweet chocolate chips for dark chocolate for a richer, more intense flavor profile that chocolate connoisseurs will adore, or try milk chocolate for a sweeter, more traditional cookie that appeals to everyone. White chocolate chips could add a lovely contrast in color and sweetness as well. Feel free to experiment with different nuts – toasted pecans, walnuts, or even hazelnuts would be delightful alternatives to almonds, each adding its own unique crunch and flavor. You could even add a pinch of cinnamon or a tiny bit of chili powder to the dough for an unexpected, exciting kick. For an extra layer of decadence, drizzle the cooled cookies with a little melted caramel, a silky chocolate ganache, or a sprinkle of colorful sprinkles to match a theme or holiday. And don’t shy away from different marshmallow flavors if you can find them – strawberry or chocolate marshmallows would introduce entirely new dimensions of flavor and fun. You could even make them mini by using smaller portions of dough and mini marshmallows for charming, bite-sized treats, or go extra large for a truly indulgent, shareable dessert experience. Think about seasonal twists too; a touch of peppermint extract and crushed candy canes around the holidays, or toasted coconut flakes for a tropical vibe in the summer. The possibilities are truly endless, allowing you to personalize these delightful treats to your heart’s content and never get bored!
I genuinely hope you’re feeling incredibly inspired to roll up your sleeves and give these magnificent cookies a try. There’s something incredibly satisfying about baking these yourself, from the anticipation of the rising dough to the intoxicating aroma that fills your kitchen, and finally, the moment you pull them, golden and fragrant, from the oven. The pure joy of creating something so utterly delicious, and then sharing it with loved ones, is one of life’s simplest yet most profound pleasures. I promise you, the look on your friends’ and family’s faces when they discover that surprise, molten marshmallow center will make all your efforts worthwhile. Please, don’t keep this deliciousness to yourself! Once you’ve baked your batch of these incredible cookies, I would absolutely love for you to share your experience. Take photos of your beautiful creations, tell me about any variations you tried, or simply let me know how much you (and everyone else!) enjoyed them. Your feedback and baking adventures truly make my day and inspire others. So go ahead, preheat that oven, gather your ingredients, and prepare to bake some magic. You won’t regret it; you’re about to create something truly special!
Rocky Road Cookies Stuffed with Gooey Marshmallow
Rocky Road Cookies Stuffed With Marshmallow are an experience, a delightful surprise with every bite. These chewy chocolate cookies, studded with chocolate chunks and crunchy pecans, feature an incredible molten, gooey marshmallow core that stretches and melts with warmth. Perfect for sharing at parties or cozy nights in with a cup of hot chocolate.
Ingredients
-
1 cup (226g) unsalted butter, softened
-
¾ cup (150g) granulated sugar
-
¾ cup (160g) packed light brown sugar
-
2 large eggs
-
1 tsp pure vanilla extract
-
2 ¼ cups (270g) all-purpose flour
-
¾ cup (75g) unsweetened cocoa powder
-
1 tsp baking soda
-
½ tsp salt
-
1 cup (170g) semi-sweet chocolate chips or chopped chocolate
-
¾ cup (80g) chopped walnuts or pecans
-
½ cup (50g) mini marshmallows (for dough)
-
12-15 large marshmallows (for stuffing)
-
½ cup (85g) semi-sweet chocolate chips or chopped chocolate (for melting)
-
¼ cup (25g) mini marshmallows (for topping)
-
¼ cup (25g) chopped walnuts or pecans (for topping)
-
Flaky sea salt (optional)
Instructions
-
Step 1
Cut large marshmallows into 1-1.5 inch pieces, greasing knife/shears lightly. Arrange pieces on a parchment-lined plate, ensuring they don’t touch. Freeze for 30-45 minutes; this step is crucial for success. -
Step 2
Preheat oven to 350°F (175°C). Line two baking sheets with parchment paper. In a separate bowl, whisk together 2 ¼ cups all-purpose flour, ¾ cup unsweetened cocoa powder, 1 tsp baking soda, and ½ tsp salt. -
Step 3
In a mixer, beat 1 cup softened unsalted butter, ¾ cup granulated sugar, and ¾ cup light brown sugar for 2-3 minutes until light and fluffy. Scrape bowl, then add 2 eggs one at a time, followed by 1 tsp pure vanilla extract, beating until combined. -
Step 4
Gradually add dry ingredient mixture to wet, beating on low speed until just combined (do not overmix). Remove bowl from mixer and fold in 1 cup semi-sweet chocolate chips/chopped chocolate, ¾ cup chopped walnuts/pecans, and ½ cup mini marshmallows until evenly distributed. Optionally, chill dough for at least 30 minutes. -
Step 5
Retrieve frozen marshmallows. Scoop 2 tablespoons (1.5-2 oz) of cookie dough. Flatten into a 3-4 inch disc. Place one frozen marshmallow in the center, bring dough edges up, and pinch to seal completely, forming a smooth ball with no cracks. Repeat for all cookies. -
Step 6
Place stuffed cookie balls 2-3 inches apart on prepared baking sheets. Bake for 10-13 minutes until edges are set but centers are soft and slightly underbaked. Let cool on baking sheets for 5-10 minutes, then transfer to a wire rack to cool. -
Step 7
Melt ½ cup additional semi-sweet chocolate chips/chopped chocolate until smooth. While cookies are warm, arrange ¼ cup mini marshmallows and ¼ cup chopped walnuts/pecans on top. Drizzle melted chocolate over cookies and toppings. Optionally, sprinkle flaky sea salt. Let chocolate set slightly. Serve warm; reheat for 10-15 seconds if cooled. Store leftovers in an airtight container at room temperature for 3-4 days or freeze for 2-3 months.
Important Information
Nutrition Facts (Per Serving)
It is important to consider this information as approximate and not to use it as definitive health advice.
Allergy Information
Please check ingredients for potential allergens and consult a health professional if in doubt.

Leave a Comment