
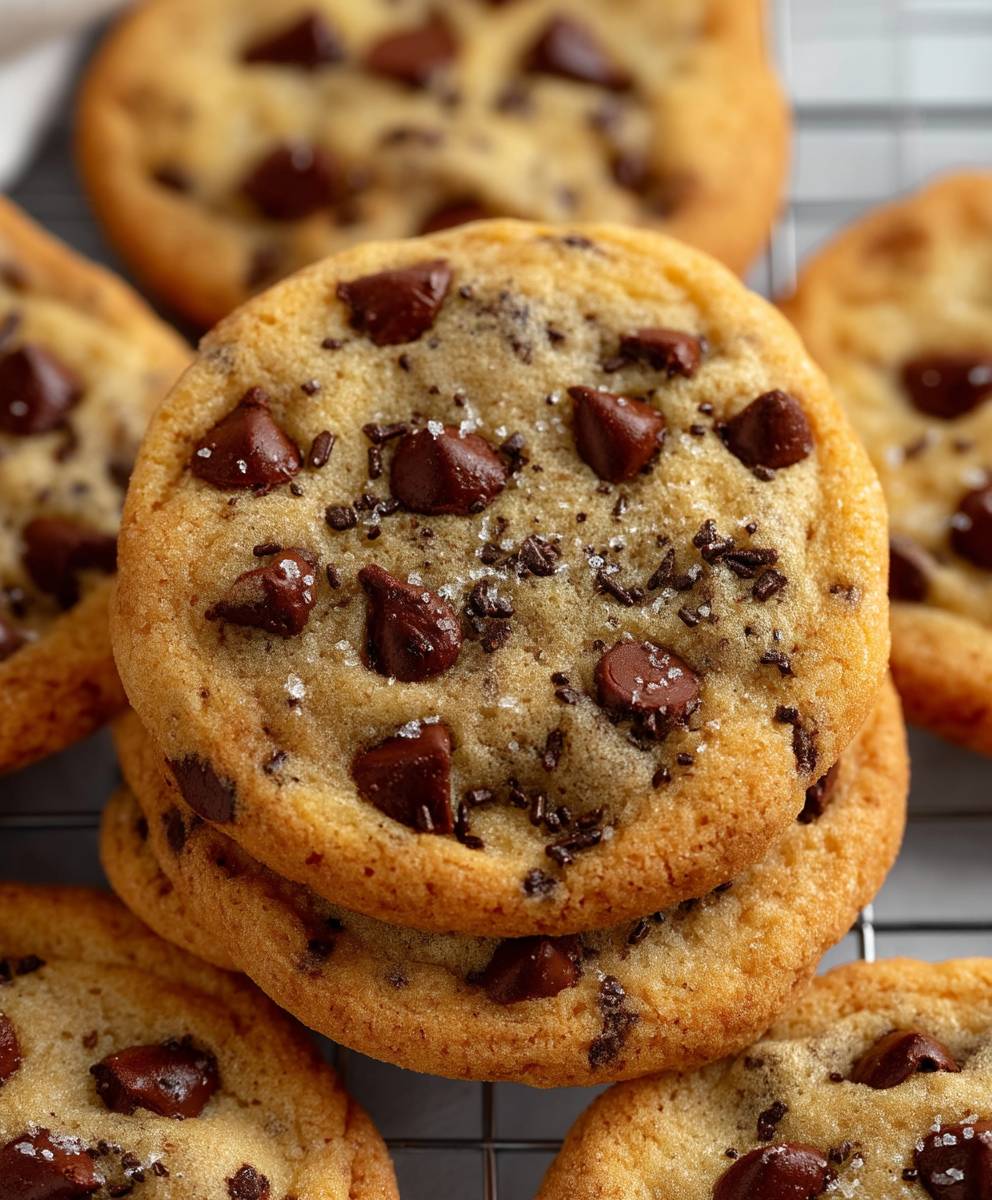
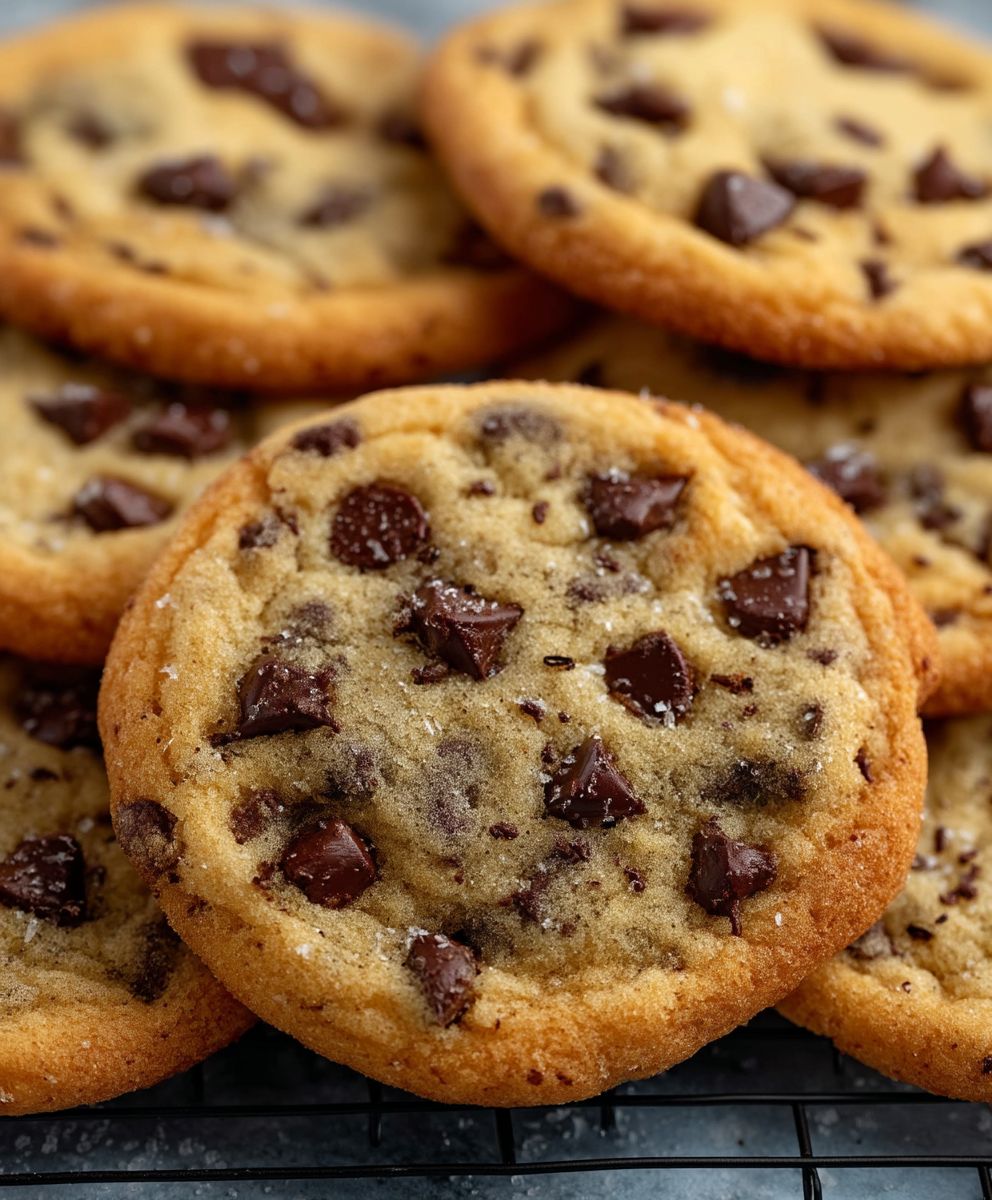
Eggless Chocolate Chip Cookies, a seemingly impossible feat? Not anymore! Imagine sinking your teeth into a warm, gooey cookie, bursting with chocolate chips, and knowing that it’s entirely egg-free. For those with egg allergies, dietary restrictions, or simply a lack of eggs in the fridge, this recipe is a game-changer.
The classic chocolate chip cookie, a staple in American households, has a surprisingly rich history. While its exact origins are debated, it’s widely believed that Ruth Graves Wakefield invented it in the 1930s at the Toll House Inn in Massachusetts. But what about those who can’t partake in the traditional recipe? That’s where our Eggless Chocolate Chip Cookies come in.
People adore chocolate chip cookies for their comforting taste, satisfying texture, and undeniable convenience. They’re the perfect treat for a quick dessert, a lunchbox surprise, or a cozy night in. This egg-free version captures all of that magic, delivering a soft, chewy center and slightly crispy edges, all without the need for eggs. Get ready to experience the joy of freshly baked cookies, accessible to everyone!
Ingredients:
- 1 cup (2 sticks) unsalted butter, softened
- ¾ cup granulated sugar
- ¾ cup packed light brown sugar
- 2 large eggs (or flax eggs: 2 tablespoons ground flaxseed meal + 6 tablespoons water, mixed and rested for 5 minutes)
- 1 tablespoon vanilla extract
- 2 ¼ cups all-purpose flour
- 1 teaspoon baking soda
- 1 teaspoon salt
- 2 cups chocolate chips (milk chocolate, semi-sweet, or dark chocolate your choice!)
- Optional: ½ cup chopped walnuts or pecans
Preparing the Dough:
- Cream the Butter and Sugars: In a large bowl, or the bowl of your stand mixer, cream together the softened butter, granulated sugar, and brown sugar until light and fluffy. This usually takes about 3-5 minutes. Make sure to scrape down the sides of the bowl occasionally to ensure everything is evenly mixed. The mixture should be pale and almost doubled in volume. This step is crucial for achieving a soft and chewy cookie!
- Add the Eggs (or Flax Eggs) and Vanilla: Beat in the eggs (or flax egg mixture) one at a time, mixing well after each addition. If you’re using flax eggs, make sure the flaxseed meal and water mixture has rested for at least 5 minutes before adding it to the batter. This allows the flaxseed to bind and act as an egg replacement. Then, stir in the vanilla extract.
- Combine Dry Ingredients: In a separate medium bowl, whisk together the all-purpose flour, baking soda, and salt. Whisking ensures that the baking soda and salt are evenly distributed throughout the flour, which is important for proper leavening and flavor.
- Gradually Add Dry Ingredients to Wet Ingredients: Gradually add the dry ingredients to the wet ingredients, mixing on low speed until just combined. Be careful not to overmix the dough, as this can develop the gluten in the flour and result in tough cookies. Overmixing is a common mistake, so err on the side of undermixing. A few streaks of flour are okay at this point.
- Stir in Chocolate Chips (and Nuts, if using): Gently fold in the chocolate chips (and chopped nuts, if using) until they are evenly distributed throughout the dough. I like to use a rubber spatula for this step to avoid overmixing.
- Chill the Dough (Important!): Cover the bowl with plastic wrap and chill the dough in the refrigerator for at least 30 minutes, or up to 24 hours. Chilling the dough allows the gluten to relax, which results in a more tender cookie. It also helps to prevent the cookies from spreading too much during baking. If you chill the dough for longer than a few hours, you may need to let it sit at room temperature for a few minutes before scooping.
Baking the Cookies:
- Preheat Oven: Preheat your oven to 375°F (190°C). Line baking sheets with parchment paper or silicone baking mats. Parchment paper or silicone mats prevent the cookies from sticking to the baking sheet and make cleanup a breeze.
- Scoop the Dough: Use a cookie scoop or spoon to drop rounded tablespoons of dough onto the prepared baking sheets, leaving about 2 inches between each cookie. I prefer using a cookie scoop because it ensures that all the cookies are the same size, which helps them bake evenly.
- Bake: Bake for 9-11 minutes, or until the edges are golden brown and the centers are still slightly soft. The baking time will vary depending on your oven and the size of your cookies. Keep a close eye on them to prevent them from burning.
- Cool: Remove the baking sheets from the oven and let the cookies cool on the baking sheets for a few minutes before transferring them to a wire rack to cool completely. This allows the cookies to firm up slightly and prevents them from breaking when you transfer them.
Tips and Variations:
- For Chewier Cookies: Use more brown sugar than granulated sugar. Brown sugar contains molasses, which adds moisture and chewiness to the cookies.
- For Crispier Cookies: Use more granulated sugar than brown sugar. Granulated sugar helps the cookies spread and become crispier.
- Add Spices: Add ½ teaspoon of ground cinnamon, nutmeg, or ginger to the dry ingredients for a warm and cozy flavor.
- Use Different Chocolate Chips: Experiment with different types of chocolate chips, such as white chocolate chips, peanut butter chips, or butterscotch chips.
- Add Extracts: Try adding a different extract, such as almond extract or peppermint extract, in place of the vanilla extract.
- Make Them Gluten-Free: Substitute the all-purpose flour with a gluten-free all-purpose flour blend. Be sure to use a blend that contains xanthan gum, as this will help to bind the ingredients together.
- Freezing the Dough: You can freeze the cookie dough for up to 3 months. Scoop the dough into balls and place them on a baking sheet lined with parchment paper. Freeze for 30 minutes, or until solid. Then, transfer the frozen dough balls to a freezer bag or airtight container. When you’re ready to bake, simply bake the frozen dough balls for a few minutes longer than the recipe calls for.
- Storing the Cookies: Store the baked cookies in an airtight container at room temperature for up to 3 days.
Troubleshooting:
- Cookies are too flat: This could be due to several factors, including using softened butter that is too warm, not chilling the dough long enough, or using too much sugar. Make sure your butter is softened but still cool to the touch, chill the dough for at least 30 minutes, and measure your ingredients accurately.
- Cookies are too dry: This could be due to overbaking or using too much flour. Be careful not to overbake the cookies, and measure your flour accurately. Spoon the flour into the measuring cup and level it off with a knife, rather than scooping it directly from the bag.
- Cookies are too hard: This could be due to overmixing the dough or using too much flour. Be careful not to overmix the dough, and measure your flour accurately.
- Cookies are not spreading: This could be due to using butter that is too cold or not using enough sugar. Make sure your butter is softened but still cool to the touch, and measure your sugar accurately.
Flax Egg Instructions:
- Combine Flaxseed Meal and Water: In a small bowl, combine 2 tablespoons of ground flaxseed meal with 6 tablespoons of water.
- Stir and Let Rest: Stir the mixture well and let it rest for at least 5 minutes, or until it becomes thick and gelatinous. This allows the flaxseed to bind and act as an egg replacement.
- Use in Recipe: Use the flax egg mixture in place of the eggs in the cookie recipe.
Detailed Butter Softening Guide:
Softening butter properly is crucial for achieving the right texture in your cookies. Here’s a detailed guide to ensure your butter is perfectly softened:
- The Ideal Softness: The butter should be soft enough to easily press your finger into, but it should not be melted or greasy. It should hold its shape but yield easily to pressure.
- Room Temperature Softening: The best way to soften butter is to leave it at room temperature for about an hour. The exact time will depend on the temperature of your room. In warmer climates, it may only take 30 minutes, while in cooler climates, it may take longer.
- Quick Softening Methods (Use with Caution!): If you’re short on time, you can use one of these quick softening methods, but be careful not to melt the butter:
- Microwave: Microwave the butter in 5-second intervals, checking it after each interval. Be very careful not to melt the butter.
- Grate: Grate the butter using a cheese grater. The smaller pieces will soften more quickly.
- Pound: Place the butter in a resealable plastic bag and pound it with a rolling pin until it is softened.
- Avoid Melting: Melting the butter will change the texture of the cookies and can result in flat, greasy cookies. If you accidentally melt the butter, let it cool and solidify slightly before using it.
Why Chilling the Dough is Important:
Chilling the cookie dough is a step that many people skip, but it’s actually very important for achieving the best results. Here’s why:
- 1 cup (2 sticks) unsalted butter, softened
- ¾ cup granulated sugar
- ¾ cup packed light brown sugar
- 2 large eggs (or flax eggs: 2 tablespoons ground flaxseed meal + 6 tablespoons water, mixed and rested for 5 minutes)
- 1 tablespoon vanilla extract
- 2 ¼ cups all-purpose flour
- 1 teaspoon baking soda
- 1 teaspoon salt
- 2 cups chocolate chips (milk chocolate, semi-sweet, or dark chocolate your choice!)
- Optional: ½ cup chopped walnuts or pecans
- Cream Butter and Sugars: In a large bowl, cream together the softened butter, granulated sugar, and brown sugar until light and fluffy (3-5 minutes). Scrape down the sides of the bowl.
- Add Eggs (or Flax Eggs) and Vanilla: Beat in the eggs (or flax egg mixture) one at a time, mixing well after each addition. Stir in the vanilla extract.
- Combine Dry Ingredients: In a separate bowl, whisk together the flour, baking soda, and salt.
- Add Dry Ingredients to Wet Ingredients: Gradually add the dry ingredients to the wet ingredients, mixing on low speed until just combined. Do not overmix.
- Stir in Chocolate Chips (and Nuts): Gently fold in the chocolate chips (and nuts, if using) until evenly distributed.
- Chill Dough: Cover and chill the dough in the refrigerator for at least 30 minutes, or up to 24 hours.
- Preheat Oven: Preheat oven to 375°F (190°C). Line baking sheets with parchment paper or silicone baking mats.
- Scoop Dough: Drop rounded tablespoons of dough onto the prepared baking sheets, leaving about 2 inches between each cookie.
- Bake: Bake for 9-11 minutes, or until the edges are golden brown and the centers are still slightly soft.
- Cool: Let the cookies cool on the baking sheets for a few minutes before transferring them to a wire rack to cool completely.
- For Chewier Cookies: Use more brown sugar than granulated sugar.
- For Crispier Cookies: Use more granulated sugar than brown sugar.
- Add Spices: Add ½ teaspoon of ground cinnamon, nutmeg, or ginger to the dry ingredients.
- Use Different Chocolate Chips: Experiment with different types of chocolate chips.
- Add Extracts: Try adding a different extract, such as almond extract or peppermint extract.
- Make Them Gluten-Free: Substitute the all-purpose flour with a gluten-free all-purpose flour blend.
- Freezing the Dough: You can freeze the cookie dough for up to 3 months.
- Storing the Cookies: Store the baked cookies in an airtight container at room temperature for up to 3 days.
- Troubleshooting:
- Cookies are too flat: This could be due to several factors, including using softened butter that is too warm, not chilling the dough long enough, or using too much sugar. Make sure your butter is softened but still cool to the touch, chill the dough for at least 30 minutes, and measure your ingredients accurately.
- Cookies are too dry: This could be due to overbaking or using too much flour. Be careful not to overbake the cookies, and measure your flour accurately. Spoon the flour into the measuring cup and level it off with a knife, rather than scooping it directly from the bag.
- Cookies are too hard: This could be due to overmixing the dough or using too much flour. Be careful not to overmix the dough, and measure your flour accurately.
- Cookies are not spreading: This could be due to using butter that is too cold or not using enough sugar. Make sure your butter is softened but still cool to the touch, and measure your sugar accurately.
Conclusion:
And there you have it! These Eggless Chocolate Chip Cookies are truly a game-changer. I know, I know, you might be skeptical about a cookie without eggs, but trust me on this one. The texture is perfectly chewy, the chocolate chips are melty and gooey, and the flavor is unbelievably rich. It’s a recipe that consistently delivers, and I’m confident it will become a staple in your baking repertoire.
Why is this a must-try? Well, beyond the obvious deliciousness, it’s incredibly versatile. Whether you have egg allergies, are vegan, or simply ran out of eggs (we’ve all been there!), this recipe is your saving grace. It’s also surprisingly easy to make, requiring minimal ingredients and effort. You can whip up a batch in under 30 minutes, from start to finish, making it perfect for those last-minute cravings or unexpected guests. Plus, the absence of eggs allows the chocolate flavor to really shine through, creating a truly decadent experience.
But the best part? The possibilities are endless! Feel free to get creative with your mix-ins. Try adding chopped nuts like walnuts or pecans for a bit of crunch. A sprinkle of sea salt on top before baking enhances the sweetness and adds a delightful salty-sweet contrast. For a more sophisticated flavor profile, consider using dark chocolate chips or adding a teaspoon of espresso powder to the dough. If you’re feeling adventurous, a dash of cinnamon or nutmeg can add a warm and comforting touch.
Serving suggestions? Oh, where do I even begin? These cookies are fantastic on their own, warm from the oven with a glass of cold milk. They’re also incredible crumbled over ice cream or used as the base for a cookie sundae. For a truly indulgent treat, try sandwiching them with a scoop of vanilla ice cream or a layer of Nutella. And if you’re looking for a thoughtful gift, a batch of these cookies beautifully packaged makes a wonderful present for friends, family, or even yourself!
I’ve personally made these Eggless Chocolate Chip Cookies countless times, and they always disappear in a flash. They’re a crowd-pleaser, a guaranteed hit, and a recipe that I’m incredibly proud to share with you. I truly believe that everyone deserves to experience the joy of a perfectly baked chocolate chip cookie, regardless of dietary restrictions or ingredient availability.
So, what are you waiting for? Preheat your oven, gather your ingredients, and get ready to bake up a batch of these amazing cookies. I promise you won’t be disappointed. And more importantly, I want to hear about your experience! Did you try any variations? Did you add any special ingredients? What did your friends and family think?
Please, please, please, leave a comment below and let me know how your cookies turned out. Share your photos on social media and tag me so I can see your creations. I’m so excited to hear your feedback and see how you make this recipe your own. Happy baking, and enjoy every single bite of these delicious Eggless Chocolate Chip Cookies! I am sure you will love this recipe as much as I do.
Eggless Chocolate Chip Cookies: The Ultimate Guide to Baking Perfection
Classic, soft, and chewy chocolate chip cookies with golden edges. Easily customizable with various chocolate chips, nuts, or spices.


Leave a Comment