
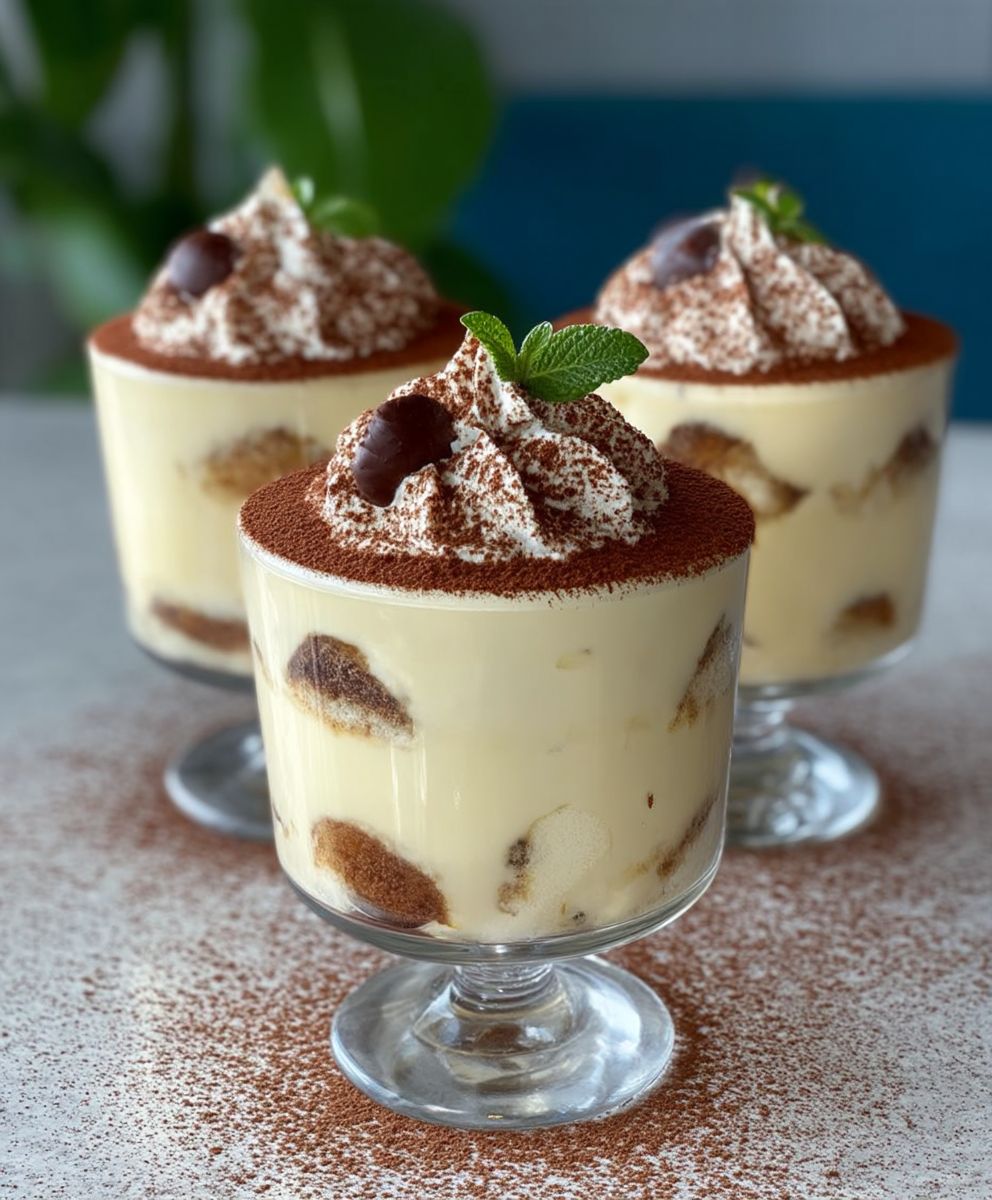
Easy Tiramisu Cups: Prepare to be transported to Italy with every delectable bite! Imagine layers of coffee-soaked ladyfingers, rich mascarpone cream, and a dusting of cocoa powder, all perfectly portioned into individual servings. These aren’t just desserts; they’re mini masterpieces of Italian culinary tradition, simplified for your convenience.
Tiramisu, meaning “pick me up” or “cheer me up” in Italian, has a relatively recent history, believed to have originated in the Veneto region of Italy in the latter half of the 20th century. While its exact origins are debated, its popularity is undeniable. This classic dessert has captivated hearts (and taste buds!) worldwide. But let’s be honest, sometimes we crave that incredible flavor without the fuss of making a large dish. That’s where these easy tiramisu cups come in!
People adore tiramisu for its harmonious blend of flavors and textures. The bitterness of the coffee beautifully complements the sweetness of the mascarpone, while the cocoa powder adds a touch of elegance. The creamy texture is balanced by the soft, sponge-like ladyfingers. And the best part? These individual cups are incredibly easy to make, perfect for a quick dessert after dinner or a delightful treat for a party. Get ready to impress your friends and family with this simplified version of a beloved classic!
Ingredients:
- For the Ladyfingers:
- 24 Italian ladyfingers (savoiardi biscuits)
- 1 cup strong brewed coffee, cooled
- 1/4 cup coffee liqueur (such as Kahlua or Tia Maria), optional
- For the Mascarpone Cream:
- 16 ounces (2 cups) mascarpone cheese, softened
- 1 1/4 cups heavy cream, cold
- 3/4 cup granulated sugar
- 1 teaspoon vanilla extract
- Pinch of salt
- For Dusting:
- Unsweetened cocoa powder, for dusting
- Chocolate shavings (optional), for garnish
Preparing the Coffee Mixture
Okay, let’s get started! The first thing we need to do is prepare the coffee mixture for dipping our ladyfingers. This is what gives tiramisu its signature coffee flavor, so it’s important to get it right.
- Brew the Coffee: Brew a cup of strong coffee. I usually use a dark roast for a more intense flavor, but you can use your favorite. Let it cool completely. This is crucial! Hot coffee will make the ladyfingers soggy.
- Combine Coffee and Liqueur (Optional): Once the coffee is cool, pour it into a shallow dish. If you’re using coffee liqueur, add it to the coffee and stir well. The liqueur adds a lovely depth of flavor, but it’s perfectly fine to skip it if you prefer a non-alcoholic version.
Making the Mascarpone Cream
Now for the star of the show: the mascarpone cream! This is what makes tiramisu so incredibly rich and decadent. Make sure your mascarpone is softened and your heavy cream is cold for the best results.
- Whip the Heavy Cream: In a large bowl (or the bowl of your stand mixer), pour in the cold heavy cream. Using an electric mixer (either a hand mixer or a stand mixer fitted with the whisk attachment), beat the heavy cream on medium-high speed until stiff peaks form. This usually takes about 3-5 minutes. Be careful not to overwhip, or you’ll end up with butter! You want firm, but still smooth, peaks.
- Combine Mascarpone, Sugar, Vanilla, and Salt: In a separate large bowl, add the softened mascarpone cheese, granulated sugar, vanilla extract, and a pinch of salt. Beat with an electric mixer on medium speed until smooth and creamy. Make sure there are no lumps of mascarpone remaining.
- Gently Fold in the Whipped Cream: This is the most important step! Gently fold the whipped cream into the mascarpone mixture using a spatula. Be careful not to deflate the whipped cream, as this will make the cream mixture less airy and light. Fold until just combined; don’t overmix. Overmixing can cause the mascarpone to become grainy.
Assembling the Tiramisu Cups
Alright, we’ve got our coffee mixture and our mascarpone cream ready to go. Now comes the fun part: assembling the tiramisu cups! This is where you can get creative with the presentation.
- Dip the Ladyfingers: Working one at a time, quickly dip each ladyfinger into the cooled coffee mixture. Don’t soak them! Just a quick dip on each side is enough. You want them to be moistened, but not soggy. Soggy ladyfingers will make your tiramisu cups watery.
- Create the First Layer: Place a layer of dipped ladyfingers at the bottom of each cup. You may need to break the ladyfingers into smaller pieces to fit them snugly into the cups. Aim for a single, even layer.
- Add a Layer of Mascarpone Cream: Spoon or pipe a layer of the mascarpone cream over the ladyfingers. Use about 1/3 of the cream for this first layer. Spread it evenly to cover the ladyfingers completely.
- Repeat Layers: Repeat the process with another layer of dipped ladyfingers and another layer of mascarpone cream. You should have two layers of ladyfingers and two layers of cream.
- Final Layer of Cream: Top each cup with the remaining mascarpone cream, creating a smooth and even surface.
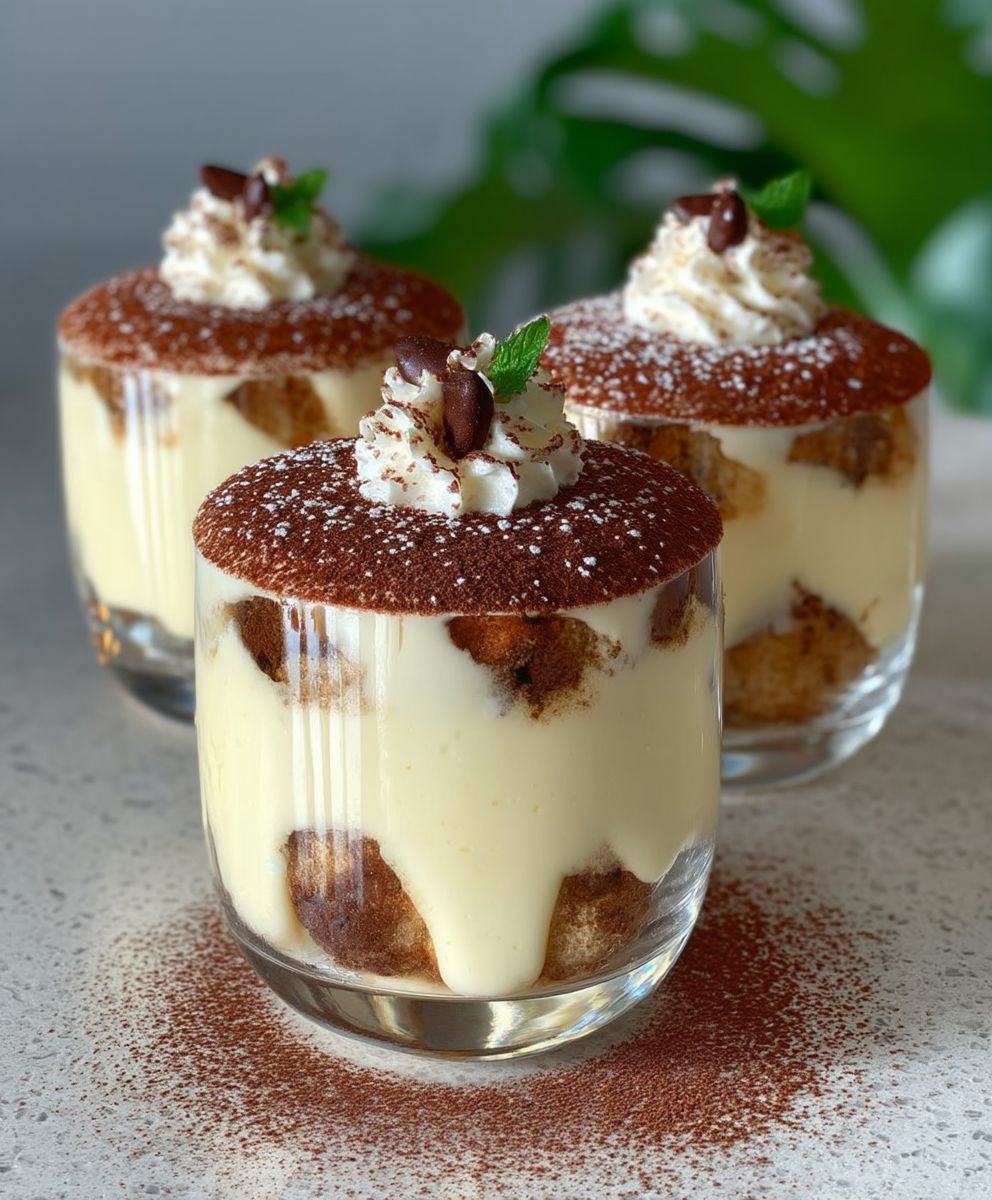
- Dust with Cocoa Powder: Using a fine-mesh sieve, dust the tops of the tiramisu cups generously with unsweetened cocoa powder. This adds a beautiful visual appeal and a slightly bitter counterpoint to the sweetness of the cream.
- Garnish (Optional): If desired, garnish the tiramisu cups with chocolate shavings. You can use a vegetable peeler to create chocolate shavings from a bar of dark chocolate.
- Chill: Cover the tiramisu cups with plastic wrap and refrigerate for at least 4 hours, or preferably overnight. This allows the flavors to meld together and the ladyfingers to soften completely. The longer they chill, the better they taste!
Tips and Variations
Here are a few extra tips and ideas to customize your tiramisu cups:
- Coffee Strength: Adjust the strength of the coffee to your liking. If you prefer a milder coffee flavor, use a lighter roast or dilute the coffee with a little water.
- Liqueur Options: Experiment with different liqueurs. Amaretto, rum, or brandy are all delicious alternatives to coffee liqueur.
- Chocolate Lovers: Add a layer of chocolate shavings or chocolate chips between the ladyfingers and cream for an extra chocolatey treat. You could also use chocolate ladyfingers.
- Fruit Flavors: Add a layer of fresh berries, such as raspberries or strawberries, between the ladyfingers and cream for a fruity twist.
- Espresso Powder: For an even more intense coffee flavor, add a teaspoon of espresso powder to the mascarpone cream.
- Serving Size: Adjust the size of the cups to your preference. You can use small ramekins, shot glasses, or even mason jars.
- Make Ahead: Tiramisu cups are perfect for making ahead of time. They can be stored in the refrigerator for up to 3 days.
- Vegan Tiramisu: To make a vegan version, use vegan ladyfingers, vegan mascarpone cheese, and vegan heavy cream.
Troubleshooting
Sometimes things don’t go exactly as planned. Here are a few common issues and how to fix them:
- Soggy Ladyfingers: If your ladyfingers are too soggy, you’re probably dipping them for too long. Reduce the dipping time to just a quick dip on each side.
- Grainy Mascarpone Cream: This usually happens when the mascarpone is overmixed. Be careful not to overmix the mascarpone cream, especially after adding the whipped cream.
- Runny Mascarpone Cream: This can happen if the mascarpone is too warm or if the whipped cream is not stiff enough. Make sure the mascarpone is softened but not warm, and that the heavy cream is whipped to stiff peaks.
- Bitter Cocoa Powder: If the cocoa powder is too bitter, try using a Dutch-processed cocoa powder, which is less acidic.
Enjoy!
I hope you enjoy making and eating these easy tiramisu cups! They’re a perfect dessert for any occasion, and they’re sure to impress your friends and family. Don’t be afraid to experiment with different flavors and variations to create your own signature tiramisu recipe. Happy baking!
Conclusion:
And there you have it! These Easy Tiramisu Cups are truly a must-try recipe for anyone craving a taste of Italy without spending hours in the kitchen. The combination of the coffee-soaked ladyfingers, the creamy mascarpone filling, and the dusting of cocoa powder creates a symphony of flavors and textures that will leave you wanting more. I promise, even if you’re a beginner baker, you can absolutely nail this recipe. It’s that simple!
But why are these little cups so special? Well, beyond the ease of preparation, they offer a delightful individual serving that’s perfect for parties, potlucks, or even just a special treat for yourself after a long day. No more messy slicing or uneven portions each cup is a perfectly portioned piece of tiramisu heaven. Plus, the presentation is just gorgeous! They look so elegant and sophisticated, yet they require minimal effort.
Serving Suggestions and Variations:
Now, let’s talk about how you can make these Easy Tiramisu Cups even more amazing. While the classic recipe is divine, there’s always room for a little personalization!
* Boozy Boost: For a more adult-friendly version, add a splash of coffee liqueur, rum, or Marsala wine to the coffee mixture before soaking the ladyfingers. Just be mindful of the alcohol content if you’re serving to children or those who prefer to abstain.
* Chocolate Lover’s Dream: Grate some dark chocolate into the mascarpone filling or sprinkle chocolate shavings on top for an extra dose of chocolatey goodness. You could even use chocolate ladyfingers for an even richer flavor.
* Berry Bliss: Add a layer of fresh berries, such as raspberries, strawberries, or blueberries, between the ladyfingers and the mascarpone filling. The tartness of the berries will complement the sweetness of the tiramisu beautifully.
* Nutty Delight: Sprinkle chopped nuts, such as almonds, hazelnuts, or walnuts, on top of the tiramisu cups for added texture and flavor. Toasted nuts will provide an even more intense nutty aroma.
* Espresso Power: If you’re a serious coffee lover, use a stronger espresso or add a shot of espresso directly to the mascarpone filling for an extra caffeine kick.
* Vegan Tiramisu Cups: Substitute the mascarpone cheese with a vegan alternative, such as cashew cream or coconut cream. Use plant-based ladyfingers and ensure your cocoa powder is vegan-friendly.
These are just a few ideas to get you started. Feel free to experiment and create your own unique variations of these Easy Tiramisu Cups. The possibilities are endless!
I truly believe that this recipe will become a staple in your dessert repertoire. It’s quick, easy, impressive, and utterly delicious. So, what are you waiting for? Gather your ingredients, put on your apron, and get ready to whip up a batch of these irresistible treats.
And most importantly, I want to hear about your experience! Did you try the recipe? Did you make any modifications? What did your friends and family think? Share your photos and stories in the comments below. I can’t wait to see your creations and hear all about your tiramisu adventures. Happy baking!
Easy Tiramisu Cups: A Simple & Delicious Dessert Recipe
Individual tiramisu cups are an easy and elegant twist on the classic Italian dessert. Layers of coffee-soaked ladyfingers and creamy mascarpone, dusted with cocoa powder, create a perfect make-ahead treat.
Ingredients
- 24 Italian ladyfingers (savoiardi biscuits)
- 1 cup strong brewed coffee, cooled
- 1/4 cup coffee liqueur (such as Kahlua or Tia Maria), optional
- 16 ounces (2 cups) mascarpone cheese, softened
- 1 1/4 cups heavy cream, cold
- 3/4 cup granulated sugar
- 1 teaspoon vanilla extract
- Pinch of salt
- Unsweetened cocoa powder, for dusting
- Chocolate shavings (optional), for garnish
Instructions
- Brew a cup of strong coffee. Let it cool completely.
- Pour the cooled coffee into a shallow dish. If using, add coffee liqueur and stir.
- In a large bowl, beat cold heavy cream on medium-high speed until stiff peaks form (3-5 minutes). Be careful not to overwhip.
- In a separate bowl, beat softened mascarpone cheese, granulated sugar, vanilla extract, and a pinch of salt on medium speed until smooth and creamy.
- Gently fold the whipped cream into the mascarpone mixture using a spatula until just combined. Be careful not to deflate the whipped cream or overmix.
- Quickly dip each ladyfinger into the cooled coffee mixture. Do not soak.
- Place a layer of dipped ladyfingers at the bottom of each cup, breaking them if needed to fit.
- Spoon or pipe a layer of mascarpone cream over the ladyfingers (about 1/3 of the cream). Spread evenly.
- Repeat the process with another layer of dipped ladyfingers and another layer of mascarpone cream.
- Top each cup with the remaining mascarpone cream, creating a smooth surface.
- Dust the tops of the tiramisu cups generously with unsweetened cocoa powder using a fine-mesh sieve.
- Garnish with chocolate shavings, if desired.
- Cover the tiramisu cups with plastic wrap and refrigerate for at least 4 hours, or preferably overnight.
Notes
- Adjust coffee strength to your liking.
- Experiment with different liqueurs like Amaretto, rum, or brandy.
- Add a layer of chocolate shavings or berries for variations.
- Tiramisu cups can be made ahead and stored in the refrigerator for up to 3 days.
- For vegan tiramisu, use vegan ladyfingers, mascarpone, and heavy cream.
- If ladyfingers are too soggy, reduce dipping time.
- If mascarpone cream is grainy, avoid overmixing.
- If mascarpone cream is runny, ensure mascarpone is softened but not warm and heavy cream is whipped to stiff peaks.
- If cocoa powder is too bitter, use Dutch-processed cocoa powder.


Leave a Comment