
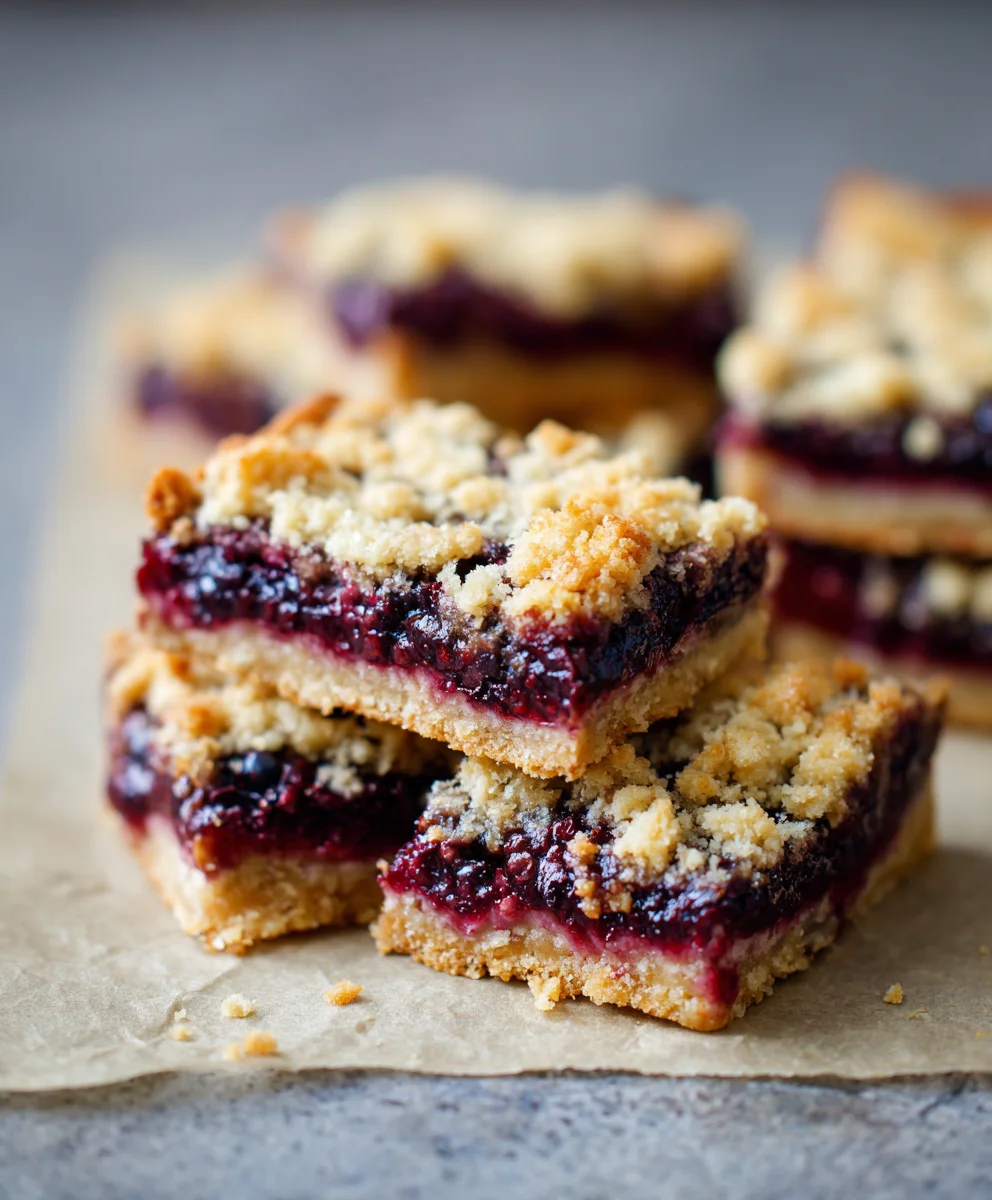
Blackberry Pie Crum extractble Bars are here to revolutionize your dessert game! Imagine all the comforting, familiar flavors of a classic blackberry pie, but presented in a wonderfully portable, undeniably convenient bar form. I am absolutely thrilled to share this recipe with you because it perfectly blends the timeless appeal of a beloved dessert with the practical ease required for today’s busy lifestyles.
Historically, fruit pies, especially those made with plump, juicy blackberries, have graced tables for centuries, celebrating bountiful summer harvests and providing a sense of warmth and comfort during any season. They evoke fond memories and a feeling of home. However, traditional pies can sometimes be a bit challenging to slice and serve neatly, particularly at gatherings, picnics, or when packing for an on-the-go treat. This is precisely where these delightful bars shine! People adore this dish not just for its exquisite blend of sweet and tart blackberries, beautifully encased in a tender, buttery shortbread crust and topped with an irresistibly golden, crumbly streusel. They also cherish its sheer convenience and grab-and-go nature. No plates or forks are strictly required for these beauties! They offer a perfect harmony of textures – the jammy fruit filling, the sturdy base, and that glorious, melt-in-your-mouth crumble – all in one perfect, handheld bite. Whether you’re preparing them for a school lunchbox, a community potluck, or simply enjoying a quiet afternoon indulgence, these Blackberry Pie Crum extractble Bars are guaranteed to be a resounding success. Get ready to bake a batch that will disappear in record time!
Ingredients:
-
For the Crumbly Crust & Topping:
- 2 ½ cups (300g) all-purpose flour, plus extra for dusting, if needed. I find that a good quality unbleached flour yields the best texture for these bars.
- ¾ cup (150g) granulated sugar. This gives the perfect amount of sweetness to balance the tartness of the blackberries.
- 1 teaspoon baking powder. This helps create that lovely, slightly risen, tender texture in our crumble.
- ¼ teaspoon salt. A crucial ingredient to enhance all the other flavors and provide a nice counterpoint.
- 1 cup (226g) unsalted butter, very cold and cut into ½-inch cubes. Using very cold butter is absolutely key to achieving that wonderfully flaky and tender crumb. Trust me on this one!
- 1 large egg, lightly beaten. This acts as a binder, helping the crust come together and making the topping perfectly crisp.
- 1 teaspoon pure vanilla extract. A touch of vanilla always elevates the flavor profile, adding warmth and depth.
-
For the Blackberry Filling:
- 4 cups (approx. 600-700g) fresh or frozen blackberries. If using frozen, there’s no need to thaw them beforehand; just proceed as usual. I love the vibrant color and tart burst of flavor fresh blackberries bring to these Blackberry Pie Crumble Bars.
- ½ cup (100g) granulated sugar, or more to taste depending on the sweetness of your berries. We want a nice balance, not overly sweet.
- 2 tablespoons fresh lemon juice. This brightens the flavor of the blackberries beautifully and prevents the filling from becoming too cloying.
- 2 tablespoons cornstarch. This is our secret weapon for a perfectly thick and luscious filling that won’t run all over the place when you cut into your bars.
- ½ teaspoon lemon zest (optional, but highly recommended for an extra punch of citrusy aroma).
Preparing the Crumbly Crust and Topping for your Blackberry Pie Crumble Bars:
- Preheat and Prepare Your Pan: First things first, let’s get our oven ready. Preheat your oven to a steady 375°F (190°C). While that’s heating up, grab a 9×13-inch baking pan. I like to line mine with parchment paper, leaving an overhang on the sides. This little trick makes lifting the cooled bars out of the pan an absolute breeze, ensuring perfectly clean cuts. If you don’t have parchment, a good greasing and flouring will do the trick, but seriously, try the parchment method if you can!
- Combine Dry Ingredients: In a large mixing bowl, the kind you love to bake with, combine your 2 ½ cups of all-purpose flour, ¾ cup of granulated sugar, 1 teaspoon of baking powder, and ¼ teaspoon of salt. Give these dry ingredients a good whisk with a fork or a balloon whisk until they are thoroughly combined. We want an even distribution of all the leavening and seasoning. This ensures every bite of our Blackberry Pie Crumble Bars has that perfect foundation.
- Incorporate the Cold Butter: Now for the fun part – introducing the butter! Add your 1 cup (226g) of very cold butter, cut into ½-inch cubes, to the dry mixture. You can use a pastry blender, two forks, or even your fingertips for this step. The goal is to cut the butter into the flour until the mixture resembles coarse crumbs, with some pea-sized pieces of butter still visible. It’s crucial not to overwork the dough with your hands if using them, as the warmth can melt the butter, which we want to avoid for maximum flakiness. The colder the butter, the flakier the crumble will be. This is a fundamental step for any amazing crumble!
- Add Wet Ingredients: In a separate small bowl, whisk together your 1 lightly beaten large egg and 1 teaspoon of pure vanilla extract. Pour this egg mixture over the butter-flour mixture. Gently mix with a fork or your hands until the dough just starts to come together. Again, be careful not to overmix; we’re looking for a shaggy, cohesive dough, not a smooth one. Overmixing develops gluten, which can lead to a tough crust, and we want tender bars!
- Divide and Press the Crust: Now, for the base of our glorious Blackberry Pie Crumble Bars. Take about two-thirds (roughly 350-400g) of this prepared dough mixture and press it evenly into the bottom of your parchment-lined 9×13-inch baking pan. I like to use the bottom of a clean glass or a flat-bottomed measuring cup to help press it down firmly and evenly. Ensure the layer is consistent across the entire base of the pan. This creates a sturdy foundation for our delicious blackberry filling.
- Chill the Crust: Once the crust is pressed into place, I highly recommend placing the pan in the refrigerator to chill for at least 15-20 minutes. This brief chill time allows the butter to firm up again, which helps prevent the crust from shrinking too much during baking and ensures a wonderfully tender texture. While the crust is chilling, you can move on to preparing our vibrant blackberry filling.
- Prepare the Crumble Topping: The remaining one-third of the dough mixture will become our beautiful, crumbly topping. Set this aside for now. You might want to break it up a little with your fingers to ensure it’s in nice, loose crumbs when it’s time to sprinkle it over the filling. If you feel it’s become a bit warm, you can pop it in the fridge for a few minutes too, just to keep those butter bits cold.
Crafting the Luscious Blackberry Filling for your Blackberry Pie Crumble Bars:
- Combine Blackberries and Sugar: In a medium-sized bowl, gently combine your 4 cups of fresh or frozen blackberries with ½ cup of granulated sugar. If your berries are on the tart side, feel free to add another tablespoon or two of sugar here. This is where your personal preference comes into play! If using frozen berries, there’s no need to thaw them; they’ll release their juices beautifully as they bake.
- Add Lemon and Thickener: Sprinkle the 2 tablespoons of cornstarch over the berry mixture. The cornstarch is vital for thickening the filling; without it, your bars would be too runny and difficult to cut. Pour in the 2 tablespoons of fresh lemon juice and, if you’re using it, the ½ teaspoon of lemon zest. The lemon juice and zest truly brighten the flavor of the blackberries, cutting through their sweetness and adding a wonderful aromatic quality.
- Gently Mix: Using a spatula or large spoon, gently fold all the ingredients together until the cornstarch is fully incorporated and the berries are evenly coated. Be careful not to mash the berries too much, especially if they are fresh, as we want to maintain some of their whole structure in the final product. If you’re using frozen berries, they might release a bit of liquid, which is perfectly normal. Just make sure everything is well combined. You’ll notice the mixture becoming slightly glossy as the sugar starts to dissolve. This filling is the star of our Blackberry Pie Crumble Bars!
- A Note on Consistency: The cornstarch won’t fully activate until it’s heated in the oven, so don’t expect the mixture to be thick in the bowl. It will look quite liquidy, especially if using frozen berries, and that’s exactly what we want. The magic happens during baking!
Assembling and Baking your Glorious Blackberry Pie Crumble Bars:
- Retrieve the Chilled Crust: Take your chilled baking pan with the pressed crust out of the refrigerator. It should feel firm to the touch, and the butter will be nice and solid. This helps to create a crisp, sturdy base for our bars.
- Spread the Blackberry Filling: Carefully and evenly spoon the prepared blackberry filling over the chilled crust. Use the back of your spoon or a spatula to spread it right to the edges, ensuring a consistent layer of fruit throughout the pan. Make sure there are no large gaps, so every piece of your Blackberry Pie Crumble Bars gets a generous portion of that luscious filling.
- Add the Crumbly Topping: Now for the final layer! Take the remaining one-third of the dough mixture you set aside earlier. Using your fingers, crumble it evenly over the blackberry filling. Try to break it into various-sized crumbs – some larger, some smaller – to create that rustic, appealing streusel texture. Don’t press it down; we want it light and airy so it can get wonderfully crisp and golden brown as it bakes. This crumble is what gives our Blackberry Pie Crumble Bars their signature textural contrast.
- Bake to Perfection: Place your pan in the preheated 375°F (190°C) oven. Bake for approximately 45 to 55 minutes. The exact baking time can vary depending on your oven, so keep an eye on them. You’ll know they’re ready when the crumble topping is beautifully golden brown, and the blackberry filling is visibly bubbling around the edges, indicating that the cornstarch has thickened properly and the berries are cooked through. The aroma filling your kitchen will be absolutely incredible – a sure sign of success!
- Look for Visual Cues: If you notice the topping browning too quickly before the filling seems fully set, you can loosely tent the pan with aluminum foil for the last 10-15 minutes of baking. This prevents over-browning while allowing the filling to finish cooking. Don’t rush this step; a perfectly baked bar has a set filling that holds its shape.
Cooling and Serving your Delicious Blackberry Pie Crumble Bars:
- The Importance of Cooling: This is arguably the hardest part – resisting the urge to dig in immediately! Once your Blackberry Pie Crumble Bars are out of the oven, place the pan on a wire rack to cool completely. And I mean completely. This typically takes at least 2 to 3 hours, but sometimes even longer. During this cooling period, the filling will continue to set and firm up, making the bars much easier to cut into clean, defined squares. If you try to cut them while warm, the filling will likely ooze, and the bars will crumble, no matter how delicious they taste. Patience truly is a virtue here!
- Lifting and Cutting: Once fully cooled, use the parchment paper overhang to carefully lift the entire slab of bars out of the baking pan and transfer it to a large cutting board. This step is why I highly recommend the parchment! With a sharp knife, ideally one with a long, thin blade, slice the bars into your desired size. I usually go for 12-16 squares, but you can make them larger or smaller depending on your preference. For the cleanest cuts, wipe your knife clean with a damp cloth between each slice.
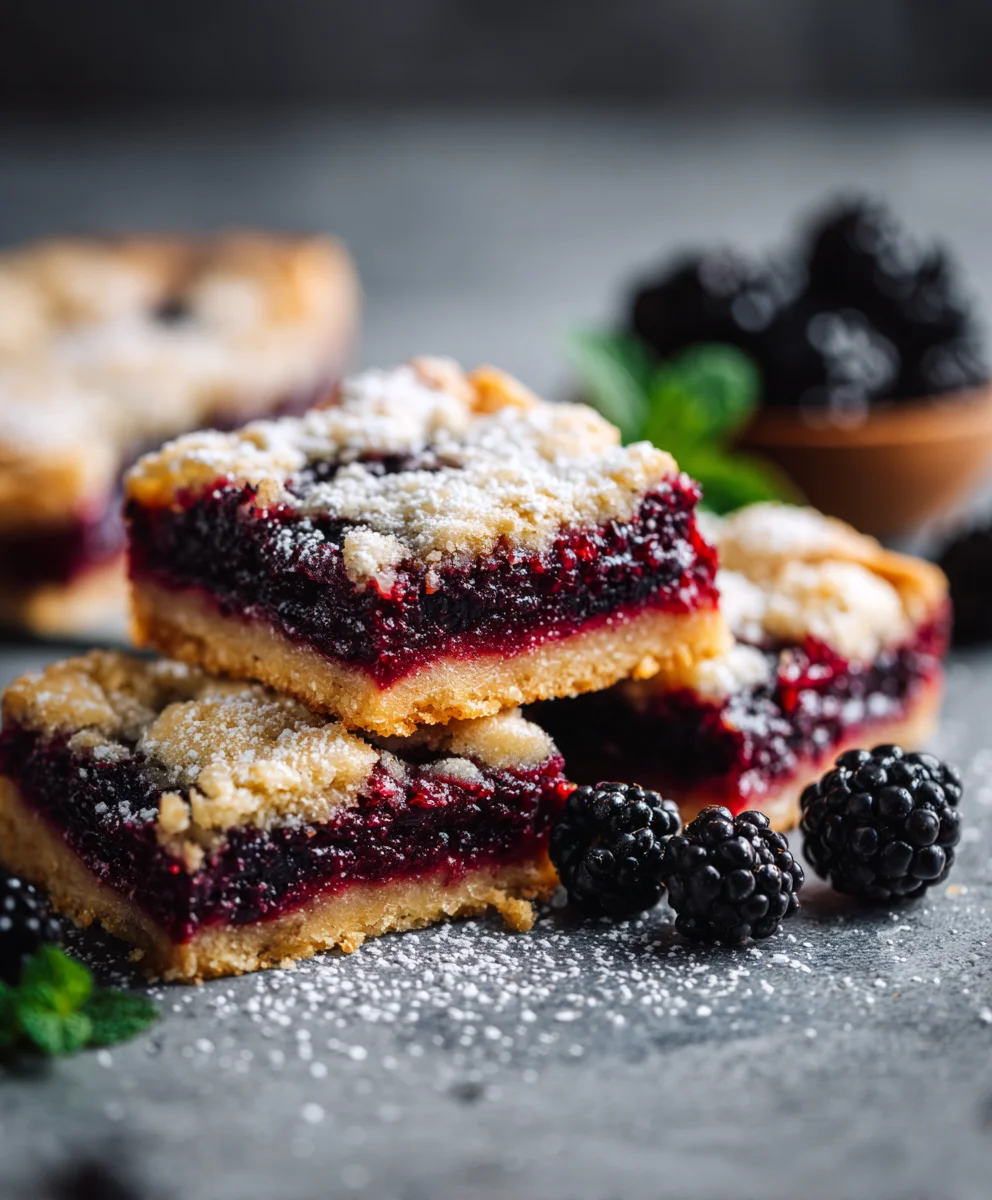
- Serving Suggestions: These Blackberry Pie Crumble Bars are absolutely delightful on their own, offering a wonderful balance of sweet and tart with a satisfying crumbly texture. However, if you’re feeling a little extra indulgent (and why not?), they pair beautifully with a scoop of vanilla bean ice cream or a dollop of freshly whipped cream. A light dusting of powdered sugar over the top just before serving also adds a pretty touch and a subtle extra sweetness.
- Storage: Store any leftover Blackberry Pie Crumble Bars in an airtight container at room temperature for up to 3-4 days. If you want to extend their freshness, you can store them in the refrigerator for up to a week. They also freeze quite well; simply wrap individual bars tightly in plastic wrap and then place them in a freezer-safe bag or container for up to 2-3 months. Thaw at room temperature when you’re ready for a delicious treat.
- Enjoy Your Hard Work: Take a moment to appreciate the beautiful creation you’ve made. These homemade Blackberry Pie Crumble Bars are a true testament to the joy of baking and the simple pleasure of fresh, seasonal ingredients. Share them with friends and family, or keep them all to yourself – I won’t tell!
Conclusion:
Why You Absolutely Must Try This Recipe
So, there you have it – my cherished recipe for what I genuinely believe will become one of your new favorite treats. Why is this particular recipe an absolute must-try? Well, it’s more than just a simple dessert; it’s an experience. Imagine sinking your teeth into a perfectly crafted bar where the vibrant, slightly tart burst of fresh blackberries meets the comforting sweetness of a flaky, buttery crust. Then, just when you think it couldn’t get any better, you hit that irresistible, golden, crumbly topping that adds a delightful texture contrast. It’s the perfect harmony of gooey fruit filling, sturdy yet tender base, and a heavenly crumb that makes these Blackberry Pie Crum extractble Bars truly exceptional. This isn’t just a dessert that tastes good; it’s a dessert that feels good to make and even better to share. It effortlessly combines the rustic charm of a classic pie with the convenience and portability of a bar, making it ideal for any occasion. Forget complicated pastry techniques; this recipe delivers maximum flavor with minimal fuss, ensuring even a novice baker can achieve stunning results. I promise you, the aroma alone as these bake will have your household eagerly anticipating their first bite, and the taste will exceed all expectations. It’s a guaranteed crowd-pleaser, delivering both nostalgic comfort and an exciting burst of flavor that will leave everyone reaching for a second piece. These bars are simply irresistible!
Serving Suggestions for Every Occasion
Now that you’re convinced these bars are a culinary masterpiece, let’s talk about how to best enjoy them. While utterly delicious on their own, especially when still slightly warm from the oven, a few simple additions can elevate your experience even further. My personal favorite way to serve these is alongside a generous scoop of good quality vanilla bean ice cream. The cold, creamy sweetness of the ice cream melting ever so slightly into the warm, fruity bar is a match made in dessert heaven, creating a truly decadent treat. For those who prefer a more sophisticated touch, a dollop of rich, tangy créme fraîche or a spoonful of smooth mascarpone cheese provides a delightful contrast that beautifully balances the sweetness and adds a luxurious mouthfeel. Don’t limit these to just after-dinner indulgence, though! These versatile bars make a fantastic addition to a brunch spread, perhaps served with a steaming cup of freshly brewed coffee or a refreshing glass of iced tea on a warm afternoon. Their sturdy, portable nature also makes them perfect for packing into lunchboxes for a special workday treat or bringing along to picnics, barbecues, and potlucks – they travel incredibly well and are always a welcome sight. Even for a simple afternoon snack, pairing a bar with a light herbal tea or a robust black coffee creates a wonderfully satisfying and comforting moment. The combination of textures and flavors means they stand alone proudly, but they also graciously accept accompaniments, allowing you to tailor the experience to your mood or the specific occasion you’re celebrating. They are truly adaptable to any setting.
Get Creative! Delicious Variations to Explore
But the magic doesn’t stop with the core recipe; one of the things I love most about these bars is how incredibly adaptable they are. Don’t feel confined to blackberries if another fruit calls to you! Imagine these made with plump, juicy raspberries for a tarter profile, or a vibrant mix of blueberries and raspberries for a delightful mixed berry creation. Peaches, especially when in season, would also make a divine filling, perhaps with a delicate hint of fresh ginger or a pinch of cinnamon to complement their sweetness. For a wonderful autumn twist, thinly sliced apples, generously spiced with cinnamon and nutmeg, would transform these into a cozy, comforting treat perfect for a crisp evening. You can also play around with the crumb topping to add your personal flair. For an extra layer of texture and nutty flavor, try adding finely chopped almonds, pecans, or walnuts to the oat topping mixture. A sprinkle of ground cardamom or a touch more cinnamon in the crumb can also introduce new, aromatic dimensions of flavor that will surprise and delight. If you’re feeling a little fancy, a simple lemon glaze drizzled artfully over the cooled bars, or even a delicate white chocolate drizzle, could add an extra touch of elegance and a different flavor profile. For those with dietary considerations, experimenting with gluten-free flour blends for the base and topping, or using your preferred sugar alternatives, can often yield equally delicious results with minor adjustments to liquid content or baking time. The beauty of baking is in making it your own, and I truly encourage you to experiment and find your favorite variations! Let your culinary imagination soar with these versatile bars.
Your Turn! Share Your Delicious Experience
So, what are you waiting for? I truly hope this recipe inspires you to tie on your apron, gather your ingredients, and dive into the delightful process of making these incredible bars. There’s a unique joy that comes from baking something from scratch, especially when the end result is as wonderfully rewarding as these are. Imagine the smiles on the faces of your family and friends as they bite into a slice of pure homemade happiness, crafted with your own hands. This isn’t just about following instructions; it’s about creating something special, sharing warmth, and making cherished memories around delicious food. I am genuinely excited for you to experience the satisfaction of pulling a golden tray of these delectable treats from your oven, filling your home with an irresistible aroma. Once you’ve made them, I would absolutely love to hear about your experience! Did you stick to the original recipe, or did you try one of the exciting variations? What was your favorite part of the process, and what did your tasters think? Please don’t hesitate to share your thoughts, your tips, and even your photos in the comments below or on social media. Your feedback and stories are invaluable and help our community of home bakers grow and discover new favorites. Happy baking, my friends, and I look forward to hearing all about your delicious creations!
Blackberry Pie Crumble Bars
Deliciously portable Blackberry Pie Crumble Bars feature a sweet and tart blackberry filling sandwiched between a tender, buttery shortbread crust and a golden, crumbly streusel topping. A perfect grab-and-go dessert for any occasion.
Ingredients
-
2 ½ cups (300g) all-purpose flour
-
¾ cup (150g) granulated sugar (for crust/topping)
-
1 teaspoon baking powder
-
¼ teaspoon salt
-
1 cup (226g) cold unsalted butter, cubed
-
1 large egg, lightly beaten
-
1 teaspoon pure vanilla extract
-
4 cups (600-700g) fresh or frozen blackberries
-
½ cup (100g) granulated sugar (for filling)
-
2 tablespoons fresh lemon juice
-
2 tablespoons cornstarch
-
½ teaspoon lemon zest (optional)
Instructions
-
Step 1
Preheat oven to 375°F (190°C). Line a 9×13-inch baking pan with parchment paper, leaving an overhang on the sides. -
Step 2
In a large bowl, whisk together 2 ½ cups flour, ¾ cup granulated sugar, 1 teaspoon baking powder, and ¼ teaspoon salt. Cut in 1 cup cold cubed butter until the mixture resembles coarse crumbs with some pea-sized pieces. In a separate small bowl, whisk 1 large egg and 1 teaspoon vanilla extract; pour over the butter-flour mixture. Gently mix until the dough just starts to come together. -
Step 3
Press about two-thirds of the dough evenly into the bottom of the prepared pan. Light hand with the dough – Packing it too firmly will result in a tough base. Chill the crust in the refrigerator for at least 15-20 minutes. Set aside the remaining one-third of the dough for the topping. -
Step 4
In a medium bowl, gently combine 4 cups fresh or frozen blackberries with ½ cup granulated sugar. Sprinkle in 2 tablespoons cornstarch, 2 tablespoons fresh lemon juice, and optional ½ teaspoon lemon zest. Gently fold until ingredients are well combined. -
Step 5
Retrieve the chilled crust from the refrigerator. Evenly spoon the prepared blackberry filling over the crust. Crumble the reserved dough mixture over the filling, ensuring an even layer. Bake in the preheated oven for 45 to 55 minutes, or until the topping is golden brown and the filling is visibly bubbling around the edges. If the topping browns too quickly, loosely tent the pan with aluminum foil. -
Step 6
Once baked, place the pan on a wire rack to cool completely for at least 2 to 3 hours. This is crucial for the filling to set. Once cooled, use the parchment paper overhang to lift the bars from the pan. Slice into 12-16 squares with a sharp knife. Serve as is, or with a scoop of vanilla bean ice cream or whipped cream. Store leftovers in an airtight container at room temperature for 3-4 days, or refrigerate for up to a week.
Important Information
Nutrition Facts (Per Serving)
It is important to consider this information as approximate and not to use it as definitive health advice.
Allergy Information
Please check ingredients for potential allergens and consult a health professional if in doubt.


Leave a Comment