
Cherries In The Snow — a name that immediately evokes images of a dessert both elegant and whimsical, isn’t it? Imagine serving a dish that looks as if freshly fallen snow has gently embraced a bounty of ruby-red cherries, creating a breathtaking contrast that promises a delightful culinary experience. This classic American no-bake dessert has graced countless family tables and potluck gatherings for generations, becoming a beloved staple in many households, especially during holidays or when a refreshing, yet indulgent, treat is desired.
What truly makes this dish a timeless favorite? It’s the irresistible interplay of textures and flavors: the sweet, slightly tart burst of juicy cherries, the airy, cloud-like cream cheese filling, and the satisfying crunch of a buttery cookie crust. It’s a symphony for the senses, providing both comfort and a touch of celebratory flair without the fuss of baking.
Its ease of preparation, combined with its stunning presentation and utterly delicious taste, ensures that Cherries In The Snow remains a cherished recipe.
I am absolutely delighted to guide you through creating this iconic dessert, guaranteeing smiles all around.
Ingredients:
- For the Graham Cracker Crust:
- 2 cups (about 1 sleeve and a half) graham cracker crumbs (finely crushed)
- 1/2 cup (1 stick) unsalted butter, melted
- 1/4 cup granulated sugar
- For the Creamy Dream Layer:
- 2 packages (8 ounces each) cream cheese, softened to room temperature
- 1 cup powdered sugar (confectioners’ sugar), sifted
- 1 teaspoon pure vanilla extract
- 1 container (12 ounces) frozen whipped topping, thawed (like Cool Whip)
- For the Luscious Cherry Topping:
- 1 can (21 ounces) cherry pie filling
- Optional Garnish:
- Fresh mint leaves
- Chocolate shavings or curls
- A few fresh cherries, pitted
Preparing the Perfect Graham Cracker Crust for Your Cherries In The Snow
- Get Your Pan Ready: Begin by lightly greasing a 9×13-inch baking dish with non-stick cooking spray or a little butter. This small step helps ensure your beautiful “Cherries In The Snow” creation will be easy to serve later.
- Crush Those Graham Crackers: This is where the magic starts for our base. You’ll need finely crushed graham cracker crumbs. There are a couple of excellent ways to achieve this. My personal favorite is using a food processor; just pulse the graham cracker sheets until they resemble fine sand. If you don’t have a food processor, no worries! Place the graham crackers in a large Ziploc bag, seal it, and use a rolling pin or the bottom of a heavy pan to crush them thoroughly. The goal is a consistent, fine crumb – this provides the best texture for our crust, a truly essential part of the “Cherries In The Snow” experience. Measure out exactly 2 cups.
- Melt the Butter: In a microwave-safe bowl, melt the 1/2 cup of unsalted butter. Be careful not to let it boil, just until it’s fully liquid. This melted butter is what will bind our crumbs together.
- Combine and Sweeten: In a medium-sized mixing bowl, combine the graham cracker crumbs, the 1/4 cup of granulated sugar, and the melted butter. Stir these ingredients together thoroughly with a spoon or spatula until all the crumbs are evenly moistened. It should have the consistency of wet sand – every crumb coated in that buttery goodness.
- Press into the Pan: Now, pour the crumb mixture into your prepared 9×13-inch baking dish. Using the bottom of a flat-bottomed glass or a measuring cup, firmly and evenly press the mixture across the bottom of the pan. Make sure it’s packed down well; this dense crust is what will hold up to the creamy layers above. The more compact it is, the less likely it is to crumble when you serve your “Cherries In The Snow.”
- Chill Out: Place the pan with the pressed crust into the refrigerator for at least 30 minutes. This chilling time is crucial; it helps the butter solidify and firm up the crust, making it sturdy enough to support the rich creamy layer and the sweet cherry topping without falling apart. Don’t skip this step for the best foundation for your “Cherries In The Snow”!
Crafting the Irresistibly Creamy Layer for Your Cherries In The Snow
- Soften That Cream Cheese: For the silkiest, lump-free creamy layer, it’s absolutely vital that your cream cheese is softened to room temperature. I usually take it out of the fridge at least an hour before I plan to start. If you’re short on time, you can carefully unwrap the blocks and microwave them on low power for 10-15 seconds at a time until soft, but not melted. Trust me, cold cream cheese makes for lumpy results, and we want nothing but pure smoothness for our “Cherries In The Snow.”
- Whip the Cream Cheese: In a large mixing bowl, using an electric mixer (either a stand mixer with a paddle attachment or a hand mixer), beat the softened cream cheese on medium speed for 2-3 minutes. You want it to become light, fluffy, and completely smooth, with no lumps whatsoever. Scrape down the sides of the bowl frequently to ensure everything gets incorporated. This step incorporates air and ensures a delightful texture.
- Add Sweetness and Flavor: Gradually add the sifted 1 cup of powdered sugar to the cream cheese mixture, beating on low speed until just combined, then increase to medium and beat until fully incorporated and smooth. Sifting the powdered sugar beforehand prevents any lumps from forming, ensuring that silky texture we’re aiming for. Next, add the 1 teaspoon of pure vanilla extract and beat for another 30 seconds until well blended. The vanilla truly enhances the creamy flavor.
- Fold in the Whipped Topping: Now for the light and airy component! Gently fold in the thawed whipped topping. This step requires a delicate touch. Use a spatula to gently incorporate the whipped topping into the cream cheese mixture. Do not beat it with the electric mixer at this stage, as it will deflate the whipped topping and make your creamy layer less airy. Fold until just combined, being careful not to overmix. You’re aiming for a light, fluffy, cloud-like consistency that perfectly complements the rich flavors of “Cherries In The Snow.”
Assembling and Chilling Your Exquisite Cherries In The Snow
- Spread the Creamy Goodness: Retrieve your chilled graham cracker crust from the refrigerator. Carefully spoon the entire cream cheese mixture over the chilled crust. Using an offset spatula or the back of a spoon, gently spread the creamy layer evenly from edge to edge. Take your time to create a smooth, beautiful surface; this is the snow component of our “Cherries In The Snow.”
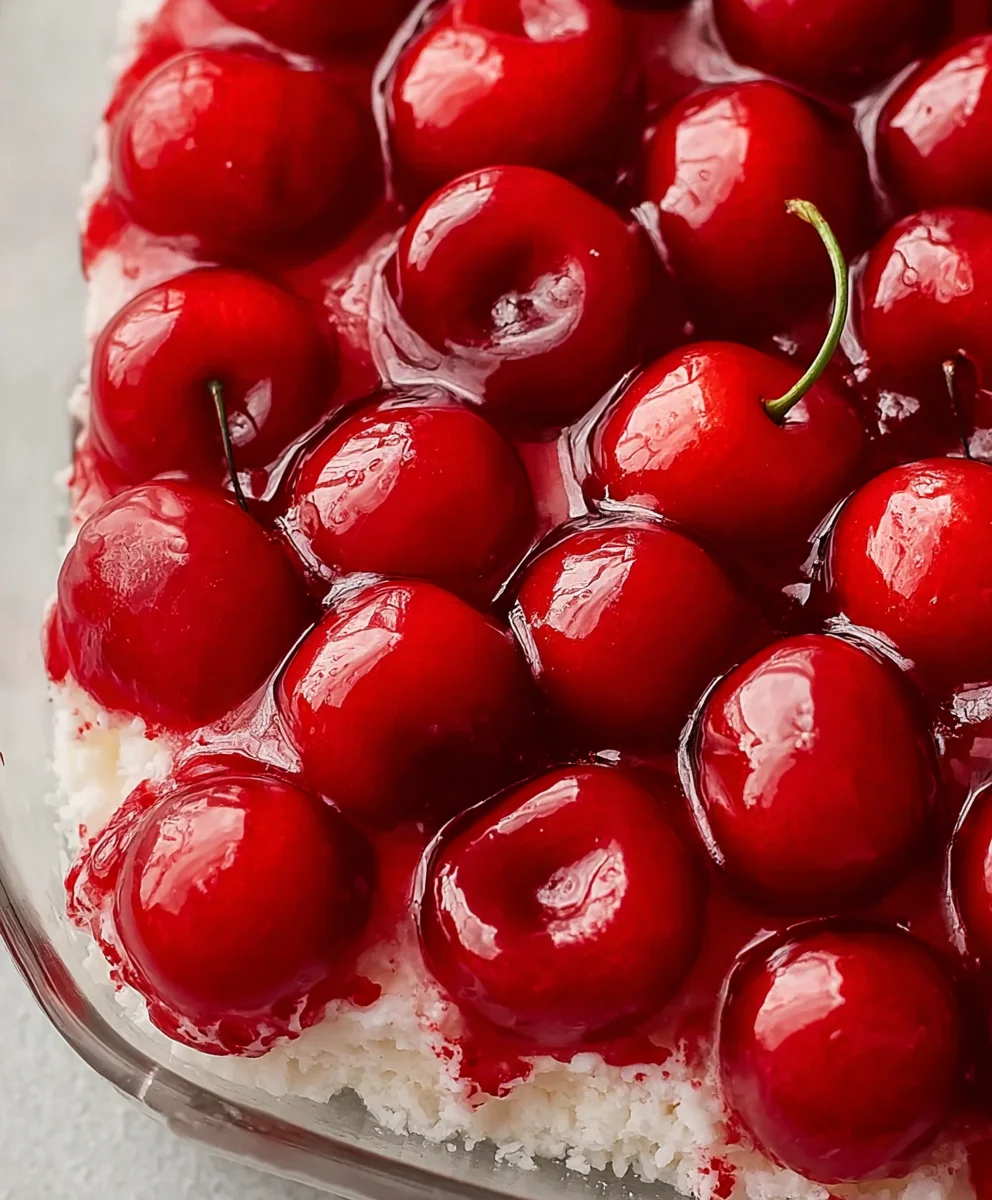
- Layer on the Cherries: Now for the star of the show – the cherries! Open your can of cherry pie filling. Spoon the cherry filling evenly over the creamy white layer. You can spread it all the way to the edges, or leave a small border of the white cream visible for a lovely presentation. The vibrant red of the cherries against the white cream is what gives this dessert its iconic “Cherries In The Snow” appearance. Make sure to distribute the cherries and their luscious glaze as evenly as possible.
- The Long Chill: This is arguably the most important step for a successful “Cherries In The Snow.” Cover the baking dish tightly with plastic wrap and place it back into the refrigerator. It needs to chill for a minimum of 4 hours, but ideally overnight. This extended chilling time allows all the layers to set properly, firming up the cream cheese mixture and ensuring that each slice holds its shape beautifully. Patience is key here for the ultimate dessert experience. The flavors will also meld and deepen during this time, creating a more harmonious and delicious treat.
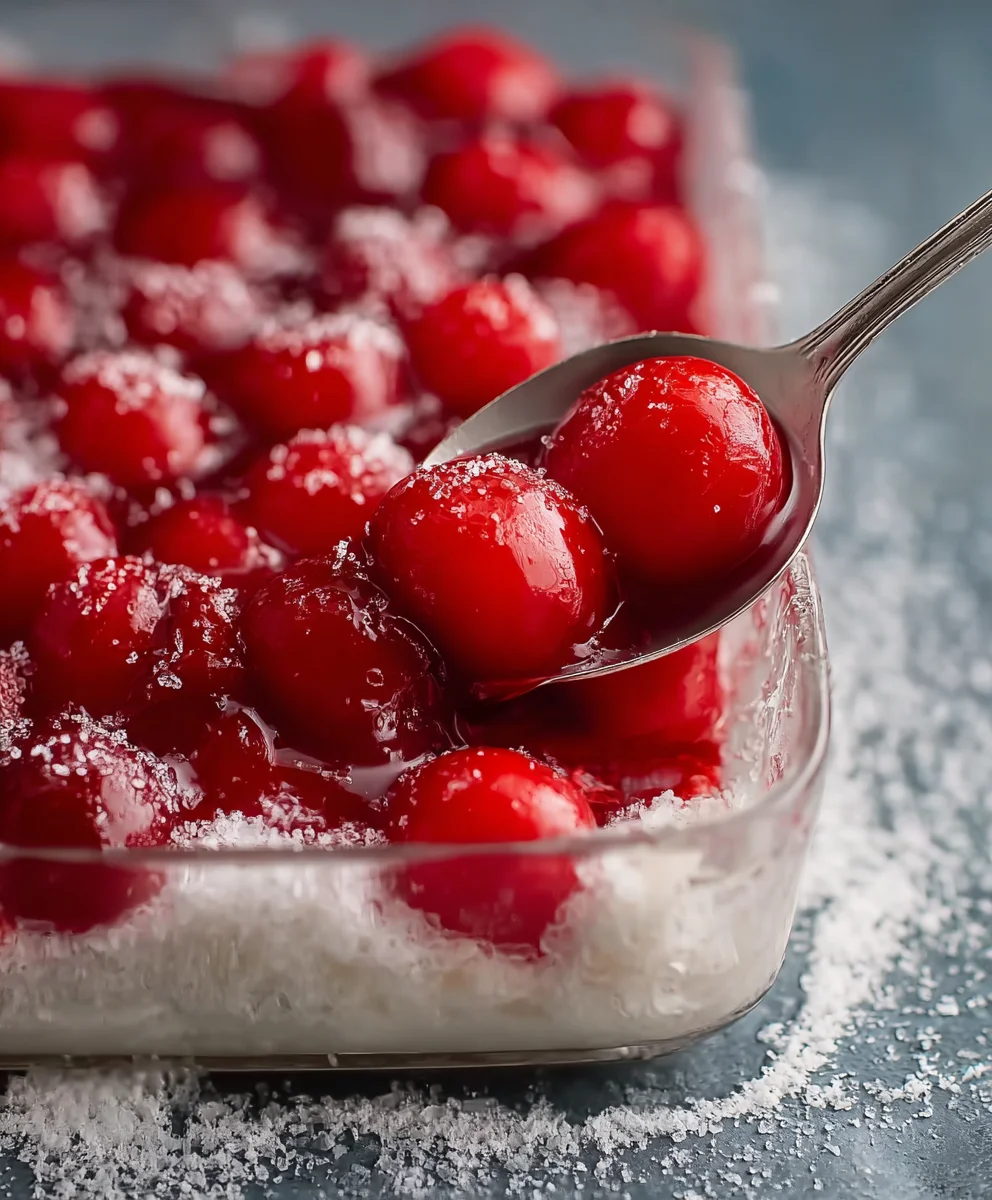
- Slice and Serve with Panache: Once your “Cherries In The Snow” has thoroughly chilled and set, it’s time to enjoy! Remove it from the refrigerator. For clean slices, use a sharp knife that has been run under hot water and wiped dry before each cut. This prevents the filling from sticking and ensures neat, attractive portions.
- Garnish and Delight: For an extra touch of elegance and freshness, consider garnishing each serving. A sprig of fresh mint adds a pop of color and a lovely aroma. A few chocolate shavings or curls sprinkled over the top introduce a subtle bitterness that wonderfully balances the sweetness of the cherries and cream. If you have any extra fresh cherries, pitting and placing one on top of each slice makes for an absolutely stunning presentation. Your guests will be truly impressed by your homemade “Cherries In The Snow”!
- Storage: Any leftover “Cherries In The Snow” can be stored, covered tightly with plastic wrap, in the refrigerator for up to 3-4 days. It tastes just as wonderful, if not better, the next day as the flavors continue to develop. Enjoy every delightful bite of this classic, easy-to-make, and incredibly satisfying dessert!
Conclusion:
And there you have it, my friends! We’ve reached the sweet end of our culinary journey, but truly, this is just the beginning of your delicious adventure. I genuinely believe this recipe is more than just a dessert; it’s an experience, a delightful moment waiting to happen in your kitchen and at your table. From its effortless preparation to its stunning presentation and, most importantly, its absolutely irresistible taste, this dish is destined to become a firm favorite in your repertoire.
What makes it a true must-try? For starters, the blissful combination of textures: the delicate crunch of the crumbly base, the smooth, pillowy embrace of the creamy filling, and the juicy burst of sweet-tart cherries in every bite. It’s a symphony for the senses, striking that perfect balance between refreshing and indulgent. It’s light enough not to overwhelm, yet rich enough to satisfy even the most demanding sweet tooth. Plus, it’s a showstopper without demanding hours of your precious time. No complicated techniques, no finicky baking, just simple ingredients coming together to create something truly magical. This is precisely why the delightful “Cherries In The Snow” is more than just a recipe; it’s a promise of pure, unadulterated joy in every spoonful. It’s the kind of dessert that elicits gasps of delight and requests for the recipe, making you feel like a master chef with minimal effort. Trust me, the sheer satisfaction of seeing your loved ones enjoy this stunning creation is a reward in itself.
Serving Suggestions:
While this dessert is undeniably glorious straight from the fridge in a large serving dish, there are countless ways to elevate its presentation and tailor it to any occasion. For an elegant touch, try serving individual portions in beautiful stemmed glass coupes or small mason jars. This not only looks incredibly sophisticated but also makes for convenient portion control and easy grab-and-go options at a potluck or garden party. Imagine a row of these gleaming jars, each perfectly layered, ready for guests to pick up. You could also garnish each serving with a fresh sprig of mint, a dusting of finely grated dark chocolate, or a few extra fresh cherries on top for an extra pop of color and flavor. It’s also a fantastic dessert to bring to a summer barbecue or a holiday gathering, as it travels well and always impresses. It’s particularly wonderful after a hearty meal, offering a refreshing and light finish that cleanses the palate beautifully. Think about serving it alongside a cup of freshly brewed coffee or a light herbal tea for a truly satisfying end to any meal.
Creative Variations:
The beauty of this recipe lies not only in its simplicity but also in its incredible adaptability. While the classic “Cherries In The Snow” is perfection, don’t hesitate to get creative with your own variations. You could experiment with different fruit fillings – perhaps a medley of mixed berries like raspberries and blueberries for a summer twist, or even sliced peaches when they’re perfectly ripe. For the crust, instead of the traditional graham crackers, consider crushed shortbread cookies, vanilla wafers, or even finely ground almonds for a gluten-free option. To enhance the creamy layer, a touch of almond extract can complement the cherries beautifully, or a teaspoon of lemon zest could add a bright, zesty counterpoint. For a truly decadent treat, you might swirl in some melted white chocolate into the whipped cream before folding it in, creating an even richer, more luxurious texture. And for the adults, a subtle splash of kirsch (cherry brandy) or amaretto layered with the cherries could add an intriguing depth and warmth. The possibilities are truly endless, allowing you to personalize this dessert to your exact preferences or whatever fresh, seasonal ingredients you have on hand.
Now, it’s your turn! I implore you to step into the kitchen, gather your ingredients, and give this incredible recipe a try. You won’t regret it. I am so confident that you will fall in love with its ease and its exquisite taste. Once you’ve whipped up your own batch of this glorious dessert, I would absolutely love to hear all about your experience. Did you stick to the classic? Or did you venture into creative variations? Please, share your photos and your thoughts! Your feedback and your culinary triumphs inspire not only me but also our entire community of food lovers. So, go forth, create, and most importantly, enjoy every single delicious bite!
Cherries In The Snow: Easy, Creamy & Delicious Dessert Recipe
Cherries In The Snow is an elegant and whimsical no-bake American dessert featuring a buttery graham cracker crust, a light and creamy dream layer, and a luscious ruby-red cherry topping. Easy to prepare and stunning to serve, it’s a timeless favorite for any occasion.
Ingredients
-
2 cups graham cracker crumbs
-
1/2 cup unsalted butter, melted
-
1/4 cup granulated sugar
-
2 (8 ounces each) packages cream cheese, softened (For a lighter version, use light cream cheese.)
-
1 cup powdered sugar, sifted
-
1 teaspoon pure vanilla extract
-
1 (12 ounces) container frozen whipped topping, thawed (For a lighter version, use fat-free Cool Whip. Alternatively, substitute with 3 cups sweetened whipped cream stabilized with 1 tsp gelatin.)
-
1 (21 ounces) can cherry pie filling
-
Fresh mint leaves (optional garnish)
-
Chocolate shavings or curls (optional garnish)
-
Fresh cherries, pitted (optional garnish)
Instructions
-
Step 1
Lightly grease a 9×13-inch baking dish. In a medium bowl, combine 2 cups finely crushed graham cracker crumbs, 1/2 cup melted unsalted butter, and 1/4 cup granulated sugar. Press mixture firmly and evenly into the prepared dish. Chill crust in the refrigerator for at least 30 minutes. -
Step 2
Ensure 2 (8 oz) packages of cream cheese are softened to room temperature. In a large mixing bowl, beat softened cream cheese with an electric mixer until light, fluffy, and completely smooth (2-3 minutes). Gradually beat in 1 cup sifted powdered sugar and 1 teaspoon pure vanilla extract until smooth and well blended. Gently fold in 1 (12 oz) container thawed whipped topping using a spatula until just combined, being careful not to deflate. -
Step 3
Retrieve the chilled crust. Carefully spoon the entire creamy mixture over the crust and spread evenly. Open 1 (21 oz) can of cherry pie filling and spoon it evenly over the creamy white layer. Cover the baking dish tightly with plastic wrap and refrigerate for a minimum of 4 hours, ideally overnight, to allow all layers to set properly. -
Step 4
Once thoroughly chilled and set, remove from the refrigerator. For clean slices, use a sharp knife run under hot water and wiped dry before each cut. Garnish individual servings with a sprig of fresh mint, chocolate shavings, or a fresh pitted cherry, if desired. Store any leftovers, covered, in the refrigerator for up to 3-4 days.
Important Information
Nutrition Facts (Per Serving)
It is important to consider this information as approximate and not to use it as definitive health advice.
Allergy Information
Please check ingredients for potential allergens and consult a health professional if in doubt.


Leave a Comment