
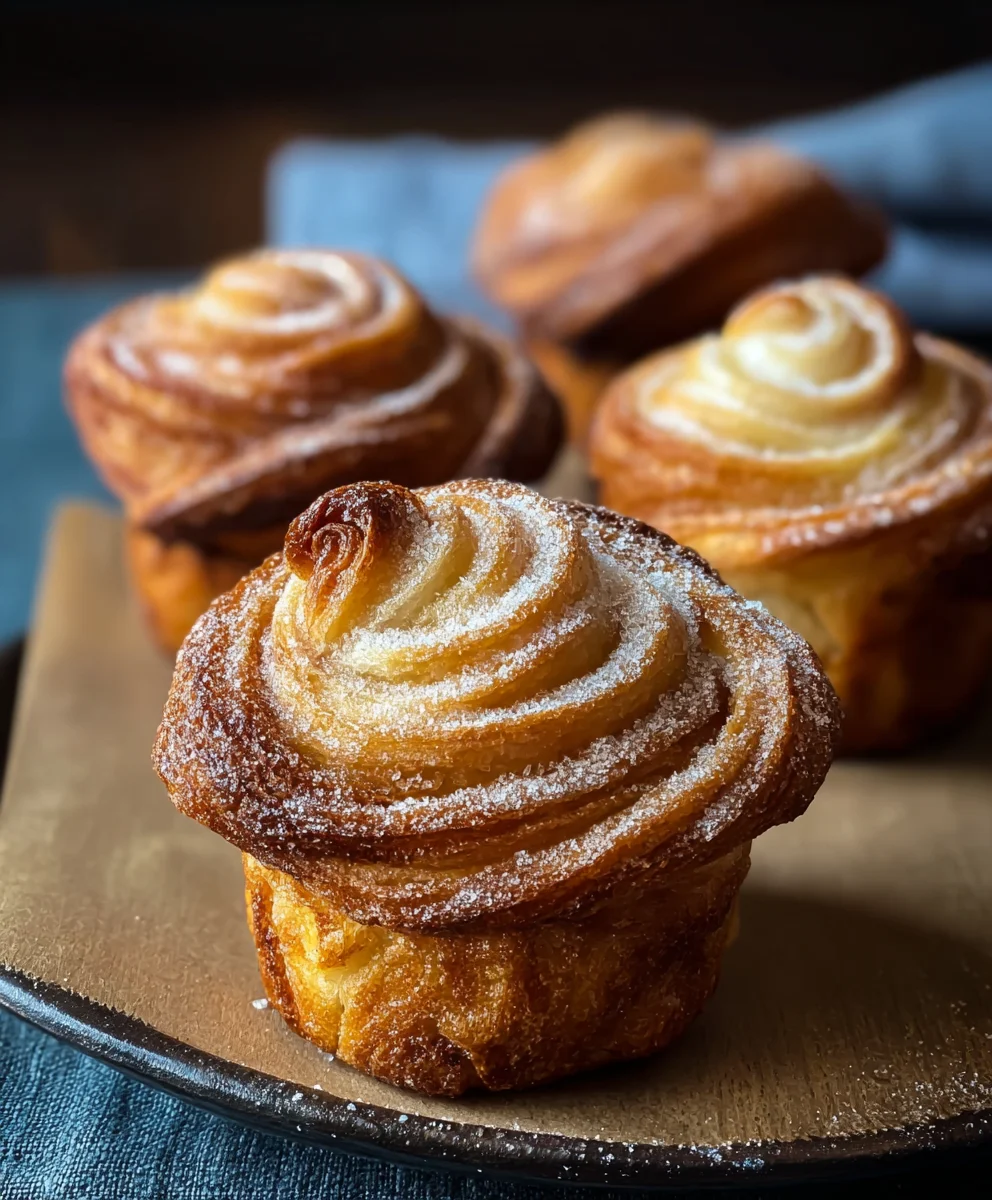
Cruffins Recipe – this delightful culinary innovation has captured the hearts of pastry lovers worldwide, offering an irresistible fusion of two beloved baked goods. Imagine the buttery, flaky layers of a perfectly laminated croissant, elegantly baked into the convenient, individual shape of a muffin. This ingenious creation, a true testament to modern patisserie, first emerged from innovative bakeries, quickly becoming a viral sensation and a must-try for anyone with a penchant for exquisite breakfast treats or decadent desserts. I’m absolutely thrilled to guide you through crafting these marvels in your own kitchen.
People adore cruffins not just for their stunning appearance, but for the incredible textural experience they deliver – a crisp exterior giving way to a soft, airy, and deeply flavorful interior. This unique combination offers the best of both worlds, making every bite a journey of discovery. Whether filled with rich custards, vibrant fruit compotes, or simply dusted with cinnamon sugar, mastering this Cruffins Recipe promises a truly rewarding baking adventure that yields a show-stopping pastry, perfect for special occasions or a luxurious everyday indulgence. I believe you’ll find the journey of creating these hybrid beauties as satisfying as enjoying the first delightful bite.
Ingredients:
- For the Dough:
- 300g (approximately 2 ½ cups) strong bread flour or all-purpose flour
- 30g (2 tablespoons) granulated sugar
- 6g (1 teaspoon) instant dry yeast
- 5g (¾ teaspoon) fine sea salt
- 120ml (½ cup) warm milk (around 105-115°F / 40-46°C)
- 60ml (¼ cup) warm water (around 105-115°F / 40-46°C)
- 1 large egg, at room temperature
- 30g (2 tablespoons) unsalted butter, softened
- For the Butter Block (Beurrage):
- 170g (¾ cup) high-quality unsalted butter (preferably European-style with higher fat content), chilled
- For Dusting:
- A generous amount of extra strong bread flour or all-purpose flour
- Optional Fillings/Toppings:
- Powdered sugar for dusting
- Lemon curd, chocolate ganache, or cream cheese frosting for filling
- Muffin tin (standard 12-cup)
Preparing the Dough
- Activate the Yeast: In a large mixing bowl, combine the warm milk and warm water. Sprinkle in the instant dry yeast and a pinch of the granulated sugar. Stir gently and let it sit for about 5-10 minutes until it becomes frothy. This bubbling indicates that your yeast is alive and ready to work its magic on our Cruffins Recipe.
- Combine Dry Ingredients: In a separate medium bowl, whisk together the strong bread flour, remaining granulated sugar, and fine sea salt. This ensures an even distribution of all the dry components before we introduce them to our wet mixture.
- Mix Wet Ingredients: Once your yeast is active, add the room temperature egg to the milk mixture and whisk until well combined. The egg adds richness and helps with the structure of the dough.
- Form the Dough: Gradually add the dry flour mixture to the wet ingredients, mixing with a wooden spoon or a stand mixer with a dough hook on low speed until a shaggy dough forms. Once all the flour is incorporated, increase the speed slightly and knead for about 5 minutes until the dough starts to come together.
- Incorporate Butter: Add the softened unsalted butter, one tablespoon at a time, allowing each piece to fully incorporate into the dough before adding the next. This slow addition helps the butter emulsify properly, contributing to a tender crumb.
- Knead to Perfection: Continue to knead the dough for another 8-10 minutes on medium speed until it becomes smooth, elastic, and passes the windowpane test. To perform the windowpane test, take a small piece of dough and gently stretch it with your fingers. If you can stretch it thin enough to see light through it without tearing, your dough is perfectly kneaded for our Cruffins Recipe. If it tears, knead for a few more minutes and test again. This extensive kneading develops the gluten, which is crucial for the flaky layers we’re aiming for.
- First Proof (Bulk Fermentation): Lightly grease a large bowl with a neutral oil. Place the dough in the bowl, turning it once to coat the top. Cover the bowl tightly with plastic wrap or a damp kitchen towel. Let the dough rise in a warm, draft-free place for 1.5 to 2 hours, or until it has doubled in size. The ideal temperature for proofing is around 75-80°F (24-27°C). A slow, steady rise builds flavor.
- Chill the Dough: Once doubled, gently punch down the dough to release the air. Reshape it into a rectangle, wrap it tightly in plastic wrap, and place it in the refrigerator for at least 4 hours, or preferably overnight (up to 12-18 hours). Chilling the dough is an absolutely critical step for this Cruffins Recipe. It not only slows down the yeast activity but also firms up the gluten, making the dough easier to handle and preventing the butter from melting out during lamination. A well-chilled dough is key to achieving those distinct, delicate layers.
Preparing the Butter Block
- Prepare the Butter: While the dough is chilling, prepare your butter block. Take the 170g of chilled unsalted butter. Cut it into roughly 1/2-inch thick slices and arrange them on a piece of parchment paper to form a 6×6 inch (15×15 cm) square.
- Shape the Butter Block: Place another piece of parchment paper on top of the butter. Using a rolling pin, gently pound and roll the butter until it forms an even 6×6 inch (15×15 cm) square. The goal here is to make the butter pliable but still cold and firm, ensuring it has the same consistency throughout. This is vital so the butter spreads evenly without tearing the dough during the lamination process.
- Chill the Butter: Keep the butter block in the refrigerator until you are ready to laminate the dough. It should be firm but flexible, not rock hard, to prevent it from cracking when rolled.
Laminating the Dough
This is where the magic happens for our Cruffins Recipe, creating those signature flaky layers. Precision and keeping everything cold are paramount.
- Roll Out the Dough: Remove the chilled dough from the refrigerator. On a lightly floured surface, roll the dough out into a rectangle approximately 18×9 inches (45×23 cm) and about ¼ inch (6mm) thick. Try to maintain straight edges and even thickness. If the dough starts to resist, cover it and let it rest for 5-10 minutes before continuing. This allows the gluten to relax.
- Encase the Butter: Place the chilled butter block in the center of your rolled-out dough. Fold one side of the dough over the butter, then fold the other side over, completely encasing the butter like an envelope. Pinch the seams tightly to seal the butter inside. It’s crucial that the butter is fully enclosed to prevent it from leaking during rolling.
- First Turn (Single Fold): Lightly flour your work surface and the top of the dough. Orient the dough so that the sealed seam is facing upwards, perpendicular to you. Gently and evenly roll the dough out into a long rectangle, aiming for approximately 20×8 inches (50×20 cm) and about ¼ inch (6mm) thick. Use steady, even pressure with your rolling pin, working from the center outwards, avoiding pressing too hard on the edges.
- Perform the Single Fold: Once rolled, imagine dividing the dough into three equal sections lengthwise. Fold one end of the dough into the middle, covering one-third of the rectangle. Then, fold the other end over that, creating three layers of dough and two layers of butter. This is called a “single turn” or “book fold.”
- Chill (First Rest): Wrap the folded dough tightly in plastic wrap and refrigerate for at least 30-45 minutes. This chilling period is essential; it allows the butter to firm up again and the gluten in the dough to relax, preventing tearing during subsequent rolling. Do not rush this step!
- Second Turn (Single Fold): Remove the dough from the fridge. Place it on your lightly floured surface, making sure the open edge of the “book” is perpendicular to you. Repeat steps 14 and 15: roll the dough out to approximately 20×8 inches (50×20 cm) again, maintaining even thickness. Then perform another single fold, folding it into thirds.
- Chill (Second Rest): Wrap the dough again and refrigerate for another 30-45 minutes. We are building layers, and each chill allows the structure to set.
- Third Turn (Single Fold): For the final turn, remove the dough from the fridge. Place it on your lightly floured surface, with the open edge perpendicular to you. Roll it out one last time to approximately 20×8 inches (50×20 cm). Perform the third and final single fold. You should now have developed beautiful, delicate layers essential for the perfect Cruffins Recipe.
- Final Chill: Wrap the laminated dough tightly and refrigerate for at least 1-2 hours, or even overnight. This final chill is crucial for making the dough firm enough to handle and cut precisely without losing its structure. It ensures the butter is solid, which prevents it from melting out too quickly in the oven and helps achieve that incredible rise and flakiness.
Shaping the Cruffins
- Prepare Muffin Tins: Lightly grease a standard 12-cup muffin tin with butter or a non-stick spray. You can also line it with paper liners for easier removal, though classic Cruffins are often baked directly in the tin to help them achieve their signature tall shape.
- Roll Out the Laminated Dough: Remove the well-chilled laminated dough from the refrigerator. On a lightly floured surface, roll the dough out into a large rectangle, approximately 18×12 inches (45×30 cm) and about ⅛ inch (3-4 mm) thick. Aim for consistent thickness across the entire surface. If the dough starts to shrink back, let it rest for 5-10 minutes before continuing to roll.
- Trim and Cut Strips: Using a sharp knife or a pizza cutter, trim the edges of the dough to create clean, straight lines. Then, cut the large rectangle lengthwise into long strips, each about 1 to 1.5 inches (2.5-4 cm) wide. You should get about 10-12 strips, depending on your desired Cruffin size and the width of your strips. These strips will become the foundation of our Cruffins Recipe.
- Shape Each Cruffin: Take one strip of dough. Starting at one end, tightly roll the strip into a coil, like a snail shell. Once you reach the end of the strip, tuck the end underneath the coil to secure it. The goal is to create a tight, compact coil that will unfold into beautiful layers when baked.
- Place in Muffin Tin: Carefully transfer each coiled dough into a prepared muffin cup. Repeat with the remaining dough strips until all your muffin cups are filled.
Final Proof and Baking
- Second Proof (Final Rise): Cover the muffin tin loosely with plastic wrap or a light kitchen towel. Place the Cruffins in a warm, draft-free place for about 1.5 to 2 hours, or until they have visibly puffed up and look soft and airy. They won’t double in size like bread dough, but they should feel light and look well-risen. Be careful not to overproof, as this can cause the layers to collapse. This final proof is critical for light and airy Cruffins.
- Preheat Oven: About 20-30 minutes before the end of the proofing time, preheat your oven to 375°F (190°C). If you have a convection setting, you might reduce the temperature slightly to 350°F (175°C).
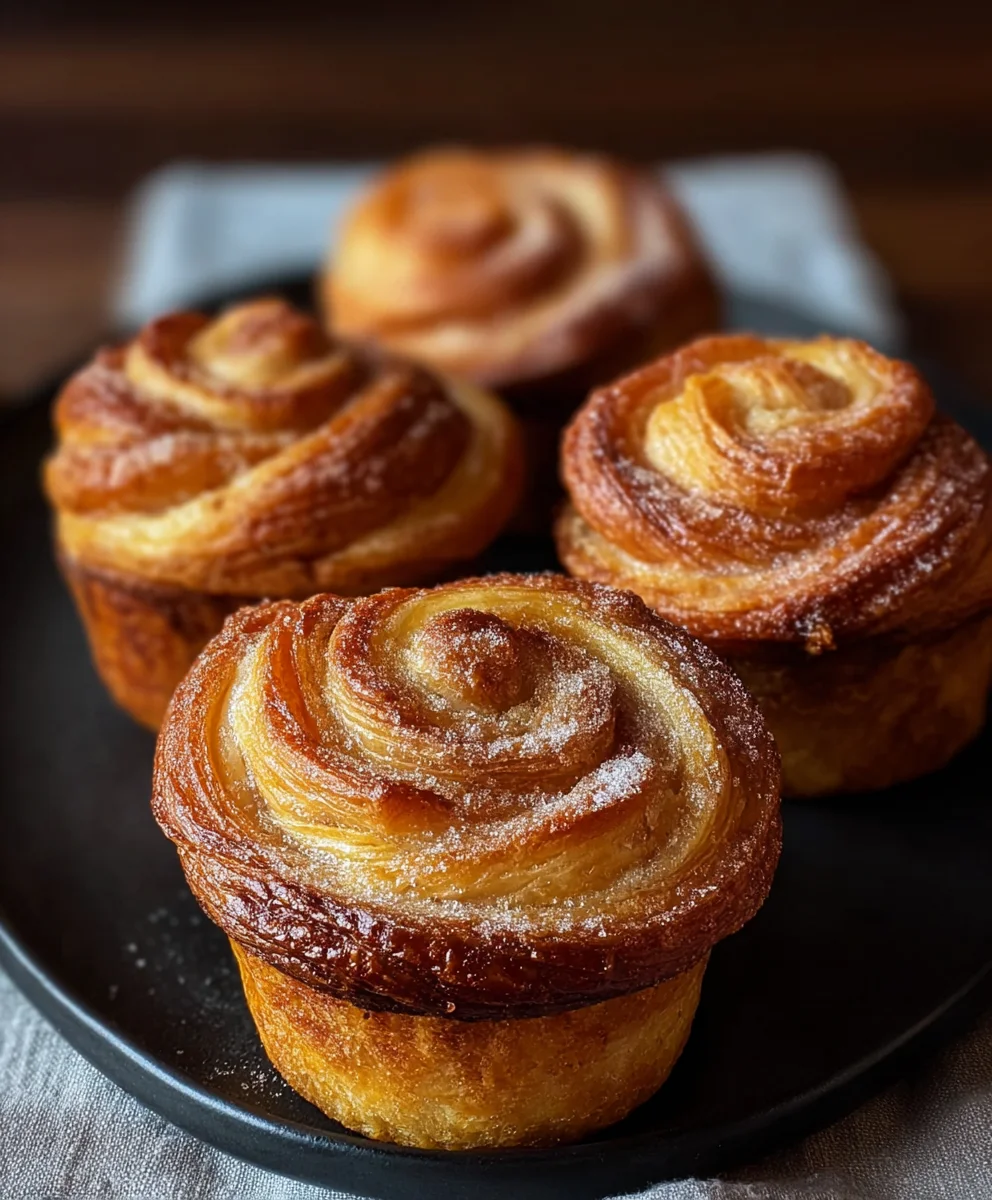
- Bake the Cruffins: Once proofed and the oven is preheated, remove the plastic wrap. Bake the Cruffins for 20-25 minutes, or until they are deeply golden brown on top and bottom. If you notice them browning too quickly, you can loosely tent them with aluminum foil for the last few minutes of baking. The deep golden color indicates a perfectly cooked, crispy exterior.
- Cooling: Once baked, immediately remove the muffin tin from the oven. Let the Cruffins cool in the muffin tin for about 5-10 minutes before carefully transferring them to a wire rack to cool completely. Cooling on a wire rack allows air to circulate around them, preventing the bottoms from becoming soggy and maintaining that lovely crisp texture of a well-executed Cruffins Recipe.
Finishing Touches
- Dust or Fill: Once cooled, your Cruffins are ready for their grand finale! You can simply dust them generously with powdered sugar for a classic look and taste.
- Add Fillings (Optional): For an extra special treat, you can fill them. Using a piping bag fitted with a small, round tip, or even just a small knife, carefully make a small incision on the side or top of each Cruffin. Gently pipe in your desired filling, such as luscious lemon curd, rich chocolate ganache, or tangy cream cheese frosting. The combination of the flaky pastry and a delightful filling truly elevates this Cruffins Recipe.
- Serve: These Cruffins are best enjoyed fresh, ideally on the same day they are baked, to fully appreciate their delicate layers and buttery aroma. They make an exquisite breakfast, brunch, or dessert item.
Conclusion:
Oh, my friends, if there’s one thing I hope you take away from our culinary journey today, it’s that the world of baking holds endless wonders, and some of the most magical creations are surprisingly within reach. This isn’t just another pastry; it’s an experience, a delightful fusion that elevates both the humble muffin and the majestic croissant into something truly spectacular. I genuinely believe that once you pull these golden, flaky, irresistible treats from your oven, you’ll understand exactly why I’ve dedicated so much enthusiasm to sharing this incredible Cruffins Recipe with you.
Think about that moment: the scent of warm butter and caramelized sugar wafting through your kitchen, drawing everyone closer. Then, the visual feast – perfectly spiraled, golden-brown tops, each one a testament to your baking prowess. And finally, the taste! The initial crispness as you bite through the delicate layers, followed by the soft, airy, and buttery interior that simply melts in your mouth. It’s a symphony of textures and flavors that will undoubtedly make these a new favorite in your household.
Why You Absolutely Must Try This Recipe
Beyond the sheer deliciousness, there’s a profound satisfaction that comes from mastering a recipe that seems intricate but, with my step-by-step guide, becomes entirely approachable. You’re not just baking; you’re crafting an edible work of art. The unique combination of the croissant’s signature lamination and the muffin’s charming shape offers a versatility that few other baked goods can claim. They’re impressive enough for a special occasion, yet comforting enough for a lazy Sunday morning. You’re giving yourself, and those you share them with, a truly memorable treat. It’s a chance to impress without immense stress, a journey that begins with a few simple ingredients and culminates in something truly extraordinary. The effort, I promise, is rewarded tenfold by the sheer delight these pastries bring.
Endless Possibilities for Enjoyment
Now, let’s talk about making these beauties truly your own! While absolutely divine straight from the oven, still warm and unadorned, the serving possibilities for your homemade cruffins are as vast as your imagination.
For those with a sweet tooth, a simple dusting of powdered sugar is always a classic. But why stop there? Imagine a drizzle of vanilla bean glaze, or perhaps a zesty lemon glaze for a burst of brightness that cuts through the richness beautifully. For the chocolate lovers, a quick chocolate ganache or a Nutella swirl baked right into the layers would be absolutely heavenly, turning them into an irresistible dessert. You could even fill them post-baking with a creamy custard, a rich jam, or a vibrant berry compote for an extra layer of decadence and surprise. A sprinkle of cinnamon sugar before baking adds a lovely warmth, perfect for a cozy afternoon with a hot beverage. Consider adding a hint of orange zest to the dough for an aromatic twist, or even a few chocolate chips folded into the layers for a melt-in-your-mouth experience.
And please, don’t limit your cruffin experience to just sweet! These masterpieces are incredibly versatile. Picture a savory cruffin, perhaps with a sprinkle of sharp cheddar cheese and fresh chives baked into the dough, or a delicate swirl of pesto and sun-dried tomatoes. You could even experiment with crumbled bacon, caramelized onions, or a touch of everything bagel seasoning for an elevated breakfast or brunch item that will leave your guests talking. They pair beautifully with a strong cup of coffee or a delicate tea, making them perfect for a leisurely morning. They also make an exquisite addition to any brunch spread, afternoon tea, or even as a unique dessert with a scoop of ice cream and a fruit drizzle for a sophisticated finish. Imagine serving them alongside a charcuterie board – the flaky texture contrasting with savory meats and cheeses. The versatility is truly what makes them a star.
Your Baking Adventure Awaits!
I truly hope you feel inspired and excited to dive into this wonderful Cruffins Recipe. Don’t be intimidated by the process; embrace the journey, enjoy the sensory experience of working with dough, and revel in the anticipation of the delicious results. Baking should always be a joyful exploration, and this recipe is perfectly poised to bring a lot of joy to your kitchen. Remember, practice makes perfect, but even your first attempt will be filled with deliciousness and a sense of accomplishment. There’s something incredibly rewarding about creating something so beautiful and tasty with your own hands.
Once you’ve baked your batch, I would absolutely love to hear about your experience! What variations did you try? Did you discover a new favorite topping or filling? How did your family and friends react to these delightful creations? Please don’t hesitate to share your photos, your triumphs, and even your “lessons learned” in the comments or wherever you share your culinary adventures on social media. Your insights not only inspire me but also help others on their baking journey, fostering a wonderful community of fellow food enthusiasts. So, go on, preheat your oven, gather your ingredients, and embark on this delicious baking adventure. Let’s make some cruffins, savor every bite, and share the happiness! Happy baking, my friends!
Cruffins (Croissant Muffin Hybrid)
This delightful culinary innovation offers an irresistible fusion of two beloved baked goods: the buttery, flaky layers of a perfectly laminated croissant, elegantly baked into the convenient, individual shape of a muffin. This ingenious creation is a true testament to modern patisserie, offering a crisp exterior giving way to a soft, airy, and deeply flavorful interior.
Ingredients
-
300g (2 ½ cups) strong bread flour or all-purpose flour
-
30g (2 tbsp) granulated sugar
-
6g (1 tsp) instant dry yeast
-
5g (¾ tsp) fine sea salt
-
120ml (½ cup) warm milk
-
60ml (¼ cup) warm water
-
1 large egg, room temperature
-
30g (2 tbsp) unsalted butter, softened
-
170g (¾ cup) unsalted butter, chilled (for butter block)
-
Extra flour for dusting
-
Powdered sugar (optional, for dusting)
-
Lemon curd, chocolate ganache, or cream cheese frosting (optional, for filling)
Instructions
-
Step 1
In a large bowl, combine 120ml warm milk, 60ml warm water, 6g instant dry yeast, and a pinch of granulated sugar; stir and let sit 5-10 min until frothy. In a separate bowl, whisk 300g flour, remaining 30g granulated sugar, and 5g fine sea salt. Add dry mixture and 1 large egg to the yeast mixture; mix until a shaggy dough forms. Gradually add 30g softened unsalted butter, then knead for 8-10 min until smooth and elastic (passes windowpane test). -
Step 2
Lightly grease a large bowl, place the dough, turn once to coat, cover, and let rise in a warm, draft-free place for 1.5-2 hours until doubled. Gently punch down, reshape into a rectangle, wrap tightly, and refrigerate for at least 4 hours, or preferably overnight (up to 18 hours). -
Step 3
Cut 170g chilled unsalted butter into 1/2-inch slices, arrange on parchment paper, and top with another parchment sheet. Pound and roll the butter to form an even 6×6 inch (15×15 cm) square. Chill the butter block until ready to use. -
Step 4
On a lightly floured surface, roll the chilled dough to an 18×9 inch (45×23 cm) rectangle, about ¼ inch thick. Place the chilled butter block in the center, fold one side of the dough over, then the other, completely encasing the butter. Pinch seams tightly. Orient the dough so the sealed seam is perpendicular to you. Roll dough to approximately 20×8 inches (50×20 cm), then perform a single fold (fold one end into the middle, then fold the other end over). Wrap and refrigerate for 30-45 minutes. -
Step 5
Repeat the single fold process (steps of rolling and folding into thirds) two more times, chilling for 30-45 minutes after each turn. Remember to orient the dough with the open edge perpendicular to you each time. -
Step 6
After the third turn, wrap the laminated dough tightly and refrigerate for at least 1-2 hours, or even overnight. This is crucial for firming the dough and butter before shaping. -
Step 7
Lightly grease a standard 12-cup muffin tin. Remove the well-chilled dough and roll it out into a large rectangle, approximately 18×12 inches (45×30 cm) and about ⅛ inch (3-4 mm) thick. Trim the edges to create clean lines, then cut the rectangle lengthwise into long strips, each about 1 to 1.5 inches (2.5-4 cm) wide. Take one strip and tightly roll it into a coil, like a snail shell, tucking the end underneath to secure. Place each coiled dough into a prepared muffin cup. -
Step 8
Cover the muffin tin loosely with plastic wrap or a light kitchen towel. Place the Cruffins in a warm, draft-free place for about 1.5-2 hours, or until they have visibly puffed up and look soft and airy. They should feel light and well-risen. -
Step 9
About 20-30 minutes before the end of proofing, preheat your oven to 375°F (190°C) (350°F / 175°C convection). Once proofed, remove plastic wrap and bake for 20-25 minutes, or until deeply golden brown on top and bottom. If browning too quickly, loosely tent with aluminum foil. -
Step 10
Immediately remove the muffin tin from the oven. Let Cruffins cool in the tin for 5-10 minutes, then carefully transfer them to a wire rack to cool completely. Once cooled, dust generously with powdered sugar or, optionally, fill with lemon curd, chocolate ganache, or cream cheese frosting. Serve fresh.
Important Information
Nutrition Facts (Per Serving)
It is important to consider this information as approximate and not to use it as definitive health advice.
Allergy Information
Please check ingredients for potential allergens and consult a health professional if in doubt.


Leave a Comment