
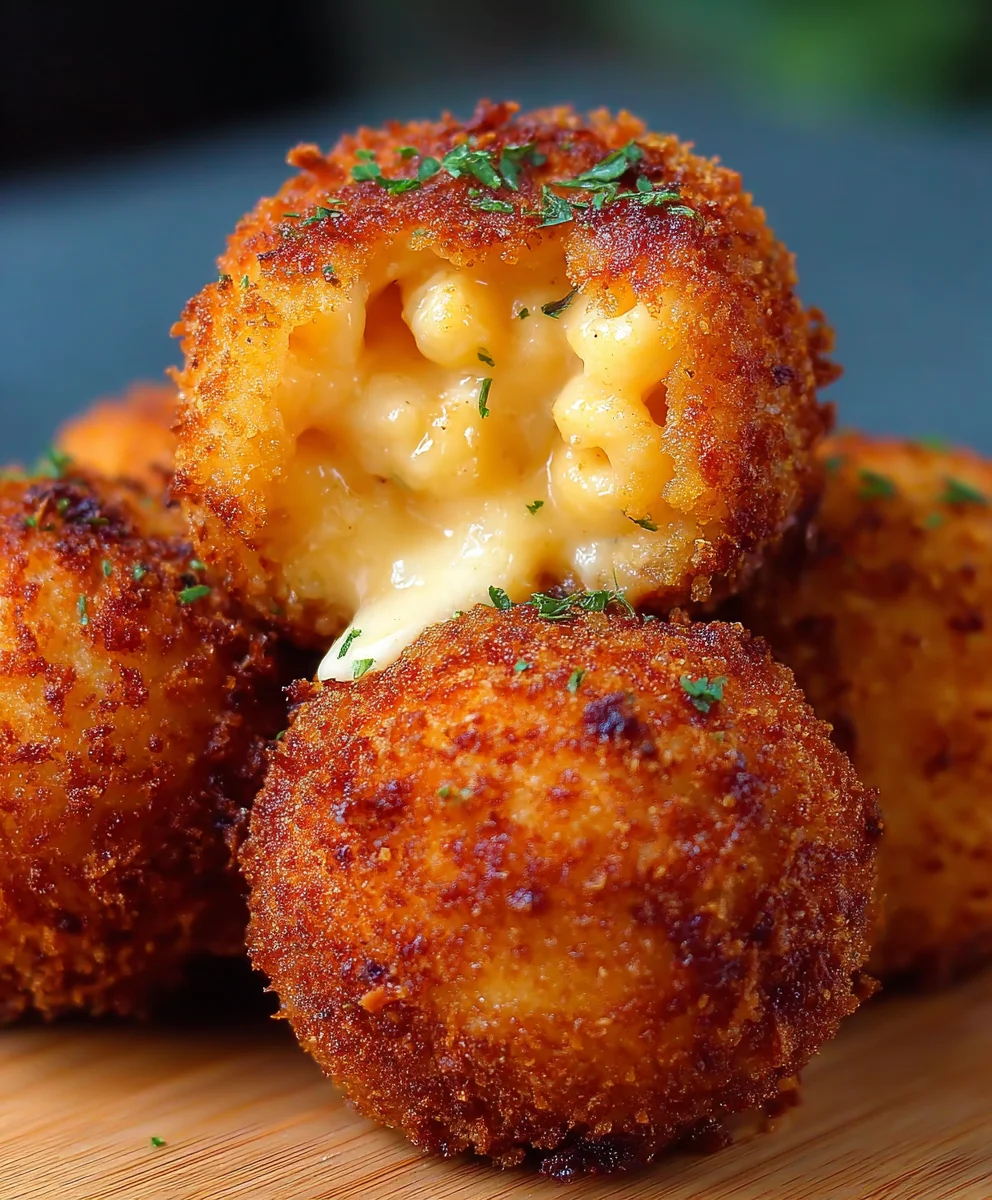
Crispy Fried Mac and Cheese Balls are more than just a nostalgic comfort food; they’re a revelation in texture and flavor that consistently steal the show at parties and family dinners alike. Imagine this: a golden-brown, impossibly crunchy exterior that gives way to a molten, gooey center of rich, cheesy macaroni. It’s a delightful contrast that has people reaching for more before the first batch is even gone. What makes these little spheres of deliciousness so universally adored? It’s that perfect marriage of familiar, beloved mac and cheese with the irresistible allure of a perfectly fried bite. We’ve all had mac and cheese, but transforming it into these portable, bite-sized marvels elevates it to a whole new level of indulgence. The secret to truly exceptional Crispy Fried Mac and Cheese Balls lies in achieving that satisfying crunch without sacrificing the creamy, cheesy heart within.

Ingredients:
- 2 cups elbow macaroni, cooked and drained
- 2 tablespoons unsalted butter
- 2 tablespoons all-purpose flour
- 1 cup milk
- 2 cups shredded cheddar cheese
- 1/2 cup grated Parmesan cheese
- Salt and pepper to taste
- 1 cup all-purpose flour
- 2 large eggs, beaten
- 1 1/2 cups seasoned breadcrumbs
- Vegetable oil, for frying
Making the Mac and Cheese Base
The foundation of these irresistible Crispy Fried Mac and Cheese Balls is a rich and creamy mac and cheese. Begin by melting the 2 tablespoons of unsalted butter in a medium saucepan over medium heat. Once the butter is fully melted and shimmering, whisk in the 2 tablespoons of all-purpose flour. This creates a roux, which will thicken our cheese sauce. Cook the roux for about 1 to 2 minutes, stirring constantly, until it’s a pale golden color. This step is crucial for removing the raw flour taste.
Gradually pour in the 1 cup of milk while whisking continuously. Keep whisking until the sauce is smooth and starts to thicken. This should take another 2 to 3 minutes. Once the sauce has a nice, velvety consistency, reduce the heat to low. Now it’s time for the cheese! Add the 2 cups of shredded cheddar cheese and the 1/2 cup of grated Parmesan cheese to the saucepan. Stir gently until all the cheese is melted and incorporated, creating a wonderfully gooey and cheesy sauce. Season generously with salt and pepper to taste. Remember, the cheese can be salty, so start with a little and add more if needed.
Gently fold in the 2 cups of cooked and drained elbow macaroni into the cheese sauce. Ensure every piece of pasta is coated in that luscious cheese mixture. The macaroni should be slightly firm, not mushy, as it will be shaped and fried later. Once everything is well combined, transfer the mac and cheese mixture to a shallow dish or baking sheet lined with parchment paper. Spread it out evenly to a thickness of about ½ to ¾ inch. This will help it cool down faster and make it easier to handle. Place this in the refrigerator for at least 1 hour, or until it’s firm enough to scoop and shape. The chilling process is essential for the balls to hold their form.
Preparing for Frying
While the mac and cheese base is chilling, set up your breading station. You’ll need three shallow bowls or plates. In the first bowl, place the 1 cup of all-purpose flour. In the second bowl, lightly beat the 2 large eggs until they are well combined. In the third bowl, pour in the 1 1/2 cups of seasoned breadcrumbs. If you want extra flavor, you can add a pinch of garlic powder, onion powder, or paprika to the breadcrumbs.
Once the mac and cheese mixture is thoroughly chilled and firm, use a tablespoon or a small cookie scoop to portion out the mixture. Roll each portion into a compact ball, about 1 to 1.5 inches in diameter. It’s important to pack them tightly so they don’t fall apart during frying. If the mixture is too sticky, you can lightly dampen your hands with water.
Now, it’s time to coat each mac and cheese ball. First, dredge each ball in the all-purpose flour, ensuring it’s evenly coated. Gently shake off any excess flour. Next, dip the floured ball into the beaten eggs, allowing any excess to drip off. Finally, roll the egg-coated ball in the seasoned breadcrumbs, pressing gently to make sure the breadcrumbs adhere well. Repeat this breading process for all the mac and cheese balls. For an extra crispy coating, you can double-dip them: after the first breading, dip them back into the egg and then into the breadcrumbs again. Place the breaded balls on a clean plate or baking sheet.
Frying the Crispy Mac and Cheese Balls
In a large, heavy-bottomed pot or a deep fryer, pour enough vegetable oil to reach a depth of at least 3 inches. Heat the oil over medium-high heat until it reaches 350°F (175°C). It’s crucial to maintain this temperature for perfectly crispy, evenly cooked balls. If the oil is too cool, the balls will absorb too much grease and become soggy. If it’s too hot, the outside will burn before the inside is heated through. You can test the oil temperature by dropping a tiny piece of breadcrumb into it; it should sizzle immediately.
Carefully lower 3-4 mac and cheese balls into the hot oil at a time. Do not overcrowd the pot, as this will lower the oil temperature and result in uneven frying. Fry the balls for 3-5 minutes, turning them occasionally with a slotted spoon or spider strainer, until they are golden brown and crispy all over. The goal is to achieve a beautiful, deep golden hue.
Using the slotted spoon, carefully remove the fried mac and cheese balls from the oil and place them on a wire rack set over a baking sheet. This allows excess oil to drain off, ensuring they stay as crispy as possible. If you don’t have a wire rack, you can use paper towels, but a wire rack is preferable for maintaining crispiness. Repeat the frying process with the remaining balls, ensuring the oil returns to 350°F (175°C) between batches. Allow the balls to rest for a minute or two before serving to avoid burning your mouth on the molten cheese inside. Serve them hot and enjoy every crispy, cheesy bite of these delightful Crispy Fried Mac and Cheese Balls!
Conclusion:
There you have it – your ultimate guide to making incredibly delicious Crispy Fried Mac and Cheese Balls! We’ve walked through each step, from crafting the perfect cheesy macaroni base to achieving that irresistible golden-brown crunch. These little bites are a true crowd-pleaser, perfect for parties, appetizers, or even a fun weeknight treat. Remember, the key to success lies in chilling the mac and cheese thoroughly before forming and frying, which ensures they hold their shape beautifully and achieve that sought-after crispiness. Don’t be afraid to get creative with your cheese choices and coatings; the possibilities are truly endless!
For serving suggestions, these Crispy Fried Mac and Cheese Balls are fantastic on their own, but they truly shine when paired with your favorite dipping sauces. A zesty marinara, a creamy ranch, a spicy sriracha mayo, or even a sweet and tangy barbecue sauce all work wonderfully. For variations, consider adding a sprinkle of chili flakes to the mac and cheese mixture for a bit of heat, or incorporate finely chopped bacon or jalapeños for extra flavor dimensions. You could also experiment with different breadcrumb coatings, such as panko for an extra-crispy texture or even crushed crackers for a unique twist.
I truly encourage you to give this recipe a try. The joy of seeing your guests’ delighted faces as they bite into these delightful morsels is incredibly rewarding. Happy cooking!
Frequently Asked Questions:
Q: How do I prevent my Crispy Fried Mac and Cheese Balls from falling apart during frying?
A: The most crucial step is to ensure your mac and cheese mixture is completely chilled and firm before forming the balls. Chilling solidifies the cheese and pasta, making them easier to shape and preventing them from disintegrating in the hot oil. Double-coating them in flour, egg, and breadcrumbs also helps create a stronger outer shell.
Q: Can I make Crispy Fried Mac and Cheese Balls ahead of time?
A: Yes, absolutely! You can prepare the mac and cheese mixture and form the balls up to a day in advance. Store them in a single layer on a baking sheet in the refrigerator. When you’re ready to cook, fry them directly from the fridge. For longer storage, you can freeze the formed balls on a baking sheet until solid, then transfer them to a freezer-safe container. Fry them from frozen, adding a few extra minutes to the cooking time.
Crispy Fried Mac and Cheese Balls – Ultimate Comfort Food
Irresistible crispy fried mac and cheese balls, a perfect comfort food that’s golden brown on the outside and gooey and cheesy on the inside.
Ingredients
-
2 cups elbow macaroni, cooked and drained
-
2 tablespoons unsalted butter
-
2 tablespoons all-purpose flour
-
1 cup milk
-
2 cups shredded cheddar cheese
-
1/2 cup grated Parmesan cheese
-
Salt and pepper to taste
-
1 cup all-purpose flour
-
2 large eggs, beaten
-
1 1/2 cups seasoned breadcrumbs
-
Vegetable oil, for frying
Instructions
-
Step 1
Melt butter in a saucepan over medium heat. Whisk in flour to create a roux and cook for 1-2 minutes until pale golden. Gradually whisk in milk until smooth and thickened. -
Step 2
Reduce heat to low. Add cheddar and Parmesan cheeses, stirring until melted and creamy. Season with salt and pepper to taste. Gently fold in cooked macaroni. -
Step 3
Transfer mac and cheese to a parchment-lined shallow dish, spread to ½-¾ inch thickness. Refrigerate for at least 1 hour until firm enough to shape. -
Step 4
Set up a breading station with three shallow bowls: one with 1 cup all-purpose flour, one with 2 beaten eggs, and one with 1 ½ cups seasoned breadcrumbs. -
Step 5
Scoop tablespoon-sized portions of the chilled mac and cheese, roll into compact 1-1.5 inch balls. Dredge each ball in flour, then dip in beaten egg, and finally coat thoroughly in breadcrumbs. Repeat for all balls. -
Step 6
Heat vegetable oil in a deep pot or fryer to 350°F (175°C). Carefully fry 3-4 balls at a time for 3-5 minutes, turning occasionally, until golden brown and crispy. -
Step 7
Remove fried balls with a slotted spoon and drain on a wire rack. Ensure oil returns to 350°F between batches. Let rest for a minute before serving hot.
Important Information
Nutrition Facts (Per Serving)
It is important to consider this information as approximate and not to use it as definitive health advice.
Allergy Information
Please check ingredients for potential allergens and consult a health professional if in doubt.

Leave a Comment