
Gin Extractgerbread House – imagine transforming a beloved holiday tradition into an exquisite, adult-friendly masterpiece, brimming with festive cheer and a subtle, sophisticated twist! I am absolutely thrilled to guide you through crafting a gingerbread house that not only captures the nostalgic warmth of the season but also introduces an unexpected depth of flavor. While traditional gingerbread houses have charmed generations since their popularization in 19th-century Germany, especially after the Brothers Grimm fairy tale, “Hansel and Gretel,” our unique approach elevates this classic.
A Timeless Tradition, Reimagined
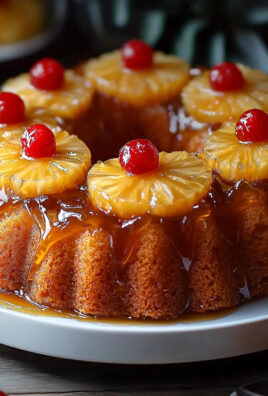
You see, this isn’t just any gingerbread house; it’s a culinary adventure. People adore gingerbread houses for the sheer joy of creation, the sweet aroma that fills the home, and the delightful blend of ginger, cinnamon, and molasses. However, this particular Gin Extractgerbread House takes that love a step further by infusing the aromatic botanicals of gin, through a carefully chosen extract, into the very fabric of its construction. The result is a wonderfully robust gingerbread with an intriguing, nuanced finish that pairs perfectly with mulled wine or a festive cocktail. It’s an eye-catching centerpiece and a truly delectable treat that promises to be the talking point of your holiday gatherings, offering a delightful balance of familiar comfort and exciting novelty. Get ready to bake a memory!
Ingredients:
-
For the Gin Extractgerbread Dough:
- 6 cups (720g) all-purpose flour, plus more for dusting
- 1 tablespoon ground ginger
- 1 tablespoon ground cinnamon
- 1 teaspoon ground cloves
- 1 teaspoon ground nutmeg
- 1 teaspoon baking soda
- 1/2 teaspoon salt
- 1 cup (226g) unsalted butter, softened
- 1 cup (200g) granulated sugar
- 1 large egg
- 1/2 cup (120ml) unsulphured molasses
- 2 tablespoons fresh orange zest
- 2 teaspoons high-quality gin extract (this is where our unique flavor comes in!)
-
For the Royal Icing (The “Glue” and Decoration):
- 4 large egg whites (or 1/2 cup pasteurized liquid egg whites)
- 4 cups (480g) powdered sugar, sifted
- 1/2 teaspoon cream of tartar
- 1 teaspoon vanilla extract (optional, for flavor)
- 1-2 tablespoons fresh lemon juice or water, as needed for consistency
-
For the Gin-Kissed Glaze (Optional, for extra flavor and shine):
- 1/2 cup powdered sugar
- 1 tablespoon gin extract (yes, more gin!)
- 1-2 teaspoons water or milk, as needed
-
For Decoration:
- Assorted candies: gumdrops, peppermints, M&M’s, candy canes, licorice, silver dragees
- Pretzels for fences
- Edible glitter or sprinkles
- Small gingerbread figures or sugar cookies
Preparing the Gin Extractgerbread Dough
- Whisk Dry Ingredients: In a large bowl, combine the 6 cups of all-purpose flour, 1 tablespoon of ground ginger, 1 tablespoon of ground cinnamon, 1 teaspoon of ground cloves, 1 teaspoon of ground nutmeg, 1 teaspoon of baking soda, and 1/2 teaspoon of salt. Use a whisk to ensure everything is thoroughly mixed and there are no lumps. Set this aside for a moment. This fragrant blend of spices is what gives our Gin Extractgerbread its classic warmth, amplified by our special extract.
- Cream Butter and Sugar: In the bowl of a stand mixer fitted with the paddle attachment, or using a large bowl and a hand mixer, cream together the 1 cup of softened unsalted butter and 1 cup of granulated sugar on medium speed until the mixture is light and fluffy. This usually takes about 3-5 minutes. Scraping down the sides of the bowl occasionally is key to ensuring even mixing.
- Add Wet Ingredients: Beat in the large egg until just combined. Then, add the 1/2 cup of unsulphured molasses, 2 tablespoons of fresh orange zest, and our star ingredient, 2 teaspoons of high-quality gin extract. Mix on low speed until everything is well incorporated. The gin extract adds a subtle, sophisticated botanical note that truly elevates this Gin Extractgerbread House from traditional gingerbread.
- Combine Wet and Dry: Gradually add the dry ingredient mixture to the wet ingredients, mixing on low speed until just combined. Be careful not to overmix! Overmixing can develop the gluten too much, leading to a tough dough. The dough will be quite stiff and may still look a little crumbly, but it should hold together when pressed.
- Divide and Chill: Divide the Gin Extractgerbread dough into two or three equal portions. Flatten each portion into a disc, wrap tightly in plastic wrap, and refrigerate for at least 2 hours, or preferably overnight. Chilling the dough is a crucial step; it allows the flavors to meld, and more importantly, it makes the dough much easier to roll out and prevents excessive spreading during baking, which is vital for structural integrity when building a Gin Extractgerbread House.
Rolling and Cutting the Gin Extractgerbread Pieces
- Prepare Your Workspace: Lightly flour a clean work surface (a large wooden board or silicone mat works wonders) and your rolling pin. Take one chilled dough disc out of the refrigerator and let it sit at room temperature for about 10-15 minutes to make it slightly more pliable, but still firm.
- Roll the Dough: Using your floured rolling pin, roll out the Gin Extractgerbread dough to an even thickness of about 1/4 inch (about 6mm). Consistency in thickness is paramount for all your house pieces to bake evenly and fit together properly. If the dough starts to stick, gently lift it and add a little more flour underneath. If it becomes too warm and soft, pop it back into the fridge for 10-15 minutes to firm up again. This step requires a bit of patience, but it pays off with perfectly structured Gin Extractgerbread walls.
- Use Templates: Now for the fun part – cutting out your Gin Extractgerbread House pieces! You’ll need sturdy templates for the front/back walls, side walls, and roof panels. You can either purchase a kit or print and cut your own from cardstock. Lay your templates carefully on the rolled dough, maximizing space while leaving a little room between each piece.
- Cut with Precision: Use a sharp knife or a pizza cutter to cut around the templates. For windows and doors, cut those out at this stage as well, if your design includes them. Carefully remove the excess dough from around your cut pieces. Gather the scraps, gently re-knead them, and re-chill if needed before rolling out again for additional pieces or decorative elements.
- Transfer to Baking Sheets: Using a thin metal spatula, carefully transfer the cut Gin Extractgerbread pieces to baking sheets lined with parchment paper. Leave some space between each piece to allow for air circulation during baking. If any pieces warp slightly during transfer, gently reshape them with your fingers.
- Repeat: Continue this process with the remaining dough discs until all your Gin Extractgerbread House components are cut out and ready for baking. You might need to work in batches, using multiple baking sheets.
Baking the Extractgerbread Components
- Preheat Oven: Preheat your oven to 350°F (175°C). Ensure your oven rack is in the middle position for even baking.
- Bake the Pieces: Bake the Gin Extractgerbread pieces for 10-15 minutes, depending on their size and thickness. Smaller, thinner pieces will bake faster, while larger, thicker ones will take a bit longer. Look for the edges to be firm and slightly darkened, and the surface to feel firm when gently pressed. Do not overbake, or your Gin Extractgerbread will become too hard and potentially crack easily during assembly.
- Cool Completely: As soon as you take the Gin Extractgerbread pieces out of the oven, if they look like they’ve spread or distorted slightly, you can gently place your templates back over them and trim the edges with a sharp knife for clean, straight lines. This is a critical step for a well-fitting Gin Extractgerbread House. Let the pieces cool on the baking sheets for about 5 minutes before carefully transferring them to a wire rack to cool completely. They must be entirely cool and firm before attempting assembly, which could take a few hours or even overnight. Patience here is key to a stable structure for your Gin Extractgerbread House.
Preparing the Royal Icing
- Whisk Egg Whites: In a very clean, grease-free bowl (using a stand mixer with a whisk attachment is ideal), combine the 4 large egg whites (or 1/2 cup pasteurized liquid egg whites) and 1/2 teaspoon cream of tartar. Whisk on medium-high speed until soft peaks form. Ensure your bowl and whisk are impeccably clean; even a tiny bit of grease can prevent the egg whites from whipping properly.
- Add Powdered Sugar: Gradually add the 4 cups of sifted powdered sugar, about 1/2 cup at a time, mixing on low speed until incorporated after each addition. Once all the sugar is in, increase the speed to high and beat until stiff, glossy peaks form. This can take 5-7 minutes.
-
Adjust Consistency: Mix in the 1 teaspoon of vanilla extract, if using. Now, you need to adjust the consistency for different uses.
- For “glue” (structural icing for assembly): The icing should be very thick and stiff, similar to toothpaste. If it’s too thick, add a few drops of lemon juice or water, one drop at a time, mixing well after each addition until you reach the desired consistency. It needs to hold its shape perfectly.
- For outlining and fine details: A slightly thinner consistency, where a dollop of icing holds its shape but the peak gently folds over.
- For flooding (filling in larger areas): A runnier consistency, like thick syrup, where a piped line disappears into the surface after 10-15 seconds. You can thin down small portions of the structural icing for these decorative purposes.
The consistency of your royal icing is paramount for the successful assembly and decoration of your Gin Extractgerbread House.
- Store Properly: Royal icing dries very quickly when exposed to air. Keep the surface of the icing covered with plastic wrap pressed directly against it, or place a damp cloth over the bowl, when not in use. Store in an airtight container at room temperature for up to 3 days.
Assembling Your Gin Extractgerbread House
- Gather Supplies: You’ll need your cooled Gin Extractgerbread pieces, your stiff royal icing (in a piping bag with a round tip or a sturdy zip-top bag with the corner snipped), and some cans or heavy objects to act as temporary supports.
- Start with Side Walls: On your serving platter or base, pipe a thick line of royal icing along the bottom edge of one side wall piece. Press it firmly onto the platter. Immediately pipe another line of icing along the vertical edge where a front or back wall will meet.
- Attach Front/Back Wall: Take one of the front or back wall pieces and carefully press its bottom edge onto the platter, adjoining it to the side wall. Pipe a line of icing along the vertical seam where the two pieces meet. Use your cans or supports to prop up the walls as they dry.
- Continue Building: Repeat the process for the remaining side wall and the other front/back wall, essentially creating a rectangular or square box. Ensure all seams are generously “glued” with icing. Don’t be shy with the icing; it’s your structural integrity!
- Let Dry: This is a critical step. Allow the assembled walls to dry and set for at least 2-4 hours, or preferably overnight, before attempting to put on the roof. The longer it dries, the sturdier your Gin Extractgerbread House will be. You want the icing to be completely hard to the touch.
- Attach the Roof: Once the walls are completely dry and stable, pipe a thick line of royal icing along the sloped edges of the front and back walls, and along the top edges of the side walls. Carefully place one roof panel onto one side, pressing gently to adhere. Immediately pipe another thick line of icing along the peak where the second roof panel will meet. Place the second roof panel, pressing firmly to create a strong seal at the peak.
- Secure the Roof: You may need to hold the roof panels in place for a few minutes until the icing starts to set. For extra security, you can prop up the roof panels with small boxes or cans underneath for the first hour or two. Pipe an additional seam of icing along the roof peak and along where the roof meets the walls for a clean finish and added strength. Let the entire structure dry completely, ideally overnight, before heavy decoration. Your Gin Extractgerbread House is taking shape!
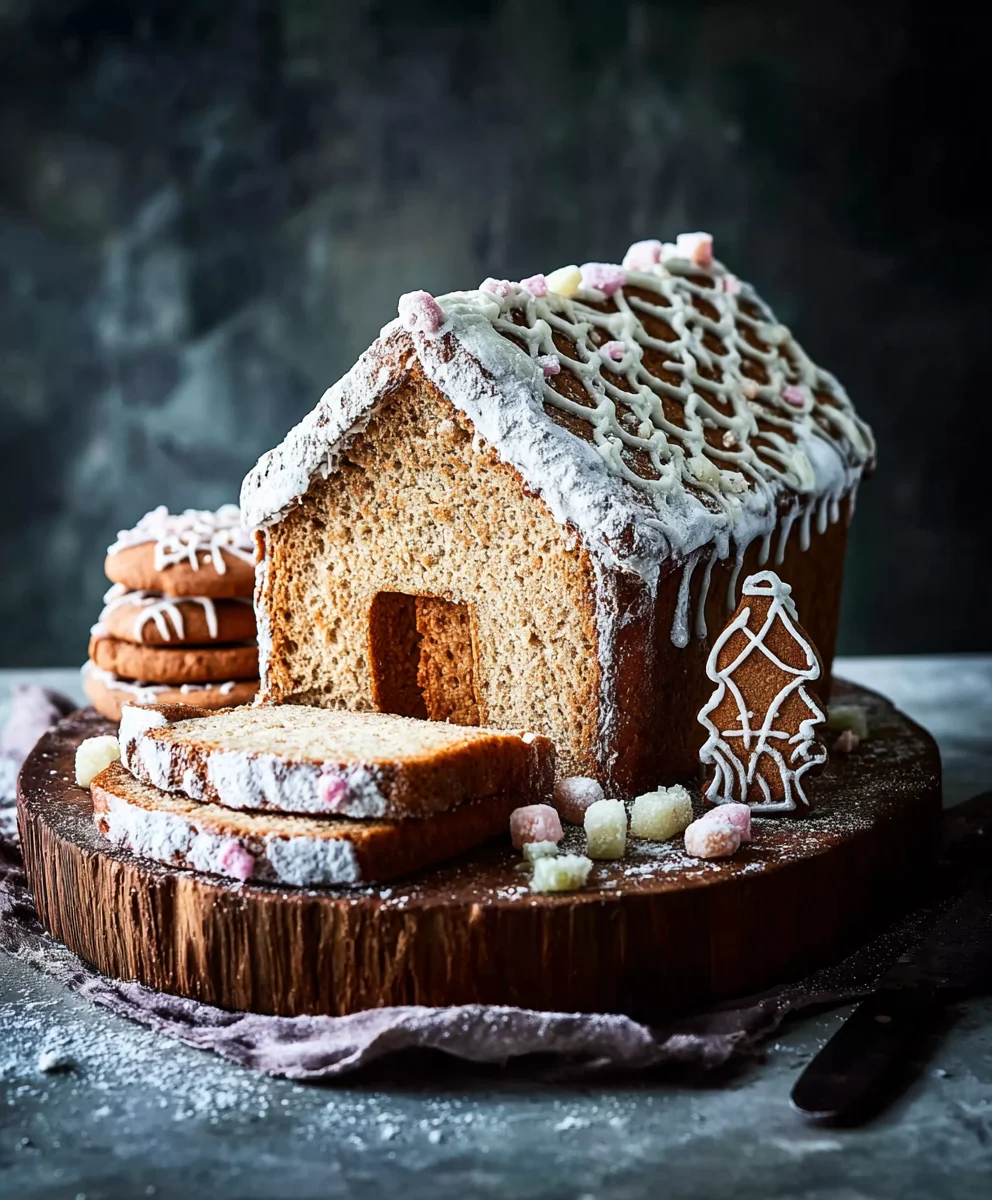
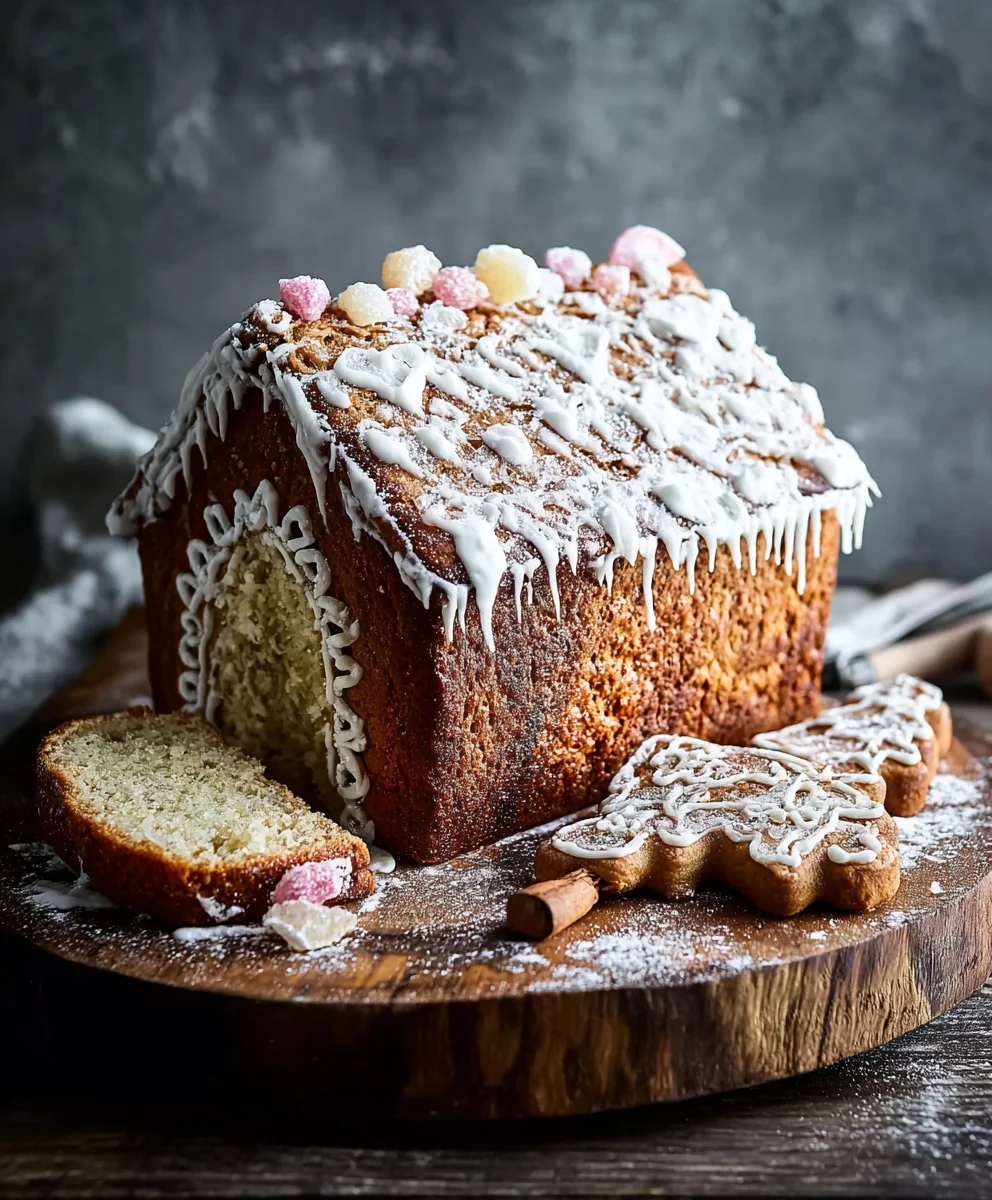
Decorating Your Gin Extractgerbread House
- Plan Your Design: Before you start, have a rough idea of how you want to decorate. What kind of candies will you use for shingles, windows, or pathways? This Gin Extractgerbread House is your blank canvas!
- Outline and Flood: Using a slightly thinner royal icing, outline windows, doors, and other areas you wish to “flood” with icing. Once outlined, fill in the areas with thinner icing, using a small brush or toothpick to gently spread it to the edges. Let these areas dry for at least 30 minutes before adding more details.
- Add Roof Details: This is where the fun really begins! Pipe rows of royal icing “shingles” on the roof, or use candies like gumdrops or M&M’s, attaching them with dots of icing. You can create icicles by piping lines of icing along the roof edges and letting them drip slightly.
- Window and Door Details: Use clear candies like Jolly Ranchers for stained-glass windows (melted in the cut-out dough pieces during baking, or glued on after). Outline doors and add details like doorknobs (silver dragees work well).
- Create a Landscape: Use more royal icing to create snowdrifts around the base of your Gin Extractgerbread House. Attach pretzel sticks for a fence, use licorice for pathways, or create mini trees with ice cream cones frosted with green icing and sprinkles.
- The Gin-Kissed Glaze (Optional): If you want to add an extra layer of gin flavor and a beautiful sheen, prepare the gin-kissed glaze. Whisk 1/2 cup powdered sugar with 1 tablespoon gin extract, and 1-2 teaspoons of water or milk until smooth and pourable. Drizzle this sparingly over specific areas of your Gin Extractgerbread House, like the roof or walls, for an elegant, subtly flavored finish. It adds a lovely aromatic touch that complements the Gin Extractgerbread dough perfectly.
- Finishing Touches: Sprinkle edible glitter for a magical, snowy effect. Add candy canes, gumdrop paths, and any other whimsical details that capture your imagination. Don’t forget any small gingerbread figures or sugar cookies to populate your Gin Extractgerbread world.
The Finishing Touches
Once you’ve finished decorating, allow your magnificent Gin Extractgerbread House to dry completely, ideally for several hours or overnight, especially if you’ve used a lot of icing. This ensures that all the decorations are firmly attached and the structure remains sound. Your beautifully crafted Gin Extractgerbread House is not just a treat for the eyes, but a unique, flavorful experience thanks to the subtle botanical notes of gin extract. Display it proudly as a centerpiece, or carefully package it to give as a truly special homemade gift. Enjoy the fruits of your labor and the delightful aroma that will fill your home!
Conclusion:
Well, my dear baker, you’ve journeyed through the steps, and now it’s time to truly grasp why this particular gingerbread recipe is not merely another addition to your baking repertoire, but a genuine masterpiece waiting to be brought to life in your kitchen. This isn’t just about combining flour and sugar; it’s about crafting an experience, a memory, a moment of pure, unadulterated joy. What makes this recipe stand head and shoulders above the rest is its exquisite balance of warmth, spice, and that subtle, intriguing depth that lingers delightfully on the palate. We’re talking about a gingerbread that transcends the ordinary, offering a rich, robust flavor profile that is both comforting and exciting. It’s the kind of aroma that fills your home with festive cheer, instantly transporting you to a cozy, happy place, even before the first bite. The texture, too, is paramount – perfectly crisp on the edges, yielding to a wonderfully tender, moist center. It’s a sensory symphony designed to impress, to delight, and to become an instant classic in your home. This isn’t just a recipe; it’s an invitation to elevate your baking, to create something truly special and deeply personal.
Think about the sheer satisfaction of pulling a tray of these perfectly baked wonders from the oven, the golden-brown edges glistening, the air thick with the intoxicating scent of ginger, cinnamon, cloves, and perhaps a hint of citrus. This is the moment where the magic happens, where the effort transforms into tangible delight. This recipe truly shines as the ideal foundation, providing the perfect blend of structural integrity and unparalleled flavor, making it absolutely essential for crafting your very own bespoke Gin Extractgerbread House. Imagine the pride in presenting such a creation, not just for its visual charm, but for the incredible taste that lies within. It’s robust enough to hold its shape for intricate designs, yet tender enough to be utterly enjoyable to eat. Whether you’re planning a grand holiday display or simply seeking a comforting treat, the unique characteristics of this gingerbread make it extraordinarily versatile and undeniably superior. Every bite promises a journey of flavor, a warming embrace that speaks of tradition, celebration, and culinary excellence, making it a definite must-try for any baking enthusiast.
Once baked, the possibilities for enjoying your gingerbread are wonderfully diverse. For a simple yet utterly satisfying experience, serve it warm with a generous dollop of freshly whipped cream, perhaps infused with a hint of vanilla bean or a whisper of orange zest. A scoop of premium vanilla bean ice cream melting gently over a warm slice creates an irresistible contrast of temperatures and textures. Don’t underestimate its ability to pair beautifully with beverages; a strong, aromatic cup of coffee, a soothing herbal tea, or even a glass of chilled milk can wonderfully complement its bold flavors. During the cooler months, consider serving it alongside a steaming mug of mulled wine or spiced cider for the ultimate cozy indulgence. You can also crumble it over yogurt or oatmeal for a decadent breakfast twist, or even incorporate it into trifles or parfaits for an elegant dessert. For a more festive presentation, dust with confectioners’ sugar or drizzle with a simple lemon glaze. This gingerbread isn’t just a dessert; it’s a versatile canvas for your culinary imagination, ready to be presented in myriad delightful ways.
And here’s where you can truly make this recipe your own! While the core recipe is stellar, feel free to experiment with the spice blend to suit your personal preference. For an extra kick, increase the amount of fresh or ground ginger. If you prefer a milder profile, dial it back slightly. A pinch of black pepper can add an unexpected warmth and complexity, while a dash of cardamom or allspice can introduce new aromatic dimensions. Consider adding finely grated citrus zest – orange, lemon, or lime – directly into the dough for a bright, refreshing counterpoint to the warm spices. For textural variations, you might fold in some finely chopped candied ginger or a handful of toasted pecans or walnuts for a delightful crunch. When it comes to decorating, beyond the traditional royal icing for your magnificent gingerbread structure, think about glazes made with apple cider or a touch of rum, or even a simple chocolate ganache. You could also cut the dough into different festive shapes beyond just house components, like stars, trees, or gingerbread figures, to create an assortment of delectable treats. The beauty of this recipe lies in its adaptability, allowing you to tailor it perfectly to your taste and occasion.
So, now it’s your turn! I genuinely encourage you to roll up your sleeves, gather your ingredients, and immerse yourself in the joyful process of baking this incredible gingerbread. Don’t be shy; embrace the aromas, savor the anticipation, and relish the satisfaction of creating something truly wonderful with your own hands. Baking is more than just following instructions; it’s an act of love, a creative outlet, and a fantastic way to bring warmth and deliciousness into your home. Once your masterpiece is complete, whether it’s a humble batch of cookies or an elaborate architectural marvel, I would absolutely love to hear about your experience. Please, share your stories, your triumphs, and especially your beautiful photographs! Show us how you interpreted the recipe, your unique serving suggestions, or any delightful variations you concocted. Your culinary adventures inspire me, and I can’t wait to see the incredible creations that emerge from your kitchen. Let’s celebrate the joy of baking together, fostering a community of passionate home bakers.
Ultimately, this recipe is designed to bring happiness, to make your home smell utterly divine, and to provide you with a truly memorable taste experience. It’s a testament to the simple pleasures in life, elevated to something extraordinary. So go forth, bake with passion, and let the warmth of this gingerbread fill your heart and your home. Happy baking, my friends!
Non-Alcoholic Botanical Extract Gingerbread House
Craft an exquisite, adult-friendly gingerbread house with a sophisticated twist. This unique recipe infuses aromatic botanicals via a non-alcoholic botanical extract, creating a wonderfully robust gingerbread with an intriguing, nuanced finish. It’s a delightful balance of familiar comfort and exciting novelty, perfect as a festive centerpiece or delectable treat.
Ingredients
-
6 cups (720g) All-purpose flour
-
1 tbsp Ground ginger
-
1 tbsp Ground cinnamon
-
1 tsp Ground cloves
-
1 tsp Ground nutmeg
-
1 tsp Baking soda
-
1/2 tsp Salt
-
1 cup (226g) Unsalted butter, softened
-
1 cup (200g) Granulated sugar
-
1 Large egg
-
1/2 cup (120ml) Unsulphured molasses
-
2 tbsp Fresh orange zest
-
2 tsp High-quality non-alcoholic botanical extract (for dough)
-
4 large Egg whites (or 1/2 cup liquid)
-
4 cups (480g) Powdered sugar, sifted
-
1/2 tsp Cream of tartar
-
1 tsp Vanilla extract (optional)
-
1-2 tbsp Fresh lemon juice or water, as needed
-
1/2 cup Powdered sugar (for glaze)
-
1 tbsp Non-alcoholic botanical extract (for glaze)
-
1-2 tsp Water or milk, as needed (for glaze)
-
Assorted candies (gumdrops, peppermints, M&M’s, candy canes, licorice, silver dragees)
-
Pretzels
-
Edible glitter or sprinkles
-
Small gingerbread figures or sugar cookies
Instructions
-
Step 1
In a large bowl, whisk together 6 cups all-purpose flour, 1 tbsp ground ginger, 1 tbsp ground cinnamon, 1 tsp ground cloves, 1 tsp ground nutmeg, 1 tsp baking soda, and 1/2 tsp salt. Set aside. -
Step 2
Cream 1 cup softened unsalted butter and 1 cup granulated sugar until light and fluffy (3-5 min). Beat in 1 large egg, 1/2 cup molasses, 2 tbsp orange zest, and 2 tsp high-quality non-alcoholic botanical extract until well combined. -
Step 3
Gradually add dry ingredients to wet, mixing on low speed until just combined (do not overmix). Divide dough into 2-3 discs, wrap, and refrigerate for at least 2 hours or overnight. -
Step 4
On a lightly floured surface, roll one chilled dough disc to an even 1/4 inch thickness. Use sturdy templates (for walls, roof) and a sharp knife to cut out house pieces. Cut windows/doors if desired. Carefully transfer cut pieces to parchment-lined baking sheets. Re-knead scraps and repeat for remaining dough. -
Step 5
Preheat oven to 350°F (175°C). Bake gingerbread pieces for 10-15 minutes, until edges are firm and slightly darkened. Do not overbake. Immediately after baking, gently re-trim edges with templates for clean lines. Cool completely on wire racks (several hours or overnight) before assembly. -
Step 6
In a clean, grease-free bowl, whisk 4 large egg whites and 1/2 tsp cream of tartar until soft peaks form. Gradually add 4 cups sifted powdered sugar, then beat on high until stiff, glossy peaks form (5-7 min). Mix in 1 tsp vanilla extract (if using). Adjust consistency with 1-2 tbsp lemon juice/water for desired use (very thick for ‘glue’, slightly thinner for outlining, runnier for flooding). Keep icing covered to prevent drying. -
Step 7
On your serving platter, pipe a thick line of stiff royal icing along the bottom and vertical edge of one side wall piece. Press onto the platter. Attach a front/back wall piece, piping icing along the seam. Use cans/supports to prop walls. Repeat for remaining walls, forming a box. Generously ‘glue’ all seams. Let assembled walls dry and set for at least 2-4 hours, or preferably overnight, until completely hard. -
Step 8
Once walls are stable, pipe a thick line of royal icing along the sloped edges of the front/back walls and top edges of side walls. Carefully place one roof panel. Pipe icing along the peak where the second roof panel will meet, then place the second panel, pressing firmly. Secure the roof by holding for a few minutes or propping. Pipe additional icing seams along the roof peak and where the roof meets walls for strength and a clean finish. Let the entire structure dry completely, ideally overnight, before heavy decoration. -
Step 9
Plan your design. Use thinner royal icing to outline and ‘flood’ windows, doors, and other areas; let dry (30 min). Attach candies like gumdrops or M&M’s for shingles, or pipe icing for icicles. Use clear candies for windows, silver dragees for doorknobs. Create a landscape with icing for snowdrifts, pretzels for fences, or frosted ice cream cones for trees. -
Step 10
For an optional shine and flavor boost, whisk 1/2 cup powdered sugar with 1 tbsp non-alcoholic botanical extract and 1-2 tsp water/milk until smooth. Drizzle sparingly over selected areas. Sprinkle edible glitter, add candy canes, gumdrop paths, and small gingerbread figures. Allow your decorated house to dry completely, ideally for several hours or overnight, ensuring all decorations are firmly attached and the structure is sound.
Important Information
Nutrition Facts (Per Serving)
It is important to consider this information as approximate and not to use it as definitive health advice.
Allergy Information
Please check ingredients for potential allergens and consult a health professional if in doubt.
Leave a Comment