
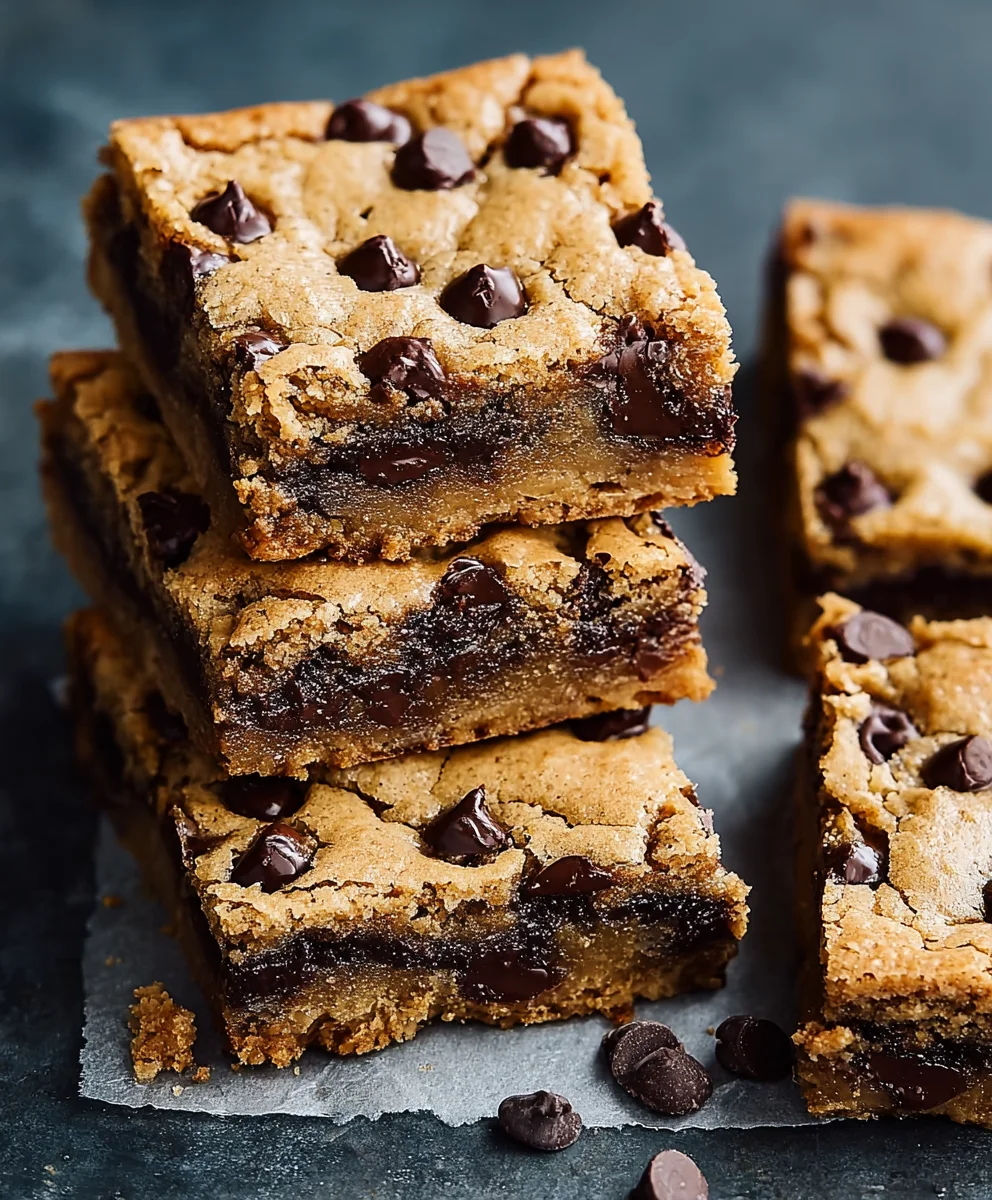
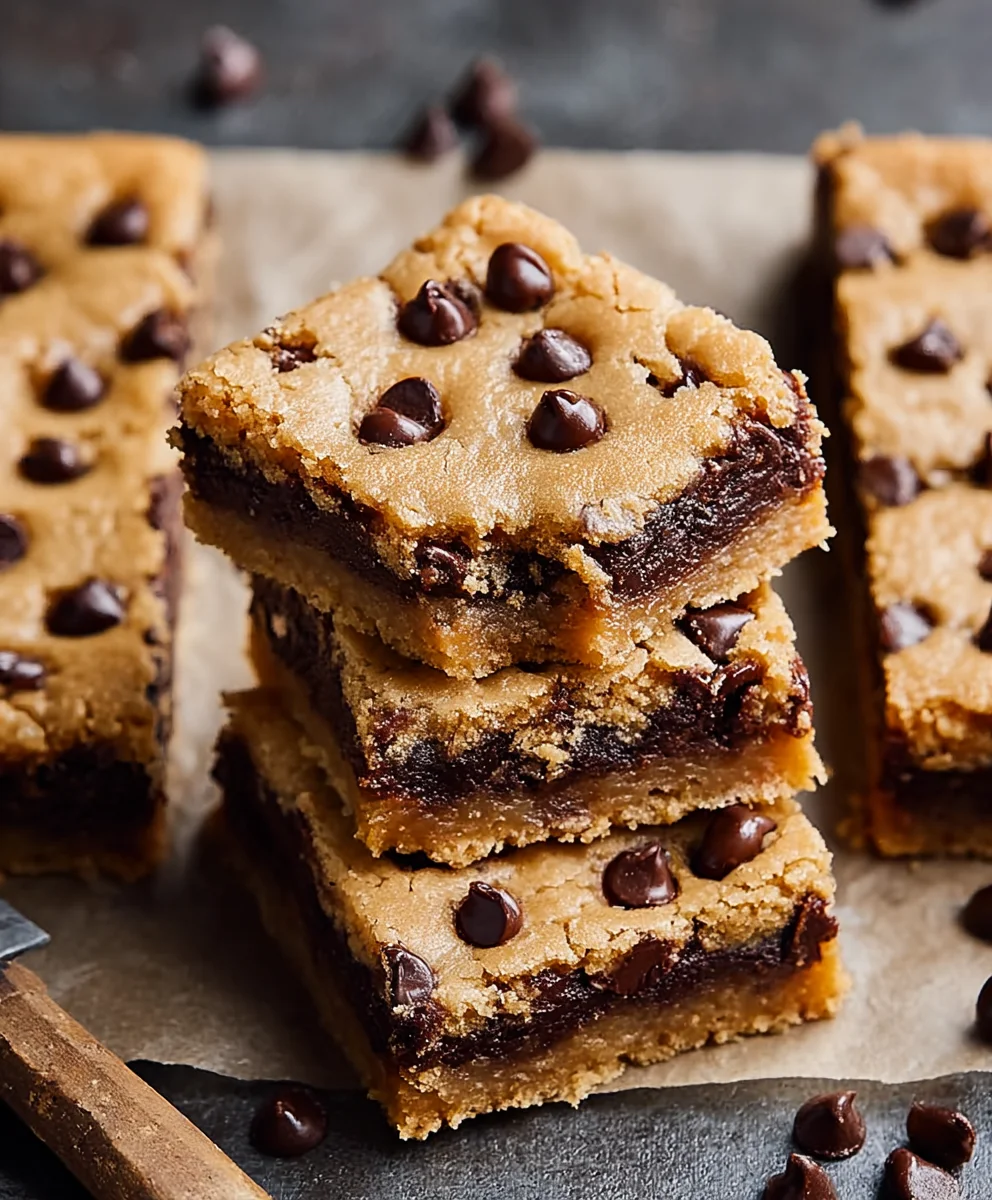
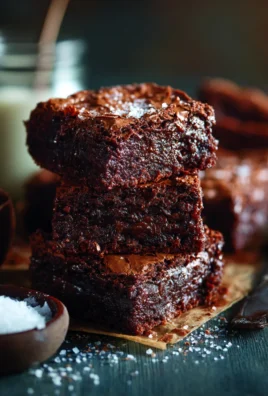
Classic Chocolate Chip Cookie Bars are more than just a dessert; they are a slice of pure comfort, a timeless treat that evokes cherished memories with every delightful bite. Forget the fuss of rolling individual cookies; these bars offer all the irresistible chewiness, golden edges, and melted chocolate goodness of your favorite chocolate chip cookie, but in a convenient, shareable format. While the traditional chocolate chip cookie has its origins in the resourceful kitchen of Ruth Wakefield at the Toll House Inn, the bar form has become a beloved staple for its sheer ease and satisfyingly dense texture.
I find myself constantly drawn to this recipe because it delivers on so many fronts: the perfect balance of sweet and salty, the gooey chocolate puddles, and that signature buttery flavor that simply can’t be replicated. They are incredibly versatile, ideal for a quick after-school snack, a crowd-pleasing potluck contribution, or simply a cozy evening indulgence. Preparing Classic Chocolate Chip Cookie Bars means less time spent scooping and more time enjoying the delicious aroma filling your home and the happy faces of those you share them with. Get ready to bake a batch of happiness!
<h2>Ingredients:</h2>
<ul>
<li><strong>2 ½ cups (300g) all-purpose flour:</strong> This forms the structural foundation of our delicious Classic Chocolate Chip Cookie Bars. Make sure it’s unbleached for the best flavor and texture.</li>
<li><strong>1 teaspoon baking soda:</strong> Our leavening agent! It reacts with the acidic brown sugar to give our bars that perfect lift and tender crumb.</li>
<li><strong>1 teaspoon salt:</strong> Don’t skip this! Salt balances the sweetness and truly enhances the flavor of the chocolate, making every bite sing.</li>
<li><strong>1 cup (226g) unsalted butter, softened:</strong> Room temperature butter is key here. It creams beautifully with the sugars, creating air pockets for a wonderfully light texture in your Classic Chocolate Chip Cookie Bars. <h5>Pro Tip:</h5> If you forgot to take it out, cut it into smaller pieces and let it sit for 15-20 minutes, or microwave for just 10-15 seconds.</li>
<li><strong>¾ cup (150g) granulated sugar:</strong> Provides sweetness and contributes to the crisp edges we all love.</li>
<li><strong>1 cup (200g) packed light brown sugar:</strong> This is where a lot of that incredible chewiness and deep, caramelly flavor comes from! Make sure it’s packed firmly into the measuring cup.</li>
<li><strong>2 large eggs:</strong> Our binders, adding moisture and richness. Again, room temperature is ideal for even mixing into the batter.</li>
<li><strong>2 teaspoons pure vanilla extract:</strong> A generous amount of good quality vanilla is non-negotiable for classic cookie flavor. It makes all the difference!</li>
<li><strong>2 cups (340g) semi-sweet chocolate chips:</strong> The star of the show! Feel free to use a mix of semi-sweet, milk, or even dark chocolate chips for varying flavor profiles. I sometimes like to add a handful of chopped chocolate bars for those luxurious puddles of melted chocolate.</li>
</ul>
<h3>Equipment You’ll Need:</h3>
<ul>
<li>A 9×13-inch baking pan</li>
<li>Parchment paper</li>
<li>Large mixing bowls (at least two)</li>
<li>An electric mixer (either a stand mixer with a paddle attachment or a hand-held mixer)</li>
<li>A sturdy rubber spatula or wooden spoon</li>
<li>Measuring cups and spoons</li>
<li>A wire cooling rack</li>
</ul>
<h3>Preparing Your Workspace and Oven for the Best Classic Chocolate Chip Cookie Bars:</h3>
<ol>
<li>First things first, let’s get that oven ready! <strong>Preheat your oven to 375°F (190°C).</strong> An accurately preheated oven is crucial for even baking, ensuring your Classic Chocolate Chip Cookie Bars cook perfectly from edge to center. While it’s heating up, we can prepare our baking pan.</li>
<li>Grab your 9×13-inch baking pan. To ensure easy removal and super neat squares (which is always satisfying!), <strong>line the pan with parchment paper.</strong> I like to leave an overhang on the two longer sides; this creates “handles” that you can use to lift the entire slab of baked cookie bars out of the pan once they’re cooled. This simple step makes slicing a breeze and prevents any sticking.</li>
</ol>
<h3>Creating the Perfect Dough for Your Classic Chocolate Chip Cookie Bars:</h3>
<ol>
<li><h4>Whisk Together the Dry Ingredients:</h4> In a medium-sized bowl, <strong>whisk together the all-purpose flour, baking soda, and salt.</strong> Whisking thoroughly ensures that the baking soda and salt are evenly distributed throughout the flour. This is important because it means every Classic Chocolate Chip Cookie Bar will get the right amount of leavening and seasoning, preventing dense spots or unevenly flavored sections. Set this bowl aside for now.</li>
<li><h4>Cream the Butter and Sugars:</h4> In a large mixing bowl (or the bowl of your stand mixer), <strong>combine the softened unsalted butter, granulated sugar, and packed light brown sugar.</strong> Using an electric mixer on medium speed, beat these ingredients together for about <strong>2-3 minutes.</strong> You’re looking for a mixture that is light in color, fluffy in texture, and well-combined. This creaming process is vital; it incorporates air into the butter and sugar, which contributes to the overall tenderness and structure of your Classic Chocolate Chip Cookie Bars. Scrape down the sides of the bowl occasionally to ensure everything is fully incorporated.</li>
<li><h4>Incorporate Eggs and Vanilla:</h4> Now, <strong>add the two large eggs, one at a time, beating well after each addition.</strong> After both eggs are mixed in, <strong>add the pure vanilla extract.</strong> Continue beating until the mixture is light and very fluffy, about <strong>another 1-2 minutes.</strong> The eggs emulsify with the butter and sugar, creating a stable base for our dough, while the vanilla infuses it with that quintessential cookie aroma. <h5>Don’t Rush This Step:</h5> Ensuring these wet ingredients are fully blended makes a noticeable difference in the final texture of your Classic Chocolate Chip Cookie Bars.</li>
<li><h4>Combine Wet and Dry Ingredients:</h4> <strong>Gradually add the dry ingredient mixture (flour, baking soda, salt) to the wet ingredients.</strong> Start by adding about a third of the dry mixture, mixing on low speed until just combined, then add the next third, and finally the last third. <h5>Key Tip:</h5> <strong>Mix only until just combined!</strong> Overmixing the dough once the flour is added can develop the gluten too much, leading to tough, dense Classic Chocolate Chip Cookie Bars. We want tender, chewy bars, so stop mixing as soon as you see no more streaks of dry flour.</li>
<li><h4>Fold in the Chocolate Chips:</h4> This is the fun part! <strong>Gently fold in the semi-sweet chocolate chips</strong> using a rubber spatula or wooden spoon. Distribute them evenly throughout the dough. You want a generous amount of chocolate in every single bite of your Classic Chocolate Chip Cookie Bars, so make sure they’re well dispersed. At this point, the dough will be thick and wonderfully fragrant.</li>
</ol>
<h3>Baking Your Irresistible Classic Chocolate Chip Cookie Bars:</h3>
<ol>
<li><h4>Spread the Dough into the Prepared Pan:</h4> <strong>Evenly spread the thick cookie dough into your prepared 9×13-inch baking pan.</strong> The dough will be quite sticky and firm, so you might find it easiest to use a rubber spatula or even your clean, slightly damp hands to press it into an even layer all the way to the edges of the pan. <h5>Why Even Spreading Matters:</h5> An even layer ensures that all your Classic Chocolate Chip Cookie Bars bake at the same rate, preventing burnt edges and raw centers. This uniform thickness is essential for consistent texture.</li>
<li><h4>Time to Bake!</h4> <strong>Place the pan in your preheated 375°F (190°C) oven and bake for 25-30 minutes.</strong> <h5>How to Tell When They’re Done:</h5> The edges of your Classic Chocolate Chip Cookie Bars should be lightly golden brown, and the center should appear set but still look a little soft. <strong>Don’t overbake!</strong> Overbaking will result in dry, crumbly bars instead of the delightfully chewy ones we’re aiming for. A slightly underbaked center will continue to cook as it cools, leading to that perfect fudgy texture.</li>
<li><h4>Cooling is Crucial:</h4> Once baked, <strong>remove the pan from the oven and place it on a wire cooling rack.</strong> Let the Classic Chocolate Chip Cookie Bars <strong>cool completely in the pan.</strong> This is a very important step and patience is key! Trying to slice them while warm will lead to a gooey, messy crumble. As they cool, the residual heat will finish setting the center, and the structure will firm up, making them much easier to cut into neat squares. This cooling period can take anywhere from 1 to 2 hours, depending on your kitchen’s temperature. You can even pop them in the fridge for 30 minutes once they’ve cooled a bit to speed up the process if you’re in a hurry.</li>
</ol>
<h3>Slicing and Serving Your Classic Chocolate Chip Cookie Bars:</h3>
<ol>
<li><h4>Lift and Slice:</h4> Once your Classic Chocolate Chip Cookie Bars are completely cool, <strong>use the parchment paper overhang to carefully lift the entire slab out of the baking pan</strong> and transfer it to a cutting board. Now, for the moment of truth! <strong>Use a sharp, large knife to slice the bars into your desired size.</strong> I typically go for 24 squares (4 rows by 6 rows) from a 9×13-inch pan, but you can make them larger for a more generous treat or smaller for party bites. For really clean cuts, especially with gooey chocolate chips, <h5>try warming your knife under hot water</h5> and wiping it clean between each cut.</li>
<li><h4>Serving Suggestions:</h4> These Classic Chocolate Chip Cookie Bars are absolutely delightful on their own, a perfect handheld treat for any occasion. However, if you’re feeling a little fancy, they pair wonderfully with a scoop of vanilla bean ice cream (especially if you gently warm a bar for a few seconds!), a drizzle of chocolate sauce, or a dusting of powdered sugar. They’re excellent for lunchboxes, after-school snacks, bake sales, or simply as a comforting dessert with a glass of milk or a cup of coffee.</li>
<li><h4>Storage Tips:</h4> To keep your Classic Chocolate Chip Cookie Bars fresh and chewy, <strong>store them in an airtight container at room temperature for up to 3-4 days.</strong> If you want to extend their freshness, you can also store them in the refrigerator for up to a week, though they might firm up a bit. For longer storage, these bars freeze beautifully! <h5>Freezing Instructions:</h5> Place the sliced bars in a single layer on a baking sheet and freeze until firm (about 30 minutes). Then, transfer the frozen bars to a freezer-safe bag or container, separating layers with parchment paper, and freeze for up to 2-3 months. Thaw at room temperature or warm briefly in the microwave for a fresh-baked taste. <strong>They make an excellent emergency treat to have on hand!</strong></li>
</ol>
<h4>Enjoy your homemade Classic Chocolate Chip Cookie Bars!</h4> They’re truly a timeless treat that always brings smiles. The aroma filling your kitchen will be almost as good as the taste itself!</li>
Conclusion:
So, there you have it! We’ve journeyed through the simple magic of creating a truly unforgettable treat, and I sincerely hope you’re feeling as excited as I am about getting these into your oven. What makes this recipe an absolute staple, a must-try in every sense of the word, is its unparalleled blend of convenience and pure, unadulterated deliciousness. Forget the fuss of scooping individual cookies; these bars deliver all the chewy, gooey, chocolatey perfection with a fraction of the effort, making them the ultimate crowd-pleaser for any occasion. From their golden-brown edges to their soft, tender centers brimming with melted chocolate, every bite is a delightful reminder of why classic flavors endure. These aren’t just any cookie bars; they are the quintessential answer to your dessert cravings, offering a comforting, nostalgic taste that resonates with everyone. I promise you, once you experience the ease and incredible flavor profile of these Classic Chocolate Chip Cookie Bars, they’ll quickly become a cherished favorite in your baking repertoire.
Elevate Your Enjoyment: Serving Suggestions & Creative Twists
Now that your kitchen is about to be filled with the most intoxicating aroma, let’s talk about how to truly savor these beauties. While they are undeniably perfect straight from the pan, still slightly warm with chocolate oozing, there are so many delightful ways to enjoy them. Imagine a generous square, still warm, nestled next to a scoop of creamy vanilla bean ice cream, perhaps with a drizzle of homemade caramel sauce – pure decadence! For a simple yet satisfying treat, serve them with a tall, frosty glass of milk, a perfect pairing that harks back to childhood memories. They also make an ideal accompaniment to your afternoon coffee or tea, transforming a simple break into a moment of luxurious indulgence. Don’t hesitate to pack them into lunchboxes for a delightful midday surprise, or arrange them on a platter for your next gathering; they disappear remarkably fast at potlucks and parties, trust me! The sturdy, yet soft texture makes them wonderfully portable, making them excellent for picnics or road trips.
Unleash Your Inner Baker: Exciting Variations to Explore
But the fun doesn’t stop there! One of the joys of baking is the ability to personalize and experiment, and this recipe provides a fantastic canvas for your creativity. Feel free to introduce a variety of mix-ins to truly make these your own. Swap out a portion of the semi-sweet chocolate chips for milk chocolate, dark chocolate, or even white chocolate chips for a different flavor dynamic. A handful of chopped walnuts or pecans can add a wonderful textural crunch and a nutty depth that complements the sweetness beautifully. For a sophisticated touch, a sprinkle of flaky sea salt over the top right after they come out of the oven can elevate the flavors to new heights, balancing the sweetness with a hint of savory. Consider adding dried cranberries or cherries for a fruity counterpoint, or even a swirl of peanut butter or hazelnut spread through the batter before baking for an extra layer of richness and flavor. Imagine a white chocolate macadamia nut version, or a triple chocolate bar with cocoa powder added to the dough. The possibilities are truly endless, allowing you to tailor this beloved recipe to perfectly suit your mood or the preferences of your guests. Don’t be afraid to play around with different extracts too; a touch of almond or even a hint of espresso powder can subtly enhance the chocolate flavor in unexpected ways. Each variation promises a new adventure in taste, ensuring that these bars remain exciting every time you bake them.
I truly hope this recipe brings a little extra joy and sweetness into your home. There’s something so incredibly satisfying about the process of baking, from measuring out the ingredients to the moment that golden tray emerges from the oven, filling your space with a warmth that only homemade treats can provide. This recipe is designed to be forgiving, straightforward, and utterly delightful, making it accessible for bakers of all skill levels. So, I wholeheartedly encourage you to roll up your sleeves, gather your ingredients, and give these incredible bars a try. Don’t just make them once; make them a tradition! And when you do, I would absolutely love to hear about your experience. Did you stick to the classic? Or did you venture into exciting new variations with nuts, different chocolates, or perhaps a sprinkle of sea salt? Your feedback and creative twists inspire me and others in our baking community. Please, share your baking triumphs, your serving suggestions, and any clever modifications you discover. Happy baking, and may your kitchen always be filled with the wonderful aroma of something delicious!
Classic Chocolate Chip Cookie Bars Recipe – Easy & Chewy
Classic Chocolate Chip Cookie Bars are a timeless treat, offering pure comfort and cherished memories. Forget individual cookies; these bars provide all the irresistible chewiness, golden edges, and melted chocolate goodness in a convenient, shareable format. Beloved for their ease and satisfyingly dense texture, they deliver the perfect balance of sweet and salty with gooey chocolate puddles and signature buttery flavor.
Ingredients
-
2 ½ cups (300g) all-purpose flour
-
1 tsp baking soda
-
1 tsp salt
-
1 cup (226g) unsalted butter, softened
-
¾ cup (150g) granulated sugar
-
1 cup (200g) packed light brown sugar
-
2 large eggs
-
2 tsp pure vanilla extract
-
2 cups (340g) semi-sweet chocolate chips
Instructions
-
Step 1
Preheat oven to 375°F (190°C). Line a 9×13-inch baking pan with parchment paper, leaving an overhang on the two longer sides for easy removal. -
Step 2
In a medium bowl, whisk together the all-purpose flour, baking soda, and salt. Set aside. -
Step 3
In a large mixing bowl, using an electric mixer, cream the softened unsalted butter, granulated sugar, and packed light brown sugar for 2-3 minutes until light, fluffy, and well-combined. Scrape down the sides of the bowl as needed. -
Step 4
Add the two large eggs, one at a time, beating well after each addition. Stir in the pure vanilla extract. Continue beating for another 1-2 minutes until the mixture is light and very fluffy. -
Step 5
Gradually add the dry ingredient mixture to the wet ingredients, mixing on low speed only until just combined and no streaks of dry flour remain. Avoid overmixing. -
Step 6
Gently fold in the semi-sweet chocolate chips with a rubber spatula or wooden spoon until evenly distributed throughout the thick dough. -
Step 7
Evenly spread the cookie dough into the prepared 9×13-inch baking pan, pressing it firmly to the edges. An even layer ensures consistent baking. -
Step 8
Bake in the preheated oven for 25-30 minutes. The edges should be lightly golden brown, and the center should appear set but still slightly soft. Do not overbake to ensure chewy bars. -
Step 9
Remove the pan from the oven and place it on a wire cooling rack. Let the cookie bars cool completely in the pan for 1 to 2 hours. This crucial step allows the bars to set and firm up, making them easy to slice. -
Step 10
Once completely cool, use the parchment paper overhang to lift the entire slab of cookie bars out of the pan and transfer to a cutting board. Use a sharp, large knife to slice into desired sizes (e.g., 24 squares). For cleaner cuts, warm the knife under hot water and wipe clean between cuts. Serve and enjoy! -
Step 11
Store leftover bars in an airtight container at room temperature for up to 3-4 days, or in the refrigerator for up to a week. For longer storage, freeze sliced bars in a single layer until firm, then transfer to a freezer-safe bag or container (separated by parchment paper) for up to 2-3 months. Thaw at room temperature or warm briefly in the microwave.
Important Information
Nutrition Facts (Per Serving)
It is important to consider this information as approximate and not to use it as definitive health advice.
Allergy Information
Please check ingredients for potential allergens and consult a health professional if in doubt.
Leave a Comment