

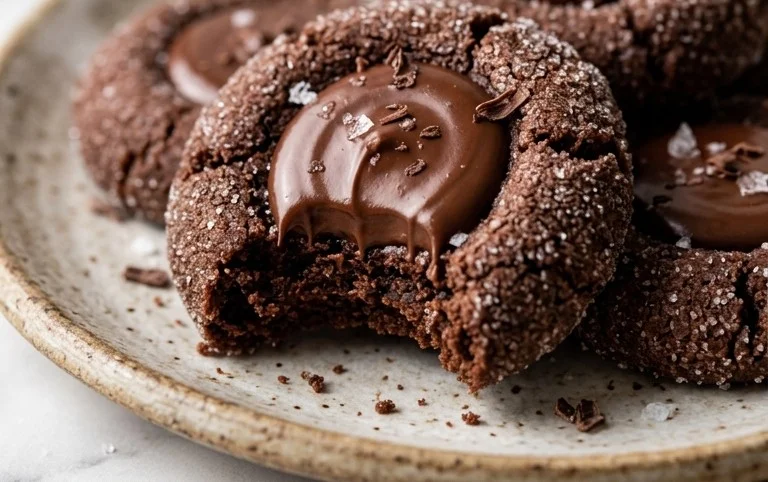
Chocolate Thumbprint Cookies are the answer when you want a cookie that feels a little special but doesn’t demand hours in the kitchen. These aren’t just any chocolate cookies; they have a deep cocoa flavor that melts in your mouth, and the best part is the little hollow in the center. That hollow gets filled with smooth, melted chocolate, creating a delightful surprise with every bite. I love making these because they look so impressive, almost like something from a bakery, but they’re genuinely straightforward. The cookie itself is tender with just a hint of crispness at the edges, a perfect contrast to the rich, gooey filling. They’re wonderfully versatile, appearing on my dessert table for casual get-togethers and even more festive holiday spreads. Kids and adults alike always reach for these.
Ingredients:
- 1 1/2 cups (188 g) all-purpose flour, spooned and leveled
- 1/2 cup (40 g) cocoa powder (Dutch process)
- 1/2 tsp salt
- 1/2 tsp baking powder
- 3/4 cup (168 g) unsalted butter, softened
- 3/4 cup (165 g) light brown sugar, packed
- 1/4 cup (50 g) granulated white sugar
- 2 egg yolks, at room temperature
- 1 1/2 tsp vanilla bean paste or extract
- 1 cup (200 g) semi-sweet chocolate chips
- 1/2 cup (120 ml) heavy whipping cream
- nonpareils for sprinkling on top (optional)
Making the Cookie Dough
The first step in creating these delightful cookies is to get your dry ingredients ready. In a medium bowl, whisk together the all-purpose flour, Dutch process cocoa powder, salt, and baking powder. Whisking them thoroughly ensures that the leavening agents and salt are evenly distributed throughout the dough, which leads to a more consistent cookie texture and rise. Set this mixture aside for now. Next, in a large bowl, cream together the softened unsalted butter, packed light brown sugar, and granulated white sugar. Beat them with an electric mixer on medium speed until the mixture is light and fluffy, usually about 3 to 4 minutes. This process incorporates air into the dough, which helps with the cookie’s tender texture. Scrape down the sides of the bowl as needed to make sure everything is well combined.

Chocolate Thumbprint Cookies
These chocolate thumbprint cookies are wonderfully rich and have a delightful surprise waiting in the center. The deep cocoa flavor in the cookie itself is complemented beautifully by the smooth, melted chocolate filling. They look impressive, but they’re surprisingly straightforward to make, making them perfect for any occasion, from a casual afternoon treat to a festive holiday gathering. The texture is wonderfully tender with a slight crisp edge, and that gooey chocolate center is pure bliss.
Ingredients:
- 1 1/2 cups (188 g) all-purpose flour, spooned and leveled
- 1/2 cup (40 g) cocoa powder (Dutch process)
- 1/2 tsp salt
- 1/2 tsp baking powder
- 3/4 cup (168 g) unsalted butter, softened
- 3/4 cup (165 g) light brown sugar, packed
- 1/4 cup (50 g) granulated white sugar
- 2 egg yolks, at room temperature
- 1 1/2 tsp vanilla bean paste or extract
- 1 cup (200 g) semi-sweet chocolate chips
- 1/2 cup (120 ml) heavy whipping cream
- nonpareils for sprinkling on top (optional)
Making the Cookie Dough
The first step in creating these delightful cookies is to get your dry ingredients ready. In a medium bowl, whisk together the all-purpose flour, Dutch process cocoa powder, salt, and baking powder. Whisking them thoroughly ensures that the leavening agents and salt are evenly distributed throughout the dough, which leads to a more consistent cookie texture and rise. Set this mixture aside for now.
Next, in a large bowl, cream together the softened unsalted butter, packed light brown sugar, and granulated white sugar. You can use an electric mixer for this, or a sturdy whisk and some elbow grease. You want to beat them until the mixture is light, fluffy, and pale in color. This process incorporates air into the dough, which helps with the cookie’s texture. Be sure your butter is truly softened – not melted – which means it should give slightly when pressed.
Once the butter and sugar mixture is nicely creamed, add the egg yolks and vanilla bean paste or extract. Beat again until everything is well combined and smooth. The egg yolks add richness and help bind the cookie dough together.
Now, gradually add the dry ingredients to the wet ingredients. Mix on low speed or stir with a spatula until just combined. Be careful not to overmix the dough at this stage. Overmixing can develop the gluten in the flour too much, resulting in tougher cookies. It’s perfectly fine if there are still a few very small streaks of flour visible; they will disappear as the dough rests and you work with it. The dough will be quite soft and a bit sticky.
Shaping and Baking the Cookies
It’s helpful to chill the dough before shaping, especially since it’s a bit soft. Cover the bowl with plastic wrap and refrigerate for at least 30 minutes, or until it’s firm enough to handle easily. This chilling step prevents the cookies from spreading too much in the oven and makes them easier to shape.
Once the dough is chilled, preheat your oven to 350°F (175°C). Line baking sheets with parchment paper. Parchment paper is a lifesaver here, preventing sticking and making cleanup a breeze.
Scoop portions of the dough, about 1 tablespoon each, and roll them into balls. Place the balls on the prepared baking sheets, about 2 inches apart. Now for the signature thumbprint! Use your thumb or the back of a small measuring spoon to gently press an indentation into the center of each dough ball. Make sure the indentation is deep enough to hold the filling, but don’t press all the way through the dough. If the dough cracks, gently press it back together.
Bake the cookies for 10-12 minutes, or until the edges are set and the tops look slightly dry. You don’t want them to be overbaked; they will continue to cook slightly on the hot baking sheet. Let the cookies cool on the baking sheets for 5 minutes before transferring them to a wire rack to cool completely. This allows them to firm up before you move them.
Preparing the Chocolate Filling
While the cookies are cooling, prepare the luscious chocolate filling. In a small saucepan or a microwave-safe bowl, combine the semi-sweet chocolate chips and the heavy whipping cream.
If you’re using a saucepan, heat it over low heat, stirring constantly, until the chocolate chips are melted and the mixture is smooth and glossy. Be very careful not to scorch the chocolate. Low and slow is the way to go.
If you’re using a microwave, heat the mixture in 30-second intervals, stirring well after each interval, until the chocolate is completely melted and smooth. Again, stir thoroughly each time to prevent hot spots.
Once the chocolate is melted and smooth, let the filling sit for a few minutes to cool slightly and thicken up a bit before filling the cookies. It should be pourable but not too thin.
Assembling and Finishing the Cookies
Once the cookies have cooled completely and the chocolate filling has thickened slightly, it’s time to fill those thumbprints. You can use a small spoon or a piping bag to fill the indentations with the chocolate ganache. Fill each cookie generously, but avoid overfilling to prevent it from spilling over the sides.
If you’re using nonpareils, sprinkle them over the wet chocolate filling immediately after filling each cookie. This helps them adhere.
Let the cookies sit at room temperature for about 30 minutes, or until the chocolate filling has set. You can speed this up slightly by placing them in the refrigerator for about 10-15 minutes, but be mindful that refrigerating for too long can sometimes make the cookies a little too firm.
These chocolate thumbprint cookies are best stored in an airtight container at room temperature for up to 3 days. Enjoy every delicious bite!
Conclusion:
These Chocolate Thumbprint Cookies are a guaranteed hit, offering that sought-after rich chocolate flavor with a surprise molten center. The combination of a tender cookie and gooey chocolate filling is simply irresistible. They look sophisticated enough for any special occasion but are simple enough for a regular weeknight treat. Don’t be afraid to get creative with the fillings or decorations; these cookies are wonderfully adaptable.
Serving Suggestions:
Enjoy these cookies with a cold glass of milk or a warm cup of coffee. They also pair wonderfully with a scoop of vanilla bean ice cream for an extra decadent dessert.
Variations:
Instead of semi-sweet chocolate chips for the filling, try dark chocolate or milk chocolate chips. You could also add a pinch of espresso powder to the cookie dough for a mocha flavor, or a drop of peppermint extract to the filling for a minty twist. Sprinkling with sea salt flakes on top of the melted chocolate adds a nice salty contrast.
Common Questions:
Why did my thumbprints flatten too much?
This can happen if the butter was too soft, or if you over-creamed the butter and sugar. Make sure your butter is softened but not melted. Also, chilling the dough for at least 30 minutes before baking helps the cookies hold their shape.
Can I make the dough ahead of time?
Yes, absolutely. The cookie dough can be refrigerated in an airtight container for up to 3 days, or frozen for up to 3 months. Thaw overnight in the refrigerator before proceeding with shaping and baking.
What else can I fill the thumbprints with?
Caramel, fruit jam (like raspberry or apricot), or a simple chocolate ganache are fantastic alternatives to melted chocolate chips. Just ensure the filling is not too liquid before baking, or it might spill out.
Chocolate Thumbprint Cookies
Decadent chocolate thumbprint cookies filled with a smooth chocolate ganache and optionally sprinkled with nonpareils.
Ingredients
-
1 1/2 cups (188 g) all-purpose flour, spooned and leveled
-
1/2 cup (40 g) cocoa powder (Dutch process)
-
1/2 tsp salt
-
1/2 tsp baking powder
-
3/4 cup (168 g) unsalted butter, softened
-
3/4 cup (165 g) light brown sugar, packed
-
1/4 cup (50 g) granulated white sugar
-
2 egg yolks, at room temperature
-
1 1/2 tsp vanilla bean paste or extract
-
1 cup (200 g) semi-sweet chocolate chips
-
1/2 cup (120 ml) heavy whipping cream
-
nonpareils for sprinkling on top (optional)
Instructions
-
Step 1
In a medium bowl, whisk together the flour, cocoa powder, salt, and baking powder. -
Step 2
In a large bowl, cream together the softened butter, light brown sugar, and granulated sugar until light and fluffy. -
Step 3
Beat in the egg yolks and vanilla bean paste until well combined. -
Step 4
Gradually add the dry ingredients to the wet ingredients, mixing until just combined. Chill the dough for 30 minutes. -
Step 5
Preheat oven to 350°F (175°C). Roll dough into 1-inch balls and place on a baking sheet lined with parchment paper. Make an indentation in the center of each cookie with your thumb. -
Step 6
Bake for 10-12 minutes, or until the edges are set but the centers are still slightly soft. Let cool on the baking sheet for a few minutes before transferring to a wire rack to cool completely. -
Step 7
While the cookies are cooling, prepare the ganache. Heat the heavy whipping cream in a small saucepan until simmering. Pour over the semi-sweet chocolate chips in a heatproof bowl and let sit for 5 minutes. Whisk until smooth. -
Step 8
Spoon the warm ganache into the indentations of the cooled cookies. Sprinkle with nonpareils, if desired, before the ganache sets.
Important Information
Nutrition Facts (Per Serving)
It is important to consider this information as approximate and not to use it as definitive health advice.
Allergy Information
Please check ingredients for potential allergens and consult a health professional if in doubt.



Leave a Comment