
Easter Rice Krispie Treats are an absolute must-have for any spring celebration, and for good reason! There’s something undeniably magical about transforming those simple, familiar ingredients into a festive masterpiece that brings smiles to faces of all ages. We all have those cherished childhood memories tied to these sweet, chewy delights, don’t we? They’re the epitome of effortless fun in the kitchen, perfect for little hands to help with and quick enough for even the busiest Easter preparations. But what truly makes these Easter Rice Krispie Treats so special is their incredible versatility. We’re not just talking about a plain old square; we’re diving into a world of vibrant colors, playful shapes, and delightful decorations that perfectly capture the spirit of the holiday. Get ready to hop into some serious fun!
Why You’ll Love This Recipe:
Easy to Make, Delicious to Eat!
These aren’t your average Rice Krispie treats! We’ve added a few touches to make them extra special for Easter. The satisfying crunch, the gooey marshmallowy chew, and the bursts of festive flavor are what keep everyone coming back for more. They’re the perfect no-bake treat to fill your Easter baskets or adorn your dessert table.
Easter Rice Krispie Treats
Easter is a time for joy, family, and of course, delicious treats! These Easter Rice Krispie Treats are a festive twist on a classic favorite, perfect for adding a pop of color and sweetness to your holiday celebrations. They’re incredibly easy to make, making them a fantastic activity to do with kids, and they’re always a crowd-pleaser. The soft, chewy marshmallow combined with the crisp cereal is a winning combination, and the addition of a festive glaze and colorful candies makes them truly special for the occasion. Get ready to impress your family and friends with these delightful Easter creations!
Ingredients:
Cooking Instructions
Creating these festive treats is a two-part process: first, we’ll make the classic Rice Krispie Treat base, and then we’ll craft a simple, vibrant glaze to give them an Easter flair.
Part 1: The Rice Krispie Treat Base
1. First, prepare your baking dish. You’ll need a 9×13 inch pan. Lightly grease it with butter or cooking spray, or line it with parchment paper, leaving some overhang on the sides for easy lifting later. This step is crucial to prevent the sticky treats from adhering to the pan. Set this aside while you work on the cereal mixture.
2. In a large, microwave-safe bowl, combine the 16 ounces of marshmallows and 2 tablespoons of unsalted butter. Microwave on high for 1 minute. Stir well. If the marshmallows aren’t fully melted and smooth, continue microwaving in 15-second intervals, stirring between each, until you achieve a completely smooth, gooey consistency. It’s important not to overheat the marshmallows, as they can become tough. A perfectly melted marshmallow mixture will be glossy and easy to stir.
3. Once your marshmallow mixture is ready, it’s time to add the star of the show: the Rice Krispies cereal. Add the 7 cups of Rice Krispies cereal to the bowl with the melted marshmallows. Gently fold the cereal into the marshmallow mixture using a spatula or wooden spoon until it is evenly coated. Work quickly but carefully. You want to ensure every piece of cereal is coated in the sticky marshmallow goodness. Be careful not to press down too hard, as this can crush the cereal and result in less crispy treats.
4. Now, transfer the Rice Krispie mixture into your prepared baking dish. Lightly grease your hands with butter or cooking spray, or use the back of a greased spatula, to gently press the mixture evenly into the pan. The key here is to press it down firmly enough to compact it, but not so hard that you make the treats dense and hard. A gentle, even press will give you the perfect chewy texture.
Part 2: The Easter Glaze and Decoration
5. While your Rice Krispie treats are cooling in the pan, let’s prepare the vibrant Easter glaze. In a medium bowl, whisk together ½ cup of softened unsalted butter, 3-4 cups of powdered sugar (start with 3 cups and add more if needed to reach desired consistency), ¼ cup of milk, and 1 teaspoon of vanilla extract. Whisk until the mixture is smooth and creamy. If the glaze is too thick, add milk, a teaspoon at a time, until it reaches a pourable, but not watery, consistency. If it’s too thin, gradually add more powdered sugar until it thickens up.
6. Once the glaze is the right consistency, it’s time for the fun! Add a few drops of green food coloring to the glaze. Stir until the color is evenly distributed and you have a beautiful pastel green. You can adjust the amount of food coloring to achieve your desired shade of green. You could even divide the glaze and use different food colorings for a multi-colored effect if you’re feeling extra creative!
7. Once the Rice Krispie treats have cooled enough to handle (they should still be slightly warm for the glaze to adhere well), gently lift them out of the pan using the parchment paper overhang. Place them on a flat surface or a cutting board. Drizzle or spread the green glaze evenly over the top of the Rice Krispie treats. Don’t worry about perfection; a slightly rustic look is charming!
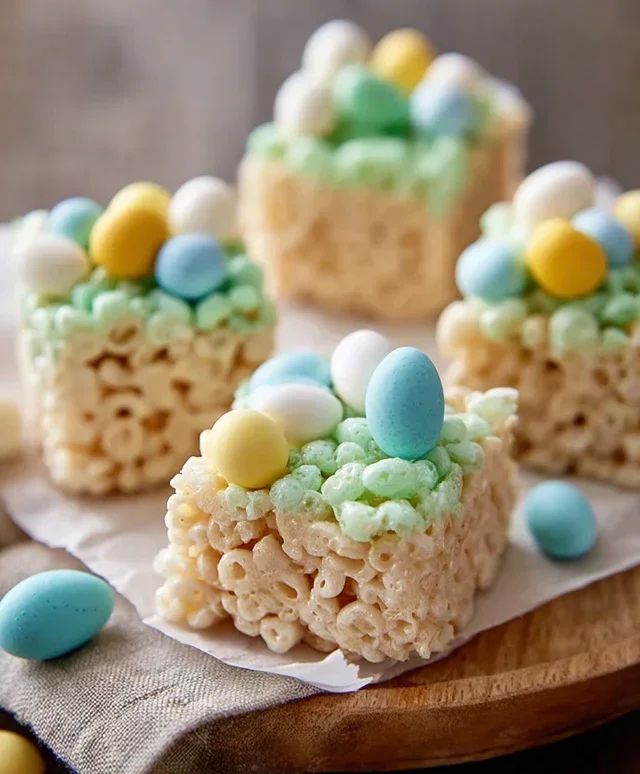
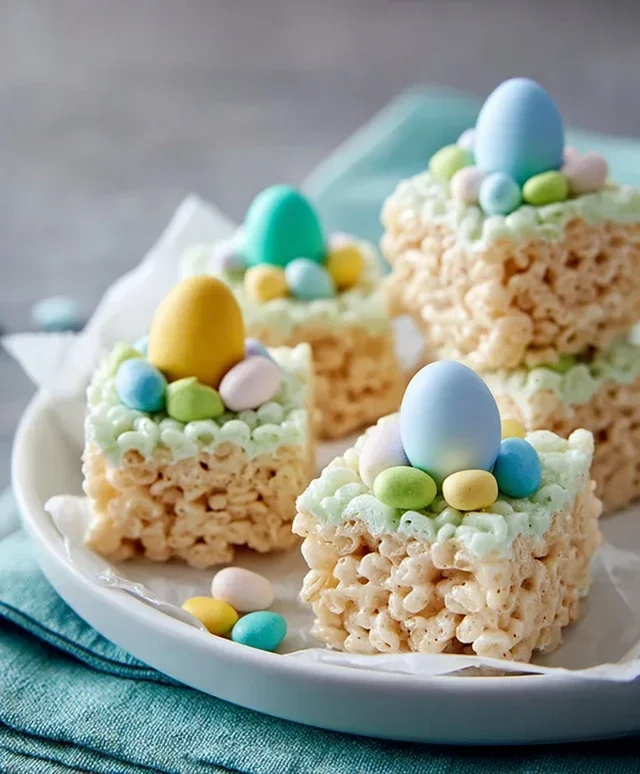
8. While the glaze is still wet, this is the perfect time to decorate your Easter Rice Krispie Treats with your Easter egg candies. Scatter mini chocolate eggs or jelly beans over the glaze. Press them gently into the glaze to ensure they stick. You can arrange them in patterns or just sprinkle them randomly for a festive explosion of color. Allow the glaze to set completely, which usually takes about 30 minutes to an hour. Once set, cut the Rice Krispie treats into squares or fun Easter shapes using a cookie cutter if you have one. Enjoy these delightful Easter treats!
Conclusion:
These Easter Rice Krispie Treats are an absolute winner for any spring celebration! Their simple preparation, delightful crunch, and sweet, chewy texture make them a universally loved treat. Whether you’re hosting an Easter brunch, putting together a festive dessert table, or simply looking for a fun activity to do with the kids, this recipe delivers pure joy. The versatility of this recipe is truly its superpower – they’re not just perfect as is, but also a fantastic canvas for creativity.
For serving, consider arrangin extractg them on a pastel-colored platter, perhaps decorated with edible spring flowers or a drizzle of white chocolate. They also make adorable additions to Easter baskets. Don’t hesitate to get creative with variations! You can mix in colorful sprinkles before the mixture sets, dip them in melted white chocolate and add even more sprinkles, or even add a touch of edible glitter for extra sparkle. I highly encourage you to give this delightful Easter Rice Krispie Treat recipe a try. It’s a foolproof way to add a touch of homemade magic to your holiday.
Frequently Asked Questions about Easter Rice Krispie Treats:
Q1: How can I make my Easter Rice Krispie Treats firmer?
For a firmer texture, you can slightly increase the amount of cereal to marshmallow ratio, or press the mixture down more firmly into the pan. You can also let them cool completely in the pan for a longer period, even refrigerating them briefly before cutting.
Q2: Can I add other mix-ins to the Easter Rice Krispie Treats?
Absolutely! Beyond sprinkles, you could fold in mini chocolate chips, M&M’s in pastel colors, or even a pinch of lemon zest for a subtle citrus note. Just be sure not to add too many wet ingredients, which could affect the texture.
Easter Rice Krispie Treats
Festive and fun Rice Krispie treats decorated for Easter with green coloring and candy eggs.
Ingredients
-
16 ounces marshmallows
-
7 cups Rice Krispies cereal
-
2 tablespoons unsalted butter
-
½ cup unsalted butter
-
3-4 cups powdered sugar
-
¼ cup milk
-
1 teaspoon vanilla extract
-
Green food coloring
-
Easter egg candies (mini chocolate eggs or jelly beans)
Instructions
-
Step 1
Grease a 9×13 inch baking dish with butter or cooking spray. -
Step 2
In a large pot, melt 2 tablespoons of unsalted butter over low heat. Add the marshmallows and stir until completely melted. -
Step 3
Remove the pot from the heat. Stir in the 7 cups of Rice Krispies cereal until well coated. -
Step 4
In a separate bowl, whisk together ½ cup unsalted butter (melted), 3-4 cups powdered sugar, ¼ cup milk, and 1 teaspoon vanilla extract until smooth. Stir in green food coloring to achieve desired shade. -
Step 5
Add the green frosting mixture to the Rice Krispie cereal mixture and stir until evenly combined. This will be a thicker mixture. -
Step 6
Press the mixture evenly into the prepared baking dish. Sprinkle the Easter egg candies over the top and gently press them in. -
Step 7
Let the treats cool completely for at least 30 minutes before cutting into squares.
Important Information
Nutrition Facts (Per Serving)
It is important to consider this information as approximate and not to use it as definitive health advice.
Allergy Information
Please check ingredients for potential allergens and consult a health professional if in doubt.


Leave a Comment