
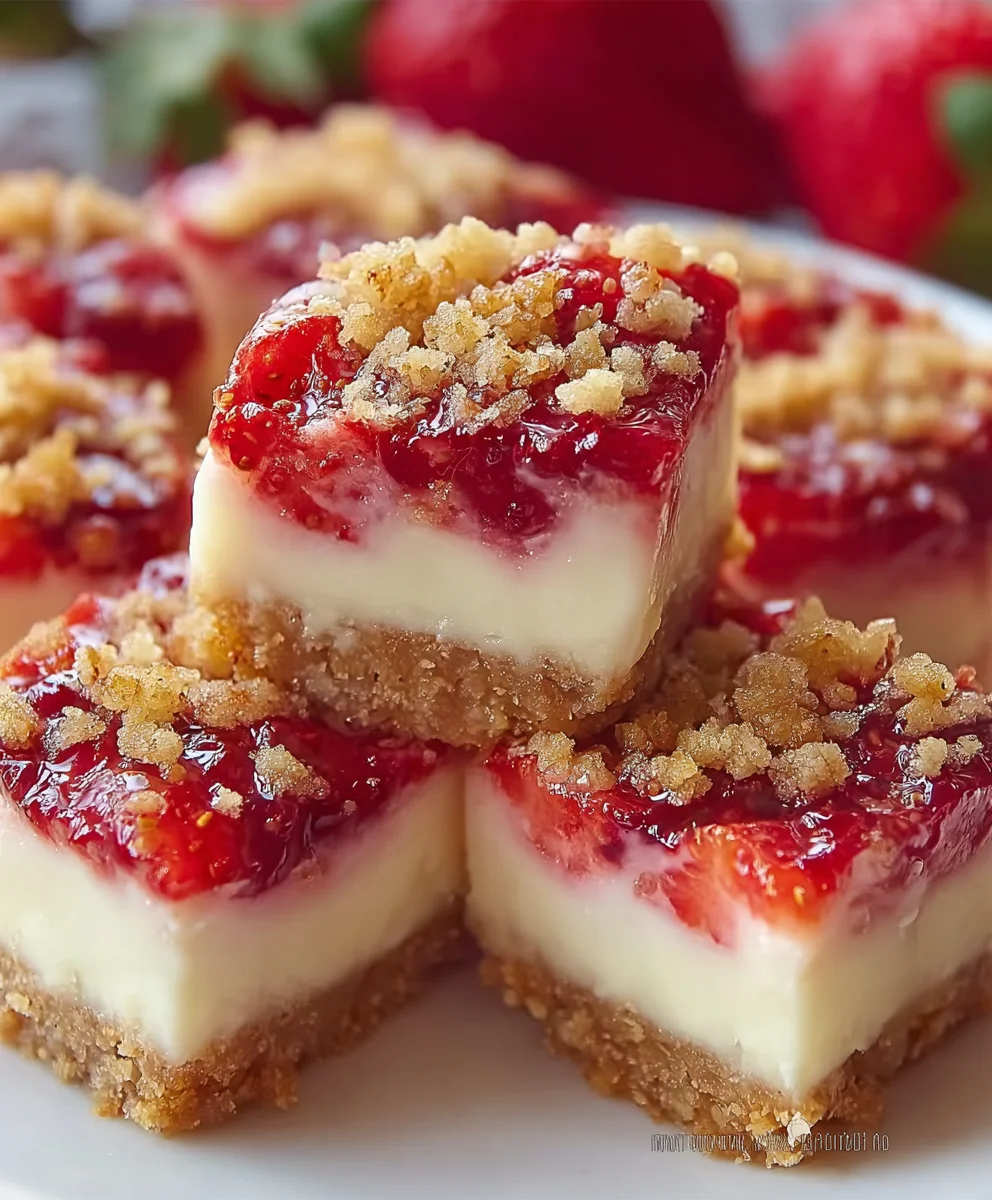
Strawberry Crunch Cheesecake Bites
Ah, just the name conjures images of vibrant pink, creamy white, and delightful golden crumbles, doesn’t it? As an avid baker, I’ve found few desserts that evoke such widespread delight and anticipation. This recipe isn’t just another sweet treat; it’s a modern classic, a sophisticated nod to those nostalgic strawberry shortcake ice cream bars we all adored as children, now transformed into an elegant, shareable dessert perfect for any occasion.
What makes these Strawberry Crunch Cheesecake Bites utterly irresistible? It’s the masterful layering of textures and flavors. Imagine: a rich, velvety cheesecake base, brightened by the fresh, sweet-tart essence of strawberries, all crowned with that iconic, buttery, and incredibly addictive strawberry crunch topping. People adore this dish not only for its stunning visual appeal but for the way it delivers a burst of pure joy in every bite – convenient, perfectly portioned, and bursting with flavor. Trust me, once you experience the harmony of creamy, crunchy, and fruity, you’ll understand why this dessert has captivated so many hearts and palates.

Ingredients:
Creating these incredible Strawberry Crunch Cheesecake Bites is a delightful journey, and gathering your ingredients thoughtfully is the first crucial step. I always recommend using high-quality ingredients as they truly make a difference in the final taste and texture of your bites.
-
For the Golden Oreo Crust:
- 24 Golden Oreo cookies (approximately 250g or one standard package), finely crushed – I find these provide the perfect vanilla base that complements the strawberry beautifully.
- 6 tablespoons (85g) unsalted butter, melted – Unsalted butter gives you control over the overall sodium content, and melting it evenly is key for a cohesive crust.
- 2 tablespoons granulated sugar – Just a touch to enhance the sweetness of the crust and help with crispness.
-
For the Creamy Cheesecake Filling:
- 4 (8-ounce/226g each) packages full-fat cream cheese, softened to room temperature – This is non-negotiable for a truly rich and decadent cheesecake. Make sure it’s very soft to prevent lumps!
- 1 ½ cups (300g) granulated sugar – For the perfect balance of sweetness in our cheesecake filling.
- ¼ cup (60ml) sour cream, room temperature – Adds a lovely tang and helps achieve that ultra-creamy, smooth texture.
- 1 tablespoon pure vanilla extract – Don’t skimp on the quality here; it elevates the entire flavor profile.
- 4 large eggs, room temperature – Using room temperature eggs ensures they incorporate smoothly into the batter, preventing overmixing.
- Pinch of salt – A small but mighty addition to balance the sweetness and enhance all the other flavors.
-
For the Irresistible Strawberry Crunch Topping:
- 20 Golden Oreo cookies (approximately 210g), roughly crushed – We’re using Golden Oreos again for consistency in flavor.
- 1 (3-ounce/85g) package strawberry gelatin powder (Jell-O brand works great) – This is where the vibrant color and intense strawberry flavor come from!
- ½ cup (113g) unsalted butter, melted – Helps bind the crunch topping together and gives it a rich, buttery taste.
- 1 cup (approximately 140g) freeze-dried strawberries, crushed into small pieces – These add an authentic, intense strawberry flavor and a delightful texture that fresh strawberries can’t replicate in a crunchy topping.
-
For the Optional Strawberry Glaze/Garnish:
- 1 cup (120g) powdered sugar (confectioners’ sugar)
- 2-3 tablespoons milk (dairy or non-dairy, as preferred)
- ¼ teaspoon pure vanilla extract
- 2-3 fresh strawberries, thinly sliced, for garnish (optional)
Preparing the Golden Oreo Crust:
A great cheesecake starts with a fantastic crust, and for these Strawberry Crunch Cheesecake Bites, we’re aiming for a buttery, crisp base that holds up beautifully. I find that taking your time with the crust truly sets the stage for success.
- First, preheat your oven to 325°F (160°C). This ensures the oven is at the correct temperature when your cheesecake goes in, which is vital for even baking.
- Crushing the Golden Oreos: This is a fun part! Take your 24 Golden Oreo cookies and crush them very finely. I personally love using a food processor for this because it gets them to a consistent, sand-like texture, which is ideal for a sturdy crust. If you don’t have a food processor, place the cookies in a large Ziploc bag, seal it, and use a rolling pin to crush them until they are fine crumbs. The finer the crumbs, the more uniform your crust will be, so take your time with this step.
- Mixing the Crust Ingredients: In a medium bowl, combine the finely crushed Golden Oreo crumbs with the 6 tablespoons of melted unsalted butter and the 2 tablespoons of granulated sugar. Use a fork or a spatula to mix these ingredients thoroughly until all the crumbs are moistened. It should resemble wet sand and hold together when you pinch it. If it seems too dry, you can add another half tablespoon of melted butter, but be careful not to make it greasy.
- Pressing the Crust: Now, for the critical part of forming the crust. Lightly grease a 9×13-inch baking pan with cooking spray or butter. Evenly press the cookie mixture into the bottom of the prepared pan. I like to use the bottom of a flat glass or a measuring cup to firmly press the crumbs down, ensuring it’s compact and level. This creates a solid base that won’t crumble when you cut your Strawberry Crunch Cheesecake Bites later. Make sure the edges are just as compacted as the center.
- Pre-baking the Crust: Bake the crust in your preheated oven for 10 minutes. This pre-baking step helps to set the crust, making it crispier and preventing it from becoming soggy once the cheesecake filling is added.
- Once baked, remove the pan from the oven and let it cool on a wire rack while you prepare the cheesecake filling. This cooling time is important; we don’t want to add cold filling to a hot crust.
Crafting the Creamy Cheesecake Filling:
The heart of our Strawberry Crunch Cheesecake Bites lies in its incredibly smooth and creamy filling. Achieving that perfect texture requires attention to detail, especially regarding ingredient temperature and mixing technique. Trust me, it’s worth every careful step!
- Prepare Your Equipment and Ingredients: First, ensure your full-fat cream cheese, sour cream, and eggs are all at absolute room temperature. This is paramount! Cold ingredients will lead to lumps in your batter and require overmixing, which can introduce too much air and cause cracks in your cheesecake. Preheat your oven again to 325°F (160°C) if it has cooled significantly, or ensure it’s still at temperature.
- Cream the Cream Cheese: In a large mixing bowl, preferably using a stand mixer with the paddle attachment (or a hand mixer), beat the softened cream cheese on medium speed for about 2-3 minutes until it’s incredibly smooth and fluffy. There should be no lumps whatsoever. Take your time here, scraping down the sides of the bowl frequently to ensure everything is incorporated. This step is crucial for a silky-smooth cheesecake.
- Add Sugar and Sour Cream: Gradually add the 1 ½ cups of granulated sugar to the cream cheese, beating on low speed until just combined. Then, add the ¼ cup of room temperature sour cream and the 1 tablespoon of pure vanilla extract. Continue to beat on low speed, scraping down the sides of the bowl often, until the mixture is homogenous and creamy, about another 1-2 minutes. Remember, gentle mixing is key at this stage to avoid incorporating too much air.
- Incorporate the Eggs: Now, add the 4 large eggs, one at a time. After each egg, beat on very low speed, just until the yellow yolk disappears and is incorporated into the batter. Do not overmix! Overmixing the eggs can lead to a soufflé-like texture and cracks in your cheesecake because it incorporates too much air. Once all eggs are incorporated, add a pinch of salt and give it one final, very gentle mix. The batter should be thick, smooth, and lump-free.
- Prepare the Water Bath (Bain-Marie): This is an essential step for a crack-free cheesecake. Wrap the bottom and sides of your 9×13-inch baking pan (the one with the cooled crust) tightly with heavy-duty aluminum foil, creating a watertight seal. I usually use two layers of foil to be extra sure.
- Pour and Bake: Pour the smooth cheesecake batter over the cooled Golden Oreo crust in the prepared pan. Gently tap the pan on the counter a few times to release any large air bubbles that might be trapped.
- Place in Water Bath: Carefully place the foil-wrapped baking pan inside a larger roasting pan. Then, pour hot (not boiling) water into the larger roasting pan, ensuring the water comes about halfway up the sides of your cheesecake pan. Be careful not to splash any water into the cheesecake batter itself.
- Baking the Cheesecake: Carefully transfer the entire roasting pan with the water bath and cheesecake to your preheated 325°F (160°C) oven. Bake for approximately 60-75 minutes. The cheesecake is done when the edges are set but the center (about 2-3 inches in diameter) still has a slight wobble when you gently jiggle the pan. It will continue to set as it cools.
- Cooling Process: Once baked, turn off the oven but leave the cheesecake inside the oven with the door slightly ajar for at least 1 hour. This slow cooling process is critical for preventing cracks.
- After 1 hour, carefully remove the cheesecake from the oven and the water bath. Remove the foil wrapping. Let it cool completely on a wire rack at room temperature for another 1-2 hours.
- Chilling is Crucial: Once completely cooled to room temperature, cover the pan loosely with plastic wrap and refrigerate for at least 6-8 hours, or preferably overnight. This chilling time is non-negotiable for the cheesecake to fully set and achieve its perfect firm yet creamy texture. Rushing this step will result in a messy cut and a less satisfying bite.
Creating the Irresistible Strawberry Crunch Topping:
The crunch topping is what makes these Strawberry Crunch Cheesecake Bites truly stand out! It’s a delightful combination of sweet, tart, and textural bliss that will have everyone asking for your secret. Preparing it correctly is key to that signature flavor and texture.
- Prepare the Topping Ingredients: First, gather your 20 Golden Oreo cookies, the package of strawberry gelatin powder, the ½ cup of melted unsalted butter, and the 1 cup of freeze-dried strawberries.
- Crush Golden Oreos: Just like with the crust, you’ll want to finely crush your 20 Golden Oreo cookies. Again, a food processor is my go-to for consistent fine crumbs. If using a bag and rolling pin, make sure they are quite fine.
- Crush Freeze-Dried Strawberries: Take your freeze-dried strawberries and crush them. You can do this in the food processor with the Oreos, or simply place them in a separate Ziploc bag and crush them with your hands or a rolling pin until they are in small, crunchy pieces. Avoid turning them into a powder; we want some textural integrity here.
- Combine Dry Ingredients: In a medium bowl, combine the finely crushed Golden Oreo crumbs, the crushed freeze-dried strawberries, and the entire package of strawberry gelatin powder. Mix these dry ingredients thoroughly with a spoon or fork until they are evenly distributed. The gelatin powder will give the crumbs a beautiful pink hue and an intense strawberry flavor.
- Add Melted Butter: Pour the ½ cup of melted unsalted butter over the dry mixture. Mix everything very well until all the crumbs are moistened and clumpy. It should look like a vibrant pink, slightly coarse crumble.
- Toast the Crunch Topping: Spread the mixture evenly on a baking sheet lined with parchment paper. Bake in your preheated 325°F (160°C) oven for about 10-12 minutes, or until the crumbs are fragrant and slightly toasted. Keep a close eye on them, as the sugar in the Oreos and butter can burn quickly. I usually give them a gentle stir halfway through baking to ensure even toasting. This toasting step deepens the flavor and enhances the crunchiness, which is vital for our Strawberry Crunch Cheesecake Bites.
- Cool the Topping: Remove the baking sheet from the oven and let the crunch topping cool completely on the baking sheet. As it cools, it will become even crunchier. Once completely cool, you can store it in an airtight container at room temperature until you’re ready to assemble.
Assembling Your Strawberry Crunch Cheesecake Bites:
Now for the grand finale! Assembling your Strawberry Crunch Cheesecake Bites is incredibly satisfying. All your hard work culminates in these beautiful, delicious treats. Precision here makes all the difference in presentation and enjoyment!
- Prepare for Cutting: Once your cheesecake has thoroughly chilled (preferably overnight), it’s ready to be cut. For the cleanest cuts, I always recommend dipping a sharp, thin knife into hot water and wiping it clean between each cut. This prevents the cheesecake from sticking and dragging.
- Cut into Bites: Carefully remove the cheesecake from the pan. You can do this by running a thin knife around the edges and then using the parchment paper if you lined the pan (though not strictly necessary for a 9×13 pan, it can help). Place the entire cheesecake slab on a large cutting board. Using your hot, clean knife, cut the cheesecake into desired bite-sized pieces. I usually aim for 4 rows by 6 rows, yielding 24 perfect squares or “bites.” You can adjust the size to your preference, creating larger bars or smaller individual treats.
- Apply the Crunch Topping: This is where your cheesecake bites get their signature “crunch.” Take your completely cooled strawberry crunch topping and spread it out on a shallow plate or a clean piece of parchment paper. Pick up each cheesecake bite and gently press its top and sides into the strawberry crunch topping, ensuring it adheres well. You can use your fingers to lightly press the crunch onto the cheesecake. Be generous with the topping; we want every bite to have that amazing texture and flavor!
- Optional Strawberry Glaze Drizzle: If you’re adding a glaze, now is the time. In a small bowl, whisk together the 1 cup of powdered sugar, 2 tablespoons of milk, and ¼ teaspoon of vanilla extract until smooth. If it’s too thick, add more milk a tiny bit at a time until you reach a drizzly consistency. If it’s too thin, add a little more powdered sugar. Drizzle this glaze over the tops of your assembled Strawberry Crunch Cheesecake Bites using a spoon or a piping bag with a very small tip. This adds an extra layer of sweetness and a beautiful finish.
- Garnish (Optional): For an extra touch of elegance and freshness, place a thin slice of fresh strawberry on top of each glazed bite, or simply arrange them artfully on your serving platter.
Important Tips for Success with Your Strawberry Crunch Cheesecake Bites:
Making a show-stopping dessert like Strawberry Crunch Cheesecake Bites can feel like a culinary challenge, but with a few tried-and-true tips, you’ll achieve professional results every time. These insights come from years of perfecting cheesecakes, and I believe they are invaluable for anyone tackling this recipe.
-
Room Temperature Ingredients are Non-Negotiable:
I cannot stress this enough. For the creamiest, lump-free cheesecake batter, your cream cheese, sour cream, and eggs absolutely must be at room temperature. Cold cream cheese will be lumpy, requiring overmixing to smooth out, which introduces too much air. Cold eggs won’t emulsify properly. Plan ahead and take these ingredients out of the fridge at least 1-2 hours before you begin mixing. This seemingly small step makes a monumental difference in the final texture of your Strawberry Crunch Cheesecake Bites.
-
Avoid Overmixing the Batter:
Once you add the eggs, mix only until they are just incorporated. Overmixing introduces excess air into the batter, which expands during baking and then collapses during cooling, often leading to cracks in your cheesecake. We want a dense, creamy texture, not an airy one.
-
The Power of the Water Bath:
The water bath (bain-marie) is your best friend for a perfectly baked, crack-free cheesecake. It creates a moist, gentle cooking environment that helps the cheesecake bake evenly and prevents the edges from drying out and cracking before the center is set. Don’t skip this step for your Strawberry Crunch Cheesecake Bites!
-
Slow Cooling Prevents Cracks:
Rapid temperature changes are the enemy of a smooth cheesecake surface. Leaving the cheesecake in the turned-off oven with the door ajar allows it to cool down gradually, minimizing the stress on the structure and significantly reducing the risk of cracks. Follow this with gradual cooling at room temperature before chilling.
-
Chilling is Crucial for Setting and Cutting:
Resist the urge to cut into your cheesecake early! The minimum 6-8 hours, or preferably overnight, chilling period is essential. This allows the cheesecake to fully set and firm up, ensuring clean, sharp cuts for your Strawberry Crunch Cheesecake Bites and a perfect texture. Cutting too soon will result in a messy, soft product.
-
Clean Cuts Every Time:
For those beautiful, professional-looking bites, use a very sharp, thin knife. Heat the knife under hot water and wipe it clean between each cut. This prevents the cheesecake from sticking to the knife and dragging, leaving you with perfectly defined edges for each of your Strawberry Crunch Cheesecake Bites.
-
Storage:
These delightful Strawberry Crunch Cheesecake Bites are best stored in an airtight container in the refrigerator for up to 5 days. For longer storage, you can freeze individual bites on a baking sheet until firm, then transfer them to a freezer-safe bag or container for up to 1 month. Thaw in the refrigerator before serving.
-
Experiment with Toppings:
While the strawberry crunch is undeniably the star, don’t hesitate to experiment! A drizzle of white chocolate or even a sprinkle of fresh mint could add another dimension to your Strawberry Crunch Cheesecake Bites. Have fun with it!
Conclusion:
Well, my friends, we’ve reached the sweet end of our journey, and I genuinely hope you’re as excited as I am about the incredible treat we’ve just explored. This isn’t just another dessert recipe; it’s an experience waiting to happen in your kitchen, a burst of joy that promises to elevate any occasion. I truly believe that once you taste the harmonious blend of creamy, tangy, and crunchy, you’ll understand exactly why I’ve been so enthusiastic about it. Prepare to be amazed by how something so delightful can also be so wonderfully approachable to make.
Why This Recipe Deserves a Permanent Spot in Your Repertoire
Let me tell you, there are countless cheesecake recipes out there, but few manage to strike such a perfect balance of flavor and texture with such delightful ease. This particular creation, our delightful Strawberry Crunch Cheesecake Bites, is truly a standout. Imagine a velvety smooth cheesecake base, offering that classic rich and slightly tangy creaminess we all adore, perfectly complemented by a vibrant burst of natural strawberry flavor infused throughout. But the magic doesn’t stop there. The “crunch” element is what truly elevates these bites from excellent to utterly unforgettable. That crispy, sweet, and slightly salty crumble topping, often reminiscent of the classic ice cream bar, adds an addictive textural contrast that will have everyone reaching for just one more. It’s the kind of dessert that looks impressive enough for a special celebration, tastes absolutely divine, and yet, is surprisingly simple to assemble, making it ideal for both seasoned bakers and those just starting their culinary adventures. Whether you’re planning a sophisticated brunch, a casual get-together, a celebratory potluck, or simply craving something extraordinary to brighten your day, these bites are the answer. They’re individual portions of pure bliss, making them super easy to serve and enjoy without any mess, and let’s be honest, who can resist a dessert that’s both beautiful and perfectly portioned? They truly encapsulate the essence of a celebratory dessert – fun, flavorful, and incredibly satisfying, leaving a lasting impression on everyone lucky enough to try them.
Elevate Your Experience: Serving Suggestions & Creative Variations
Now that you’re armed with the knowledge to create these masterpieces, let’s talk about making them truly your own and exploring ways to enhance their already incredible appeal. While our Strawberry Crunch Cheesecake Bites are absolutely divine on their own, a few thoughtful additions or creative twists can take them to the next level. For a simple yet elegant touch, consider garnishing each bite with a fresh mint leaf or a delicate slice of fresh strawberry right before serving – the vibrant green or red adds a beautiful pop of natural color and freshness. If you’re feeling a bit more adventurous, a tiny dollop of homemade whipped cream, lightly sweetened with a hint of vanilla bean, would provide an extra layer of luxurious creaminess and richness. For those who love a bit of extra decadence, a drizzle of high-quality white chocolate ganache or a very thin strawberry coulis could be an absolute game-changer, adding another dimension of sweetness and visual appeal. Thinking about variations? The “crunch” element is incredibly versatile! While strawberry is fantastic, imagine swapping out the freeze-dried strawberries in the crumble for other freeze-dried fruits like raspberries or blueberries for a different berry experience, or even a mix of berries for a “mixed berry crunch.” For a chocolate lover’s twist, you could incorporate finely crushed Oreo cookies or even chocolate wafer cookies into the crumble for a “Cookies and Cream Crunch Cheesecake Bite” concept. The cheesecake base itself is also a canvas for creativity. A swirl of lemon zest or a teaspoon of lemon extract into the cheesecake batter would introduce a delightful citrusy brightness, perfectly complementing the strawberry crunch. Don’t be afraid to experiment with different extract flavors in your cheesecake mixture – almond, coconut, or even a touch of rosewater could offer unique aromatic profiles that surprise and delight. Serve them chilled, straight from the refrigerator, for that classic refreshing cheesecake experience. Or, for a truly indulgent treat, let them sit at room temperature for about 10-15 minutes before serving to allow the cheesecake to soften ever so slightly, enhancing its creamy, melt-in-your-mouth texture. They also make fantastic additions to a dessert buffet, a picnic basket, or a potluck, as their individual nature makes them easy to transport and share without fuss, ensuring everyone gets their own perfect little portion of joy.
Your Turn! Dive In and Share Your Sweet Success!
So, what are you waiting for? I wholeheartedly encourage you to roll up your sleeves, gather your ingredients, and embark on this delightful baking adventure. You’re not just making a dessert; you’re creating moments of pure joy and satisfaction for yourself, your family, and your friends. I promise you, the aroma filling your kitchen will be just the beginning of a truly rewarding experience, culminating in smiles and contented sighs all around the table. Once you’ve whipped up your batch of these irresistible bites, I would absolutely love to hear all about it! Did you try a fun variation? Did they disappear in minutes? Were they the hit of your party? Please, don’t keep your sweet triumphs to yourself! Share your photos, your tips, and your honest feedback in the comments section below. Seeing your creations truly makes my day, and it inspires others to take the plunge as well, fostering a wonderful community of enthusiastic home bakers. Let’s celebrate the joy of creating something delicious from scratch together. Happy baking, and get ready to be amazed by the delightful magic of these amazing sweet treats!
Strawberry Crunch Cheesecake Bites
Indulge in these irresistible Strawberry Crunch Cheesecake Bites, a modern classic blending rich, velvety cheesecake with a sweet-tart strawberry essence, crowned with an iconic buttery, crunchy topping. Perfect for any occasion, these perfectly portioned treats deliver a burst of joy in every bite.
Ingredients
-
For the Golden Oreo Crust:
-
24 Golden Oreo cookies (approx. 250g) or graham crackers, finely crushed
-
6 tablespoons (85g) unsalted butter, melted
-
2 tablespoons granulated sugar
-
For the Creamy Cheesecake Filling:
-
4 (8-ounce/226g each) packages full-fat cream cheese, softened to room temperature
-
1 ½ cups (300g) granulated sugar
-
¼ cup (60ml) sour cream, room temperature
-
1 tablespoon pure vanilla extract
-
4 large eggs, room temperature
-
Pinch of salt
-
For the Irresistible Strawberry Crunch Topping:
-
20 Golden Oreo cookies (approx. 210g) or graham crackers, roughly crushed
-
1 (3-ounce/85g) package strawberry gelatin powder
-
½ cup (113g) unsalted butter, melted
-
1 cup (approx. 140g) freeze-dried strawberries, crushed into small pieces
-
For the Optional Strawberry Glaze/Garnish:
-
1 cup (120g) powdered sugar
-
2-3 tablespoons milk (dairy or non-dairy)
-
¼ teaspoon pure vanilla extract
-
2-3 fresh strawberries, thinly sliced, for garnish (optional)
Instructions
-
Step 1
Preheat oven to 325°F (160°C). Finely crush 24 Golden Oreo cookies (or graham crackers). In a medium bowl, combine crushed cookies with 6 tbsp melted unsalted butter and 2 tbsp granulated sugar; mix until moistened. Press mixture firmly and evenly into the bottom of a lightly greased 9×13-inch baking pan, muffin cups, or desired pan for bites. Bake for 10 minutes (for 9×13 pan) then let cool on a wire rack. -
Step 2
Ensure cream cheese, sour cream, and eggs are at room temperature. In a large mixing bowl, beat 4 packages softened cream cheese on medium speed for 2-3 minutes until smooth and fluffy. Gradually add 1 ½ cups granulated sugar, beating on low until just combined. Add ¼ cup room temperature sour cream and 1 tbsp pure vanilla extract; beat on low until homogenous. Add 4 large eggs, one at a time, beating on very low speed just until yolk disappears. Do not overmix. Add a pinch of salt and gently mix. -
Step 3
Wrap the bottom and sides of your 9×13-inch baking pan tightly with heavy-duty aluminum foil. Pour the cheesecake batter over the cooled crust. Place the foil-wrapped pan inside a larger roasting pan, then pour hot water into the roasting pan to come halfway up the sides of the cheesecake pan (water bath). Carefully transfer to the preheated 325°F (160°C) oven. Bake for approximately 60-75 minutes (for a 9×13 pan) until edges are set but the center still has a slight wobble. Note: If baking mini bites, bake for 20-25 minutes; for a smaller ‘larger pan’ that isn’t a 9×13 slab, bake for 35-40 minutes, until set but slightly jiggly in the center. -
Step 4
Once baked, turn off the oven and leave the cheesecake inside with the door slightly ajar for at least 1 hour for slow cooling. Remove from oven and water bath, then cool completely on a wire rack at room temperature for 1-2 hours. Cover loosely and refrigerate for at least 6-8 hours, or preferably overnight, for the cheesecake to fully set. -
Step 5
Finely crush 20 Golden Oreo cookies (or graham crackers) and 1 cup freeze-dried strawberries. In a medium bowl, combine crushed cookies, crushed freeze-dried strawberries, and 1 package strawberry gelatin powder. Mix thoroughly. Pour ½ cup melted unsalted butter over the mixture and mix very well until clumpy. Spread evenly on a parchment-lined baking sheet. Bake at 325°F (160°C) for 10-12 minutes, stirring halfway, until fragrant and slightly toasted. Cool completely on the baking sheet until crunchy. -
Step 6
Once the cheesecake is thoroughly chilled, use a sharp, thin knife (dipped in hot water and wiped clean between cuts) to cut the cheesecake into desired bite-sized pieces (e.g., 24 squares). Spread the cooled strawberry crunch topping on a shallow plate. Gently press the top and sides of each cheesecake bite into the topping, ensuring it adheres well. -
Step 7
For an optional glaze, whisk together 1 cup powdered sugar, 2-3 tbsp milk, and ¼ tsp vanilla extract until smooth. Drizzle over the assembled bites. Garnish with a thin slice of fresh strawberry on top of each bite, if desired. -
Step 8
Store Strawberry Crunch Cheesecake Bites in an airtight container in the refrigerator for up to 5 days. For longer storage, freeze individual bites on a baking sheet until firm, then transfer to a freezer-safe bag or container for up to 1 month. Thaw in the refrigerator before serving.
Important Information
Nutrition Facts (Per Serving)
It is important to consider this information as approximate and not to use it as definitive health advice.
Allergy Information
Please check ingredients for potential allergens and consult a health professional if in doubt.

Leave a Comment