
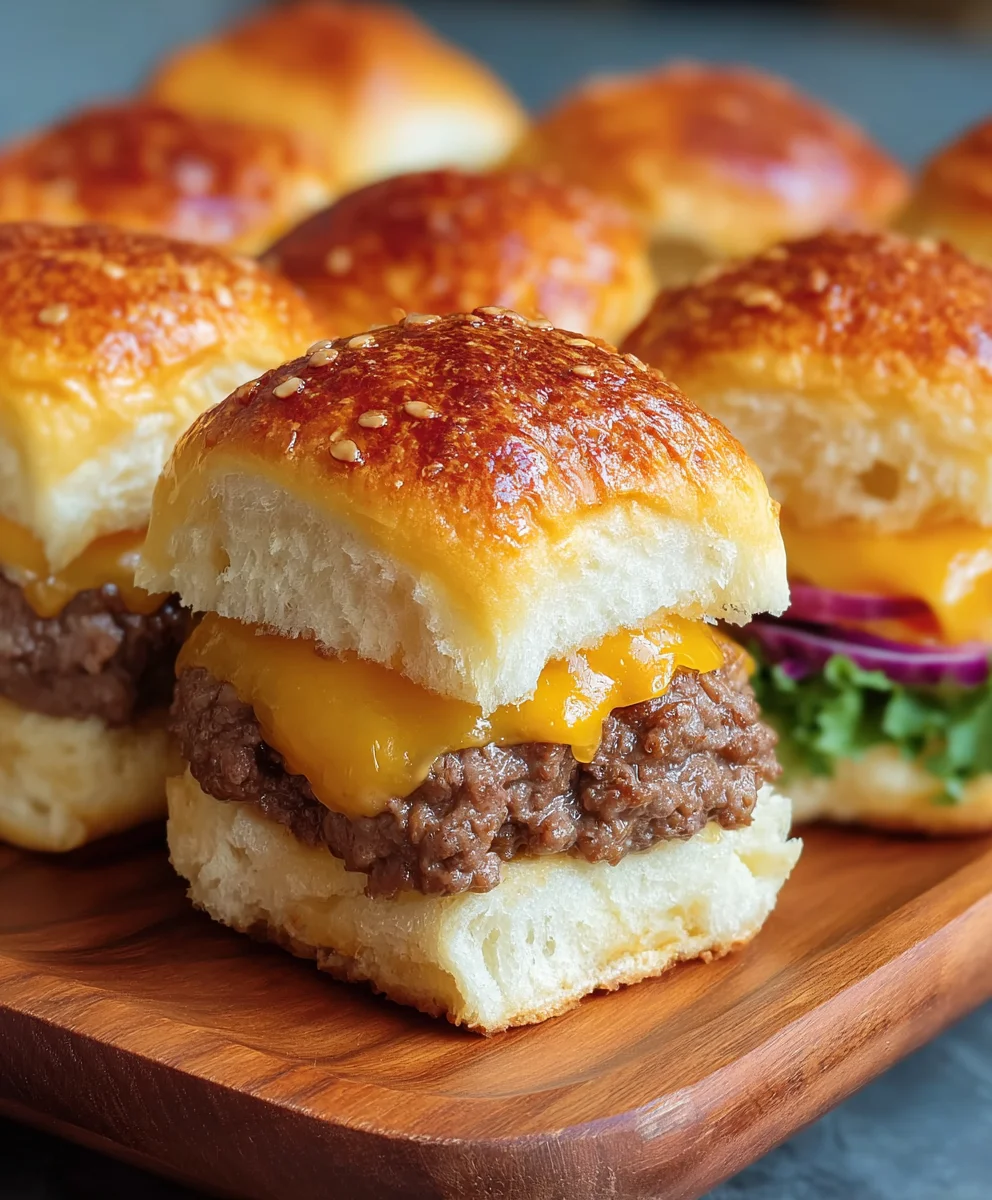
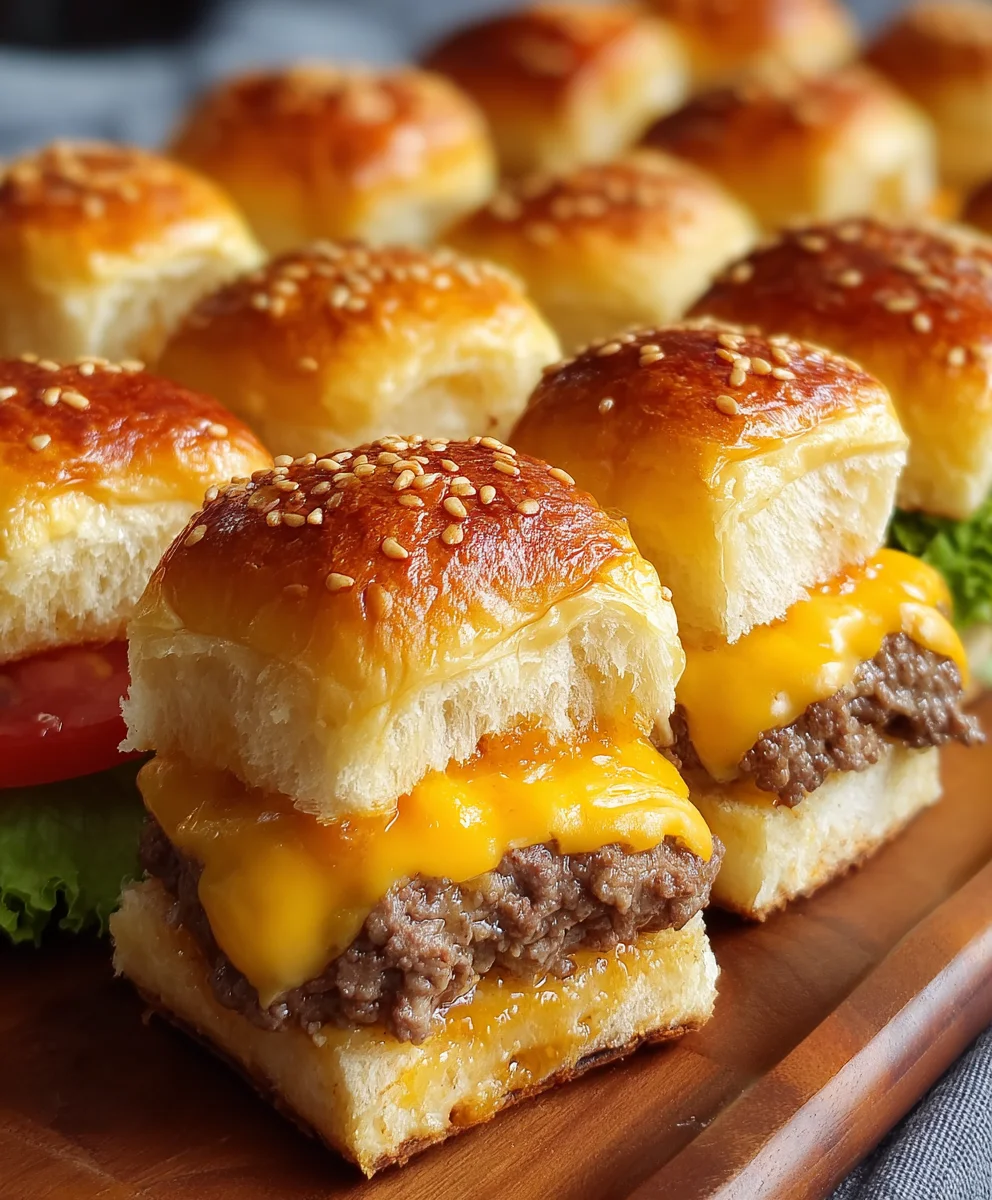
Cheeseburger Sliders With Hawaiian Rolls Recipe is an absolute game-changer for anyone looking to effortlessly elevate their next gathering or simply enjoy a comforting, flavorful meal. Imagine perfectly seasoned mini beef patties, blanketed in melty cheese, nestled within sweet, pillowy Hawaiian rolls. It’s a combination that truly sings, offering that classic cheeseburger taste in an irresistibly bite-sized package. I’ve found that these sliders aren’t just convenient; they represent a delightful evolution of the humble burger, transforming it from a casual weeknight dinner into a sophisticated yet approachable party favorite.
The slider, with its origins tracing back to the early 20th-century American diner, has long been celebrated for its compact charm. When paired with the subtle sweetness of Hawaiian rolls, this classic gets a fantastic modern twist. People simply adore this dish for countless reasons: the incredible balance of savory beef and sweet bread, the gooey texture of melted cheese, and the sheer convenience of serving a crowd with minimal fuss.
They are incredibly easy to prepare and even easier to devour!
Whether you’re hosting a game day, a family get-together, or just craving a delicious snack, mastering this delightful Cheeseburger Sliders With Hawaiian Rolls Recipe will undoubtedly earn you rave reviews. Get ready to create a dish that’s both nostalgic and excitingly new!
Ingredients:
- For the Slider Patties:
- 2 pounds (about 900g) 80/20 or 85/15 ground beef
- 1 tablespoon Worcestershire sauce
- 1 teaspoon garlic powder
- 1 teaspoon onion powder
- 1 teaspoon sea salt (or to taste)
- ½ teaspoon freshly ground black pepper (or to taste)
- For the Rolls and Cheese:
- 2 packages (24 count total) King’s Hawaiian Sweet Rolls, unsliced
- 16-20 slices American cheese (or a mix of American and Cheddar/Provolone), torn or quartered
- For the Topping & Assembly:
- 4 tablespoons unsalted butter, melted
- 1 teaspoon Worcestershire sauce (for the butter topping)
- ½ teaspoon garlic powder (for the butter topping)
- 1 medium yellow onion, very thinly sliced or finely diced (optional, for sautéing or fresh)
- 2 tablespoons neutral oil (like canola or vegetable oil), for cooking
- 2 tablespoons sesame seeds (optional, for garnish)
- Dill pickle chips, for serving (optional)
- Ketchup and mustard, for serving (optional)
- Fresh parsley, chopped (optional, for garnish)
Phase 1: Preparing the Meat Mixture for Your Cheeseburger Sliders
- Prepare Your Ground Beef: Begin by placing your ground beef into a large mixing bowl. I always find that 80/20 or 85/15 ground beef provides the perfect balance of flavor and juiciness for sliders, as the fat content helps keep them moist and tender. This ensures our “Cheeseburger Sliders With Hawaiian Rolls Recipe” will be incredibly succulent.
- Season the Beef to Perfection: To the ground beef, add 1 tablespoon of Worcestershire sauce. This is a game-changer, lending a deep, savory umami note that truly elevates the beef flavor. Next, sprinkle in 1 teaspoon of garlic powder, 1 teaspoon of onion powder, 1 teaspoon of sea salt, and ½ teaspoon of freshly ground black pepper. These seasonings are classic for a reason, creating that quintessential cheeseburger taste we all adore and making these sliders undeniably delicious.
- Gentle Mixing is Key: Now, using clean hands, very gently mix the seasonings into the ground beef. The trick here is to avoid overworking the meat. When ground beef is handled too much, it can become tough and dense, which is the last thing we want for our juicy sliders. Mix just until the seasonings are evenly distributed, ensuring no pocket of unseasoned meat remains. Keep it light and quick! This crucial step contributes to the tender texture of the sliders.
- Forming the Mini Patties: Once seasoned, it’s time to form your slider patties. Since we’re aiming for 24 sliders (using two 12-packs of Hawaiian rolls), you’ll need to form 24 individual, small patties. Each patty should be roughly 1.5 to 2 inches in diameter and about ½ inch thick. I find it helpful to make a slight indentation in the center of each patty with my thumb. This little dimple helps prevent the patties from puffing up into a dome shape while cooking, ensuring they stay flat and fit perfectly on your rolls. Uniformity in size is crucial for even cooking and a beautiful presentation, ensuring every “Cheeseburger Slider With Hawaiian Rolls Recipe” is a miniature masterpiece.
Phase 2: Preparing the Hawaiian Rolls and Other Components
- Preheat Your Oven: Before we get too far, let’s get the oven ready. Preheat your oven to 350°F (175°C). This will ensure it’s at the perfect temperature when it’s time for our sliders to get nice and toasty and the cheese to melt into gooey perfection.
- Prepare Your Baking Dish: Lightly grease a 9×13 inch baking dish (or similar size that can accommodate 24 sliders arranged tightly). A quick spray with non-stick cooking spray works wonders. This prevents the rolls from sticking and makes cleanup a breeze, allowing you to focus on enjoying your “Cheeseburger Sliders With Hawaiian Rolls Recipe.”
- Slicing the Hawaiian Rolls: Take your two packages of King’s Hawaiian Sweet Rolls. The beauty of these rolls is that they often come connected in a block. Carefully, using a large serrated knife, slice each entire block of rolls horizontally through the middle, separating the tops from the bottoms. The goal is to keep all the individual rolls connected at their sides within each top and bottom half. This makes assembly so much easier! Place the bottom halves of the rolls into your prepared baking dish, making sure they fit snugly side-by-side without leaving too many gaps.
- Cheese, Please!: Now, let’s talk cheese. I adore classic American cheese for cheeseburger sliders because of its incredible melt factor and creamy texture. You can use 16-20 slices, tearing or quartering them to fit. If you prefer, a mix of American and sharp cheddar or creamy provolone can add more depth of flavor. Have your cheese ready to go, as we’ll be layering it soon to create that iconic gooey cheeseburger experience that is central to the “Cheeseburger Sliders With Hawaiian Rolls Recipe.”
- Optional Sautéed Onions: If you love sautéed onions on your cheeseburger sliders, now is the time to prepare them. Heat a skillet over medium heat with a tablespoon of neutral oil. Add your very thinly sliced or finely diced yellow onion and cook, stirring occasionally, until they are beautifully caramelized and softened, about 8-10 minutes. This brings a wonderful sweetness and depth that complements the savory beef perfectly. Set them aside. Alternatively, you can use fresh, thinly sliced red onion for a sharper bite, added later during assembly for those who prefer a crunch.
Phase 3: Cooking the Slider Patties to Golden Perfection
- Heat Your Skillet: Place a large skillet or griddle over medium-high heat. Add 1-2 tablespoons of neutral oil. You want the pan to be hot enough to give the patties a good sear but not so hot that it smokes excessively. A cast-iron skillet is fantastic for this, providing even heat and a beautiful crust that locks in the juices, ensuring truly flavorful “Cheeseburger Sliders With Hawaiian Rolls Recipe.”
- Cook the Slider Patties: Once the oil is shimmering, carefully place the slider patties into the hot skillet. Don’t overcrowd the pan; you might need to cook them in batches to ensure proper browning and even cooking. Cook for about 2-3 minutes per side. You’re looking for a beautiful golden-brown crust to form on the bottom. The internal temperature should reach 160°F (71°C) for safe consumption. As they cook, you’ll notice their delightful aroma filling your kitchen – that’s the sign of good things to come!
- Keep Them Warm: As each batch of patties finishes cooking, transfer them to a plate lined with paper towels to absorb any excess grease. This helps prevent the sliders from becoming too oily. If you’re cooking in batches, you can loosely tent them with foil to keep them warm while you finish the rest. This ensures all your patties are ready for assembly at the same time, maintaining optimal temperature for the “Cheeseburger Sliders With Hawaiian Rolls Recipe.”
Phase 4: Assembling Your “Cheeseburger Sliders With Hawaiian Rolls Recipe” Masterpiece
- Foundation First: With the bottom halves of your Hawaiian rolls already nestled snugly in the baking dish, it’s time to build! This forms the delicious sweet base for our savory sliders.
- Layer the Patties: Carefully arrange your cooked slider patties evenly over the bottom layer of rolls. Try to get one patty on top of each individual roll for maximum cheeseburger goodness. If some rolls are slightly smaller, you might gently press two patties together to ensure full coverage. Ensuring an even layer of patties is crucial for uniform deliciousness in every bite.
- Add the Cheese: Now for the star of the show: the cheese! Generously cover the patties with your torn or quartered American cheese slices. Don’t be shy; we want that beautiful, gooey melt. Overlap the cheese slightly to ensure it cascades down and surrounds the patties, creating that irresistible cheesy pull that makes cheeseburgers so satisfying. If you’re using a mix of cheeses, layer them here for complex flavor.
- Add Your Onions (Optional): If you prepared the caramelized onions, sprinkle them evenly over the cheese layer. Their sweet notes will complement the savory beef and tangy pickles beautifully. If you prefer fresh, raw onion, you can add thin slices now or offer them on the side for individual preference. This customization is part of the fun of making “Cheeseburger Sliders With Hawaiian Rolls Recipe.”
- Top It Off: Gently place the top halves of the Hawaiian rolls back over the cheese and patties, completing your slider sandwiches. They should fit perfectly back into place, like a puzzle, ready for their final transformation in the oven.
Phase 5: Baking for Perfection and That Irresistible Golden Crust
- Prepare the Flavorful Butter Topping: In a small microwave-safe bowl, melt the 4 tablespoons of unsalted butter. Once melted, stir in the additional 1 teaspoon of Worcestershire sauce and ½ teaspoon of garlic powder. This fragrant mixture is going to give our slider tops a beautiful golden hue and an extra layer of savory flavor, truly enhancing the “Cheeseburger Sliders With Hawaiian Rolls Recipe.”
- Brush and Garnish: Using a pastry brush, generously and evenly brush the butter mixture over the tops of the Hawaiian rolls. Make sure every roll gets a good coating; this butter infusion is key to their irresistible finish. If you’re using sesame seeds, now is the time to sprinkle them over the buttered tops. They add a lovely visual appeal and a subtle nutty crunch, reminiscent of a classic burger bun, making your sliders look as good as they taste.
- Cover and Bake: Loosely cover the baking dish with aluminum foil. This step is important as it helps to trap the heat and steam, allowing the cheese to melt perfectly and the patties to heat through without the roll tops browning too quickly. Bake in your preheated 350°F (175°C) oven for 15 minutes.
- Uncover and Finish Baking: After 15 minutes, carefully remove the foil. Return the baking dish to the oven and continue baking for another 5-10 minutes, or until the tops of the rolls are beautifully golden brown and the cheese is gloriously bubbly and melted. Keep an eye on them during this final stage to prevent over-browning. The sight of that melted cheese cascading down is truly mouth-watering and signals that your “Cheeseburger Sliders With Hawaiian Rolls Recipe” is almost ready!
Phase 6: Serving Your Delicious “Cheeseburger Sliders With Hawaiian Rolls Recipe”
- Rest Before Slicing: Once out of the oven, I know it’s tempting to dive right in, but allow the sliders to rest in the baking dish for about 5 minutes. This brief resting period helps the cheese set slightly and makes slicing much easier, preventing everything from sliding apart. It ensures a cleaner presentation and a more enjoyable eating experience.
- Slice and Serve: Using that same serrated knife, carefully slice along the lines between the individual rolls to separate your cheeseburger sliders. You can serve them directly from the baking dish or transfer them to a serving platter for a more elegant presentation. The ease of slicing makes them perfect for sharing.
- Garnish and Enjoy: Arrange your sliders beautifully. I love to garnish them with a sprinkle of fresh chopped parsley for a pop of color. Serve immediately with optional dill pickle chips on the side, and small bowls of ketchup and mustard for dipping. These “Cheeseburger Sliders With Hawaiian Rolls Recipe” are perfect for parties, game nights, or a fun family dinner. Prepare for rave reviews – they are incredibly addictive and disappear quickly!
- Storage and Reheating: If you happen to have any leftovers (which is rare, trust me!), store them in an airtight container in the refrigerator for up to 2-3 days. To reheat, you can pop them back in the oven at 300°F (150°C) for about 10-15 minutes, or until heated through. Alternatively, a quick zap in the microwave will work, though the rolls might not be as crispy as freshly baked. Enjoy the delightful flavors of your “Cheeseburger Sliders With Hawaiian Rolls Recipe” even on the second day!
Conclusion:
Well, my friends, we’ve reached the end of our culinary journey, and I genuinely hope you’re feeling inspired and hungry! I truly believe that if there’s one recipe you add to your rotation this year, this should be it. What makes this particular dish an absolute must-try, you ask? It’s the sheer genius of combining perfectly seasoned ground beef with gooey, melted cheese, all nestled within the undeniably soft, subtly sweet embrace of a Hawaiian roll. This isn’t just another dinner; it’s an experience, a little bite of comfort food heaven that manages to be both incredibly satisfying and surprisingly simple to prepare. The way the savory beef and tangy cheese melt together, creating a symphony of flavors that perfectly complements the unique texture of the slightly toasted roll, is nothing short of magical. It’s a recipe that transcends occasions, shining equally brightly at a bustling game day party, a laid-back family dinner, or even as a delightful contribution to a potluck. Every single time I make them, they disappear in a flash, and I always get asked for the recipe. It truly is one of those dishes that brings smiles to faces and happy sighs around the table.
Elevate Your Slider Game: Serving Suggestions & Creative Variations
Now that you’re convinced these sliders are a culinary essential, let’s talk about how to make them even more spectacular. While they are undeniably perfect on their own, a few thoughtful additions can take your experience to the next level. For classic American diner vibes, I love serving these sliders alongside crispy golden French fries, a generous bowl of creamy coleslaw, or some crunchy onion rings. Don’t forget the pickles! A side of tangy dill pickle spears or a sweet gherkin relish provides a wonderful contrast to the richness of the cheeseburger. For an ultimate interactive experience, consider setting up a “slider bar” with various toppings and sauces. Think beyond the basic ketchup and mustard! Offer a zesty homemade burger sauce, a smoky BBQ sauce, spicy sriracha mayo, or even a sophisticated truffle aioli.
And the fun doesn’t stop there. The beauty of this base recipe is its incredible versatility. You can easily switch up the cheese – try pepper jack for a little kick, smoked gouda for depth, or Swiss for a nutty flavor profile. Want to add more to the filling? Sautéed onions and mushrooms can be mixed in with the beef, or crispy bacon bits layered on top before baking. For those who love a bit of heat, a sprinkle of finely diced jalapeños inside the sliders before baking adds a fantastic zing. You could even transform these into breakfast sliders by swapping the beef for sausage patties and adding a scrambled egg layer. For a completely different twist, try a BBQ chicken version by shredding cooked chicken, tossing it in your favorite BBQ sauce, and layering it with cheese. The possibilities are truly endless once you master this core concept, and the Hawaiian rolls provide the perfect canvas for all sorts of mini sandwich creations.
Your Turn: Make, Share, and Inspire!
So, what are you waiting for? I wholeheartedly encourage you to roll up your sleeves and give this incredible Cheeseburger Sliders With Hawaiian Rolls Recipe a try. I promise you, it’s simpler than you think and the rewards in terms of flavor and satisfied eaters are immense. Don’t be intimidated; the process is straightforward, and the result is consistently impressive. Imagine the delighted faces of your family and friends as they bite into these warm, savory, and perfectly sweet little bundles of joy. Once you’ve whipped up your batch, I would absolutely love to hear about your experience! Did you stick to the classic version, or did you get creative with some of the variations I suggested? Perhaps you came up with a brilliant new topping or side dish that I absolutely need to try! Please, feel free to share your creations and stories online or with your friends and family. Your feedback and personal touches not only inspire me but also help other home cooks discover new favorites. Cooking is a journey of discovery and sharing, and I can’t wait to see what deliciousness you bring to your kitchen with this fantastic recipe. Happy cooking!
Delicious Cheeseburger Sliders with Sweet Hawaiian Rolls
Cheeseburger Sliders with Hawaiian Rolls are an absolute game-changer for effortlessly elevating your next gathering or simply enjoying a comforting meal. Imagine perfectly seasoned mini beef patties, blanketed in melty cheese, nestled within sweet, pillowy Hawaiian rolls. This combination truly sings, offering classic cheeseburger taste in an irresistibly bite-sized package.
Ingredients
-
2 lbs ground beef (80/20 or 85/15)
-
1 tbsp Worcestershire sauce
-
1 tsp garlic powder
-
1 tsp onion powder
-
1 tsp sea salt
-
½ tsp black pepper
-
2 pkgs (24 ct total) King’s Hawaiian Sweet Rolls, unsliced
-
16-20 slices American cheese (or mix), torn
-
4 tbsp unsalted butter, melted
-
1 tsp Worcestershire sauce (for topping)
-
½ tsp garlic powder (for topping)
-
1 medium yellow onion, thinly sliced (optional)
-
2 tbsp neutral oil
-
2 tbsp sesame seeds (optional)
-
Dill pickle chips (optional, for serving)
-
Ketchup and mustard (optional, for serving)
-
Fresh parsley, chopped (optional, for garnish)
Instructions
-
Step 1
In a large bowl, combine ground beef with 1 tbsp Worcestershire sauce, 1 tsp garlic powder, 1 tsp onion powder, 1 tsp sea salt, and ½ tsp black pepper. Gently mix until seasonings are evenly distributed, avoiding overworking the meat. -
Step 2
Form 24 individual small patties (roughly 1.5-2 inches diameter, ½ inch thick). Make a slight indentation in the center of each with your thumb to prevent puffing during cooking. -
Step 3
Preheat your oven to 350°F (175°C). Lightly grease a 9×13 inch baking dish. -
Step 4
Using a serrated knife, carefully slice each entire block of Hawaiian rolls horizontally through the middle, separating the tops from the bottoms while keeping the rolls connected at their sides. Place the bottom halves snugly in the prepared baking dish. -
Step 5
Have your 16-20 slices of American cheese (torn or quartered) ready. If desired, sauté the thinly sliced yellow onion in 1 tbsp neutral oil over medium heat until caramelized (about 8-10 minutes); set aside. -
Step 6
Heat 1-2 tbsp neutral oil in a large skillet or griddle over medium-high heat. Cook slider patties in batches for about 2-3 minutes per side until golden brown and cooked through (internal temperature 160°F/71°C). Transfer cooked patties to a paper towel-lined plate and loosely tent with foil to keep warm. -
Step 7
Arrange the cooked slider patties evenly over the bottom layer of Hawaiian rolls in the baking dish. Generously cover the patties with the torn cheese slices, overlapping slightly to ensure good melt coverage. If using, sprinkle the caramelized onions over the cheese layer. -
Step 8
Gently place the top halves of the Hawaiian rolls back over the cheese and patties, completing your slider sandwiches. -
Step 9
In a small microwave-safe bowl, melt the 4 tbsp unsalted butter. Stir in the additional 1 tsp Worcestershire sauce and ½ tsp garlic powder. -
Step 10
Using a pastry brush, generously and evenly brush the butter mixture over the tops of the Hawaiian rolls. If using, sprinkle sesame seeds over the buttered tops for garnish. -
Step 11
Loosely cover the baking dish with aluminum foil. Bake in the preheated oven for 15 minutes. -
Step 12
Carefully remove the foil. Return the baking dish to the oven and continue baking for another 5-10 minutes, or until the tops of the rolls are beautifully golden brown and the cheese is gloriously bubbly and melted. -
Step 13
Once out of the oven, allow the sliders to rest in the baking dish for about 5 minutes. Using a serrated knife, carefully slice along the lines between the individual rolls to separate the sliders. Garnish with fresh chopped parsley if desired. Serve immediately with optional dill pickle chips, ketchup, and mustard. -
Step 14
Store any leftover sliders in an airtight container in the refrigerator for up to 2-3 days. Reheat in the oven at 300°F (150°C) for 10-15 minutes, or quickly in the microwave.
Important Information
Nutrition Facts (Per Serving)
It is important to consider this information as approximate and not to use it as definitive health advice.
Allergy Information
Please check ingredients for potential allergens and consult a health professional if in doubt.


Leave a Comment