
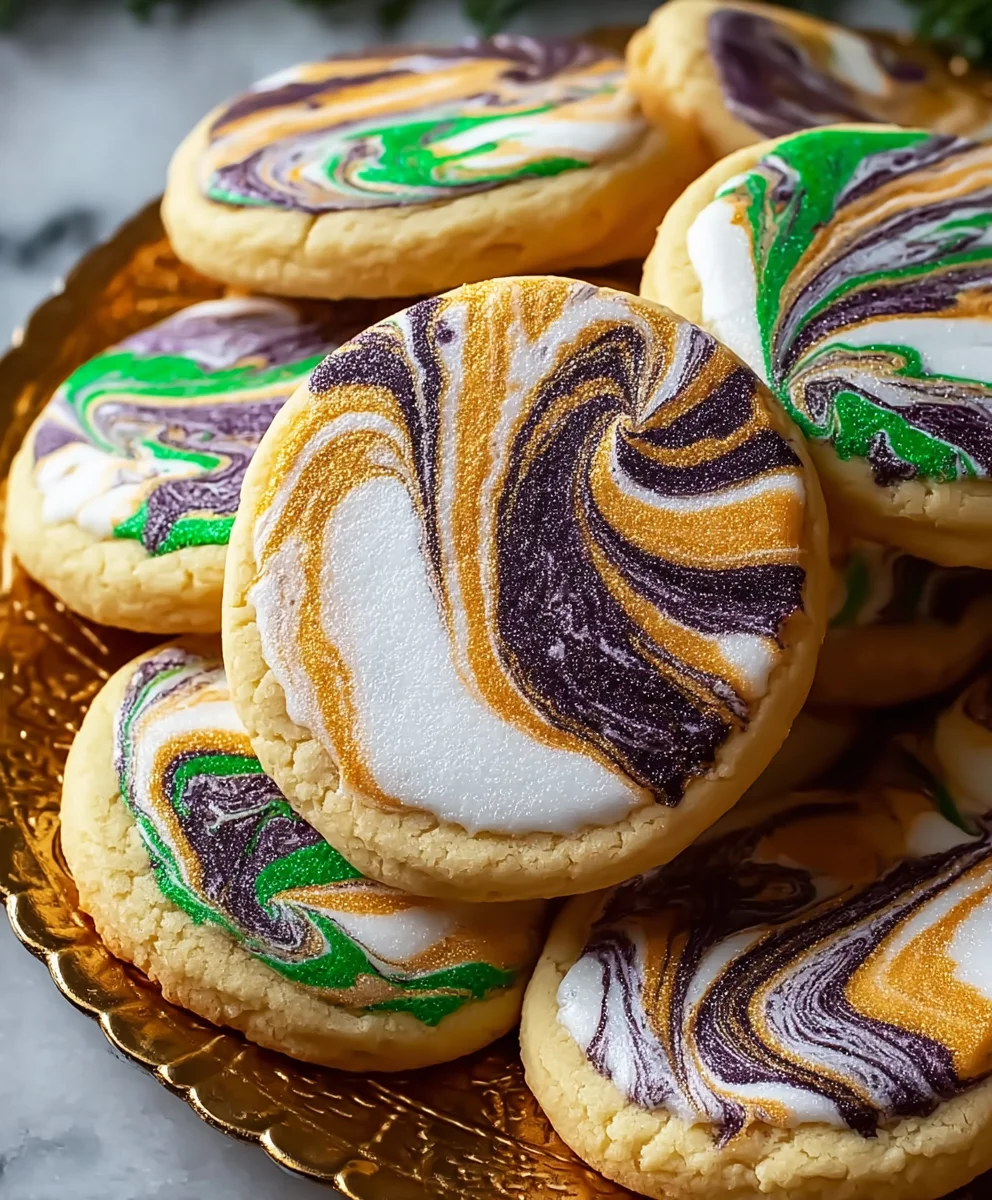
Marbled Sugar Cookies are more than just a sweet treat; they are miniature works of art that promise to captivate and delight everyone who lays eyes on them. Have you ever wondered how to create desserts that are as visually stunning as they are delicious? Well, you’re in for a delightful surprise! These cookies take the humble, beloved sugar cookie and elevate it to an entirely new level with mesmerizing swirls of color that make each one unique.
While the classic sugar cookie traces its origins back to German settlers in Pennsylvania in the 1700s, becoming a staple for celebrations and holidays, the technique of marbling adds a contemporary, artistic twist to this timeless favorite. It’s this fusion of tradition and innovation that truly makes them special.
Why We Love Marbled Sugar Cookies So Much
People adore these cookies not only for their incredible aesthetic appeal, which makes them perfect for any occasion from elegant parties to casual get-togethers, but also for their undeniably delicious flavor and texture. Imagine a perfectly tender, buttery cookie, infused with a hint of vanilla, that melts in your mouth, leaving you craving just one more. The magic of Marbled Sugar Cookies lies in that irresistible combination of a crisp edge, a soft center, and a beautiful design that truly sets them apart. They’re a joy to bake and an even greater joy to share, ensuring smiles all around!
Ingredients:
For the Perfect Marbled Sugar Cookies:
- 3 cups (360g) All-Purpose Flour: I always make sure it’s unbleached for the best texture in my Marbled Sugar Cookies.
- 1 teaspoon Baking Powder: This gives our cookies just the right amount of lift.
- 1/2 teaspoon Salt: A little pinch brings out all the wonderful flavors.
- 1 cup (226g) Unsalted Butter: Make sure it’s softened to room temperature – this is crucial for a smooth dough.
- 1 cup (200g) Granulated Sugar: For that classic sweet cookie base.
- 1 large Egg: Also at room temperature, it binds everything together beautifully.
- 1 teaspoon Pure Vanilla Extract: The soul of any good sugar cookie, giving our Marbled Sugar Cookies their delightful aroma.
For the Silky Royal Icing for Marbled Sugar Cookies:
- 4 cups (480g) Powdered Sugar (Confectioners’ Sugar): Sifted, please! This prevents lumps and ensures a smooth finish for your Marbled Sugar Cookies.
- 3 tablespoons Meringue Powder: This is what gives royal icing its structure, shine, and helps it harden beautifully.
- 1/2 to 3/4 cup Warm Water: We’ll add this gradually to achieve the perfect consistency.
- 1/2 teaspoon Clear Vanilla Extract or Almond Extract: Clear extract prevents discoloration of your vibrant icing colors.
- Gel Food Coloring: A variety of your favorite colors for the stunning marbled effect. I usually pick 2-3 complementary shades plus white.
Making the Marbled Sugar Cookie Dough:
- Combine Dry Ingredients: In a medium bowl, whisk together the 3 cups of all-purpose flour, 1 teaspoon of baking powder, and 1/2 teaspoon of salt. Set this mixture aside for now. Ensuring these are well combined prevents pockets of leavening or salt in your finished Marbled Sugar Cookies. I always make sure to use a good whisk for at least 30 seconds.
- Cream Butter and Sugar: In the bowl of a stand mixer fitted with the paddle attachment (or using a hand mixer and a large bowl), beat the 1 cup of softened unsalted butter and 1 cup of granulated sugar together on medium speed. You’re looking for a light, fluffy, and pale yellow mixture. This usually takes about 3-5 minutes. Don’t rush this step! Properly creaming the butter and sugar incorporates air, which contributes to the tender texture of your finished Marbled Sugar Cookies. Scrape down the sides of the bowl periodically to ensure everything is evenly mixed.
- Add Egg and Vanilla: Reduce the mixer speed to low. Add the large room-temperature egg and the 1 teaspoon of pure vanilla extract. Continue mixing until they are just combined, being careful not to overmix. Overmixing at this stage can develop too much gluten, which can lead to tough cookies. We want our Marbled Sugar Cookies to be delightfully tender.
- Gradually Incorporate Dry Ingredients: With the mixer on low speed, gradually add the dry ingredient mixture to the wet ingredients, about a third at a time. Mix only until the flour is just incorporated and no dry streaks remain. It’s absolutely essential not to overmix at this stage. As soon as you see the dough coming together, stop the mixer. This helps to maintain the delicate texture of your Marbled Sugar Cookies.
- Chill the Dough: Gather the dough into a disc, wrap it tightly in plastic wrap, and refrigerate it for at least 1 hour, but preferably 2 hours. I sometimes even chill it overnight! Chilling is a non-negotiable step for Marbled Sugar Cookies for a few reasons: it allows the butter to firm up, making the dough easier to roll without sticking; it prevents the cookies from spreading too much in the oven, helping them maintain their shape; and it also allows the flavors to meld beautifully. If you try to roll warm dough, it will be sticky and challenging, leading to frustration and misshapen cookies. This chilling time is an investment in perfectly formed Marbled Sugar Cookies.
Rolling and Cutting Your Marbled Sugar Cookies:
- Prepare Your Workspace: Lightly flour a clean, dry surface, your rolling pin, and your hands. You can also roll the dough between two sheets of parchment paper, which is my preferred method as it reduces the need for additional flour, keeping your Marbled Sugar Cookies tender. Take one portion of the chilled dough from the refrigerator. If the dough is too firm, let it sit at room temperature for 5-10 minutes to soften slightly, but not too much.
- Roll Out the Dough: Using your rolling pin, roll the dough evenly to a thickness of about 1/4 inch. Consistency in thickness is key here; if your cookies are of varying thickness, some will bake faster than others, leading to unevenly baked Marbled Sugar Cookies. If you’re using parchment paper, gently peel back the top layer of parchment occasionally to ensure the dough isn’t sticking.
- Cut Out Shapes: Dip your cookie cutters into a bit of flour before each cut to prevent sticking. Press the cutters firmly straight down into the dough, then lift straight up. Avoid twisting the cutter, as this can distort the cookie shape and make your Marbled Sugar Cookies uneven. Carefully transfer the cut-out cookies to a baking sheet lined with parchment paper or a silicone baking mat. Leave about 1 inch between each cookie.
- Re-roll Scraps: Gather any dough scraps, gently press them together, and re-roll. You might need to chill these scraps for another 15-20 minutes if they become too warm and soft before cutting more Marbled Sugar Cookies. Try not to re-roll the dough more than two or three times, as excessive handling can develop gluten and make the cookies tough.
Baking Your Marbled Sugar Cookies to Perfection:
- Preheat Oven and Prepare Sheets: Preheat your oven to 350°F (175°C). Line several baking sheets with parchment paper or silicone baking mats. This prevents sticking and promotes even baking for your Marbled Sugar Cookies.
- Bake the Cookies: Bake one sheet at a time in the preheated oven for 8-12 minutes, depending on the size and thickness of your cookies. You’re looking for the edges to be just lightly golden. The centers should still look soft, but not raw. I always rotate my baking sheet halfway through the baking time to ensure even browning. Keep a close eye on them, as oven temperatures can vary, and overbaked Marbled Sugar Cookies lose their tender quality.
- Cool Completely: Once baked, remove the baking sheets from the oven and let the cookies cool on the sheets for about 5 minutes before carefully transferring them to a wire rack to cool completely. This step is absolutely critical! Your Marbled Sugar Cookies must be completely cool before you even think about applying royal icing. Attempting to ice warm cookies will cause the icing to melt and run, ruining your beautiful designs. Patience is a virtue when it comes to decorating Marbled Sugar Cookies.
Crafting the Royal Icing for Marbled Sugar Cookies:
- Whisk Meringue Powder and Water: In a large bowl or the bowl of a stand mixer fitted with the whisk attachment, combine the 3 tablespoons of meringue powder with 1/2 cup of warm water. Whisk on medium-high speed until the meringue powder is fully dissolved and the mixture is foamy, which usually takes about 2-3 minutes. This forms the base for our sturdy royal icing for Marbled Sugar Cookies.
- Gradually Add Powdered Sugar: Slowly add the 4 cups of sifted powdered sugar to the meringue mixture, about a cup at a time, mixing on low speed until combined after each addition. Once all the sugar is in, increase the speed to medium-high and beat for 5-7 minutes, until the icing is very thick and holds stiff peaks. It should look like marshmallow fluff.
- Incorporate Extract: Stir in the 1/2 teaspoon of clear vanilla or almond extract. This adds a lovely flavor without altering the color of your Marbled Sugar Cookies.
- Achieve Piping Consistency: At this point, your icing will be quite stiff – perfect for piping intricate details or creating a strong border. To achieve a piping consistency (often called “outline” or “20-second” consistency), gradually add small amounts of warm water, about 1/2 teaspoon at a time, mixing well after each addition. You’re looking for an icing that, when a spoonful is dropped back into the bowl, the trace of the icing disappears within 15-20 seconds. This consistency is perfect for outlining your Marbled Sugar Cookies, creating a barrier to hold in the flood icing.
- Achieve Flooding Consistency: Once you have your piping consistency, you’ll need a slightly thinner consistency for flooding (often called “10-second” consistency). Take a portion of the piping consistency icing and thin it out further with a few more drops of water. This time, when a spoonful is dropped back, the trace should disappear within 8-10 seconds. This is the perfect consistency to fill in the outlined areas of your Marbled Sugar Cookies. Always test your consistency on a piece of parchment paper before applying it to your cookies.
- Divide and Color Icing: Divide your royal icing into separate bowls, one for each color you plan to use for your marbled effect, plus a bowl for plain white. Add a tiny amount of gel food coloring to each bowl and mix thoroughly until you achieve your desired vibrant shades. Remember that gel colors are highly concentrated, so start with just a toothpick’s worth. Cover each bowl with plastic wrap directly touching the surface of the icing to prevent it from crusting over. Transfer each color to separate piping bags fitted with small round tips (like PME #1 or #2) for outlining and slightly larger tips (like PME #3 or #4) or simply snip the ends for flooding. Having a good range of colors ready is essential for stunning Marbled Sugar Cookies.
The Marbling Magic: Decorating Your Marbled Sugar Cookies:
- Outline Your Cookies: Using the piping consistency icing, carefully outline the edges of each completely cooled Marbled Sugar Cookie. This creates a dam that will prevent your thinner flood icing from running over the sides. Let this outline dry for 10-15 minutes, or until it’s set enough to hold the flood icing. This small drying time is a critical step for preventing blowouts in your Marbled Sugar Cookies.
- Flood Your Cookies: Now, take your flood consistency icing (typically white or a light base color is excellent for a strong contrast). Fill in the outlined area of each cookie, working quickly. Use a scribe tool or a toothpick to gently spread the icing to the edges and pop any air bubbles. You want a smooth, even layer. This layer will be the canvas for your Marbled Sugar Cookies.
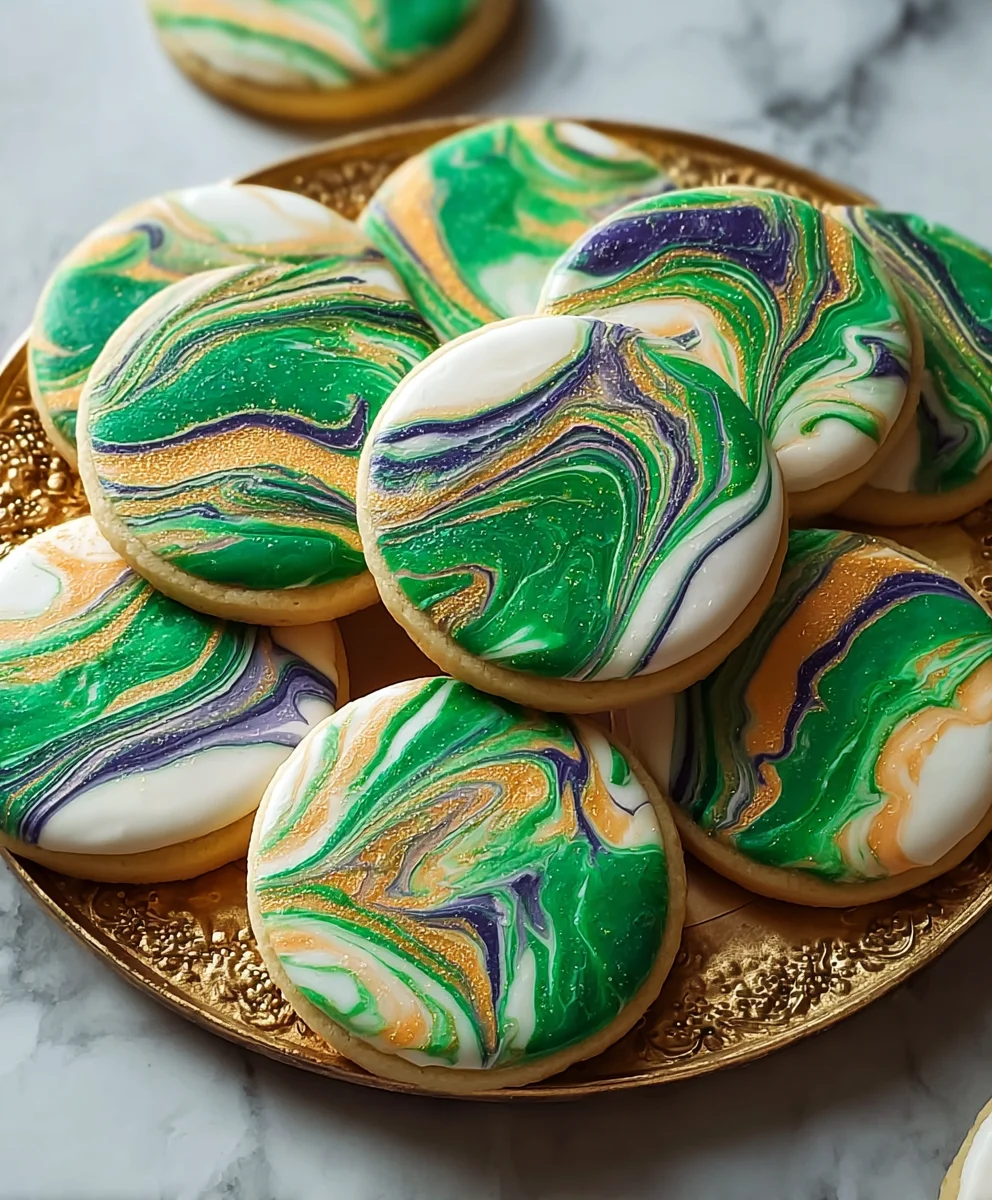
- Apply Wet-on-Wet Contrasting Colors: This is where the magic truly happens for your Marbled Sugar Cookies! While the flood icing is still wet (this is key – it must be wet for the colors to meld), immediately pipe dots, lines, or spirals of your contrasting colored flood icings onto the wet base. For instance, if your base is white, you might pipe dots of blue, pink, and yellow. Or, if you prefer lines, draw parallel lines across the wet base. Don’t hesitate; work fairly quickly here. The beauty of Marbled Sugar Cookies comes from this wet-on-wet technique.
- Create the Marble Effect: Once you have your contrasting colors on the wet base, immediately grab your scribe tool or a clean toothpick. Gently drag the tip through the wet icing, swirling and pulling the colors together to create beautiful, organic marbled patterns. You can drag in straight lines, create zigzags, or make circular motions – experiment to find patterns you love! The more you drag, the more blended your colors will be; less dragging will result in more defined lines. This is the heart of creating those stunning Marbled Sugar Cookies. Clean your scribe tool after each swipe for the cleanest lines.
- Allow Your Marbled Sugar Cookies to Dry Completely: This is arguably the most important and longest step. Carefully place your decorated Marbled Sugar Cookies on a flat surface or a cooling rack in a dry, room-temperature area. Allow them to dry undisturbed for at least 6-8 hours, or preferably overnight (12-24 hours). The icing needs to harden completely, or it will smudge, dent, or stick together. If you live in a humid environment, you might consider using a dehydrator on a very low setting (around 90-100°F) for an hour or two to help speed up the initial hardening process of your Marbled Sugar Cookies. Proper drying ensures a durable, beautiful finish. Once completely dry, the surface will be hard and smooth to the touch. You can then stack them without worry.
Tips for Flawless Marbled Sugar Cookies:
-
Humidity is the Enemy:
Royal icing and humidity do not mix well. On very humid days, royal icing takes much longer to dry and can sometimes remain tacky. If it’s a humid day, try running a dehumidifier in the room where your Marbled Sugar Cookies are drying.
-
Patience, Patience, Patience:
Rushing any step, especially the drying process, will compromise the quality of your Marbled Sugar Cookies. Take your time, enjoy the process, and let everything set properly.
-
Practice Makes Perfect:
Don’t be discouraged if your first batch of Marbled Sugar Cookies isn’t exactly what you envisioned. Royal icing decorating takes practice. Try piping on parchment paper first to get a feel for the consistency and your hand movements.
-
Storage:
Once completely dry, store your Marbled Sugar Cookies in an airtight container at room temperature for up to 2 weeks. They will remain fresh and delicious, ready to impress!
-
Color Choices:
For the most striking Marbled Sugar Cookies, choose colors that contrast well. A light base color with darker, vibrant swirls works beautifully. Consider using a clear vanilla extract to ensure your white icing stays pristine white.
Conclusion:
And there you have it, my friends! We’ve journeyed together through the delightful process of creating what I genuinely believe are some of the most charming and utterly delicious cookies you’ll ever bake. This isn’t just another sugar cookie recipe; it’s an invitation to infuse a little bit of edible art into your kitchen, creating treats that are as pleasing to the eye as they are to the palate. I truly can’t emphasize enough why these cookies are an absolute must-try for any baking enthusiast, novice or seasoned. They manage to strike that perfect balance: simple enough to tackle on a quiet afternoon, yet sophisticated enough to impress at any gathering. The subtle, sweet crunch followed by a tender, melt-in-your-mouth interior is simply irresistible, and the magic of seeing those unique swirls emerge from the dough never ceases to amaze me. Each cookie becomes a tiny, edible masterpiece, a testament to the simple joy of homemade goodness.
The beauty of these particular Marbled Sugar Cookies lies not only in their incredible taste and stunning visual appeal but also in the sheer fun of the creative process. The act of swirling the colors together is incredibly therapeutic, and the anticipation of pulling those beautifully patterned cookies from the oven is a little thrill I cherish every time. They embody everything wonderful about a classic sugar cookie – that comforting, familiar flavor – but elevated with an elegant twist that makes them feel extra special. Whether you’re looking for a delightful afternoon project, a unique gift to share with loved ones, or simply a treat to brighten your own day, these cookies fit the bill perfectly. They’re not just a dessert; they’re an experience, a conversation starter, and a clear demonstration that homemade can indeed rival, if not surpass, anything from a high-end bakery.
Elevate Your Cookie Experience: Serving Suggestions & Creative Variations
Once your beautiful batch of cookies is cooled and ready, the possibilities for enjoying them are endless! For a simple, comforting treat, I love serving them alongside a steaming cup of Earl Grey tea or a robust coffee – the slight bitterness of the beverage beautifully complements the cookies’ sweetness. They also make an absolutely stunning addition to any dessert platter, especially during holidays or special occasions; imagine a vibrant array of these alongside other confections, truly making your table pop. Don’t forget about gifting, either! Arranged in a charming box or a simple cello bag tied with a ribbon, these cookies become a thoughtful and personalized present that’s sure to be cherished. Their handmade charm and artistic flair make them incredibly personal and memorable gifts.
But why stop there? Let’s talk variations! This recipe is incredibly adaptable. Feeling adventurous? Try swapping out vanilla extract for almond extract to give them a delicate, nutty undertone, or a hint of lemon zest for a brighter, citrusy lift. For different holidays, play with your color palette: festive reds and greens for Christmas, soft pastels for Easter or a baby shower, or bold oranges and blacks for Halloween. You could even experiment with different food colorings, perhaps gel colors for more vibrant hues. For an extra touch of sparkle, a light dusting of edible glitter or pearl dust right after they cool will make them shimmer under the light. And while they are perfect plain, a drizzle of a simple glaze – think a powdered sugar and milk mix, perhaps flavored with a touch of mint or raspberry – could add another layer of flavor and visual intrigue. You might even consider experimenting with different cookie cutter shapes to match your theme, making each cookie truly unique and tailored to the moment.
Your Turn: Bake, Share, and Inspire!
Now, it’s your turn. My biggest hope is that you’ll feel inspired to roll up your sleeves, gather your ingredients, and dive into the wonderful world of baking these beautiful cookies. Don’t be intimidated by the marbling technique; it’s genuinely much easier and more forgiving than it looks, and there’s no right or wrong way – every swirl is perfect. The true magic is in the individual touch you bring to each one. I promise you, the joy of seeing your own unique patterns emerge, coupled with the incredible aroma filling your home, is an experience that will warm your heart and reward your efforts tenfold. Please, please, do me a favor and give this recipe a try! I would absolutely love to hear about your baking adventures. Did you try a new color combination? Experiment with an extract? Whatever your experience, share your thoughts and, most importantly, your glorious cookie creations! Post a picture, tell us about your favorite part, and let’s celebrate the art of baking together. Happy baking, my dear friends!
Marbled Sugar Cookies
These Marbled Sugar Cookies are miniature works of art, transforming the classic sugar cookie into a visually stunning, delicious treat with mesmerizing swirls of color. Each tender, buttery cookie, infused with non-alcoholic vanilla, offers a crisp edge and soft center, perfect for any occasion. Decorated cookies keep for 2 weeks at room temperature or 3 months frozen. Dough freezes for up to 1 month.
Ingredients
-
3 cups (360g) All-Purpose Flour
-
1 teaspoon Baking Powder
-
1/2 teaspoon Salt
-
1 cup (226g) Unsalted Butter, softened
-
1 cup (200g) Granulated Sugar
-
1 large Egg, room temperature
-
1 teaspoon Non-alcoholic Vanilla Extract
-
4 cups (480g) Powdered Sugar, sifted
-
3 tablespoons Meringue Powder
-
1/2 to 3/4 cup Warm Water
-
1/2 teaspoon Clear Non-alcoholic Vanilla or Almond Extract
-
Gel Food Coloring (various colors)
Instructions
-
Step 1
Whisk together 3 cups flour, 1 tsp baking powder, and 1/2 tsp salt. In a separate bowl, cream 1 cup softened unsalted butter with 1 cup granulated sugar until light and fluffy. Beat in 1 large egg and 1 tsp non-alcoholic vanilla extract. Gradually add dry ingredients to wet, mixing until just combined. -
Step 2
Gather dough into a disc, wrap tightly, and refrigerate for at least 1-2 hours (preferably overnight) to prevent spreading and maintain shape. -
Step 3
Lightly flour a surface or roll dough between parchment paper to 1/4-inch thickness. Cut shapes using floured cookie cutters and transfer to baking sheets lined with parchment paper. Re-roll scraps and chill if necessary. -
Step 4
Preheat oven to 350°F (175°C). Bake cookies for 8-12 minutes, or until edges are lightly golden. Let cool on baking sheets for 5 minutes, then transfer to a wire rack to cool completely before icing. -
Step 5
In a bowl, whisk 3 tbsp meringue powder with 1/2 cup warm water until foamy. Gradually add 4 cups sifted powdered sugar, beating on medium-high speed for 5-7 minutes until very thick. Stir in 1/2 tsp clear non-alcoholic vanilla or almond extract. -
Step 6
Divide icing into portions. Thin some icing to piping consistency (15-20 second trace) and others to flooding consistency (8-10 second trace) by adding small amounts of warm water. Color each portion with desired gel food coloring. -
Step 7
Outline cooled cookies with piping consistency icing and let dry for 10-15 minutes. Fill in the outlined areas with flood consistency icing, spreading to the edges with a scribe tool or toothpick. -
Step 8
While the flood icing is still wet, immediately pipe dots, lines, or spirals of contrasting colored flood icings onto the base. Gently drag a scribe tool or toothpick through the wet colors to create marbled patterns. -
Step 9
Carefully place decorated cookies on a flat surface or cooling rack and allow to dry undisturbed for at least 6-8 hours, or preferably overnight (12-24 hours), until the icing is completely hardened.
Important Information
Nutrition Facts (Per Serving)
It is important to consider this information as approximate and not to use it as definitive health advice.
Allergy Information
Please check ingredients for potential allergens and consult a health professional if in doubt.
Leave a Comment