
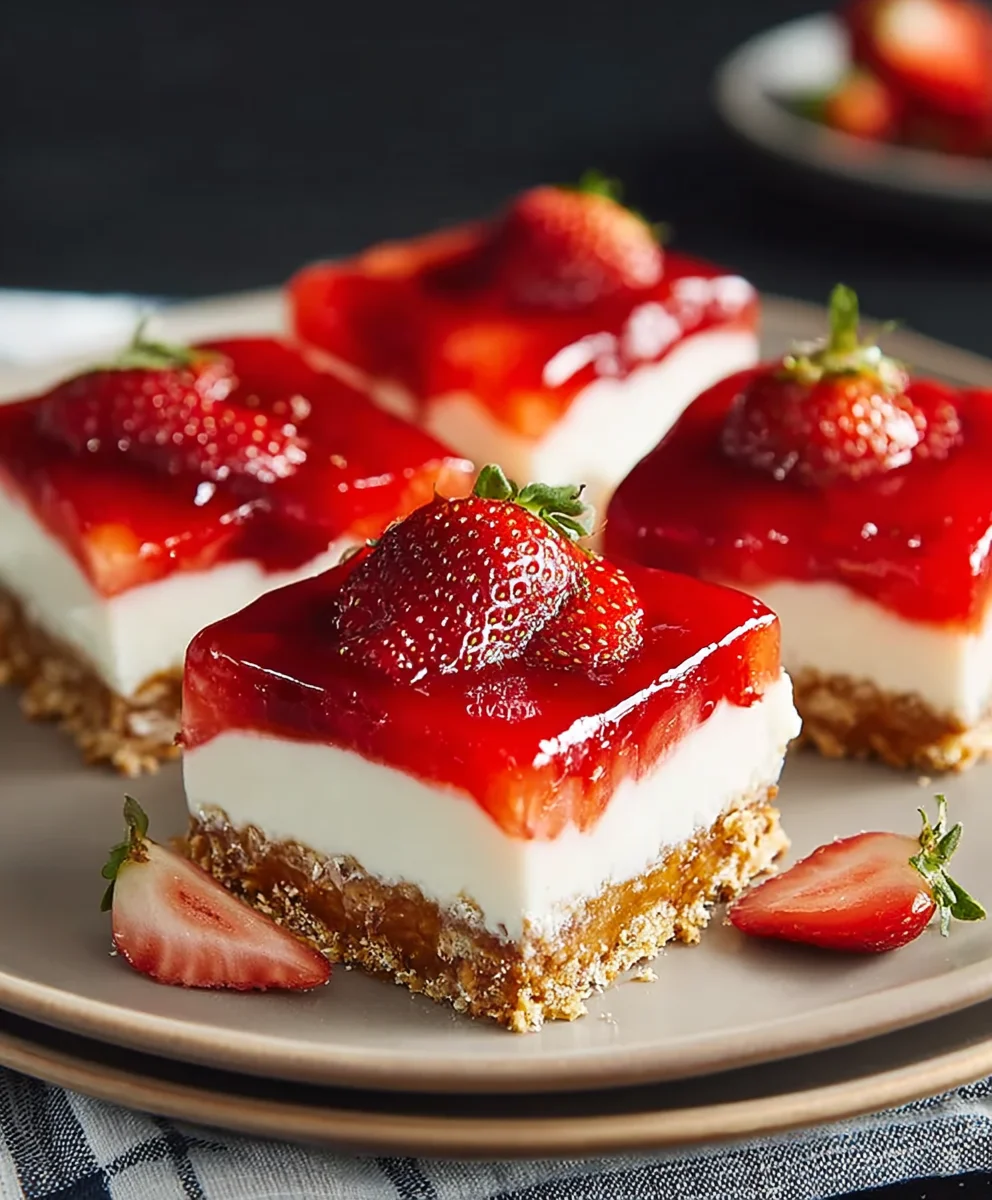
Strawberry Pretzel Salad has long held a special place at family gatherings and potlucks across America, often stealing the show from more traditional desserts. I’ve always been captivated by its ingenious layers: the irresistible salty crunch of the pretzel crust, the velvety smooth and tangy cream cheese filling, and finally, the vibrant, sweet burst of fresh strawberries suspended in a shimmering strawberry gel. It’s a dish that masterfully defies expectations, blurring the lines between a salad and a delectable dessert, and proving that sometimes, the most unexpected combinations yield the most cherished results.
A Beloved Classic with a Sweet and Salty Twist
While its name might suggest a healthier side dish, this iconic creation is, without a doubt, a dessert that brings smiles to every face. Its origins are somewhat shrouded in the delightful mystery of mid-20th-century American culinary innovation, likely emerging as a creative way to use convenience foods like gelatin and frozen fruit, evolving into a beloved staple for holidays and celebrations. People adore this Strawberry Pretzel Salad not just for its stunning visual appeal but for the incredible interplay of flavors and textures—the perfect symphony of sweet, salty, creamy, and crunchy in every single bite. It’s a refreshingly light yet utterly satisfying treat that promises to be the highlight of any meal I serve.

Ingredients:
-
For the Pretzel Crust:
- 2 cups (about 4.5 ounces or 125g) finely crushed pretzels (I usually go for mini pretzels, they crush nicely!)
- ¾ cup (1½ sticks or 170g) unsalted butter, melted
- ¼ cup (50g) granulated sugar
-
For the Cream Cheese Layer:
- 1 (8-ounce or 226g) block full-fat cream cheese, softened to room temperature (this is crucial for a smooth layer!)
- 1 cup (200g) granulated sugar
- 1 (12-ounce or 340g) container frozen whipped topping (like Cool Whip), thawed in the refrigerator
-
For the Strawberry Jell-O Topping:
- 2 (6-ounce or 170g each) packages strawberry-flavored gelatin (Jell-O brand works perfectly)
- 2 cups (480ml) boiling water
- 2 (10-ounce or 283g each) packages frozen sliced strawberries, thawed and undrained (the juices are packed with flavor!)
Crafting the Irresistible Pretzel Crust
Ah, the pretzel crust! This is truly the foundation of our magnificent Strawberry Pretzel Salad. It provides that perfectly salty, sweet, and crunchy counterpoint to the creamy and fruity layers, making every bite an adventure. Let’s get started on creating this beautiful base.
-
Prepare Your Pretzels for Crushing:
First things first, we need to transform those crunchy pretzels into a fine crumb. You have a couple of options here, depending on your kitchen arsenal and personal preference. I often use a food processor because it’s incredibly efficient. Simply add your 2 cups of pretzels to the processor and pulse until they are finely crushed. We’re aiming for a consistency similar to coarse sand or graham cracker crumbs, without any large chunks. If you don’t have a food processor, no worries! You can place the pretzels in a large, sturdy Ziploc bag, seal it well, and then use a rolling pin, the bottom of a heavy pot, or even your fists to smash them into fine crumbs. This can be a bit therapeutic, actually! Just make sure the bag is strong enough to withstand the pressure. The finer the crumbs, the better your crust will hold together.
-
Melt the Butter and Combine with Sugar:
Next, grab your ¾ cup of unsalted butter and melt it down. You can do this in a microwave-safe bowl in 30-second increments, stirring in between, or in a small saucepan over low heat on the stovetop. Once your butter is fully melted and glistening, pour it into a medium-sized mixing bowl. To this melted butter, add your ¼ cup of granulated sugar. Give it a good stir until the sugar is dissolved and well incorporated into the butter. This simple step adds a wonderful sweetness that balances the saltiness of the pretzels.
-
Mix the Pretzel Crumbs:
Now, it’s time to bring the pretzels into the mix! Add your finely crushed pretzels to the bowl with the melted butter and sugar. Using a spoon or your clean hands, gently mix everything together until all the pretzel crumbs are evenly coated with the buttery sugar mixture. It should look like wet sand and hold together when you squeeze a small amount in your hand. This thorough coating is essential for forming a cohesive and delicious crust.
-
Press the Crust into Your Baking Dish:
Grab a 9×13-inch baking dish. This size is perfect for the layers we’re building. Evenly spread the pretzel mixture into the bottom of the dish. Now comes a crucial part: pressing it down firmly. I like to use the bottom of a flat-bottomed glass or the back of a spoon to really pack it down. The firmer you press, the less likely your crust is to crumble when you cut into the salad later. Pay special attention to the corners and edges to ensure an even thickness across the entire base. We want a solid foundation for our Strawberry Pretzel Salad.
-
Bake the Crust to Perfection:
Preheat your oven to 350°F (175°C). Once preheated, carefully place your baking dish with the pressed pretzel crust into the oven. Bake for about 8-10 minutes. The goal here isn’t to brown it excessively, but rather to toast the pretzels lightly and help the crust set so it becomes wonderfully crisp and holds its shape. You’ll notice a delightful aroma filling your kitchen. After 8-10 minutes, remove the dish from the oven. It’s absolutely vital to let the crust cool completely before moving on to the next layer. Seriously, resist the urge to rush! A warm crust will melt your cream cheese layer, and we definitely don’t want that. I usually let it sit on a wire rack at room temperature for at least 30 minutes, or even pop it in the fridge for 15-20 minutes to speed up the cooling process.
Creating the Luscious Cream Cheese Layer
This is where the “salad” gets its creamy, dreamy texture. This layer is a sweet, tangy, and incredibly smooth blanket that will sit atop our crispy pretzel base. It provides a delightful contrast and acts as a barrier, preventing our juicy strawberry Jell-O from making the pretzels soggy.
-
Soften the Cream Cheese:
Before you even think about mixing, ensure your 8-ounce block of full-fat cream cheese is at true room temperature. I can’t stress this enough! If your cream cheese is cold, it will be lumpy and difficult to incorporate smoothly, no matter how much you beat it. I usually take it out of the fridge at least an hour before I plan to start, or if I’m short on time, I might unwrap it and let it sit in a warm spot for a bit. You want it pliable, almost spreadable. Trust me, this small detail makes a huge difference in the final texture of your cream cheese layer for our Strawberry Pretzel Salad.
-
Beat the Cream Cheese and Sugar:
In a large mixing bowl, combine the softened cream cheese and 1 cup of granulated sugar. Using an electric mixer (either a hand mixer or a stand mixer with the paddle attachment), beat the mixture on medium-high speed until it’s incredibly smooth, creamy, and free of any lumps. This will take about 2-3 minutes. Scrape down the sides of the bowl occasionally to make sure everything is getting properly incorporated. You’ll notice the mixture becoming lighter in color and fluffier as you beat air into it. We’re aiming for absolute velvety smoothness here.
-
Gently Fold in the Thawed Whipped Topping:
Now, carefully add the entire 12-ounce container of thawed whipped topping to the cream cheese mixture. This is where a light hand is key. Using a spatula, gently fold the whipped topping into the cream cheese and sugar mixture. You don’t want to beat it vigorously, as this can deflate the whipped topping and make your layer less airy. Fold until just combined, ensuring there are no streaks of plain cream cheese or whipped topping remaining. The resulting mixture should be light, airy, and uniformly smooth. This layer is going to be incredibly fluffy and delicious, perfectly complementing the crisp pretzel base.
-
Spread the Creamy Layer Over the Cooled Crust:
Once your pretzel crust is completely cooled (and I mean completely), spoon the cream cheese mixture evenly over the top. Use an offset spatula or the back of a spoon to gently spread the mixture from edge to edge. It’s really important to completely seal the pretzel crust with the cream cheese layer, especially along the sides. This barrier is crucial for preventing the Jell-O from seeping into the pretzels and making them soggy. Take your time to ensure a solid, continuous layer. Once spread, place the baking dish into the refrigerator to chill for at least 30 minutes while you prepare the strawberry Jell-O topping. This chilling time helps the cream cheese layer firm up, creating an even more robust barrier and making it easier to pour the next layer.
Preparing the Vibrant Strawberry Jell-O Topping
The final layer, and perhaps the most visually striking part of our Strawberry Pretzel Salad, is the glistening strawberry Jell-O topping. It brings a burst of fruity flavor and a beautiful color that just screams summer.
-
Dissolve the Gelatin:
In a large, heat-proof bowl, empty the contents of both (6-ounce) packages of strawberry-flavored gelatin. Now, carefully pour in the 2 cups of boiling water. Stir continuously for at least 2 minutes, or until the gelatin powder is completely dissolved. You want to make sure there are absolutely no granules left at the bottom of the bowl. This ensures a smooth, clear Jell-O layer. A whisk works wonders here to break up any clumps quickly.
-
Add the Frozen Strawberries:
Once your gelatin is fully dissolved, it’s time for the star fruit! Add both packages of thawed, undrained frozen sliced strawberries to the hot Jell-O mixture. Do not drain the strawberries! The juices they release are full of intense strawberry flavor and will be absorbed into the Jell-O, making it even more delicious. The frozen (or still very cold) strawberries will also help to cool down the Jell-O mixture quickly, which is a big time-saver and crucial for the next step. Stir everything together gently until the strawberries are evenly distributed throughout the liquid gelatin.
-
Cool the Jell-O Mixture:
This is a critical step for the success of your Strawberry Pretzel Salad. We need the Jell-O mixture to be cool but not yet set before pouring it over the cream cheese layer. If you pour hot Jell-O over the cream cheese, it will melt the creamy layer, creating a messy situation. You’ll want to let the mixture cool at room temperature, stirring occasionally, for about 20-30 minutes, or until it has thickened slightly and is no longer warm to the touch. It should feel cool, but still be pourable. You can speed this up by placing the bowl in an ice bath, stirring frequently, but be careful not to let it set too much.
-
Pour Over the Chilled Cream Cheese Layer:
Once the Jell-O mixture has cooled to the right consistency (it should be thick but pourable, like a slightly syrupy consistency), retrieve your baking dish with the chilled cream cheese layer from the refrigerator. Very carefully and slowly, pour the strawberry Jell-O mixture evenly over the cream cheese. I often pour over the back of a spoon to help disperse the liquid gently and prevent it from disturbing the cream cheese layer. Make sure the entire surface is covered. The goal is to achieve a beautiful, distinct layer of strawberry Jell-O. Distribute the strawberries evenly across the surface if they’ve settled to the bottom of your bowl.
The Grand Finale: Chilling and Serving Your Strawberry Pretzel Salad
We’re almost there! The hardest part is behind us, and now we just need to give our beautiful creation time to firm up and become the perfect Strawberry Pretzel Salad we’ve been dreaming of.
-
Chill, Chill, Chill!:
Once the strawberry Jell-O layer is poured, gently transfer the baking dish back into the refrigerator. This is where the magic happens and everything truly sets. It’s really important to give it ample time to chill. I recommend at least 4 hours, but honestly, overnight chilling is always best. This allows all three layers to fully set and marry their flavors perfectly. When fully set, the Jell-O will be firm, and the cream cheese layer will be well-chilled. Impatience is the enemy of a perfectly structured Strawberry Pretzel Salad!
-
Slice and Serve:
When you’re ready to serve your spectacular Strawberry Pretzel Salad, take it out of the refrigerator. Using a sharp knife, cut the salad into individual squares. I typically get 12-15 servings from a 9×13-inch pan. Because of the distinct layers, it might be a little tricky to get out the first piece, but once you do, the rest should come out beautifully. Each piece will showcase those lovely layers: the golden-brown pretzel crust, the creamy white filling, and the vibrant red strawberry Jell-O. You can serve it as is, or for an extra touch, a dollop of fresh whipped cream or a few fresh mint leaves can make it look even more appealing.
-
Storage:
Any leftover Strawberry Pretzel Salad should be stored in the refrigerator, covered with plastic wrap or in an airtight container. It will keep well for 3-4 days, though the pretzel crust may start to soften slightly over time. But let’s be real, leftovers of this delicious dessert are a rare occurrence in my house!
A Note on Enjoyment:
This Strawberry Pretzel Salad is more than just a dessert; it’s a celebration in a dish. The symphony of sweet, salty, creamy, crunchy, and fruity elements makes it truly unforgettable. It’s a fantastic dish for potlucks, family gatherings, or just a delightful treat on a warm day. Enjoy every single bite of your homemade creation!
After immersing ourselves in the delightful world of this truly unique dessert, I trust you can now appreciate why this particular recipe isn’t just another sweet treat; it’s an experience. We’ve journeyed through its perfect marriage of textures and flavors – the delightful crunch of the salty pretzel crust, the velvety embrace of the sweetened cream cheese layer, and the vibrant, refreshing burst of fresh strawberries suspended in a shimmering gelatin topping. It’s this remarkable balance that elevates our beloved creation far beyond the ordinary. I genuinely believe that once you taste it, you’ll understand why I’m so passionate about sharing this recipe with you. It’s the kind of dish that brings a smile to everyone’s face, a guaranteed crowd-pleaser that sparks conversations and creates lasting memories. Imagine the compliments you’ll receive when you present something so visually stunning and incredibly delicious! This isn’t just a dessert; it’s a statement, a testament to the fact that sometimes, the most unexpected combinations create the most unforgettable culinary masterpieces. The contrasting elements work in perfect harmony, creating a symphony of sweet, salty, creamy, and crunchy in every single bite. It’s truly an irresistible concoction, surprisingly easy to assemble, yet so incredibly sophisticated in its presentation and taste. Every time I prepare it, I’m reminded of how a few simple ingredients can transform into something so profoundly satisfying.
Elevate Your Serving Experience and Explore Delightful Variations
While this dessert is undeniably magnificent on its own, I’m excited to share some fantastic ways to enhance your enjoyment and perhaps even customize it to your heart’s content. For serving, ensure your Strawberry Pretzel Salad is thoroughly chilled; that’s when its refreshing qualities truly shine. A minimum of four hours in the refrigerator, or even overnight, allows all the layers to set beautifully and for the flavors to meld. Garnish individual servings with a fresh sprig of mint for an elegant touch, or perhaps a few extra thinly sliced strawberries to emphasize its fruity core. For a slightly more decadent presentation, a light dusting of powdered sugar or a delicate drizzle of white chocolate can add another layer of visual appeal and subtle sweetness. Don’t be afraid to think outside the box when it comes to serving; small, individual parfait glasses or ramekins make for charming single portions, perfect for a dinner party or a more formal gathering.
Now, let’s talk about variations – this recipe is wonderfully adaptable! If strawberries aren’t in season or you simply fancy a change, consider swapping them for other fresh berries like blueberries or raspberries. A mixed berry pretzel salad can be equally stunning and delicious, offering a different profile of tartness and sweetness. You could also experiment with different gelatin flavors; raspberry or cherry gelatin would pair beautifully with their respective fruits. For those with dietary considerations, gluten-free pretzels work wonderfully in the crust, maintaining that essential crunch. If you’re looking to reduce sugar, consider using a sugar-free gelatin and adjusting the sweetness in the cream cheese layer to your preference. Another fun twist involves incorporating a hint of citrus zest into the cream cheese layer – a little lemon or orange zest can add a bright, zesty counterpoint. Some people even like to add a layer of toasted coconut flakes to the pretzel crust for an extra textural dimension and tropical flair. Imagine serving this alongside a scoop of vanilla bean ice cream or a light sorbet for an extra special treat on a warm evening. The possibilities are truly endless, and each variation offers a chance to make this already incredible dessert uniquely yours.
Your Culinary Journey Starts Now!
My friend, I sincerely hope that reading through this has ignited a spark within you. This isn’t just a recipe; it’s an invitation to create something truly special and bring immense joy to your table. I promise you, the process of making this delightful dish is as rewarding as the first incredible bite. It’s straightforward, forgiving, and yields results that consistently impress. So, please, gather your ingredients, set aside a little time, and embark on this delicious adventure. Don’t let another day pass without experiencing the magic of this sweet and salty sensation. I genuinely believe that once you try it, this recipe will earn a permanent spot in your culinary repertoire, becoming a cherished go-to for countless occasions. And when you do, I would absolutely love to hear all about it! Did you stick to the classic? Did you venture into one of the variations? What did your family and friends think? Share your successes, your serving ideas, and any creative twists you came up with in the comments below or on social media. Your experiences not only inspire me but also help our wonderful community of home cooks discover new favorites and refine their skills. Let’s celebrate the joy of good food together! Go ahead, give it a try – you won’t regret it!
Classic Strawberry Pretzel Salad: Sweet, Salty & Creamy
This Strawberry Pretzel Salad is a beloved classic, offering a perfect symphony of sweet, salty, creamy, and crunchy in every bite. It features an irresistible salty pretzel crust, a velvety smooth cream cheese filling, and a vibrant strawberry Jell-O topping, making it a show-stopping dessert for any gathering.
Ingredients
-
2 cups finely crushed pretzels
-
¾ cup unsalted butter, melted
-
¼ cup granulated sugar
-
1 (8-ounce) block full-fat cream cheese, softened
-
1 cup granulated sugar
-
1 (12-ounce) container frozen whipped topping, thawed
-
2 (6-ounce) packages strawberry-flavored gelatin
-
2 cups boiling water
-
2 (10-ounce) packages frozen sliced strawberries, thawed and undrained
Instructions
-
Step 1
Finely crush 2 cups of pretzels. Mix with ¾ cup melted unsalted butter and ¼ cup granulated sugar. Press mixture firmly into a 9×13-inch baking dish, ensuring an even layer. -
Step 2
Bake the pressed pretzel crust at 350°F (175°C) for 8-10 minutes. Remove from oven and let cool completely on a wire rack (approx. 30 minutes). -
Step 3
In a large bowl, beat 1 (8-ounce) block softened cream cheese and 1 cup granulated sugar until smooth and creamy. Gently fold in 1 (12-ounce) container thawed frozen whipped topping until just combined and airy. -
Step 4
Spread the cream cheese mixture evenly over the completely cooled pretzel crust, ensuring the entire crust, especially the edges, is sealed. Chill the dish in the refrigerator for at least 30 minutes. -
Step 5
In a large heat-proof bowl, empty 2 (6-ounce) packages strawberry-flavored gelatin. Carefully pour in 2 cups boiling water and stir continuously for at least 2 minutes until completely dissolved. Add 2 (10-ounce) packages thawed, undrained frozen sliced strawberries; stir gently. -
Step 6
Let the Jell-O mixture cool at room temperature, stirring occasionally, for about 20-30 minutes, or until slightly thickened but still pourable. -
Step 7
Retrieve the chilled baking dish. Very carefully and slowly pour the cooled strawberry Jell-O mixture evenly over the cream cheese layer, covering the entire surface. Distribute strawberries evenly. -
Step 8
Gently transfer the baking dish back into the refrigerator. Chill for at least 4 hours (preferably overnight) until all layers are fully set. Once set, cut into individual squares and serve. Store any leftovers covered in the refrigerator for 3-4 days.
Important Information
Nutrition Facts (Per Serving)
It is important to consider this information as approximate and not to use it as definitive health advice.
Allergy Information
Please check ingredients for potential allergens and consult a health professional if in doubt.
Leave a Comment