
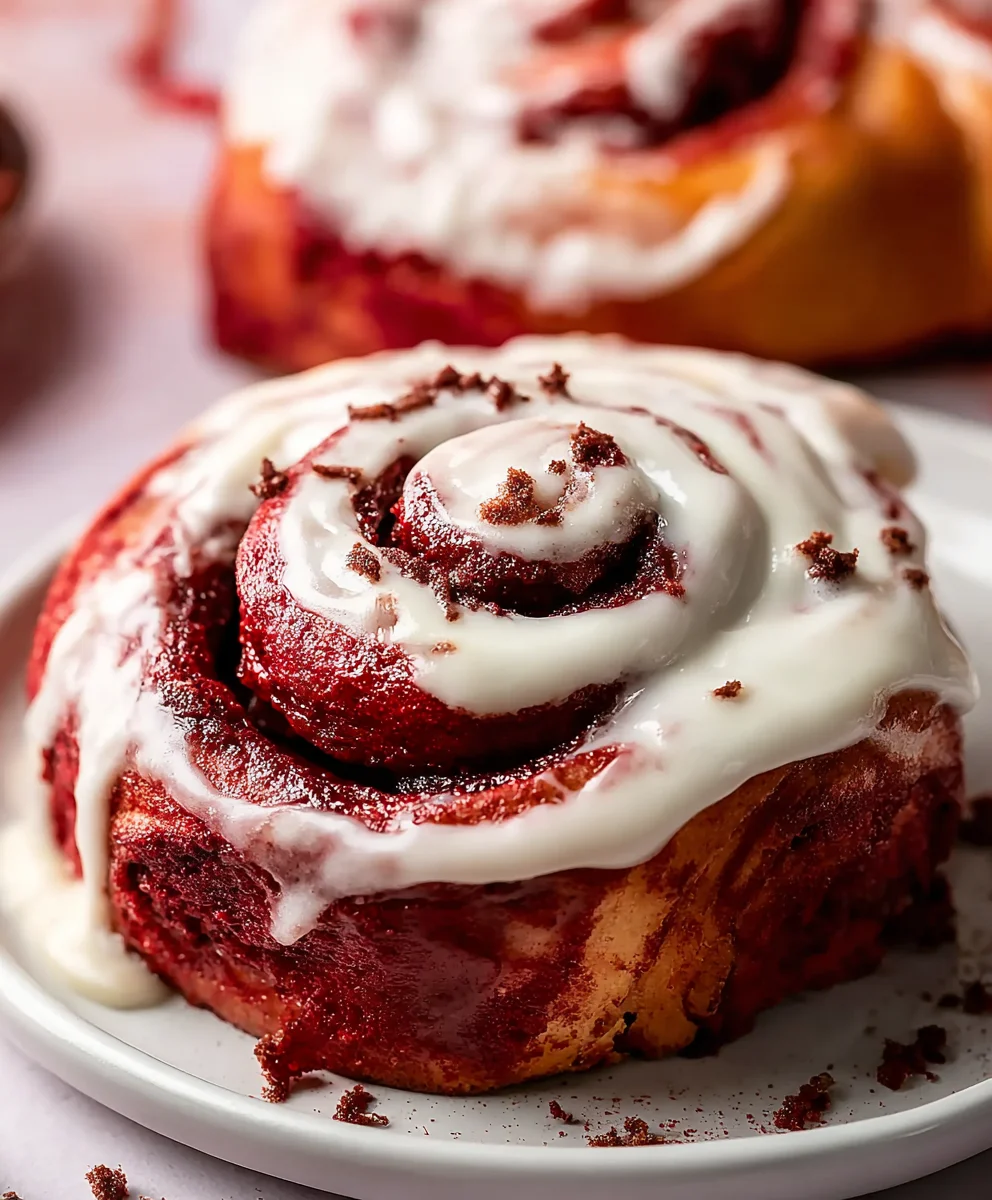
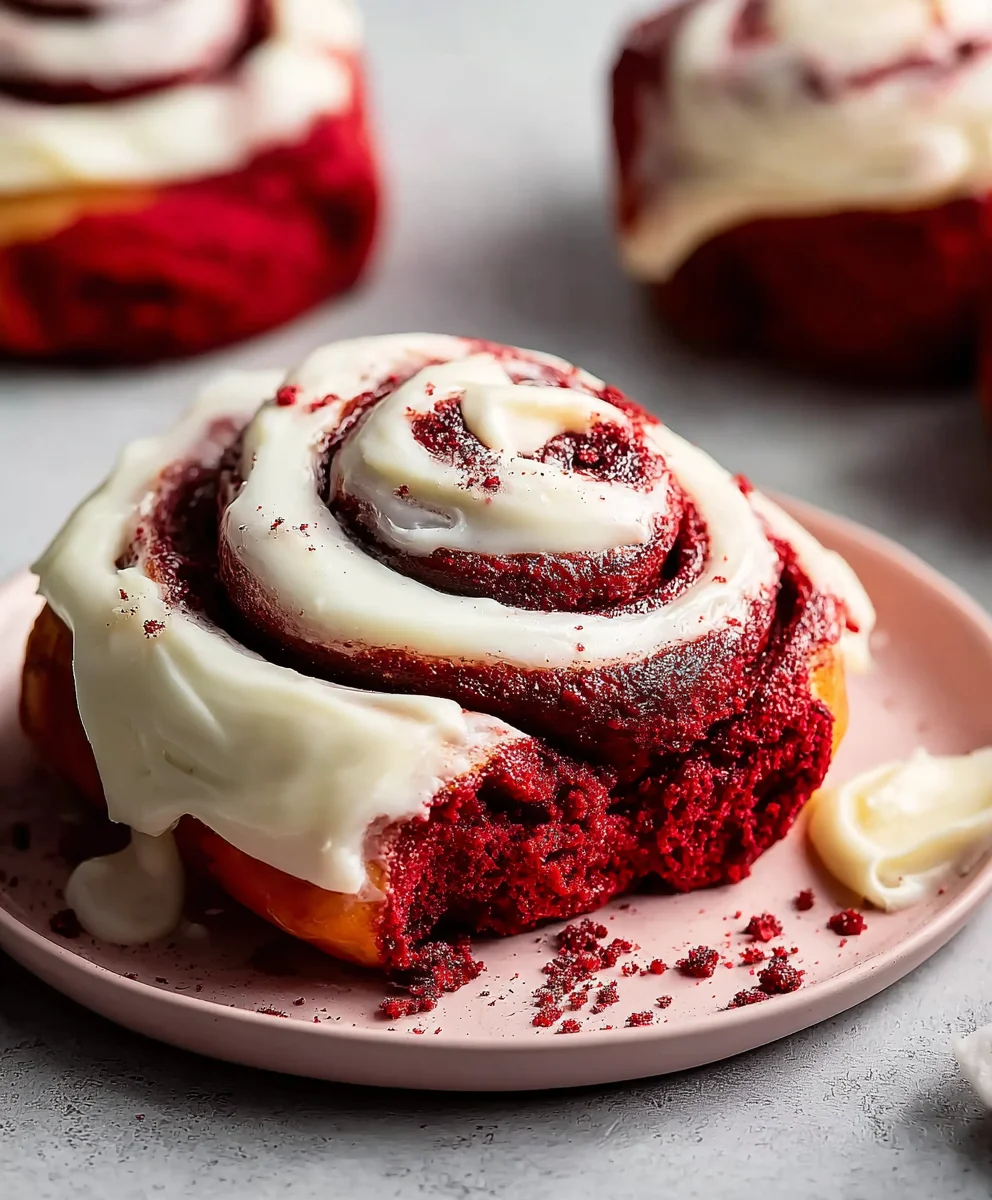
Red Velvet Cinnamon Rolls From Scratch are more than just a breakfast pastry; they are a decadent declaration of love, a show-stopping treat that transforms any morning into a special occasion. Imagine waking up to the intoxicating aroma of freshly baked dough, cinnamon, and a hint of cocoa, all culminating in a visually stunning masterpiece. I’ve always been captivated by the allure of Red Velvet – its rich, captivating color and subtle flavor profile, often associated with luxurious desserts and festive celebrations. When combined with the comforting, universally adored cinnamon roll, you get a truly unparalleled culinary experience that promises indulgence with every bite.
This particular recipe elevates the classic comfort food to an art form, marrying the distinctive, slightly tangy cocoa notes of Red Velvet with the warm, spicy embrace of traditional cinnamon rolls. People adore this dish not only for its striking appearance and the irresistible contrast of fluffy, tender dough against a gooey, spiced filling, but also for the creamy, tangy sweetness of its signature cream cheese frosting. There’s an undeniable charm and a deep sense of satisfaction that comes from mastering these magnificent Red Velvet Cinnamon Rolls From Scratch, knowing every delicious bite is a testament to your effort and passion. Prepare to delight your senses and impress everyone at your table with this extraordinary treat!
Ingredients:
For the Red Velvet Dough:
- 1 cup (240ml) whole milk, warmed to 105-115°F (40-46°C)
- 2 ¼ teaspoons (7g) active dry yeast (one standard packet)
- ¼ cup (50g) granulated sugar, plus 1 teaspoon for yeast activation
- ½ cup (113g) unsalted butter, melted and cooled slightly
- 1 large egg, at room temperature
- 2 tablespoons unsweetened cocoa powder, preferably Dutch-processed for richer color
- 2-3 tablespoons red gel food coloring, or enough to achieve a deep red hue (gel provides the best color without thinning the dough)
- 1 teaspoon pure vanilla extract
- ½ teaspoon salt
- 4 ½ – 5 cups (540-600g) all-purpose flour, plus more for dusting (I always recommend weighing flour for accuracy)
For the Red Velvet Filling:
- ½ cup (113g) unsalted butter, softened to room temperature
- 1 cup (200g) light brown sugar, packed
- 2 tablespoons unsweetened cocoa powder, preferably Dutch-processed
- 2 teaspoons ground cinnamon
For the Cream Cheese Glaze:
- 4 ounces (113g) full-fat cream cheese, softened to room temperature
- ¼ cup (57g) unsalted butter, softened to room temperature
- 2 cups (240g) powdered sugar, sifted
- 1 teaspoon pure vanilla extract
- 1-3 tablespoons whole milk or heavy cream, as needed for desired consistency
Instructions:
Preparing the Red Velvet Dough:
- Activate the Yeast: In a large mixing bowl (or the bowl of a stand mixer), combine the warmed milk with 1 teaspoon of granulated sugar. Sprinkle the active dry yeast over the top. Stir gently once and let it sit for 5-10 minutes. You’ll know your yeast is alive and ready when it becomes foamy and bubbly on the surface. If it doesn’t foam, your milk might have been too hot or too cold, or your yeast may be old. It’s best to start over with fresh yeast. This step is crucial for light, fluffy Red Velvet Cinnamon Rolls From Scratch.
- Combine Wet Ingredients: To the activated yeast mixture, add the cooled melted butter, the room temperature large egg, 2-3 tablespoons of red gel food coloring, the 2 tablespoons of unsweetened cocoa powder, and the 1 teaspoon of vanilla extract. Whisk everything together until well combined and the color is evenly distributed. This mixture should be a vibrant, deep red. Don’t be shy with the red food coloring here; it’s what gives “Red Velvet” its signature look!
- Add Dry Ingredients: In a separate bowl, whisk together 4 ½ cups of the all-purpose flour, the remaining ¼ cup of granulated sugar, and the ½ teaspoon of salt. Gradually add this dry mixture to your wet ingredients, mixing on low speed with a stand mixer (using the dough hook attachment) or by hand with a sturdy wooden spoon.
- Kneading the Dough: Once the dough starts to come together into a shaggy mass, turn it out onto a lightly floured surface if you’re kneading by hand, or continue with your stand mixer. Knead for 8-10 minutes. If kneading by hand, you’ll feel the dough transform from sticky to smooth and elastic. If using a stand mixer, let it work on medium-low speed until the dough clears the sides of the bowl and is smooth and pliable. The dough should be slightly tacky but not excessively sticky. You may need to add up to ½ cup more flour, a tablespoon at a time, if the dough is too sticky, but be careful not to add too much, as this can result in tough rolls. The goal is a soft, elastic dough that springs back when gently poked. You can perform the “windowpane test”: pinch off a small piece of dough and gently stretch it. If you can stretch it thin enough to see light through it without tearing, your gluten is well-developed.
First Rise:
- Prepare for Rising: Lightly grease a large clean bowl with a little oil or non-stick spray. Place the kneaded red velvet dough into the bowl, turning it once to coat the entire surface with oil. This prevents it from drying out during the rise.
- First Proof: Cover the bowl tightly with plastic wrap or a clean, damp kitchen towel. Place the bowl in a warm, draft-free spot in your kitchen. I often put mine in an oven that’s been warmed to its lowest setting for just a minute or two and then turned off, creating a perfect environment.
- Observe the Rise: Let the dough rise for 1 to 1 ½ hours, or until it has noticeably doubled in size. The exact time will depend on the warmth of your kitchen. When gently pressed with a finger, the indentation should remain. This first rise is essential for developing flavor and creating that wonderfully light texture in your Red Velvet Cinnamon Rolls From Scratch.
Preparing the Red Velvet Filling:
- Soften Butter: Ensure your ½ cup of unsalted butter is genuinely soft, but not melted. It should yield easily to a gentle press.
- Mix Filling Ingredients: In a medium bowl, combine the softened butter, packed light brown sugar, 2 tablespoons of unsweetened cocoa powder, and 2 teaspoons of ground cinnamon. Mix well with a spoon or a rubber spatula until it forms a uniform, spreadable paste. The cocoa powder and cinnamon add a beautiful depth to the red velvet flavor profile.
Assembling the Rolls:
- Prepare Work Surface: Once the dough has doubled, gently punch it down to release the air. Turn the dough out onto a lightly floured surface.
- Roll Out Dough: Using a rolling pin, roll the dough into a large rectangle, approximately 18 inches long by 12 inches wide (45×30 cm). Aim for an even thickness across the entire rectangle. This step ensures consistent roll size.
- Spread Filling: Evenly spread the prepared red velvet filling mixture over the entire surface of the dough rectangle, leaving a small ½-inch border on one of the long edges. This clean edge will help you seal the roll later.
- Roll Up the Dough: Starting from the long edge opposite the clean border, carefully and tightly roll the dough into a log. The tighter you roll, the more spirals your Red Velvet Cinnamon Rolls From Scratch will have, and they will hold their shape better.
- Seal the Seam: Once rolled, pinch the seam along the entire length of the log to seal it securely. This prevents the roll from unraveling during the second rise and baking.
- Slice the Rolls: Now it’s time to slice your masterpiece! You can use a very sharp, un-serrated knife, or my preferred method for clean cuts: a piece of unflavored dental floss or kitchen twine. Slide the floss under the log, cross the ends over the top, and pull to slice through. Aim for 12 equally sized rolls, each approximately 1 ½ inches (3.8 cm) thick.
- Arrange in Pan: Lightly grease a 9×13 inch (23×33 cm) baking dish. Place the sliced rolls, cut-side up, into the prepared baking dish. Leave a little space between each roll, as they will expand during their second rise and baking.
Second Rise:
- Cover and Proof Again: Cover the baking dish loosely with plastic wrap or a clean, damp kitchen towel.
- Second Proof: Let the rolls rise again in a warm, draft-free place for another 30-45 minutes, or until they look visibly puffy and have nearly doubled in size, filling out the pan. This second rise creates the final airy texture of your Red Velvet Cinnamon Rolls From Scratch.
Baking the Rolls:
- Preheat Oven: While the rolls are on their second rise, preheat your oven to 375°F (190°C).
- Bake: Once the rolls are fully risen, remove the cover and place the baking dish into the preheated oven.
- Baking Time: Bake for 20-25 minutes, or until the edges are beautifully golden brown and the centers are cooked through and spring back when lightly touched. Keep an eye on them to prevent overbaking, which can dry them out.
- Cool Slightly: Remove the pan from the oven and let the rolls cool in the pan for about 5-10 minutes before glazing. This allows them to set slightly.
Making the Cream Cheese Glaze:
- Soften Ingredients: Ensure both your cream cheese and butter are at proper room temperature. This is key for a smooth, lump-free glaze.
- Cream Cheese and Butter: In a medium bowl, or using a stand mixer with the paddle attachment, beat the softened cream cheese and softened butter together on medium speed until they are very smooth and fluffy, about 2-3 minutes. Scrape down the sides of the bowl as needed.
- Add Powdered Sugar: Gradually add the sifted powdered sugar, beating on low speed until fully incorporated. Then increase the speed to medium-high and beat until the glaze is light and fluffy. Sifting the powdered sugar beforehand is highly recommended to avoid any pesky lumps.
- Add Flavor and Consistency: Stir in the vanilla extract. Then, add the milk or heavy cream, one tablespoon at a time, until you reach your desired drizzly, pourable consistency. Some people prefer a thicker glaze, others a thinner one – it’s all personal preference!
Serving Your Red Velvet Cinnamon Rolls:
- Glaze While Warm: While the Red Velvet Cinnamon Rolls are still slightly warm from the oven (but not piping hot), generously spread or drizzle the cream cheese glaze over the entire pan of rolls. The warmth of the rolls will allow the glaze to melt ever so slightly, creating a luscious, gooey topping that seeps into every crevice.
- Enjoy Immediately: These Red Velvet Cinnamon Rolls From Scratch are truly best enjoyed warm, straight from the oven, with that irresistible creamy glaze. They make a fantastic breakfast, brunch item, or a decadent dessert. Get ready to impress!
Conclusion:
And there you have it, my dear fellow bakers and food enthusiasts! As we wrap up our delicious journey, I truly hope you’re feeling inspired and excited to roll up your sleeves and bring this incredible recipe to life in your own kitchen. This isn’t just any dessert; it’s an experience, a labor of love that rewards you with an extraordinary treat unlike anything you’ve ever tasted from a store-bought package. What makes this recipe a true must-try is the unparalleled combination of its striking visual appeal – that deep, inviting red swirl against the creamy white frosting – with a flavor profile that perfectly balances the subtle cocoa notes of red velvet with the warm, comforting spice of cinnamon. The texture is divine: incredibly soft, pillowy rolls that practically melt in your mouth, generously coated with a luscious, tangy cream cheese frosting that provides the perfect counterpoint to the sweet dough. It’s a sensory delight, from the moment the aroma fills your home to the very last bite.
I genuinely believe that making these delightful rolls from scratch offers a level of satisfaction and flavor that simply cannot be replicated. Imagine the joy of pulling a pan of these beautifully baked, fragrant rolls from your oven, knowing every single component was crafted by your own hands. That sense of accomplishment, coupled with the sheer deliciousness, is what makes this recipe so incredibly special. It’s perfect for those moments when you want to impress, to create something memorable, or simply to treat yourself and your loved ones to an exceptional homemade confection.
Now, let’s talk about how to enjoy these masterpieces and a few ideas to make them uniquely yours. While these rolls are undoubtedly best enjoyed warm, straight from the oven, they are also delightful at room temperature. They make an absolutely show-stopping addition to any brunch spread, elevating your weekend breakfast into a gourmet affair. Pair them with a strong cup of coffee or a comforting mug of tea for an indulgent morning or afternoon treat. They are also fantastic as a unique dessert, perhaps served with a scoop of vanilla bean ice cream for an extra layer of decadence. For a special occasion, consider arranging them artfully on a serving platter, perhaps garnished with a sprinkle of cocoa powder or a few fresh raspberries to enhance their vibrant color.
If you’re feeling adventurous and want to put your own spin on them, here are a few suggestions:
Creative Variations to Explore:
- For an added crunch and nutty flavor, consider sprinkling some finely chopped pecans or walnuts into the cinnamon sugar filling before rolling the dough.
- Experiment with your frosting! While the classic cream cheese frosting is perfection, you could add a hint of almond extract alongside the vanilla for a slightly different aromatic profile. A dash of orange zest could also brighten the frosting beautifully.
- If you prefer a less intense sweetness, you can slightly reduce the sugar in the dough or the filling, though I find the current balance to be just right.
- Planning ahead? These rolls can be assembled the night before and left to proof slowly in the refrigerator overnight. Just pull them out about an hour before baking in the morning, and you’ll have freshly baked treats with minimal fuss.
- For a truly celebratory look, sprinkle a few red and white nonpareils or edible glitter over the frosting while it’s still soft.
My greatest hope is that you will take this recipe, embrace the journey of making it, and savor every delicious bite. The experience of creating these Red Velvet Cinnamon Rolls From Scratc is truly rewarding, and the end result is nothing short of spectacular. Don’t be intimidated by the “from scratch” aspect; I’ve designed the instructions to be clear and approachable, guiding you every step of the way to ensure your success. Once you try these, I promise you’ll find it hard to go back to anything less. Please, please, do give this recipe a try! I would absolutely love to hear about your experience. Did you make any exciting variations? How did your family and friends react? Share your photos, your triumphs, and even your questions in the comments below. Your feedback and stories inspire me and our entire community of enthusiastic home bakers. Happy baking, and enjoy every glorious mouthful!
Red Velvet Cinnamon Rolls From Scratch
Decadent Red Velvet Cinnamon Rolls From Scratch transform any morning into a special occasion. This show-stopping recipe marries the distinctive, slightly tangy cocoa notes of Red Velvet with the warm, spicy embrace of traditional cinnamon rolls, all topped with a creamy, tangy cream cheese frosting.
Ingredients
-
1 cup (240ml) whole milk, warmed
-
2 ¼ tsp (7g) active dry yeast
-
¼ cup (50g) granulated sugar, plus 1 tsp
-
½ cup (113g) unsalted butter, melted
-
1 large egg
-
2 tbsp unsweetened cocoa powder
-
2-3 tbsp red gel food coloring
-
1 tsp vanilla extract
-
½ tsp salt
-
4 ½ – 5 cups (540-600g) all-purpose flour
-
½ cup (113g) unsalted butter, softened (for filling)
-
1 cup (200g) light brown sugar, packed (for filling)
-
2 tbsp unsweetened cocoa powder (for filling)
-
2 tsp ground cinnamon (for filling)
-
4 oz (113g) full-fat cream cheese, softened (for glaze)
-
¼ cup (57g) unsalted butter, softened (for glaze)
-
2 cups (240g) powdered sugar, sifted (for glaze)
-
1 tsp vanilla extract (for glaze)
-
1-3 tbsp whole milk or heavy cream (for glaze)
Instructions
-
Step 1
Combine warmed milk with 1 tsp granulated sugar and active dry yeast. Let sit 5-10 minutes until foamy. -
Step 2
Add melted butter, egg, red gel food coloring, cocoa powder, and vanilla extract to the yeast mixture. Whisk well until combined and vibrant red. -
Step 3
In a separate bowl, whisk 4 ½ cups all-purpose flour, remaining granulated sugar, and salt. Gradually add to wet mixture and mix until a shaggy dough forms. -
Step 4
Knead for 8-10 minutes until smooth and elastic, adding up to ½ cup more flour if needed. Dough should be slightly tacky and pass the windowpane test. -
Step 5
Lightly grease a bowl, place dough, and turn to coat. Cover and let rise in a warm, draft-free spot for 1 to 1 ½ hours until doubled in size. -
Step 6
In a medium bowl, combine ½ cup softened butter, 1 cup packed light brown sugar, 2 tbsp cocoa powder, and 2 tsp ground cinnamon. Mix into a uniform, spreadable paste. -
Step 7
Punch down dough, then roll into an 18×12 inch (45×30 cm) rectangle on a lightly floured surface. -
Step 8
Evenly spread the prepared filling over the dough, leaving a ½-inch border on one long edge. -
Step 9
Tightly roll the dough into a log from the long edge, then pinch to seal the seam. Slice into 12 rolls, about 1 ½ inches (3.8 cm) thick, using a sharp knife or dental floss. -
Step 10
Place rolls cut-side up in a lightly greased 9×13 inch (23×33 cm) baking dish, leaving space between them. -
Step 11
Cover the baking dish loosely and let rolls rise again in a warm, draft-free place for 30-45 minutes until visibly puffy and nearly doubled. -
Step 12
Preheat oven to 375°F (190°C). Bake rolls uncovered for 20-25 minutes until the edges are golden brown and centers are cooked through. -
Step 13
Remove from oven and let rolls cool in the pan for 5-10 minutes. -
Step 14
In a medium bowl, beat softened cream cheese and butter until smooth and fluffy. Gradually add sifted powdered sugar, then beat until light and fluffy. Stir in vanilla extract, then add 1-3 tbsp milk or heavy cream until desired pourable consistency. -
Step 15
Generously spread or drizzle the cream cheese glaze over the slightly warm rolls. Serve immediately, warm, with a big cup of coffee or hot chocolate. For brunch, add some fresh berries on the side. For an indulgent dessert, serve with a scoop of vanilla ice cream.
Important Information
Nutrition Facts (Per Serving)
It is important to consider this information as approximate and not to use it as definitive health advice.
Allergy Information
Please check ingredients for potential allergens and consult a health professional if in doubt.


Leave a Comment