
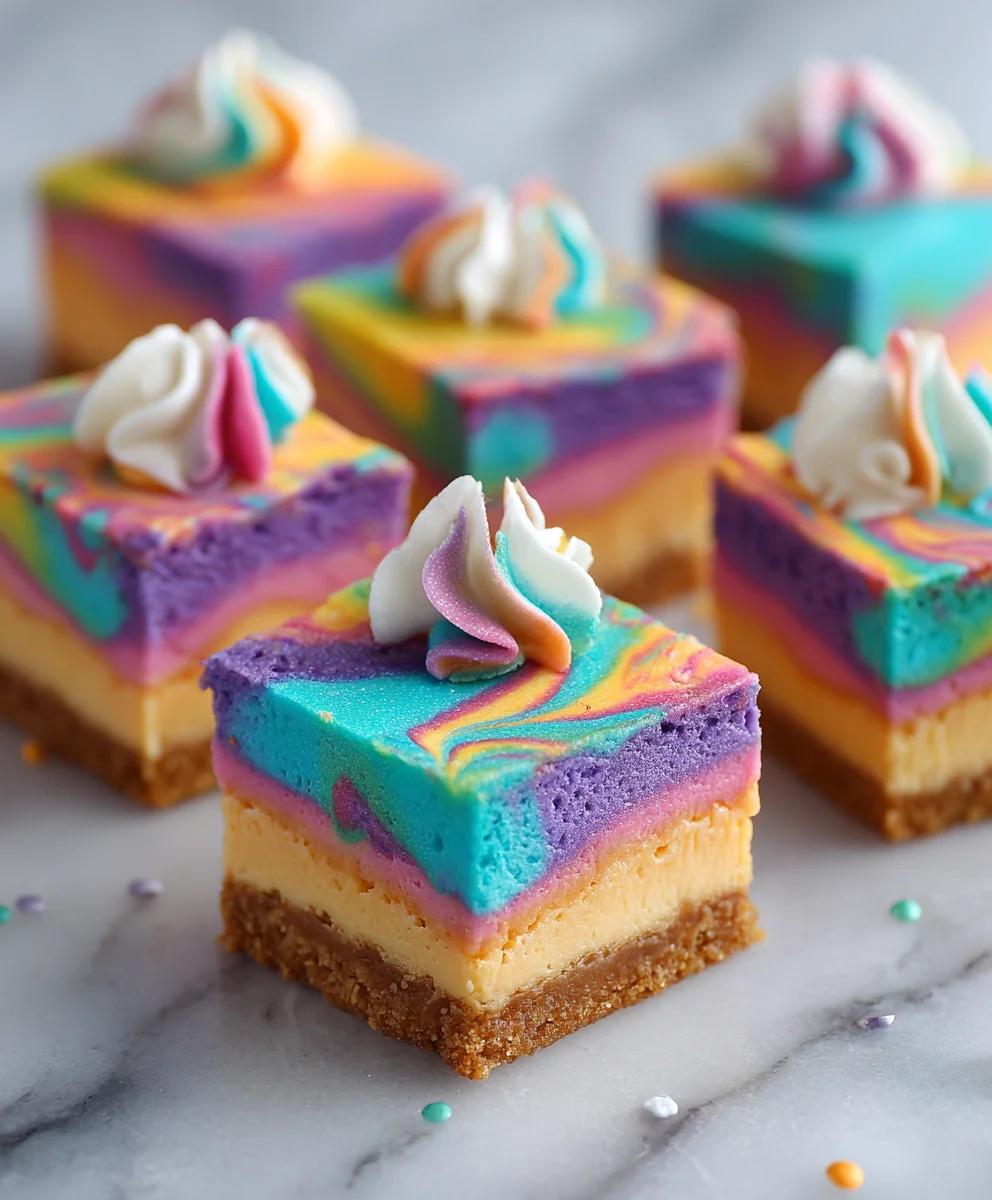
Rainbow Cheesecake Swirl Bars are more than just a dessert; they are a vibrant celebration on a plate, guaranteed to bring smiles and a burst of color to any occasion. Imagine a slice of creamy, tangy cheesecake, infused with a playful spectrum of hues, all swirled together atop a delightful graham cracker crust. It’s a treat that captures attention visually before captivating your taste buds with its exquisite balance of sweet and tart flavors. While traditional cheesecake boasts a rich history spanning centuries, from ancient Greece to modern-day delis, these mesmerizing bars represent a contemporary, fun evolution, perfectly blending classic comfort with modern artistry.
Why Everyone Falls for These Colorful Creations
People absolutely adore this dish for a multitude of reasons. Firstly, their undeniable aesthetic appeal makes them perfect for parties, potlucks, or simply brightening a dull day. Each bite offers a harmonious symphony of creamy texture from the cheesecake and a delightful crunch from the base. This particular bar format also offers unparalleled convenience, making them far easier to serve and enjoy than a traditional whole cheesecake, yet without compromising on that beloved, luxurious taste. Whether you’re a seasoned baker or just starting your culinary journey, creating these magnificent Rainbow Cheesecake Swirl Bars is a rewarding experience that culminates in a truly unforgettable dessert.
Ingredients:
-
For the Graham Cracker Crust:
- 1 ½ cups (approximately 180g) graham cracker crumbs (about 12 full graham cracker sheets)
- ¼ cup (50g) granulated sugar
- ½ cup (113g) unsalted butter, melted
-
For the Cheesecake Filling:
- 32 ounces (4 packages, 908g total) full-fat cream cheese, softened to room temperature
- 1 ½ cups (300g) granulated sugar
- ¼ cup (60ml) sour cream or full-fat Greek yogurt, at room temperature
- 2 teaspoons pure vanilla extract
- 4 large eggs, at room temperature
- Assorted gel food colorings (red, orange, yellow, green, blue, purple recommended for a vibrant rainbow)
1. Preparing the Graham Cracker Crust
Ah, the foundation of our magnificent Rainbow Cheesecake Swirl Bars! A good crust is paramount, offering that delightful buttery crunch against the creamy cheesecake. I always start here because it needs a little bake time to set up perfectly.
- First things first, let’s prepare our baking pan. I find an 8×8-inch or 9×9-inch square baking pan works beautifully for bars, but an 8×12-inch or 9×13-inch will also work if you prefer thinner bars or want to make a larger batch. Line your chosen pan with parchment paper, leaving an overhang on two sides. This is a crucial step, trust me, as it will act as little handles later to lift our finished bars out with absolute ease. I usually spray the pan lightly with cooking spray first to help the parchment stick, just a tiny trick I’ve learned over the years.
- Now, for the graham cracker crumbs. If you’re using whole graham crackers, place them in a food processor and pulse until you have fine, even crumbs. Alternatively, you can put them in a large Ziploc bag and crush them with a rolling pin – it’s a great stress reliever, actually! I aim for about 1 ½ cups of crumbs, which is typically around 12 full graham cracker sheets.
- In a medium-sized bowl, combine the graham cracker crumbs with the ¼ cup of granulated sugar. Give it a good whisk to ensure the sugar is evenly distributed throughout the crumbs. This little bit of sugar helps with the texture and browning of the crust.
- Melt your ½ cup of unsalted butter. You can do this in the microwave in 30-second intervals or in a small saucepan over low heat. Once melted, pour it over the crumb mixture.
- Stir everything together with a spoon or your hands until the crumbs are thoroughly moistened and resemble wet sand. Every crumb should be coated in butter; this is what holds the crust together!
- Press the mixture firmly and evenly into the bottom of your prepared baking pan. I like to use the flat bottom of a measuring cup or the back of a spoon to really compact it. The firmer you press, the less likely your crust will crumble when you slice into your Rainbow Cheesecake Swirl Bars. You want a solid, uniform layer.
- Place the pan in your preheated oven at 350°F (175°C) and bake for 8-10 minutes. This pre-baking step helps the crust set and become delightfully crisp, preventing it from getting soggy later when the cheesecake filling goes on top.
- Once baked, remove the pan from the oven and set it aside to cool completely while you prepare the cheesecake filling. This cooling period is important; you don’t want a hot crust melting your beautiful cheesecake batter.
2. Crafting the Velvety Cheesecake Filling
This is where the magic truly begins to happen! A rich, creamy cheesecake base is the canvas for our vibrant rainbow. The secret to a smooth, lump-free cheesecake is ensuring all your dairy ingredients are at room temperature. Seriously, don’t skip this part!
- In a very large mixing bowl, or the bowl of a stand mixer fitted with the paddle attachment, add your softened cream cheese. It should be soft enough that you can easily press a finger into it. If you forgot to take it out, you can unwrap the cream cheese, place it on a microwave-safe plate, and microwave on low power (e.g., 30% power) for 15-20 second intervals, flipping it over, until softened, but not melted.
- Beat the cream cheese on medium speed for about 2-3 minutes until it’s incredibly smooth, light, and completely free of any lumps. I like to really get some air into it here. Scrape down the sides and bottom of the bowl frequently to ensure everything is incorporated. You want it wonderfully fluffy.
- Gradually add the granulated sugar to the cream cheese, beating on medium-low speed. Continue to beat for another 2-3 minutes until the sugar is fully dissolved and the mixture is even lighter and creamier. Again, stop and scrape down the bowl multiple times. We’re building a silky-smooth base for our Rainbow Cheesecake Swirl Bars.
- Mix in the sour cream (or Greek yogurt) and vanilla extract. Beat on low speed until just combined. The sour cream adds a beautiful tang and helps create that signature creamy texture in cheesecake.
- Now, add the eggs, one at a time. This is a critical step! Beat each egg on low speed just until it’s incorporated into the mixture before adding the next. Do not overmix once the eggs are added. Overmixing introduces too much air, which can cause your cheesecake to puff up too much during baking and then crack as it cools. We want a smooth, beautiful top for our swirls, so gentle mixing is key here. After the last egg is just combined, give the bowl one final scrape to ensure everything is perfectly blended.
2.1. Dividing and Coloring the Rainbow Batter
Here’s where we bring the “rainbow” into our Rainbow Cheesecake Swirl Bars! This is the fun part where you get to play with colors.
- Divide your glorious, smooth cheesecake batter into several smaller bowls. I typically go for six bowls to get a full spectrum (red, orange, yellow, green, blue, purple). You’ll want about ½ to ¾ cup of batter in each bowl, depending on how many colors you’re using and the size of your pan. Keep the largest portion of the batter plain (uncolored); this will be your base layer in the pan.
- Add a few drops of your chosen gel food coloring to each of the smaller bowls. Gel food colorings are fantastic because they provide vibrant colors without adding too much liquid to the batter, which could alter the texture. Start with a small amount, mix well, and then add more if you want a deeper, more intense hue. Remember, a little goes a long way with gel colors!
- Gently stir each colored portion until the color is evenly distributed and vibrant. Be careful not to overmix here either, just enough to get that beautiful, consistent shade. I find a small spatula or spoon works best for this. You’ll be amazed at how quickly the colors come to life.
3. Assembling the Rainbow Swirl Bars
This is my favorite stage – watching the Rainbow Cheesecake Swirl Bars come together visually! It’s like painting with delicious batter.
- Pour the uncolored, plain cheesecake batter evenly over the cooled graham cracker crust in your prepared pan. Gently spread it with an offset spatula or the back of a spoon to create a smooth, level base layer. This ensures a clean canvas for our rainbow.
- Now for the rainbow! Take your bowls of vibrantly colored cheesecake batter. Carefully dollop small spoonfuls or drops of each color randomly over the plain cheesecake base. Don’t worry too much about perfection here; the beauty is in the organic flow. I usually start with one color, then move to the next, creating little puddles and dots of color across the surface.
- Once all your colors are dolloped, grab a thin knife or a wooden skewer. Gently drag it through the colored batter in various directions to create a beautiful swirled pattern. You can make figure-eights, zig-zags, or just random swooshes. The key is not to over-swirl! Too much swirling will cause the colors to muddy together. A few deliberate passes are all you need to create those distinct, eye-catching rainbow streaks that make these Rainbow Cheesecake Swirl Bars so special. I love seeing the vibrant hues meld just enough to create a truly mesmerizing effect.
4. The Baking Process
Baking cheesecake bars is a delicate art, but don’t fret! We’ll take it slow and steady to achieve that perfect, creamy texture without any cracks.
- Preheat your oven to 325°F (160°C). Note that this is a lower temperature than we used for the crust, which is essential for gentle cheesecake baking.
- Carefully transfer your pan of assembled Rainbow Cheesecake Swirl Bars to the preheated oven.
- Bake for approximately 35-45 minutes. Baking times can vary slightly depending on your oven and the exact dimensions of your pan. You’ll know the cheesecake is done when the edges are set and appear slightly puffed, but the very center still has a slight wobble when you gently jiggle the pan. The center should not be liquid, but a slight jiggle is perfect. It will continue to set as it cools. Overbaking can lead to a dry cheesecake and, gasp, cracks!
- Once baked, turn off the oven but leave the oven door ajar (you can prop it open with a wooden spoon) for about 30 minutes. This allows the cheesecake to cool down gradually, preventing drastic temperature changes that can also lead to cracking. This step is like a little spa treatment for your Rainbow Cheesecake Swirl Bars, helping them relax and set beautifully.
- After 30 minutes, remove the pan from the oven and place it on a wire rack to cool completely at room temperature. This will take at least 1-2 hours. Do not rush this step. Patience is a virtue when making cheesecake!
5. Chilling and Serving Your Rainbow Masterpiece
This final phase is arguably the most crucial for achieving the perfect cheesecake texture and making sure your Rainbow Cheesecake Swirl Bars are easy to cut and a joy to eat.
- Once the cheesecake has completely cooled to room temperature, cover the pan tightly with plastic wrap.
- Transfer the covered pan to the refrigerator and chill for a minimum of 4 hours, but preferably overnight. This long chilling period is absolutely non-negotiable for cheesecake. It allows the flavors to meld, the texture to firm up, and ensures clean, crisp slices. Trying to cut warm or insufficiently chilled cheesecake is a recipe for a crumbly, messy disaster, and we’ve put too much love into these Rainbow Cheesecake Swirl Bars for that!
- When you’re ready to serve, use the parchment paper overhangs to carefully lift the entire cheesecake slab out of the pan and onto a cutting board.
- Using a sharp knife, slice the cheesecake into bars. I recommend wiping your knife with a hot, damp cloth and drying it between each cut for the cleanest possible slices. This technique makes a huge difference, especially with the vibrant colors; it keeps them from smearing. I usually cut them into 16 or 20 squares, depending on how generous I’m feeling.
- Arrange your stunning Rainbow Cheesecake Swirl Bars on a platter and watch them disappear! They are truly a showstopper.
- Storage: Any leftover Rainbow Cheesecake Swirl Bars can be stored in an airtight container in the refrigerator for up to 4-5 days. They are also freezer-friendly! Wrap individual bars tightly in plastic wrap, then place them in an airtight freezer-safe container or bag for up to 1 month. Thaw in the refrigerator before serving.
There you have it! A truly magnificent dessert that’s as delightful to look at as it is to eat. These Rainbow Cheesecake Swirl Bars are perfect for parties, celebrations, or just brightening up a regular Tuesday. Enjoy every colorful bite!

<h2>Conclusion:</h2>
<p>And there you have it, my friends! We’ve reached the sweet end of our journey, and I genuinely hope you’re as excited as I am about these incredible <strong>Rainbow Cheesecake Swirl Bars</strong>. This isn’t just another dessert recipe; it’s an invitation to bring a burst of joy and vibrant color into your kitchen and onto your table. From the moment you slice into them, revealing those mesmerizing, kaleidoscopic swirls, to the very first bite that delivers a perfectly balanced symphony of tangy cream cheese and sweet, buttery crust, these bars are an absolute triumph. They are a must-try for so many reasons: their stunning visual appeal makes them an instant showstopper at any gathering, from casual brunches to festive parties; their rich, creamy texture combined with the satisfying crunch of the crust is pure bliss; and honestly, the sheer delight of creating something so beautiful and delicious yourself is incredibly rewarding. I truly believe this recipe stands out because it combines classic, comforting flavors with a playful, artistic flair that’s hard to resist. </p>
<h4>Elevate Your Dessert Experience</h4>
<p>What makes these <strong>Rainbow Cheesecake Swirl Bars</strong> particularly special is their ability to universally please. They are not overly sweet, allowing the distinct tang of the cheesecake to shine, while the buttery graham cracker crust provides a delightful contrast in both flavor and texture. Every mouthful is a delightful dance, a harmonious blend that leaves you wanting just one more slice. They manage to be sophisticated enough for an elegant dessert table, yet fun and whimsical enough to brighten a child’s birthday party. <strong>They’re surprisingly simple to make, despite their elaborate appearance</strong>, which is a huge win in my book. You get all the “wow” factor without needing advanced pastry chef skills. It’s a recipe that encourages creativity, allowing you to personalize the colors to match any theme or mood, making it incredibly versatile. I’ve found that the best desserts are those that create memories, and I have a strong feeling these bars will do just that for you and your loved ones.</p>
<h4>Serving Suggestions and Creative Variations</h4>
<p>Now, while these bars are absolutely perfect as they are, straight out of the fridge, I love to think about ways to enhance the experience even further. For a simple yet elegant presentation, consider serving them alongside a medley of fresh berries – think raspberries, blueberries, and sliced strawberries – their natural tartness provides a wonderful counterpoint to the creamy sweetness of the cheesecake. A light dusting of powdered sugar just before serving adds a touch of sophistication. If you’re feeling a little more decadent, a dollop of freshly whipped cream or a scoop of vanilla bean ice cream could take these to the next level, creating a luxurious dessert experience. For a truly indulgent treat, a drizzle of white chocolate ganache or a homemade raspberry coulis would be absolutely divine. </p>
<h5>Perfect Pairings</h5>
<p>These <strong>Rainbow Cheesecake Swirl Bars</strong> pair beautifully with a variety of beverages. A hot cup of coffee or espresso would be a classic accompaniment, cutting through the richness perfectly. For a lighter touch, a glass of chilled Prosecco or even a sparkling rosé would complement the festive nature of the bars. And for the kids (or the kids at heart!), a tall glass of cold milk makes for a comforting and delicious pairing.</p>
<h5>Customization Fun</h5>
<p>Feeling adventurous? Don’t hesitate to play with the colors! You could swap out the rainbow palette for shades of green and red for Christmas, pastels for Easter, or even school colors for a graduation party. You could also experiment with extracts, adding a hint of almond or lemon to the cheesecake batter for a different flavor profile. For an extra textural element, consider folding in a handful of mini chocolate chips or finely chopped nuts into the cheesecake base before dividing it for coloring. The possibilities are truly endless, limited only by your imagination, and that’s one of the things I love most about baking!</p>
<h4>Your Turn to Create and Share!</h4>
<p>My biggest hope now is that you’ll carve out some time in your schedule to try this recipe. <strong>Don’t let the colorful swirls intimidate you; they’re much easier to achieve than you might think!</strong> Trust me, the effort is well worth the incredible result you’ll get. I promise you’ll be met with oohs and aahs from anyone lucky enough to get a taste. Baking is such a wonderful way to express creativity and bring joy, and these <strong>Rainbow Cheesecake Swirl Bars</strong> are the perfect vehicle for both. Once you’ve made them, I would absolutely love to hear about your experience. Did you stick to the rainbow, or did you create your own unique color scheme? What did your friends and family think? Please, don’t be shy! Share your photos on social media – tag me, if you wish, or simply drop a comment below this recipe telling me all about your baking adventure. <strong>Your feedback and creations truly inspire me and the entire baking community.</strong> So go ahead, preheat that oven, gather your ingredients, and get ready to bake a batch of pure, colorful happiness. Happy baking, everyone!</p>
Rainbow Cheesecake Swirl Bars
Vibrant Rainbow Cheesecake Swirl Bars featuring creamy, tangy cheesecake infused with colorful swirls atop a buttery graham cracker crust. Easy to make and perfect for any celebration, these bars offer a delightful balance of sweet and tart flavors.
Ingredients
-
1 ½ cups graham cracker crumbs
-
¼ cup granulated sugar (for crust)
-
½ cup unsalted butter, melted
-
32 ounces (4 packages) full-fat cream cheese, softened
-
1 ½ cups granulated sugar (for filling)
-
¼ cup sour cream or full-fat Greek yogurt, at room temperature
-
2 teaspoons pure vanilla extract
-
4 large eggs, at room temperature
-
Assorted gel food colorings (red, orange, yellow, green, blue, purple recommended)
Instructions
-
Step 1
Preheat oven to 350°F (175°C). Line an 8×8 or 9×9-inch square baking pan with parchment paper, leaving an overhang. In a medium bowl, combine 1 ½ cups graham cracker crumbs, ¼ cup granulated sugar, and ½ cup melted butter. Press firmly and evenly into the bottom of the prepared pan. Bake for 8-10 minutes, then remove from oven and cool completely. -
Step 2
In a large mixing bowl, beat 32 oz (4 packages) softened full-fat cream cheese on medium speed for 2-3 minutes until incredibly smooth and lump-free, scraping down the bowl. Gradually add 1 ½ cups granulated sugar, beating for another 2-3 minutes until light and creamy. Mix in ¼ cup sour cream (or Greek yogurt) and 2 tsp pure vanilla extract on low speed until just combined. Add 4 large eggs, one at a time, beating on low speed just until each is incorporated; do not overmix. -
Step 3
Divide about two-thirds of the plain cheesecake batter into several smaller bowls (e.g., six bowls, about ½ to ¾ cup each for a full rainbow spectrum). Keep the remaining largest portion of the batter uncolored. Add a few drops of assorted gel food colorings to each small bowl and gently stir until vibrant and evenly distributed. -
Step 4
Pour the uncolored, plain cheesecake batter evenly over the cooled graham cracker crust in the prepared pan, spreading to create a smooth base layer. Carefully dollop small spoonfuls of each colored cheesecake batter randomly over the plain base. Using a thin knife or wooden skewer, gently drag it through the colored batter in various directions to create a beautiful swirled rainbow pattern. Avoid over-swirling to prevent colors from muddling. -
Step 5
Reduce oven temperature to 325°F (160°C). Carefully transfer the pan to the preheated oven. Bake for approximately 35-45 minutes, or until the edges are set and slightly puffed, but the very center still has a slight wobble when gently jiggled. Turn off the oven, leave the door ajar (prop with a wooden spoon) for 30 minutes to allow gradual cooling. Remove the pan from the oven and place it on a wire rack to cool completely at room temperature (1-2 hours). -
Step 6
Once completely cooled to room temperature, cover the pan tightly with plastic wrap and transfer to the refrigerator. Chill for a minimum of 4 hours, but preferably overnight, to allow the cheesecake to firm up completely. When ready to serve, use the parchment paper overhangs to carefully lift the entire cheesecake slab out of the pan and onto a cutting board. Using a sharp knife (wiped with a hot, damp cloth and dried between each cut for cleanest slices), cut the cheesecake into 16-20 bars. Store any leftover bars in an airtight container in the refrigerator for up to 4-5 days, or freeze for up to 1 month.
Important Information
Nutrition Facts (Per Serving)
It is important to consider this information as approximate and not to use it as definitive health advice.
Allergy Information
Please check ingredients for potential allergens and consult a health professional if in doubt.
Leave a Comment