
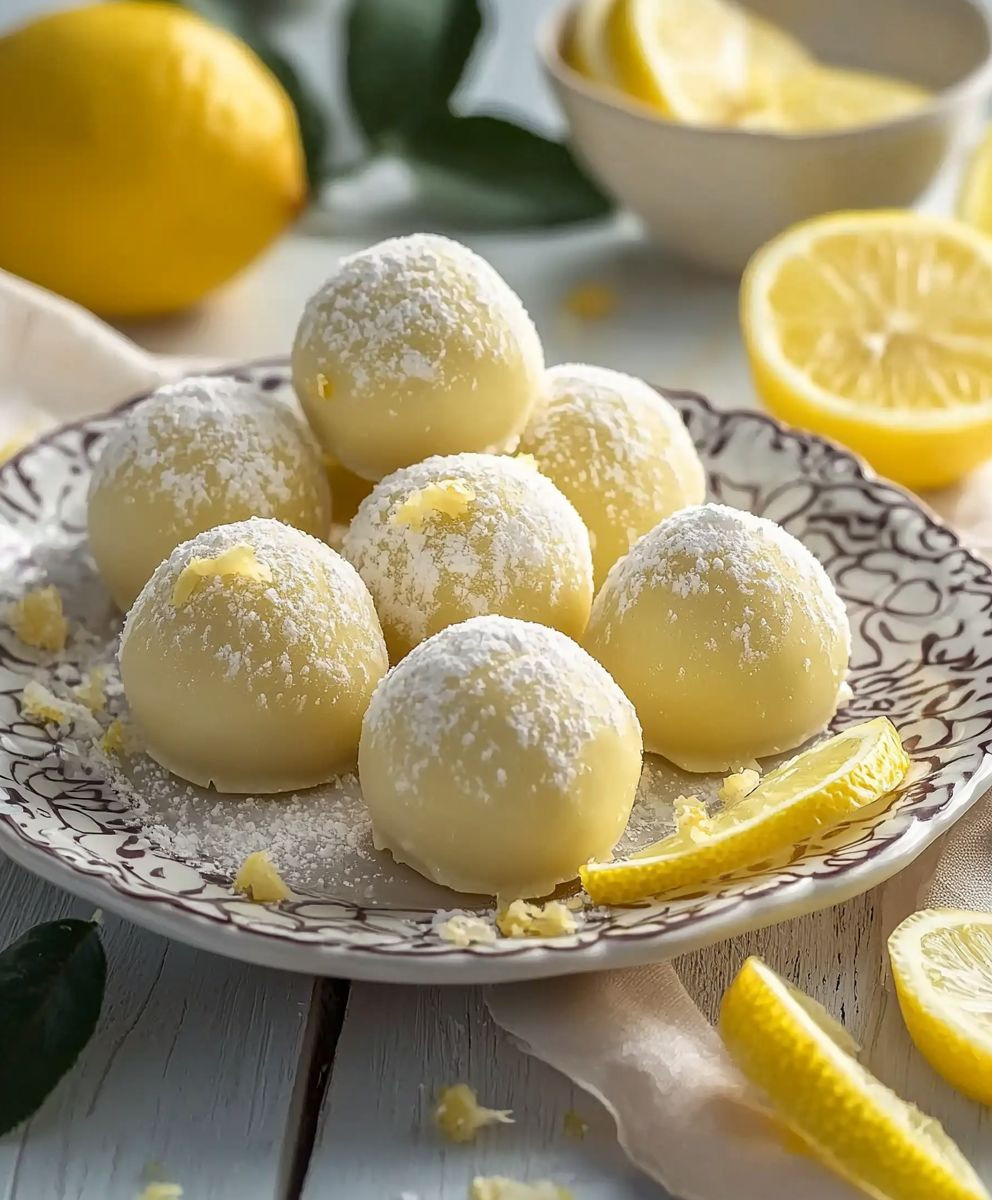
Lemon Truffles: Prepare to be transported to a realm of citrusy bliss with these delightful little bites! Imagine a burst of sunshine melting in your mouth, a perfect harmony of sweet and tangy that will leave you craving more. These aren’t just any truffles; they’re a sophisticated treat that’s surprisingly easy to make, perfect for impressing guests or simply indulging in a moment of self-care.
While the exact origins of the modern truffle are debated, the concept of combining chocolate and cream into a decadent sphere dates back to the early 20th century in France. Our Lemon Truffles take this classic confection and infuse it with the bright, zesty flavor of lemons, a fruit revered for its refreshing qualities and culinary versatility. Lemons have been used for centuries in desserts across various cultures, adding a vibrant touch to everything from pies to cakes.
What makes these lemon truffles so irresistible? It’s the perfect balance of flavors and textures. The creamy, melt-in-your-mouth center, infused with the invigorating taste of lemon, is complemented by a delicate coating of your choice perhaps white chocolate, powdered sugar, or even a sprinkle of lemon zest. They are incredibly convenient to make ahead of time, making them ideal for parties or as a thoughtful homemade gift. Plus, who can resist the allure of a bite-sized treat that delivers such an explosion of flavor? Get ready to experience the magic of homemade lemon truffles!
Ingredients:
- 1 cup (2 sticks) unsalted butter, softened
- 4 ounces cream cheese, softened
- 4 cups powdered sugar, plus more for dusting
- 1/4 cup freshly squeezed lemon juice
- 2 tablespoons lemon zest
- 1 teaspoon vanilla extract
- 1/4 teaspoon salt
- Optional coatings: white chocolate, shredded coconut, chopped nuts, sprinkles
Making the Lemon Truffle Base
Alright, let’s get started on these delightful lemon truffles! The base is super simple, but it’s important to get the consistency just right. Trust me, you’ll be popping these into your mouth before you know it!
- Cream Together Butter and Cream Cheese: In a large bowl, using an electric mixer (either a stand mixer or a hand mixer), cream together the softened butter and cream cheese until they are light and fluffy. This usually takes about 3-5 minutes. Make sure there are no lumps of cream cheese remaining. Scrape down the sides of the bowl occasionally to ensure everything is evenly mixed. This step is crucial for a smooth and creamy truffle texture.
- Gradually Add Powdered Sugar: Gradually add the powdered sugar, one cup at a time, to the butter and cream cheese mixture. Mix on low speed after each addition to prevent a powdered sugar cloud from erupting in your kitchen. Once all the powdered sugar is incorporated, increase the speed to medium and beat for another 2-3 minutes until the mixture is smooth and well combined. Don’t overmix, though, or the truffles can become tough.
- Incorporate Lemon Juice, Zest, Vanilla, and Salt: Add the freshly squeezed lemon juice, lemon zest, vanilla extract, and salt to the mixture. Mix on low speed until everything is thoroughly combined. The lemon zest is what really gives these truffles that bright, zesty flavor, so don’t skimp on it! The salt helps to balance the sweetness and enhance the lemon flavor.
- Chill the Dough: Cover the bowl with plastic wrap and refrigerate the dough for at least 2 hours, or preferably overnight. This chilling time is essential because it allows the dough to firm up, making it much easier to roll into balls. If you try to roll them right away, they’ll be too sticky and messy. Trust me, patience is key here!
Forming the Truffles
Now for the fun part rolling the truffles! This is where you get to shape these little balls of lemony goodness.
- Prepare Your Work Station: Line a baking sheet with parchment paper or wax paper. This will prevent the truffles from sticking to the sheet. Have a small bowl of extra powdered sugar ready for dusting your hands and the truffles. Also, prepare any coatings you plan to use (melted white chocolate, shredded coconut, chopped nuts, sprinkles) in separate bowls.
- Scoop and Roll: Remove the chilled dough from the refrigerator. Using a small cookie scoop or a spoon, scoop out portions of the dough. I usually aim for about 1 tablespoon per truffle. Roll each portion between your palms to form a smooth ball. If the dough is still a bit sticky, lightly dust your hands with powdered sugar.
- Place on Baking Sheet: Place the rolled truffles onto the prepared baking sheet, leaving a little space between each one.
- Chill Again (Optional but Recommended): For best results, chill the formed truffles in the refrigerator for another 30 minutes before coating. This will help them hold their shape better when you dip them in melted chocolate or roll them in other coatings.
Coating the Truffles (Optional)
This is where you can get creative! Coating the truffles adds another layer of flavor and texture, and it makes them look extra fancy.
Coating with Melted White Chocolate:
- Melt the White Chocolate: Place white chocolate chips or chopped white chocolate in a heat-safe bowl. Melt the chocolate in the microwave in 30-second intervals, stirring after each interval, until smooth. Be careful not to overheat the chocolate, as it can seize up. Alternatively, you can melt the chocolate over a double boiler.
- Dip the Truffles: Using a fork or dipping tools, dip each truffle into the melted white chocolate, ensuring it’s completely coated. Gently tap off any excess chocolate.
- Add Toppings (if desired): Immediately sprinkle the dipped truffles with your desired toppings, such as sprinkles, chopped nuts, or shredded coconut. The chocolate will set quickly, so you need to add the toppings right away.
- Place on Parchment Paper: Place the coated truffles back onto the parchment-lined baking sheet.
- Chill to Set: Refrigerate the coated truffles for about 15-20 minutes, or until the chocolate is set.
Coating with Shredded Coconut or Chopped Nuts:
- Prepare Coating: Place shredded coconut or chopped nuts in a shallow bowl.
- Roll the Truffles: Roll each truffle in the shredded coconut or chopped nuts, pressing gently to ensure the coating adheres to the truffle.
- Place on Parchment Paper: Place the coated truffles onto the parchment-lined baking sheet.
- Chill (Optional): You can chill these for a few minutes to help the coating set, but it’s not strictly necessary.
Coating with Powdered Sugar:
- Prepare Coating: Place powdered sugar in a shallow bowl.
- Roll the Truffles: Roll each truffle in the powdered sugar, ensuring it’s completely coated.
- Place on Parchment Paper: Place the coated truffles onto the parchment-lined baking sheet.
- Chill (Optional): You can chill these for a few minutes to help the coating set, but it’s not strictly necessary.
Storing the Lemon Truffles
Once your truffles are coated and set, it’s time to store them properly to keep them fresh and delicious.
- Store in an Airtight Container: Place the lemon truffles in an airtight container.
- Refrigerate: Store the truffles in the refrigerator for up to 1 week. They are best served cold, as this helps them maintain their shape and texture.
- Freezing (Optional): You can also freeze the truffles for longer storage. Place them in a freezer-safe container or bag, and they will keep for up to 2 months. Thaw them in the refrigerator before serving.
Tips and Tricks for Perfect Lemon Truffles
Here are a few extra tips to ensure your lemon truffles are a smashing success!
- Use High-Quality Ingredients: The better the quality of your ingredients, the better your truffles will taste. Use good quality butter, cream cheese, and white chocolate (if using).
- Don’t Overmix: Overmixing the dough can result in tough truffles. Mix until just combined.
- Chill Thoroughly: Chilling the dough is crucial for easy rolling and shaping. Don’t skip this step!
- Adjust Sweetness to Taste: If you prefer a less sweet truffle, you can reduce the amount of powdered sugar slightly.
- Get Creative with Coatings: Experiment with different coatings to find your favorite combination. Consider using dark chocolate, crushed cookies, or even edible glitter!
- Make Ahead: These truffles are perfect for making ahead of time. You can prepare the dough several days in advance and store it in the refrigerator until you’re ready to roll and coat them.
- Presentation Matters: Arrange the truffles on a pretty platter or in a decorative box for a beautiful presentation. They make a wonderful gift!
Troubleshooting
Sometimes things don’t go exactly as planned. Here are a few common issues and how to fix them:
- Truffles are too sticky: If the dough is too sticky to roll, it probably wasn’t chilled long enough. Place it back in the refrigerator for another hour or two. You can also lightly dust your hands with powdered sugar while rolling.
- Chocolate is seizing up: If your melted chocolate becomes thick and grainy, it has probably seized up. This can happen if it gets overheated or if water gets into it. Unfortunately, there’s no real fix for seized chocolate, so you’ll need to start over with fresh chocolate. Be sure to melt it slowly and carefully, and avoid getting any water in it.
- Coatings aren’t sticking: If

Conclusion:
And there you have it! These Lemon Truffles are truly a must-try, and I’m not just saying that because I created the recipe. The bright, zesty flavor of lemon combined with the creamy, melt-in-your-mouth texture is simply divine. They’re the perfect little bite of sunshine, ideal for any occasion, from a sophisticated dessert spread to a simple afternoon treat with a cup of tea. What makes these truffles so special is their simplicity. With just a handful of ingredients and minimal effort, you can create something truly extraordinary. Forget complicated baking projects; these are quick, easy, and guaranteed to impress. The vibrant lemon flavor is naturally uplifting, making them a wonderful pick-me-up any time of day. Plus, they’re naturally gluten-free, making them a great option for those with dietary restrictions. But the best part? They’re incredibly versatile! Feel free to experiment with different variations to suit your own taste. For a richer, more decadent truffle, try using white chocolate instead of milk chocolate for the coating. Or, if you’re a fan of all things citrus, add a touch of lime zest to the mixture for an extra burst of flavor. Serving suggestions are endless. These Lemon Truffles make a beautiful addition to a dessert platter, alongside other sweet treats like macarons or mini cheesecakes. They’re also perfect as a small gift for friends and family simply package them in a pretty box or tin and tie with a ribbon. For a truly elegant presentation, arrange them on a tiered cake stand or serve them with a dollop of whipped cream and a sprig of mint. If you’re looking for a more casual way to enjoy them, simply pop a few in your lunchbox for a delightful midday treat. They’re also a great option for parties and gatherings, as they can be made ahead of time and stored in the refrigerator until ready to serve. Imagine the smiles on your guests’ faces when they bite into these little balls of lemony goodness! I truly believe that everyone should experience the joy of these Lemon Truffles. They’re the perfect balance of sweet and tart, creamy and smooth, and they’re guaranteed to brighten your day. So, what are you waiting for? Gather your ingredients, follow the simple steps, and prepare to be amazed. I’m so excited for you to try this recipe! Once you’ve made your own batch of these delightful Lemon Truffles, I’d love to hear about your experience. Did you make any variations? What did you think of the flavor? Share your photos and comments in the comments section below. I can’t wait to see your creations and hear your feedback. Happy truffle-making! Print
Lemon Truffles: A Zesty & Delicious Dessert Recipe
- Total Time: 170 minutes
- Yield: 48 truffles 1x
Description
Bright, zesty lemon truffles with a creamy butter and cream cheese base. Roll in powdered sugar, white chocolate, coconut, or nuts for a perfect make-ahead treat!
Ingredients
- 1 cup (2 sticks) unsalted butter, softened
- 4 ounces cream cheese, softened
- 4 cups powdered sugar, plus more for dusting
- 1/4 cup freshly squeezed lemon juice
- 2 tablespoons lemon zest
- 1 teaspoon vanilla extract
- 1/4 teaspoon salt
- Optional coatings: white chocolate, shredded coconut, chopped nuts, sprinkles
Instructions
- Cream Together Butter and Cream Cheese: In a large bowl, using an electric mixer, cream together the softened butter and cream cheese until light and fluffy (3-5 minutes). Scrape down the sides of the bowl.
- Gradually Add Powdered Sugar: Gradually add the powdered sugar, one cup at a time, mixing on low speed after each addition. Once all the powdered sugar is incorporated, increase the speed to medium and beat for another 2-3 minutes until smooth.
- Incorporate Lemon Juice, Zest, Vanilla, and Salt: Add the lemon juice, lemon zest, vanilla extract, and salt to the mixture. Mix on low speed until thoroughly combined.
- Chill the Dough: Cover the bowl with plastic wrap and refrigerate the dough for at least 2 hours, or preferably overnight.
- Prepare Your Work Station: Line a baking sheet with parchment paper. Have a small bowl of extra powdered sugar ready for dusting. Prepare any coatings you plan to use in separate bowls.
- Scoop and Roll: Remove the chilled dough from the refrigerator. Using a small cookie scoop or a spoon, scoop out portions of the dough (about 1 tablespoon per truffle). Roll each portion between your palms to form a smooth ball. If the dough is still a bit sticky, lightly dust your hands with powdered sugar.
- Place on Baking Sheet: Place the rolled truffles onto the prepared baking sheet, leaving a little space between each one.
- Chill Again (Optional but Recommended): For best results, chill the formed truffles in the refrigerator for another 30 minutes before coating.
- Coating (Optional):
- White Chocolate: Melt white chocolate in 30-second intervals in the microwave, stirring after each interval, until smooth. Dip each truffle into the melted white chocolate, tap off excess, and immediately sprinkle with desired toppings. Place on parchment paper and chill for 15-20 minutes to set.
- Shredded Coconut/Chopped Nuts: Roll each truffle in shredded coconut or chopped nuts, pressing gently to adhere. Place on parchment paper. Chill briefly if desired.
- Powdered Sugar: Roll each truffle in powdered sugar, ensuring it’s completely coated. Place on parchment paper. Chill briefly if desired.
- Storing: Store in an airtight container in the refrigerator for up to 1 week. Can be frozen for up to 2 months. Thaw in the refrigerator before serving.
Notes
- Use high-quality ingredients for the best flavor.
- Don’t overmix the dough.
- Chilling the dough is crucial for easy rolling.
- Adjust sweetness to taste by reducing the amount of powdered sugar slightly.
- Experiment with different coatings.
- These truffles can be made ahead of time.
- If the dough is too sticky, chill it longer.
- If the chocolate seizes up, start over with fresh chocolate.
- Prep Time: 20 minutes
- Cook Time: 0 minutes

Leave a Comment