
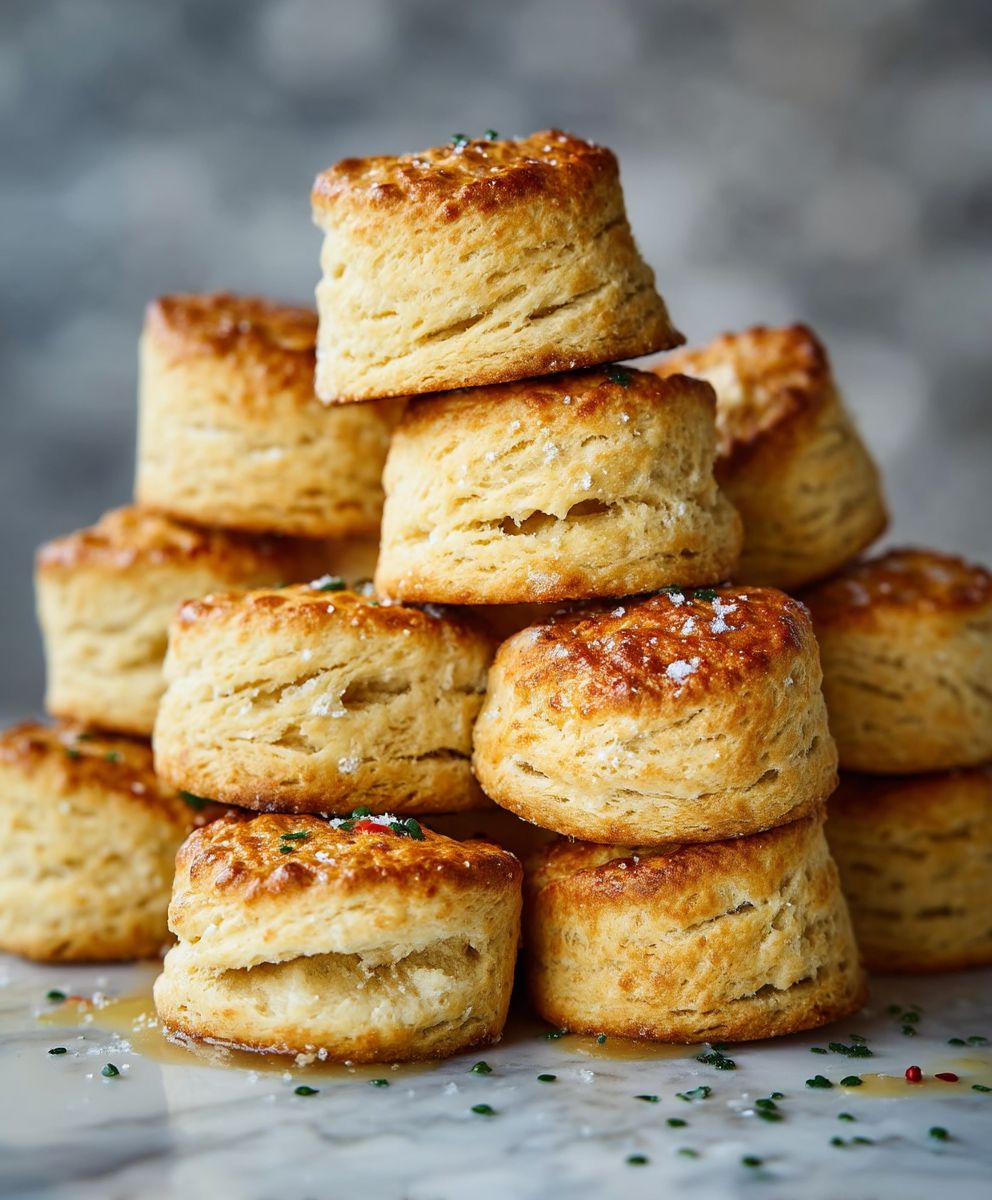
Sourdough Biscuits: Is there anything quite as comforting as a warm, flaky biscuit fresh from the oven? Imagine that classic comfort elevated with the tangy depth of sourdough a flavor combination that will redefine your biscuit experience! These aren’t your average biscuits; they’re a delightful dance between the familiar and the extraordinary.
Biscuits themselves have a rich history, tracing back to hardtack, a staple for sailors and soldiers. Over time, they evolved into the soft, buttery delights we know and love. Adding sourdough starter, however, brings a new dimension to this classic. Sourdough baking, with its ancient roots and reliance on wild yeasts, has experienced a resurgence in recent years, and for good reason! The fermentation process not only imparts a unique flavor but also enhances the digestibility of the grains.
People adore sourdough biscuits for their incredible texture a crisp, golden exterior giving way to a soft, slightly chewy interior. The subtle tang of the sourdough cuts through the richness of the butter, creating a balanced and utterly irresistible flavor profile. Whether you enjoy them slathered with butter and jam, alongside a hearty breakfast, or as a comforting side dish with dinner, these biscuits are guaranteed to be a crowd-pleaser. Plus, the process of making them, while requiring a little patience for the sourdough starter, is surprisingly simple and rewarding. Get ready to impress your friends and family with these unforgettable biscuits!
Ingredients:
- 2 cups all-purpose flour, plus more for dusting
- 1 teaspoon baking powder
- 1/2 teaspoon baking soda
- 1 teaspoon salt
- 1/2 cup (1 stick) cold unsalted butter, cut into 1/2-inch cubes
- 1/2 cup cold vegetable shortening, cut into 1/2-inch cubes
- 3/4 cup active sourdough starter, unfed (discard)
- 1/2 – 3/4 cup cold buttermilk, plus more for brushing
- Optional: 1 tablespoon honey or maple syrup (for a touch of sweetness)
Preparing the Dough: The Key to Flaky Biscuits
Alright, let’s get started! The secret to amazing sourdough biscuits lies in keeping everything cold and working quickly. This prevents the butter and shortening from melting, which is crucial for creating those beautiful, flaky layers we all crave.
- Combine the Dry Ingredients: In a large bowl, whisk together the flour, baking powder, baking soda, and salt. Make sure everything is evenly distributed. This ensures that the biscuits rise properly and have a consistent flavor.
- Cut in the Butter and Shortening: This is where the magic happens! Add the cold butter and shortening to the flour mixture. Using a pastry blender (or your fingertips, if you’re feeling brave and quick!), cut the butter and shortening into the flour until the mixture resembles coarse crumbs. You should still see small pieces of butter and shortening these are what will create the flaky layers. Don’t overmix! Overmixing will develop the gluten in the flour, resulting in tough biscuits.
- Incorporate the Sourdough Starter: Add the sourdough starter to the bowl. Gently toss it with the flour mixture until it’s somewhat incorporated. Don’t worry about getting it perfectly mixed at this stage.
- Add the Buttermilk: Gradually add the cold buttermilk, starting with 1/2 cup. Gently stir with a fork until the dough just comes together. You want a shaggy dough that’s slightly sticky. If the dough seems too dry, add more buttermilk, a tablespoon at a time, until it reaches the right consistency. Be careful not to overmix! Overmixing will develop the gluten and make the biscuits tough. Remember, a little bit sticky is good!
- Turn Out and Knead (Gently!): Lightly flour a clean work surface. Turn the dough out onto the floured surface. Gently pat the dough into a rectangle, about 1 inch thick. Fold the dough in thirds, like a letter. This creates layers! Gently pat the dough back into a 1-inch thick rectangle. Repeat this folding process 2-3 more times. This is called laminating the dough, and it’s what gives the biscuits their incredible flakiness. Be gentle and avoid overworking the dough.
- Chill the Dough (Important!): Wrap the dough tightly in plastic wrap and refrigerate for at least 30 minutes, or up to 2 hours. This allows the gluten to relax and the butter and shortening to firm up, making the biscuits even more tender and flaky. Don’t skip this step! It’s crucial for the final result.
Cutting and Baking: Achieving Golden Perfection
Now that our dough is chilled and ready, let’s get these biscuits baked to golden perfection! This part is all about precision and a hot oven.
- Preheat the Oven: Preheat your oven to 450°F (232°C). Make sure your oven is fully preheated before baking the biscuits. A hot oven is essential for creating a good rise and a golden-brown crust.
- Prepare the Baking Sheet: Line a baking sheet with parchment paper. This prevents the biscuits from sticking and makes cleanup a breeze.
- Cut Out the Biscuits: Remove the chilled dough from the refrigerator. Lightly flour your work surface again. Gently pat the dough into a 3/4-inch thick rectangle. Use a 2 1/2-inch biscuit cutter (or a sharp knife) to cut out the biscuits. Press straight down don’t twist the cutter, as this will seal the edges and prevent the biscuits from rising properly.
- Arrange on Baking Sheet: Place the biscuits on the prepared baking sheet, about 1 inch apart. For softer-sided biscuits, place them close together. For crispier sides, space them further apart.
- Brush with Buttermilk: Brush the tops of the biscuits with buttermilk. This will give them a beautiful golden-brown color.
- Bake: Bake for 15-20 minutes, or until the biscuits are golden brown and have risen nicely. Keep an eye on them, as baking times may vary depending on your oven.
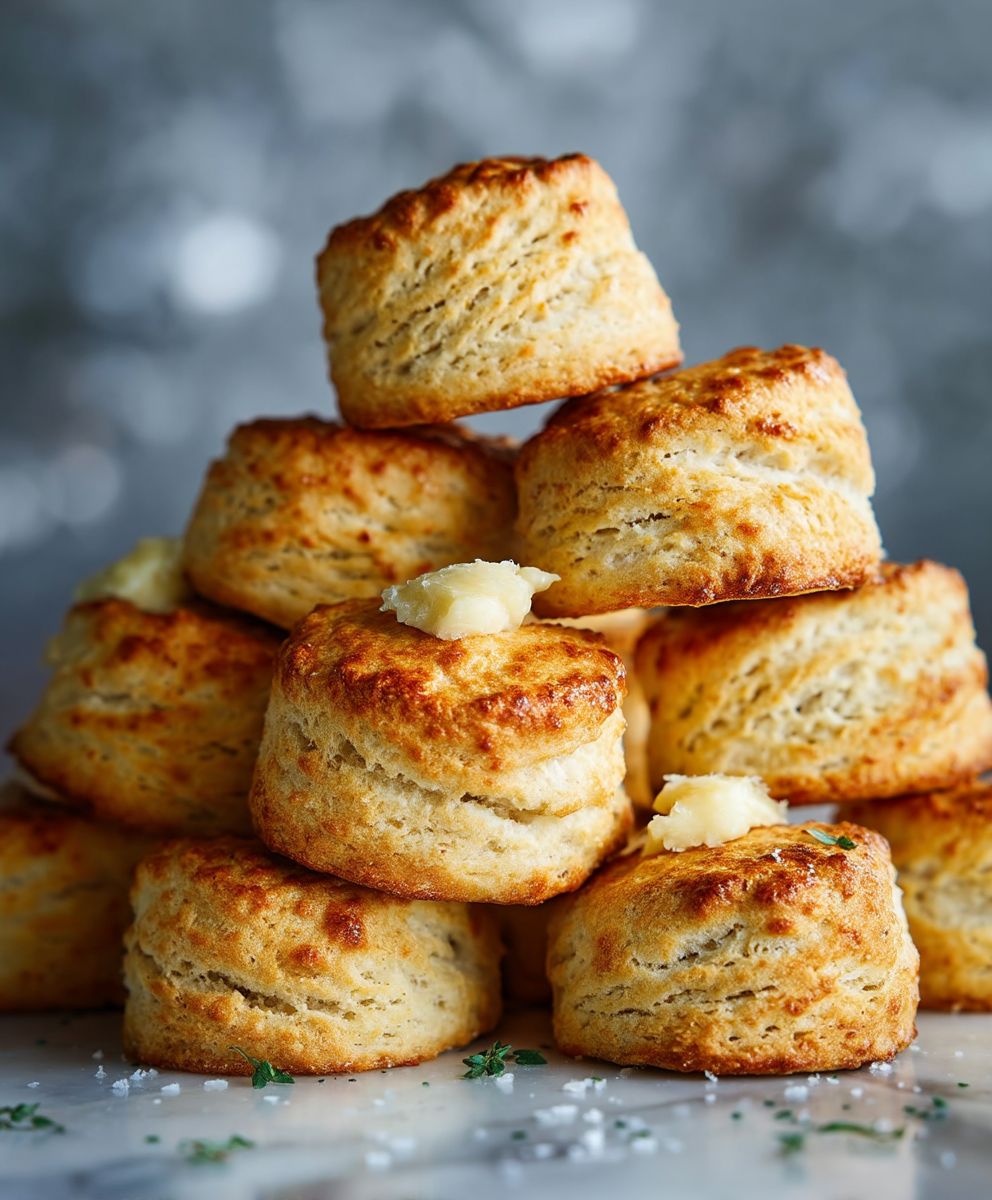
- Cool Slightly and Serve: Remove the biscuits from the oven and let them cool on the baking sheet for a few minutes before serving. They are best served warm, with butter, jam, honey, or your favorite toppings.
Tips and Tricks for Sourdough Biscuit Success
Here are a few extra tips to ensure your sourdough biscuits are the best they can be:
- Use Cold Ingredients: I can’t stress this enough! Cold butter, shortening, and buttermilk are essential for creating flaky biscuits.
- Don’t Overmix: Overmixing develops the gluten in the flour, resulting in tough biscuits. Mix the dough just until it comes together.
- Handle the Dough Gently: Be gentle when patting and folding the dough. Avoid overworking it.
- Chill the Dough: Chilling the dough allows the gluten to relax and the butter and shortening to firm up, making the biscuits more tender and flaky.
- Hot Oven: A hot oven is essential for creating a good rise and a golden-brown crust.
- Experiment with Flavors: Feel free to add other ingredients to the dough, such as cheese, herbs, or spices.
- Sourdough Starter: Using unfed sourdough starter (discard) adds a subtle tang to the biscuits. If you don’t have sourdough starter, you can omit it, but the flavor will be different. You may need to adjust the amount of buttermilk accordingly.
- Freezing: You can freeze the unbaked biscuits for up to 2 months. Place them on a baking sheet and freeze until solid, then transfer them to a freezer bag. Bake from frozen, adding a few extra minutes to the baking time.
- High Altitude Adjustments: At higher altitudes, you may need to reduce the amount of baking powder slightly. Start by reducing it by 1/4 teaspoon.
Troubleshooting: Common Biscuit Problems and Solutions
Even with the best intentions, sometimes things don’t go exactly as planned. Here are some common biscuit problems and how to fix them:
- Flat Biscuits: This could be due to several factors, including using old baking powder or baking soda, not using a hot enough oven, or overmixing the dough. Make sure your baking powder and baking soda are fresh, preheat your oven properly, and avoid overmixing the dough.
- Tough Biscuits: This is usually caused by overmixing the dough, which develops the gluten in the flour. Be gentle when mixing and handling the dough.
- Dry Biscuits: This could be due to using too much flour or not enough buttermilk. Measure the flour accurately and add enough buttermilk to create a shaggy, slightly sticky dough.
- Unevenly Baked Biscuits: This could be due to an unevenly heated oven. Rotate the baking sheet halfway through baking to ensure even browning.
Variations: Spice Up Your Sourdough Biscuits
Once you’ve mastered the basic sourdough biscuit recipe, the possibilities are endless! Here are a few ideas to get you started:
- Cheese Biscuits: Add 1/2 cup of shredded cheddar cheese, Gruyere, or Parmesan cheese to the dough.
- Herb Biscuits: Add 2 tablespoons of chopped fresh herbs, such as rosemary, thyme, or chives, to the dough.
- Garlic Biscuits: Add 1 teaspoon of garlic powder or 2 cloves of minced garlic to the dough.
- Jalapeño Cheddar Biscuits: Add 1/4 cup of chopped pickled jalapeños and 1/2 cup of shredded cheddar cheese to the dough.
- Sweet Biscuits: Add 2 tablespoons of sugar and 1/4 teaspoon of ground cinnamon to the dough. You can also brush the baked biscuits with melted butter and sprinkle with cinnamon sugar.
Serving Suggestions: Beyond Butter and Jam
While sourdough biscuits are delicious with just butter and jam, they can also be used in a variety of other ways:
- Breakfast Sandwiches: Use the biscuits to make breakfast sandwiches with eggs, bacon, sausage, or
Conclusion:
And there you have it! These Sourdough Biscuits are more than just a recipe; they’re an experience. From the tangy aroma that fills your kitchen to the satisfyingly flaky texture that melts in your mouth, these biscuits are a testament to the magic of sourdough. I truly believe that once you try them, you’ll never look at biscuits the same way again.
Why are these biscuits a must-try? Well, beyond the incredible flavor, they’re surprisingly simple to make. The active sourdough starter does most of the work, developing a depth of flavor that you just can’t achieve with baking powder alone. Plus, they’re incredibly versatile. Whether you’re a seasoned baker or just starting out, this recipe is forgiving and rewarding. The slight tang from the sourdough adds a unique twist to a classic comfort food, making them a standout addition to any meal.
But the best part? The possibilities are endless!
Serving Suggestions and Variations:
These Sourdough Biscuits are fantastic on their own, warm from the oven with a pat of butter and a drizzle of honey. But don’t stop there! Imagine them split open and filled with crispy fried chicken and a spicy honey drizzle for a truly decadent treat. Or, how about using them as the base for a savory breakfast sandwich with scrambled eggs, bacon, and cheese?
For a sweeter variation, try adding a tablespoon of sugar to the dough and brushing the tops with melted butter and a sprinkle of cinnamon sugar before baking. You could even incorporate dried cranberries or blueberries for a festive twist.
If you’re feeling adventurous, experiment with different flours. Whole wheat flour will add a nutty flavor and a slightly denser texture, while rye flour will enhance the sourdough tang. Just remember to adjust the liquid accordingly to achieve the right consistency.
And for those who love a little heat, a pinch of cayenne pepper or a dash of hot sauce in the dough will add a subtle kick that complements the sourdough flavor beautifully.
Don’t be afraid to get creative and make these biscuits your own! The beauty of baking is that it’s all about experimentation and finding what you love.
I’ve poured my heart into perfecting this recipe, and I’m so excited for you to try it. I truly believe that these sourdough biscuits will become a staple in your kitchen, a go-to recipe for breakfast, brunch, or any time you’re craving a little bit of comfort.
So, what are you waiting for? Gather your ingredients, preheat your oven, and get ready to experience the joy of baking these incredible biscuits.
Once you’ve tried them, I’d love to hear about your experience! Share your photos and comments on social media using [Your Hashtag Here] or leave a review on the recipe page. Let me know what variations you tried and what you thought of the flavor. Your feedback is invaluable and helps me continue to improve and share delicious recipes with the world. Happy baking! I can’t wait to see what you create!
Sourdough Biscuits: The Ultimate Guide to Baking Fluffy Perfection
Flaky, tangy sourdough biscuits made with cold butter, shortening, and unfed sourdough starter. Perfect for breakfast, brunch, or a savory side.
Ingredients
- 2 cups all-purpose flour, plus more for dusting
- 1 teaspoon baking powder
- 1/2 teaspoon baking soda
- 1 teaspoon salt
- 1/2 cup (1 stick) cold unsalted butter, cut into 1/2-inch cubes
- 1/2 cup cold vegetable shortening, cut into 1/2-inch cubes
- 3/4 cup active sourdough starter, unfed (discard)
- 1/2 – 3/4 cup cold buttermilk, plus more for brushing
- Optional: 1 tablespoon honey or maple syrup (for a touch of sweetness)
Instructions
- Combine Dry Ingredients: In a large bowl, whisk together the flour, baking powder, baking soda, and salt.
- Cut in Butter and Shortening: Add the cold butter and shortening to the flour mixture. Using a pastry blender or your fingertips, cut the butter and shortening into the flour until the mixture resembles coarse crumbs. You should still see small pieces of butter and shortening.
- Incorporate Sourdough Starter: Add the sourdough starter to the bowl. Gently toss it with the flour mixture until it’s somewhat incorporated.
- Add Buttermilk: Gradually add the cold buttermilk, starting with 1/2 cup. Gently stir with a fork until the dough just comes together. You want a shaggy dough that’s slightly sticky. If the dough seems too dry, add more buttermilk, a tablespoon at a time, until it reaches the right consistency.
- Turn Out and Knead (Gently!): Lightly flour a clean work surface. Turn the dough out onto the floured surface. Gently pat the dough into a rectangle, about 1 inch thick. Fold the dough in thirds, like a letter. Gently pat the dough back into a 1-inch thick rectangle. Repeat this folding process 2-3 more times.
- Chill the Dough (Important!): Wrap the dough tightly in plastic wrap and refrigerate for at least 30 minutes, or up to 2 hours.
- Preheat the Oven: Preheat your oven to 450°F (232°C).
- Prepare the Baking Sheet: Line a baking sheet with parchment paper.
- Cut Out the Biscuits: Remove the chilled dough from the refrigerator. Lightly flour your work surface again. Gently pat the dough into a 3/4-inch thick rectangle. Use a 2 1/2-inch biscuit cutter (or a sharp knife) to cut out the biscuits. Press straight down don’t twist the cutter.
- Arrange on Baking Sheet: Place the biscuits on the prepared baking sheet, about 1 inch apart. For softer-sided biscuits, place them close together. For crispier sides, space them further apart.
- Brush with Buttermilk: Brush the tops of the biscuits with buttermilk.
- Bake: Bake for 15-20 minutes, or until the biscuits are golden brown and have risen nicely.
- Cool Slightly and Serve: Remove the biscuits from the oven and let them cool on the baking sheet for a few minutes before serving. They are best served warm.
Notes
- Cold Ingredients are Key: Use cold butter, shortening, and buttermilk for flaky biscuits.
- Don’t Overmix: Overmixing develops gluten and makes tough biscuits.
- Handle Gently: Be gentle when patting and folding the dough.
- Chilling is Important: Chilling allows gluten to relax and fats to firm up.
- Hot Oven: A hot oven is essential for a good rise.
- Sourdough Starter: Using unfed sourdough starter (discard) adds a subtle tang. If you don’t have sourdough starter, you can omit it, but the flavor will be different. You may need to adjust the amount of buttermilk accordingly.
- Freezing: You can freeze the unbaked biscuits for up to 2 months. Place them on a baking sheet and freeze until solid, then transfer them to a freezer bag. Bake from frozen, adding a few extra minutes to the baking time.
- Experiment with Flavors: Feel free to add other ingredients to the dough, such as cheese, herbs, or spices.


Leave a Comment