
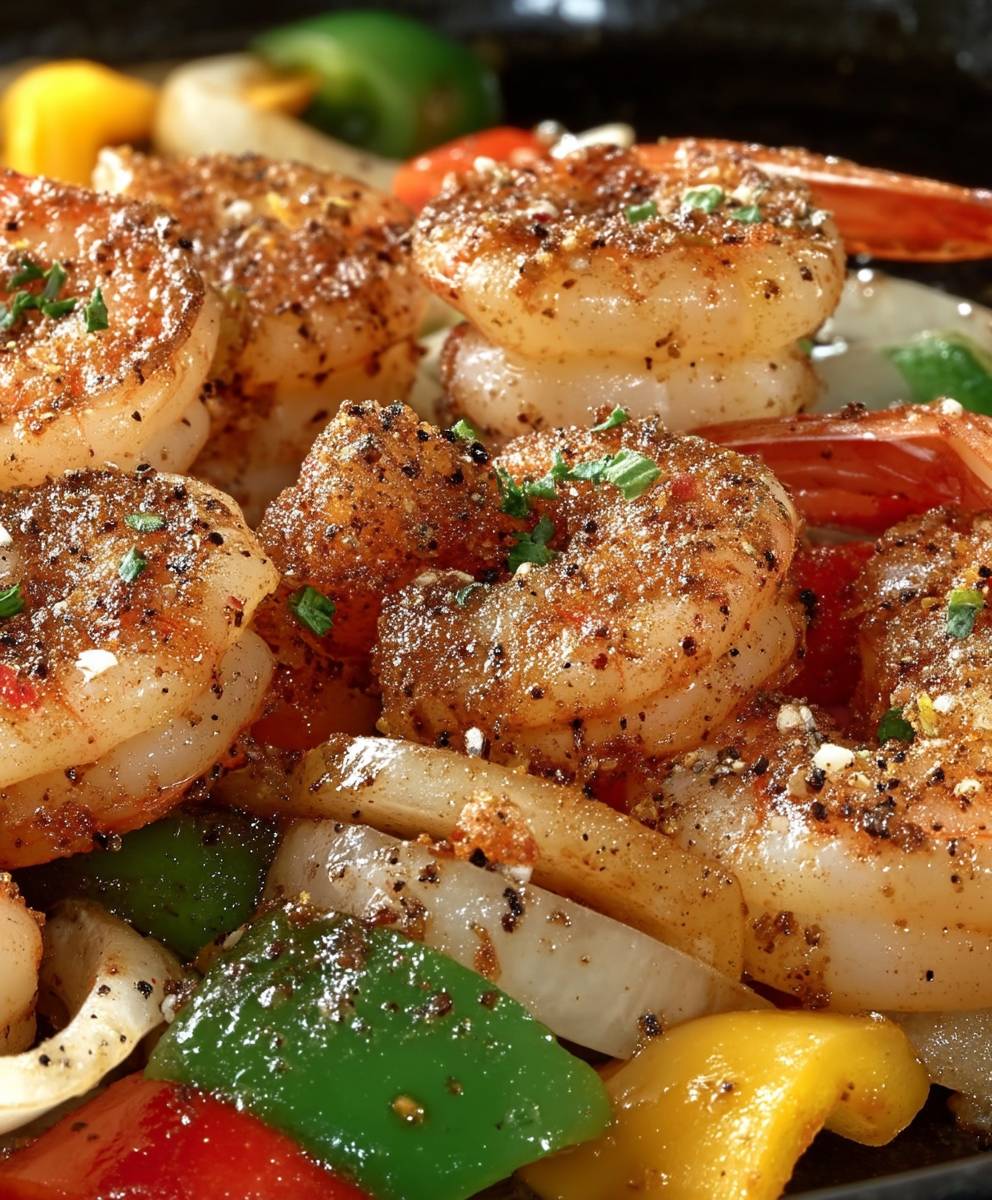
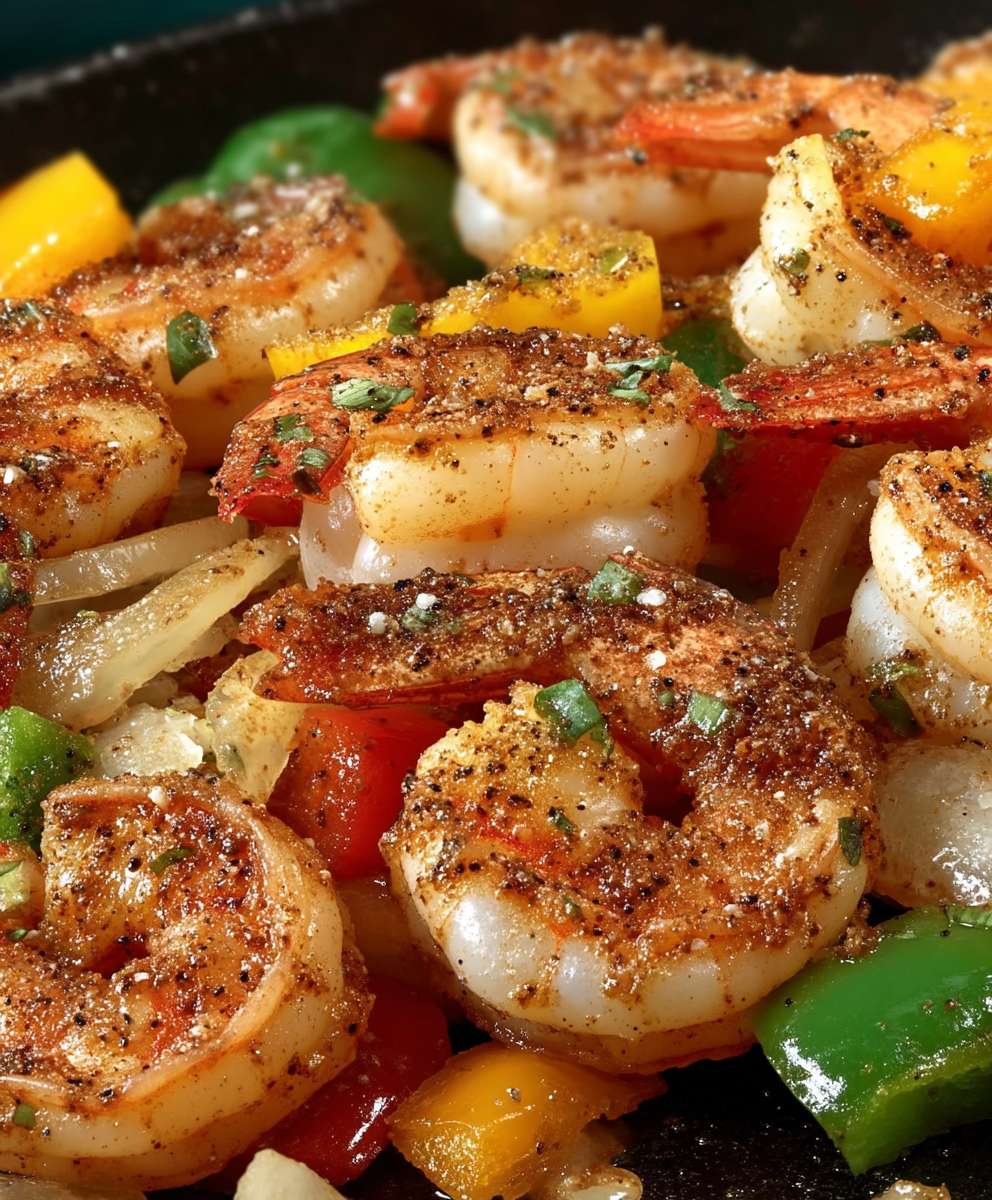
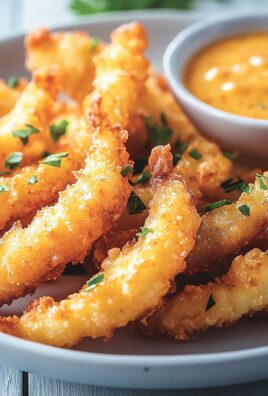
Salt Pepper Shrimp: Prepare to embark on a culinary adventure that will tantalize your taste buds and leave you craving more! Imagine succulent shrimp, perfectly crisp and bursting with flavor, thanks to a simple yet magical combination of salt, pepper, and a few other key ingredients. This isn’t just a recipe; it’s an experience.
While the exact origins of Salt Pepper Shrimp are debated, its roots are firmly planted in the vibrant and diverse culinary landscape of Chinese cuisine, particularly Cantonese cooking. Often found in bustling night markets and upscale restaurants alike, this dish represents the beauty of simplicity transforming humble ingredients into something truly extraordinary. It’s a testament to the power of balance, where the sharpness of pepper meets the savory depth of salt, creating a symphony of flavors that dance on your palate.
What makes this dish so universally loved? It’s the irresistible combination of textures and tastes. The shrimp boasts a delightful crunch on the outside, giving way to a tender and juicy interior. The intense, savory flavor profile is incredibly satisfying, making it a perfect appetizer, a delightful side dish, or even a light and flavorful main course. Plus, it’s surprisingly quick and easy to prepare, making it ideal for busy weeknights or impromptu gatherings. Get ready to discover why Salt Pepper Shrimp is a timeless classic that continues to captivate food lovers around the world!
Ingredients:
- 1 pound large shrimp, peeled and deveined
- 2 tablespoons olive oil
- 4 cloves garlic, minced
- 1/4 teaspoon red pepper flakes (optional, for heat)
- 1/4 cup dry white wine (such as Sauvignon Blanc or Pinot Grigio)
- 1/4 cup chicken broth
- 2 tablespoons lemon juice, freshly squeezed
- 2 tablespoons butter, unsalted
- 2 tablespoons fresh parsley, chopped
- Salt and freshly ground black pepper to taste
- Cooked pasta (linguine, spaghetti, or your favorite), for serving
- Lemon wedges, for garnish (optional)
Preparing the Shrimp:
- Prepare the shrimp: Make sure your shrimp are fully thawed if frozen. Pat them dry with paper towels. This is crucial for getting a good sear and preventing them from steaming in the pan. Excess moisture will lower the pan temperature and hinder browning.
- Season the shrimp: In a bowl, toss the shrimp with a generous pinch of salt and freshly ground black pepper. Don’t be shy with the seasoning! This is your chance to build flavor from the very beginning. You can also add a touch of garlic powder or onion powder at this stage if you like.
Cooking the Shrimp:
- Heat the olive oil: In a large skillet (preferably stainless steel or cast iron) over medium-high heat, heat the olive oil. You want the pan to be hot before adding the shrimp, so give it a few minutes to come up to temperature. The oil should shimmer slightly.
- Sear the shrimp: Add the shrimp to the hot skillet in a single layer. Avoid overcrowding the pan, as this will lower the temperature and cause the shrimp to steam instead of sear. If necessary, cook the shrimp in batches. Cook for about 2-3 minutes per side, or until they turn pink and opaque. They should have a nice golden-brown sear on both sides.
- Remove the shrimp: Once the shrimp are cooked through, remove them from the skillet and set them aside. Don’t overcook them, or they will become rubbery.
Making the Sauce:
- Sauté the garlic: In the same skillet, reduce the heat to medium. Add the minced garlic and red pepper flakes (if using) to the skillet. Sauté for about 30 seconds to 1 minute, or until the garlic is fragrant. Be careful not to burn the garlic, as it will become bitter.
- Deglaze the pan: Pour in the dry white wine and scrape up any browned bits from the bottom of the skillet. These browned bits are called fond, and they are packed with flavor. Let the wine simmer for about 1-2 minutes, or until it has reduced slightly.
- Add the chicken broth and lemon juice: Pour in the chicken broth and lemon juice. Stir to combine. Bring the sauce to a simmer and let it cook for about 3-5 minutes, or until it has thickened slightly.
- Finish the sauce: Remove the skillet from the heat and stir in the butter until it is melted and the sauce is emulsified. This will create a rich and glossy sauce.
- Add the parsley: Stir in the chopped fresh parsley.
- Taste and adjust seasoning: Taste the sauce and adjust the seasoning with salt and freshly ground black pepper as needed. Remember that the shrimp and pasta will also need seasoning, so don’t over-salt the sauce.
Assembling the Dish:
- Add the shrimp back to the sauce: Return the cooked shrimp to the skillet and toss to coat them in the sauce.
- Combine with pasta: Add the cooked pasta to the skillet and toss to combine with the shrimp and sauce. Make sure the pasta is well coated. You can add a little bit of the pasta cooking water to the sauce if it seems too thick. The starchy water will help to bind the sauce to the pasta.
- Serve immediately: Serve the shrimp and pasta immediately. Garnish with lemon wedges, if desired.
Tips and Variations:
- Shrimp size: I prefer to use large shrimp (21-25 count per pound) for this recipe, but you can use any size you like. Just adjust the cooking time accordingly.
- Wine: If you don’t have dry white wine on hand, you can substitute with more chicken broth or vegetable broth.
- Spice level: Adjust the amount of red pepper flakes to your liking. If you don’t like spice, you can omit them altogether.
- Herbs: Feel free to experiment with different herbs. In addition to parsley, you can add oregano, basil, or thyme.
- Vegetables: You can add vegetables to this dish, such as cherry tomatoes, spinach, or asparagus. Add them to the skillet along with the garlic and sauté until tender.
- Creamy sauce: For a creamier sauce, add a splash of heavy cream or half-and-half to the skillet along with the butter.
- Gluten-free: To make this dish gluten-free, use gluten-free pasta.
- Make ahead: You can prepare the sauce ahead of time and store it in the refrigerator for up to 2 days. Reheat the sauce before adding the shrimp and pasta.
- Serving suggestions: This dish is delicious served with a side of crusty bread for soaking up the sauce. It also pairs well with a simple salad.
Detailed Explanation of Key Steps:
Why Patting the Shrimp Dry is Important:
I cannot stress enough how important it is to pat your shrimp dry before cooking them. This step is often overlooked, but it makes a huge difference in the final result. When you add wet shrimp to a hot pan, the water will immediately lower the temperature of the pan. This will cause the shrimp to steam instead of sear, resulting in pale, rubbery shrimp. By patting the shrimp dry, you remove excess moisture and allow them to develop a beautiful golden-brown crust.
The Importance of a Hot Pan:
Using a hot pan is also crucial for getting a good sear on the shrimp. A hot pan will quickly evaporate any remaining moisture on the surface of the shrimp and allow them to brown properly. If the pan is not hot enough, the shrimp will steam and become rubbery. Make sure to heat the olive oil until it shimmers slightly before adding the shrimp.
Don’t Overcrowd the Pan:
Overcrowding the pan is another common mistake that can prevent the shrimp from searing properly. When you overcrowd the pan, the temperature of the pan will drop, and the shrimp will steam instead of sear. If necessary, cook the shrimp in batches to ensure that they have enough room to brown properly.
Why Deglazing is Essential:
Deglazing the pan with white wine is a key step in creating a flavorful sauce. The browned bits on the bottom of the pan, called fond, are packed with flavor. By deglazing the pan with wine, you loosen these browned bits and incorporate them into the sauce. This will add depth and complexity to the flavor of the sauce.
Emulsifying the Sauce with Butter:
Adding butter to the sauce at the end of cooking is a simple trick that will make the sauce richer and glossier. The butter emulsifies with the other ingredients in the sauce, creating a smooth and creamy texture. Make sure to remove the skillet from the heat before adding the butter, as the butter can burn easily.
Fresh Herbs Make a Difference:
Using fresh herbs, such as parsley, will add a bright and vibrant flavor to the dish. Dried herbs can be used in a pinch, but they will not have the same fresh flavor. If using dried herbs, use about half the amount called for in the recipe.
Adjusting the Seasoning:
Taste the sauce and adjust the seasoning with salt and freshly ground black pepper as needed. Remember that the shrimp and pasta will also need seasoning, so don’t over-salt the sauce. It’s always better to start with less salt and add more as needed.
Serving Immediately:
This dish is best served immediately. The shrimp and pasta will continue to cook in the sauce, so they can become overcooked if left to sit for too long. Serve the dish hot and garnish with lemon wedges, if desired.
Pasta Choice:
While I recommend linguine or spaghetti, feel free to use your favorite type of pasta. Penne, fettuccine, or even angel hair pasta would work well in this recipe. Just be sure to cook the pasta according to the package directions
Conclusion:
And there you have it! This Salt Pepper Shrimp recipe is truly a must-try for anyone who loves bold flavors and quick, easy meals. I know I’ve made it countless times, and it’s always a hit. The crispy shrimp, the aromatic spices, and the satisfying crunch it’s a symphony of textures and tastes that will leave you wanting more.
But why is this particular recipe so special? It’s more than just shrimp and spices. It’s the perfect balance of salty, peppery, and slightly sweet notes that dance on your palate. It’s the simplicity of the preparation, allowing you to whip up a restaurant-quality dish in your own kitchen in under 30 minutes. And it’s the sheer versatility you can adapt it to your own preferences and dietary needs.
Serving Suggestions and Variations:
This Salt Pepper Shrimp is fantastic served as an appetizer, a main course, or even as a topping for salads or rice bowls. For a complete meal, I love pairing it with steamed rice and stir-fried vegetables like bok choy or broccoli. A squeeze of fresh lime juice just before serving adds a bright, zesty finish.
Looking for variations? Here are a few ideas to get you started:
* Spicy Kick: Add a pinch of red pepper flakes or a dash of your favorite hot sauce to the spice blend for an extra kick.
* Garlic Lover’s Delight: Increase the amount of minced garlic for a more intense garlic flavor.
* Lemon Pepper Shrimp: Add lemon zest to the spice blend for a citrusy twist.
* Coconut Shrimp Variation: For a sweeter, more tropical take, dredge the shrimp in shredded coconut before frying.
* Vegetarian Option: Substitute the shrimp with firm tofu or cauliflower florets for a vegetarian-friendly version. Just be sure to adjust the cooking time accordingly.
Don’t be afraid to experiment and make this recipe your own! That’s the beauty of cooking it’s all about creativity and personal expression.
I truly believe that this recipe for Salt Pepper Shrimp will become a staple in your kitchen. It’s a crowd-pleaser, a time-saver, and a guaranteed way to impress your family and friends. It’s also a fantastic way to introduce yourself to the joys of Asian-inspired cuisine.
So, what are you waiting for? Gather your ingredients, fire up your wok (or skillet), and get ready to create some culinary magic. I’m confident that you’ll love this recipe as much as I do.
And most importantly, I want to hear about your experience! Did you try the recipe? Did you make any modifications? What did you think? Share your thoughts, photos, and tips in the comments below. I’m always eager to learn from my readers and see how you’ve put your own spin on my recipes. Happy cooking! I can’t wait to see what you create!
Salt Pepper Shrimp: The Ultimate Guide to Making It Perfectly
Quick and easy shrimp scampi with pasta, featuring succulent shrimp in a flavorful garlic-wine sauce. A classic Italian-American dish ready in under 30 minutes!
Ingredients
- 1 pound large shrimp, peeled and deveined
- 2 tablespoons olive oil
- 4 cloves garlic, minced
- 1/4 teaspoon red pepper flakes (optional, for heat)
- 1/4 cup dry white wine (such as Sauvignon Blanc or Pinot Grigio)
- 1/4 cup chicken broth
- 2 tablespoons lemon juice, freshly squeezed
- 2 tablespoons butter, unsalted
- 2 tablespoons fresh parsley, chopped
- Salt and freshly ground black pepper to taste
- Cooked pasta (linguine, spaghetti, or your favorite), for serving
- Lemon wedges, for garnish (optional)
Instructions
- Prepare the shrimp: Make sure your shrimp are fully thawed if frozen. Pat them dry with paper towels. Season the shrimp with a generous pinch of salt and freshly ground black pepper.
- Sear the shrimp: In a large skillet (preferably stainless steel or cast iron) over medium-high heat, heat the olive oil. Add the shrimp to the hot skillet in a single layer. Avoid overcrowding the pan, cook in batches if needed. Cook for about 2-3 minutes per side, or until they turn pink and opaque. Remove the shrimp from the skillet and set them aside.
- Sauté the garlic: In the same skillet, reduce the heat to medium. Add the minced garlic and red pepper flakes (if using) to the skillet. Sauté for about 30 seconds to 1 minute, or until the garlic is fragrant. Be careful not to burn the garlic.
- Deglaze the pan: Pour in the dry white wine and scrape up any browned bits from the bottom of the skillet. Let the wine simmer for about 1-2 minutes, or until it has reduced slightly.
- Add the chicken broth and lemon juice: Pour in the chicken broth and lemon juice. Stir to combine. Bring the sauce to a simmer and let it cook for about 3-5 minutes, or until it has thickened slightly.
- Finish the sauce: Remove the skillet from the heat and stir in the butter until it is melted and the sauce is emulsified.
- Add the parsley: Stir in the chopped fresh parsley.
- Taste and adjust seasoning: Taste the sauce and adjust the seasoning with salt and freshly ground black pepper as needed.
- Add the shrimp back to the sauce: Return the cooked shrimp to the skillet and toss to coat them in the sauce.
- Combine with pasta: Add the cooked pasta to the skillet and toss to combine with the shrimp and sauce. Add a little bit of the pasta cooking water to the sauce if it seems too thick.
- Serve immediately: Serve the shrimp and pasta immediately. Garnish with lemon wedges, if desired.
Notes
- Shrimp size: I prefer to use large shrimp (21-25 count per pound) for this recipe, but you can use any size you like. Just adjust the cooking time accordingly.
- Wine: If you don’t have dry white wine on hand, you can substitute with more chicken broth or vegetable broth.
- Spice level: Adjust the amount of red pepper flakes to your liking. If you don’t like spice, you can omit them altogether.
- Herbs: Feel free to experiment with different herbs. In addition to parsley, you can add oregano, basil, or thyme.
- Vegetables: You can add vegetables to this dish, such as cherry tomatoes, spinach, or asparagus. Add them to the skillet along with the garlic and sauté until tender.
- Creamy sauce: For a creamier sauce, add a splash of heavy cream or half-and-half to the skillet along with the butter.
- Gluten-free: To make this dish gluten-free, use gluten-free pasta.
- Make ahead: You can prepare the sauce ahead of time and store it in the refrigerator for up to 2 days. Reheat the sauce before adding the shrimp and pasta.
- Serving suggestions: This dish is delicious served with a side of crusty bread for soaking up the sauce. It also pairs well with a simple salad.
Leave a Comment