
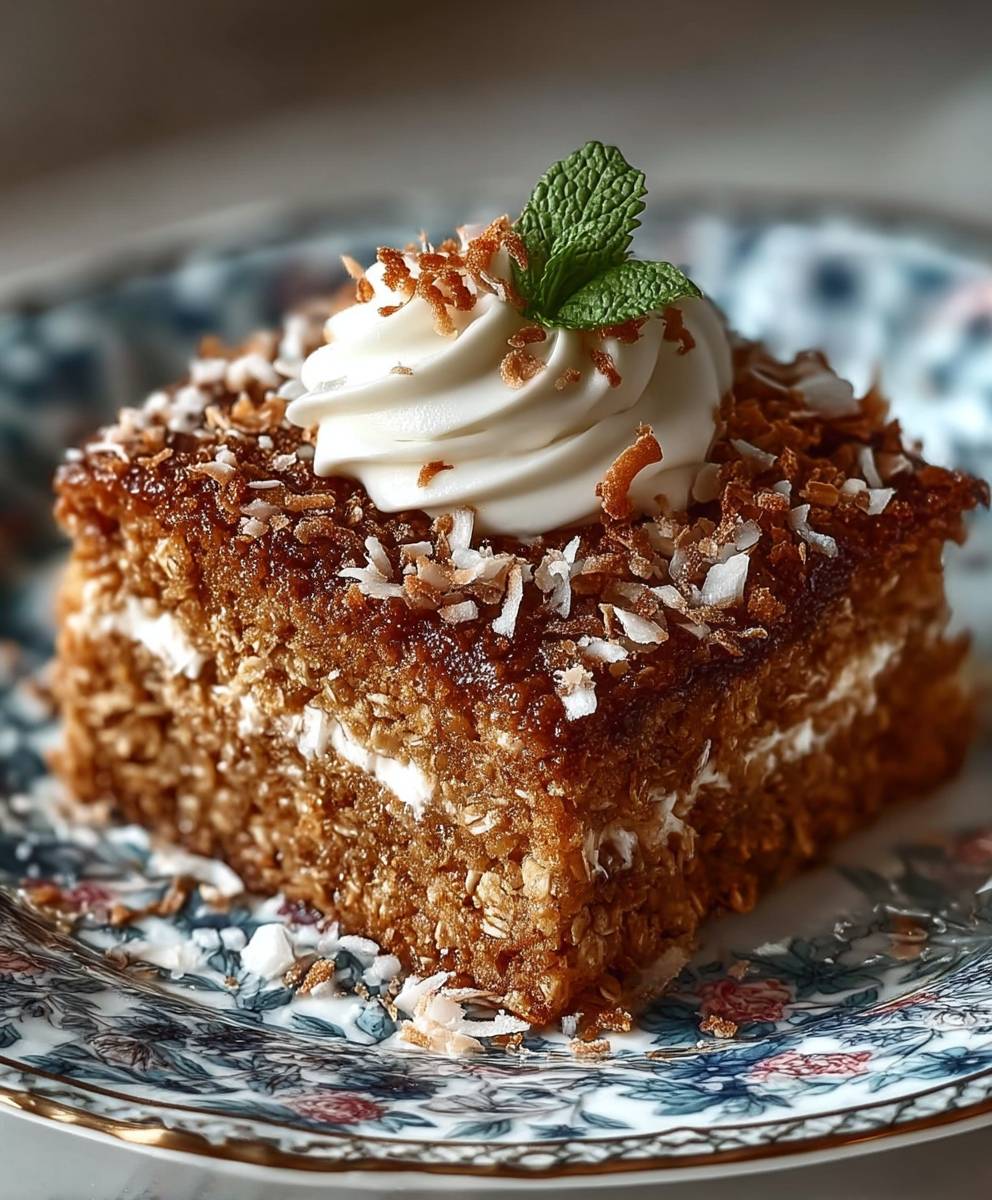
Rustic Oatmeal Cake: Prepare to be transported back to simpler times with a slice of pure comfort! This isn’t your average cake; it’s a warm, inviting hug in dessert form. Imagine the comforting aroma of cinnamon and toasted oats filling your kitchen, promising a treat that’s both wholesome and utterly delicious. Have you ever wondered about the origins of such a humble yet satisfying dessert?
Oatmeal cake, in its various forms, has been a staple in kitchens for generations, particularly in rural communities where oats were readily available and resourcefulness was key. It represents a time when baking was less about elaborate decorations and more about creating something nourishing and delicious from simple ingredients. This rustic oatmeal cake recipe honors that tradition, offering a taste of history with every bite.
What makes this cake so beloved? It’s the perfect combination of textures a moist, tender crumb studded with chewy oats, topped with a crunchy, caramelized topping. The subtle sweetness is balanced by the earthy flavor of the oats, making it a dessert that’s satisfying without being overly rich. Plus, it’s incredibly easy to make, requiring minimal effort and readily available ingredients. Whether you’re looking for a comforting treat on a chilly evening or a simple dessert to impress your friends, this cake is sure to become a new favorite.
Ingredients:
- 1 ½ cups all-purpose flour
- 1 ½ cups rolled oats (not instant)
- 1 ½ teaspoons baking powder
- 1 teaspoon baking soda
- ½ teaspoon ground cinnamon
- ¼ teaspoon ground nutmeg
- ½ teaspoon salt
- 1 cup (2 sticks) unsalted butter, softened
- 1 ½ cups packed light brown sugar
- 2 large eggs
- 1 teaspoon vanilla extract
- 1 cup buttermilk
Preparing the Oatmeal Cake Batter
Okay, let’s get started! This Rustic Oatmeal Cake is seriously one of my favorites. It’s so moist and flavorful, and it’s perfect for breakfast, brunch, or even dessert. The first step is to get all of our dry ingredients combined. This ensures that everything is evenly distributed throughout the batter, which is key for a consistent bake.
- Combine Dry Ingredients: In a large bowl, whisk together the flour, rolled oats, baking powder, baking soda, cinnamon, nutmeg, and salt. Make sure you whisk it really well to get rid of any lumps. I like to use a balloon whisk for this, but any whisk will do. Set this bowl aside for now.
- Cream Butter and Sugar: In a separate, larger bowl (or the bowl of your stand mixer), cream together the softened butter and brown sugar until light and fluffy. This usually takes about 3-5 minutes with an electric mixer. The mixture should become noticeably lighter in color and almost doubled in volume. Don’t rush this step it’s important for creating a tender cake. If you’re using a stand mixer, use the paddle attachment.
- Add Eggs and Vanilla: Beat in the eggs one at a time, making sure each egg is fully incorporated before adding the next. After the eggs are mixed in, stir in the vanilla extract. I always use pure vanilla extract for the best flavor, but imitation vanilla will work in a pinch.
- Alternate Adding Dry and Wet Ingredients: Now, gradually add the dry ingredients to the wet ingredients, alternating with the buttermilk. Begin and end with the dry ingredients. So, add about one-third of the dry ingredients to the butter-sugar mixture and mix until just combined. Then, add half of the buttermilk and mix until just combined. Repeat with another third of the dry ingredients, followed by the remaining buttermilk. Finally, add the remaining dry ingredients and mix until just combined. Be careful not to overmix the batter! Overmixing can develop the gluten in the flour, resulting in a tough cake.
Baking the Oatmeal Cake
Now that our batter is ready, it’s time to get this cake in the oven! Make sure your oven is preheated to the correct temperature, and that your baking pan is properly prepared. These steps are crucial for ensuring that the cake bakes evenly and releases easily from the pan.
- Preheat Oven: Preheat your oven to 350°F (175°C). This is the ideal temperature for baking this cake, as it allows it to bake evenly without burning the edges.
- Prepare Baking Pan: Grease and flour a 9×13 inch baking pan. You can also use baking spray with flour. This will prevent the cake from sticking to the pan and make it easy to remove after baking. I like to use a pastry brush to spread the grease evenly, and then I dust the pan with flour, tapping out any excess.
- Pour Batter into Pan: Pour the batter into the prepared baking pan and spread it evenly. Use a spatula to make sure the batter is distributed evenly in the pan.
- Bake: Bake for 30-35 minutes, or until a wooden skewer inserted into the center comes out clean. The baking time may vary depending on your oven, so start checking for doneness around 30 minutes. The cake should be golden brown on top and spring back lightly when touched.
- Cool: Let the cake cool in the pan for 10-15 minutes before inverting it onto a wire rack to cool completely. This allows the cake to set slightly, making it easier to remove from the pan without breaking.
Optional: Making a Simple Glaze
While this cake is delicious on its own, a simple glaze can really take it to the next level. This glaze is quick and easy to make, and it adds a touch of sweetness and moisture to the cake. You can adjust the consistency of the glaze by adding more or less milk, depending on your preference.
Glaze Ingredients:
- 1 cup powdered sugar
- 2-3 tablespoons milk
- ½ teaspoon vanilla extract (optional)
Instructions:
- Combine Ingredients: In a small bowl, whisk together the powdered sugar, milk, and vanilla extract (if using) until smooth. Start with 2 tablespoons of milk and add more as needed to reach your desired consistency. The glaze should be thin enough to drizzle but not so thin that it disappears into the cake.
- Drizzle over Cake: Once the cake is completely cool, drizzle the glaze evenly over the top. You can use a spoon or a whisk to drizzle the glaze.
- Let Set: Let the glaze set for a few minutes before slicing and serving. This allows the glaze to harden slightly, making it less messy to eat.
Serving and Storing the Oatmeal Cake
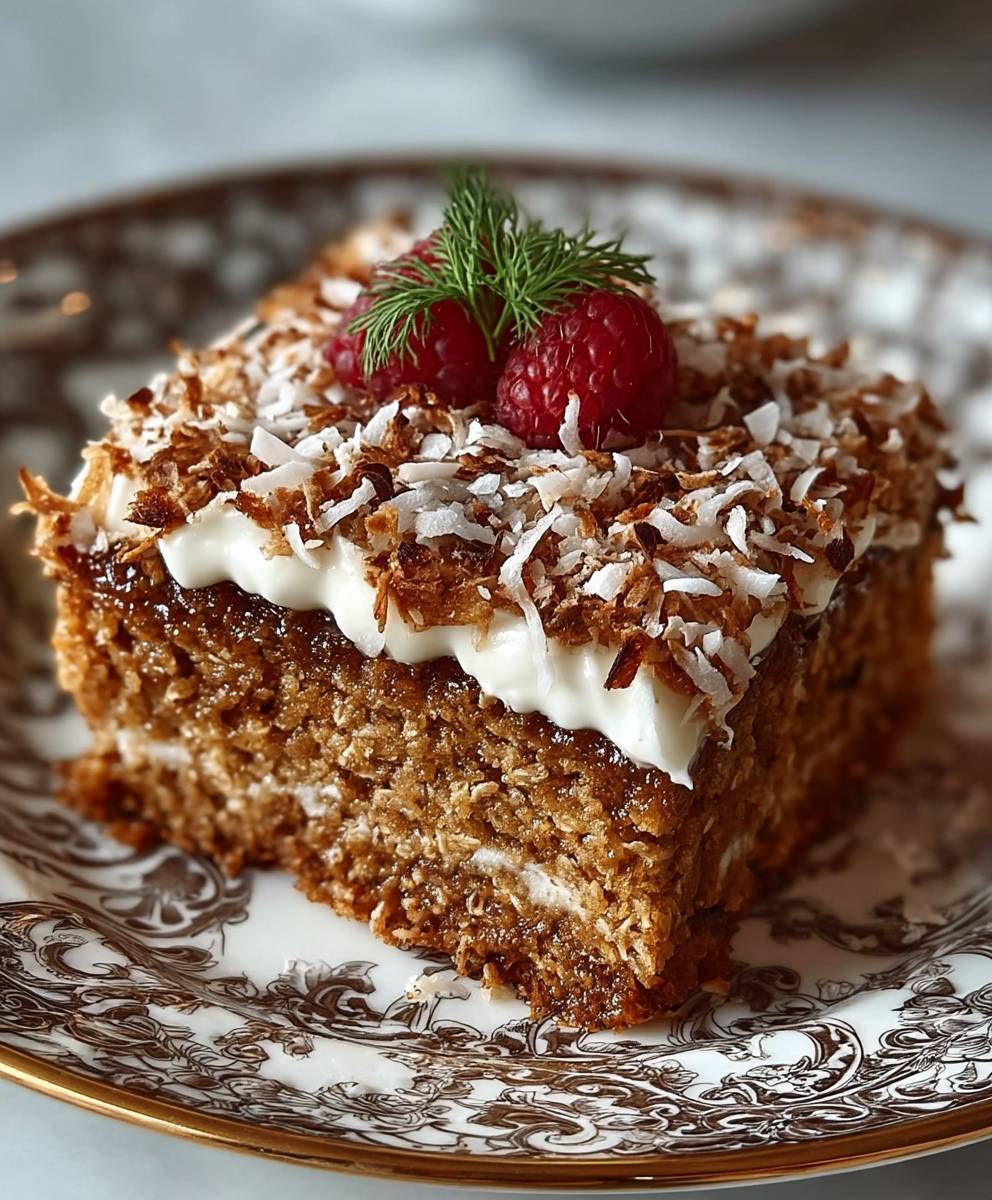
This Rustic Oatmeal Cake is best served at room temperature. It’s delicious on its own, or you can serve it with a dollop of whipped cream, a scoop of ice cream, or a side of fresh fruit. It’s also great with a cup of coffee or tea.
To store the cake, wrap it tightly in plastic wrap or store it in an airtight container at room temperature for up to 3 days. You can also freeze the cake for longer storage. To freeze, wrap the cake tightly in plastic wrap and then in aluminum foil. It can be frozen for up to 2 months. Thaw the cake overnight in the refrigerator before serving.
Tips and Variations
Here are a few tips and variations to help you customize this recipe to your liking:
- Use Different Oats: While I recommend using rolled oats for the best texture, you can also use quick-cooking oats in a pinch. Just be aware that the cake may be slightly softer.
- Add Nuts or Dried Fruit: For added flavor and texture, you can add chopped nuts (such as walnuts or pecans) or dried fruit (such as raisins or cranberries) to the batter. I recommend adding about ½ cup of nuts or dried fruit.
- Spice it Up: Experiment with different spices, such as cardamom, ginger, or allspice. You can also add a pinch of cayenne pepper for a little bit of heat.
- Make it Gluten-Free: To make this cake gluten-free, use a gluten-free all-purpose flour blend. Be sure to check the label to make sure the blend contains xanthan gum, which helps to bind the ingredients together.
- Add a Cream Cheese Frosting: For a richer and more decadent cake, top it with a cream cheese frosting. This is especially delicious if you add a little bit of cinnamon to the frosting.
- Brown Butter: For a nuttier flavor, brown the butter before creaming it with the sugar. To brown the butter, melt it in a saucepan over medium heat. Continue cooking until the butter turns a golden brown color and has a nutty aroma. Be careful not to burn the butter. Let the butter cool slightly before using it in the recipe.
- Buttermilk Substitute: If you don’t have buttermilk on hand, you can make a quick substitute by adding 1 tablespoon of lemon juice or white vinegar to 1 cup of milk. Let it sit for 5 minutes before using.
I hope you enjoy this Rustic Oatmeal Cake as much as I do! It’s a simple and delicious cake that’s perfect for any occasion. Let me know in the comments if you try it and what variations you make!
Conclusion:
And there you have it! This Rustic Oatmeal Cake is more than just a dessert; it’s a warm hug on a plate, a comforting reminder of simpler times, and a guaranteed crowd-pleaser. I truly believe this recipe deserves a spot in your regular baking rotation. Why? Because it’s incredibly easy to make, uses ingredients you likely already have in your pantry, and delivers a flavor that’s both familiar and surprisingly sophisticated. The moist, tender crumb, the subtle sweetness, and that hint of nutty oatmeal it all comes together in perfect harmony.
But the best part? It’s incredibly versatile! While I love serving it warm with a dollop of whipped cream or a scoop of vanilla ice cream, the possibilities are endless. For a brunch gathering, try slicing it and serving it with fresh berries and a drizzle of maple syrup. Or, for a more decadent treat, spread a layer of cream cheese frosting on top and sprinkle with toasted pecans.
If you’re feeling adventurous, consider these variations:
* Spice it up: Add a teaspoon of cinnamon, a half teaspoon of nutmeg, or a pinch of cloves to the batter for a warm, autumnal flavor.
* Fruity twist: Fold in a cup of chopped apples, blueberries, or cranberries for a burst of freshness.
* Nutty delight: Add a half cup of chopped walnuts, pecans, or almonds to the batter for added texture and flavor.
* Chocolate indulgence: Stir in a half cup of chocolate chips or cocoa powder for a chocolatey version.
* Lemon zest: Add the zest of one lemon to the batter for a bright, citrusy flavor.
Seriously, don’t be afraid to experiment and make this Rustic Oatmeal Cake your own! It’s a forgiving recipe, and even if you make a few tweaks, I’m confident it will still turn out delicious.
I poured my heart into perfecting this recipe, and I’m so excited for you to try it. I truly believe that baking is a form of love, and sharing a homemade treat with friends and family is one of the best ways to show you care. This cake is perfect for any occasion, from a casual weeknight dessert to a special celebration.
So, what are you waiting for? Preheat your oven, gather your ingredients, and get ready to bake up a batch of this incredible Rustic Oatmeal Cake. I promise you won’t regret it!
And most importantly, I want to hear about your experience! Did you try any of the variations I suggested? Did you add your own special touch? What did your friends and family think? Please, come back and leave a comment below and let me know how it turned out. Your feedback is invaluable, and I love hearing about your baking adventures. Happy baking! I can’t wait to see your creations!
Rustic Oatmeal Cake: The Ultimate Guide to Baking Perfection
Moist and flavorful Rustic Oatmeal Cake, perfect for breakfast, brunch, or dessert.
Ingredients
- 1 ½ cups all-purpose flour
- 1 ½ cups rolled oats (not instant)
- 1 ½ teaspoons baking powder
- 1 teaspoon baking soda
- ½ teaspoon ground cinnamon
- ¼ teaspoon ground nutmeg
- ½ teaspoon salt
- 1 cup (2 sticks) unsalted butter, softened
- 1 ½ cups packed light brown sugar
- 2 large eggs
- 1 teaspoon vanilla extract
- 1 cup buttermilk
Instructions
- Combine Dry Ingredients: In a large bowl, whisk together the flour, rolled oats, baking powder, baking soda, cinnamon, nutmeg, and salt. Set aside.
- Cream Butter and Sugar: In a separate, larger bowl, cream together the softened butter and brown sugar until light and fluffy (3-5 minutes with an electric mixer).
- Add Eggs and Vanilla: Beat in the eggs one at a time, fully incorporating each before adding the next. Stir in the vanilla extract.
- Alternate Adding Dry and Wet Ingredients: Gradually add the dry ingredients to the wet ingredients, alternating with the buttermilk. Begin and end with the dry ingredients. Mix until just combined after each addition. Be careful not to overmix.
- Preheat Oven: Preheat oven to 350°F (175°C).
- Prepare Baking Pan: Grease and flour a 9×13 inch baking pan.
- Pour Batter into Pan: Pour the batter into the prepared baking pan and spread it evenly.
- Bake: Bake for 30-35 minutes, or until a wooden skewer inserted into the center comes out clean.
- Cool: Let the cake cool in the pan for 10-15 minutes before inverting it onto a wire rack to cool completely.
- Combine Ingredients: In a small bowl, whisk together the powdered sugar, milk, and vanilla extract (if using) until smooth. Start with 2 tablespoons of milk and add more as needed to reach your desired consistency.
- Drizzle over Cake: Once the cake is completely cool, drizzle the glaze evenly over the top.
- Let Set: Let the glaze set for a few minutes before slicing and serving.
Notes
- Use rolled oats (not instant) for the best texture.
- Cream the butter and sugar well for a tender cake.
- Don’t overmix the batter.
- Check for doneness around 30 minutes of baking time.
- Cake is best served at room temperature.
- Store the cake wrapped tightly at room temperature for up to 3 days, or freeze for up to 2 months.
- Variations: Add nuts, dried fruit, different spices, or make it gluten-free. Brown the butter for a nuttier flavor. Use a buttermilk substitute if needed. Add a cream cheese frosting.
Leave a Comment